Page 65 of 120

coolant surge tank pressure cap must be fully installed
on the hybrid coolant surge tank.
Notice:If the pressure cap is not tightly installed,
coolant l")
The Drive Motor/Generator Control Module (DMCM)
coolant surge tank pressure cap must be fully installed
on the hybrid coolant surge tank.
Notice:If the pressure cap is not tightly installed,
coolant loss and possible damage to the Drive
Motor/Generator Control Module (DMCM) may occur.
Be sure the cap is properly and tightly secured.
Drive Motor/Generator Control
Module (DMCM) Cooling System
In addition to the regular cooling system, the vehicle
also has a cooling system for the DMCM system.
This system is serviced differently than the vehicle's
main cooling system. The DMCM cooling system
includes the DMCM coolant surge tank, DMCM surge
tank pressure cap, DMCM cooling pumps, hybrid
cooling radiator and the Drive Motor/Generator Control
Module (DMCM). The DMCM cooling system uses a
50/50 pre-mixed DEX-COOL™ coolant and deionized
water available at your dealer/retailer. See “Engine
Coolant” and“Cooling System” in the owner manual for
more information. When you decide it is safe to lift the hood, here is what
you will see:
A. Drive Motor/Generator
Control Module (DMCM)
B. Engine Coolant Surge Tank Pressure Cap
C. DMCM Coolant Surge Tank/Engine Coolant
Surge Tank D. DMCM Cooling
Hoses (Out of View)
E. DMCM Coolant Tank Pressure Cap
6-9
Page 66 of 120

If the coolant inside the DMCM coolant surge tank is
boiling, do not do anything else until it cools down.
The coolant level should be at or above the FULL
COLD mark with the vehicle parked on a level surface.
If it is not, there might be a leak at the DMCM cooler
core, DMCM pressure cap, DMCM cooler hoses,
DMCM cooling pump or somewhere else in the DMCM
cooling system.
Notice:Running the engine when there is a leak in
the hybrid cooling system can cause the hybrid
cooling system to lose all coolant and can damage
the system. Get any leak fixed before you drive the
vehicle or run the engine.
How to Add Coolant to the DMCM
Coolant Surge Tank
If no problem has been found yet, check to see if
coolant is visible in the DMCM coolant surge tank.
If coolant is visible, add pre‐mixed DEX-COOL™
coolant, available at your dealer/retailer, at the DMCM
coolant surge tank, but be sure the DMCM cooling
system, including the DMCM coolant surge tank
pressure cap, is cool before you do it. Use the
procedure following.
6-10
Page 67 of 120

{WARNING:
Steam and scalding liquids from a hot cooling
system can blow out and burn you badly. They are
under pressure, and if you turn the coolant surge
tank pressure cap—even a little —they can come
out at high speed. Never turn the cap when the
cooling system, including the coolant surge tank
pressure cap, is hot. Wait for the cooling system
and coolant surge tank pressure cap to cool if you
ever have to turn the pressure cap.
Notice: Using coolant other than a pre‐mixed
DEX-COOL, available at your dealer/retailer, may
damage your vehicle. Any repairs would not be
covered by your warranty. Always use a pre‐mixed
DEX-COOL (silicate-free) coolant in your vehicle.
{WARNING:
You can be burned if you spill coolant on hot
engine parts. Coolant contains ethylene glycol
and it will burn if the engine parts are hot enough.
Do not spill coolant on a hot engine. If the DMCM coolant is empty , the vehicle must be
serviced by your dealer and a special fill procedure
must be followed.
Notice:
Attempting to fill the DMCM cooling surge
tank yourself when the fluid level is empty can
damage your vehicle. Your vehicle must be
serviced.1. Park the vehicle on a level surface and turn the vehicle off. Remove the DMCM coolant surge tank
pressure cap when the DMCM cooling system,
including the DMCM coolant surge tank pressure
cap and DMCM cooling hoses, are no longer hot.
6-11
Page 68 of 120
 about one full turn.
Wait 30 seconds.
2. Then keep turning the DMCM coolant surge tankpressure cap slowly, and remove it.
3")
Turn the DMCM coolant surge tank pressure cap
slowly counterclockwise (left) about one full turn.
Wait 30 seconds.
2. Then keep turning the DMCM coolant surge tankpressure cap slowly, and remove it.
3. Add the pre‐mixed DEX‐COOL™, available at your dealer/retailer, to the DMCM coolant surge tank
until the level reaches the FULL COLD mark.
4. Turn the ignition to ON/RUN without starting the engine. The hybrid cooling pumps will run and any
trapped air will purge to the surge tank. 5. Add the pre‐mixed DEX‐COOL™, available at your
dealer/retailer, until the coolant level is maintained
at the FULL COLD mark. This should take no
longer than two minutes of hybrid cooling pump
operation.
If the level cannot be kept at the FULL COLD
level, your vehicle may need service. See your
dealer/retailer.
6. Then replace the
DMCM coolant surge
tank pressure cap.
Be sure the pressure
cap is hand-tight and
fully seated.
Notice: Using tap water, cooling system sealers or
conditioners in an attempt to stop coolant leaks can
damage the DMCM and engine cooling systems.
Never use tap water, cooling system sealers or
conditioners in your cooling system.
6-12
Page 69 of 120

Power Steering Fluid
The vehicle has electric power steering and does not
use power steering fluid.
Brakes
Brake Fluid
The brake master cylinder
reservoir is filled with
DOT 3 brake fluid. See
Engine Compartment
Overview
on page 6‑4for the location of the
reservoir.
There are only two reasons why the brake fluid level in
the reservoir might go down:
.The brake fluid level goes down because of normal
brake lining wear. When new linings are installed,
the fluid level goes back up.
.A fluid leak in the brake hydraulic system can also
cause a low fluid level. Have the brake hydraulic
system fixed, since a leak means that sooner or
later the brakes will not work well.
Do not top off the brake fluid. Adding fluid does not
correct a leak. If fluid is added when the linings are
worn, there will be too much fluid when new brake
linings are installed. Add or remove brake fluid, as
necessary, only when work is done on the brake
hydraulic system.
{WARNING:
If too much brake fluid is added, it can spill on the
engine and burn, if the engine is hot enough.
You or others could be burned, and the vehicle
could be damaged. Add brake fluid only when
work is done on the brake hydraulic system.
See “Checking Brake Fluid” in this section.
When the brake fluid falls to a low level, the brake
warning light comes on. See “Brake System Warning
Light” in the owner manual.
Refer to the Maintenance Schedule to determine when
to check the brake fluid. See “Scheduled Maintenance”
in the owner manual.
6-13
Page 70 of 120

Checking Brake Fluid
Check brake fluid by looking at the brake fluid reservoir.
SeeEngine Compartment Overview on page 6‑4.
With the engine not running for at least one minute, the
maximum fluid level (A) is at the top of the reservoir
body. With the engine running, the fluid level should be
in the proper operating range (B) between the MIN and
MAX marks. If it is not, have the brake hydraulic system
checked to see if there is a leak. After work is done on the brake hydraulic system, make
sure the level, with the engine running, is in the proper
operating range (B) between the MIN and MAX marks.
What to Add
Use only new DOT 3 brake fluid from a sealed
container. See
“Recommended Fluids and Lubricants”
in the owner manual.
Always clean the brake fluid reservoir cap and the area
around the cap before removing it. This helps keep dirt
from entering the reservoir.
{WARNING:
With the wrong kind of fluid in the brake hydraulic
system, the brakes might not work well. This could
cause a crash. Always use the proper brake fluid.
6-14
Page 71 of 120

Notice:
.Using the wrong fluid can badly damage
brake hydraulic system parts. For example,
just a few drops of mineral-based oil, such
as engine oil, in the brake hydraulic system
can damage brake hydraulic system parts
so badly that they will have to be replaced.
Do not let someone put in the wrong kind
of fluid.
.If brake fluid is spilled on the vehicle's
painted surfaces, the paint finish can be
damaged. Be careful not to spill brake fluid
on the vehicle. If you do, wash it off
immediately. See“Washing Your Vehicle”
in the owner manual.
Brake Wear
This vehicle has disc brakes. Disc brake pads have
built-in wear indicators that make a high-pitched
warning sound when the brake pads are worn and new
pads are needed. The sound can come and go or be
heard all the time the vehicle is moving, except when
applying the brake pedal firmly.
{WARNING:
The brake wear warning sound means that soon
the brakes will not work well. That could lead to
an accident. When the brake wear warning sound
is heard, have the vehicle serviced.
Notice: Continuing to drive with worn-out brake
pads could result in costly brake repair.
Some driving conditions or climates can cause a brake
squeal when the brakes are first applied or lightly
applied. This does not mean something is wrong with
the brakes.
6-15
Page 72 of 120

Properly torqued wheel nuts are necessary to help
prevent brake pulsation. When tires are rotated, inspect
brake pads for wear and evenly tighten wheel nuts in
the proper sequence to torque specifications in
“Capacities and Specifications”in the owner manual.
Brake linings should always be replaced as complete
axle sets.
Brake Pedal Travel
See your dealer/retailer if the brake pedal does not
return to normal height, or if there is a rapid increase in
pedal travel. This could be a sign that brake service
might be required.
Brake Adjustment
Every time the brakes are applied, the disc brakes
adjust for wear.
Replacing Brake System Parts
The braking system on a vehicle is complex. Its many
parts have to be of top quality and work well together if
the vehicle is to have really good braking. The vehicle
was designed and tested with top-quality brake parts. When parts of the braking system are replaced
—for
example, when the brake linings wear down and new
ones are installed —be sure to get new approved
replacement parts. If this is not done, the brakes might
not work properly. For example, if someone puts in
brake linings that are wrong for the vehicle, the balance
between the front and rear brakes can change —for the
worse. The braking performance expected can change
in many other ways if the wrong replacement brake
parts are installed.
Battery
This vehicle has a standard 12‐volt battery and a
high‐voltage hybrid battery.
Refer to the replacement number on the original battery
label when a new standard 12‐volt battery is needed.
6-16
 1
1 2
2 3
3 4
4 5
5 6
6 7
7 8
8 9
9 10
10 11
11 12
12 13
13 14
14 15
15 16
16 17
17 18
18 19
19 20
20 21
21 22
22 23
23 24
24 25
25 26
26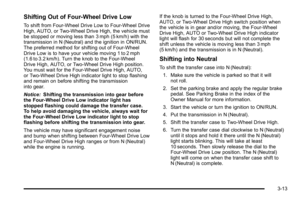 27
27 28
28 29
29 30
30 31
31 32
32 33
33 34
34 35
35 36
36 37
37 38
38 39
39 40
40 41
41 42
42 43
43 44
44 45
45 46
46 47
47 48
48 49
49 50
50 51
51 52
52 53
53 54
54 55
55 56
56 57
57 58
58 59
59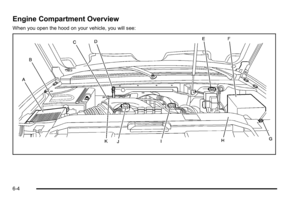 60
60 61
61 62
62 63
63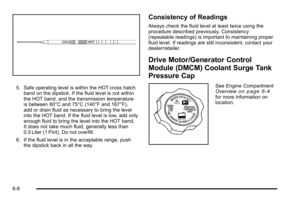 64
64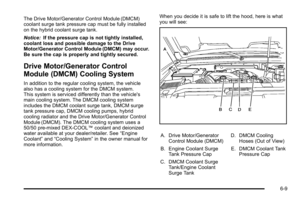 65
65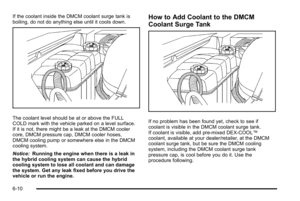 66
66 67
67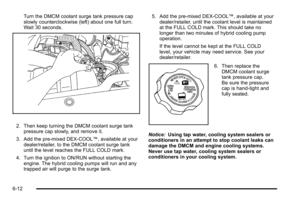 68
68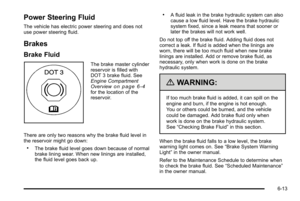 69
69 70
70 71
71 72
72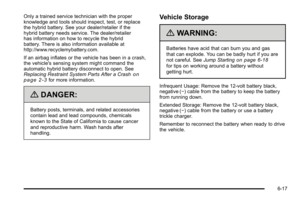 73
73 74
74 75
75 76
76 77
77 78
78 79
79 80
80 81
81 82
82 83
83 84
84 85
85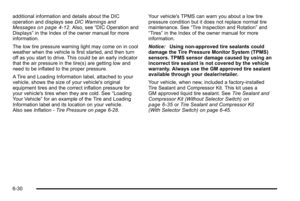 86
86 87
87 88
88 89
89 90
90 91
91 92
92 93
93 94
94 95
95 96
96 97
97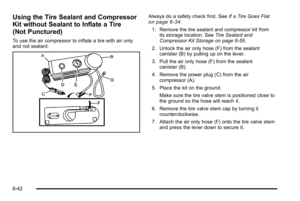 98
98 99
99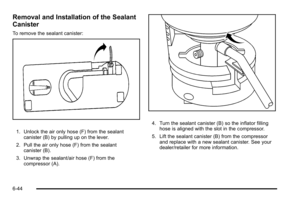 100
100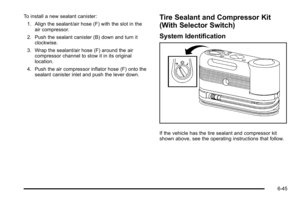 101
101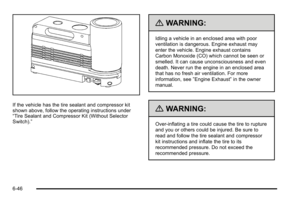 102
102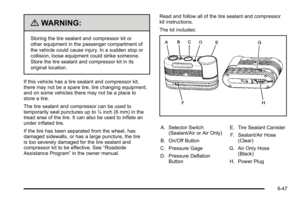 103
103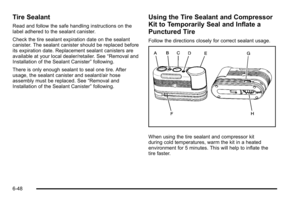 104
104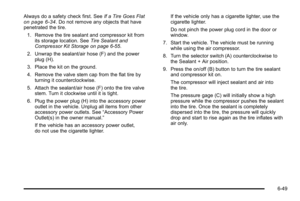 105
105 106
106 107
107 108
108 109
109 110
110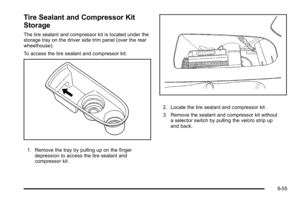 111
111 112
112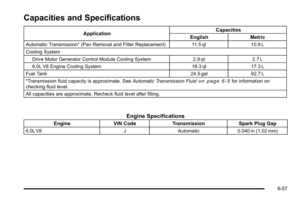 113
113 114
114 115
115 116
116 117
117 118
118 119
119