Page 57 of 120

Section 6 Service and Appearance Care
Service. . . . . . . . . . . . . . . . . . . . . . . . . . . . . . . . . . . . . . . . . . . . . 6-2
Doing Your Own Service Work . . . . . . . . . . . . . . . . . . 6-2
Checking Things Under the Hood . . . . . . . . . . . . . . . . .6-3
High Voltage Devices and Wiring . . . . . . . . . . . . . . . 6-3
Engine Compartment Overview . . . . . . . . . . . . . . . . . 6-4
Automatic Transmission Fluid . . . . . . . . . . . . . . . . . . . 6-5
Drive Motor/Generator Control Module (DMCM) Coolant Surge Tank Pressure Cap . . . . . . . . . . . . 6-8
Drive Motor/Generator Control Module (DMCM) Cooling System . . . . . . . . . . . . . . . . . . . . . . . . . . . . . . . 6-9
Power Steering Fluid . . . . . . . . . . . . . . . . . . . . . . . . . . 6-13
Brakes . . . . . . . . . . . . . . . . . . . . . . . . . . . . . . . . . . . . . . . . . 6-13
Battery . . . . . . . . . . . . . . . . . . . . . . . . . . . . . . . . . . . . . . . . . 6-16
Jump Starting . . . . . . . . . . . . . . . . . . . . . . . . . . . . . . . . . . 6-18
Bulb Replacement . . . . . . . . . . . . . . . . . . . . . . . . . . . . . . . . 6-24
Taillamps, Turn Signal, Stoplamps and Back-up Lamps . . . . . . . . . . . . . . . . . . . . . . . . . . . . . . 6-24
Replacement Bulbs . . . . . . . . . . . . . . . . . . . . . . . . . . . . 6-25 Electrical System
. . . . . . . . . . . . . . . . . . . . . . . . . . . . . . . . . 6-25
High Voltage Devices and Wiring . . . . . . . . . . . . . . 6-25
Fuses and Circuit Breakers . . . . . . . . . . . . . . . . . . . . 6-26
Underhood Fuse Block . . . . . . . . . . . . . . . . . . . . . . . . 6-26
Tires . . . . . . . . . . . . . . . . . . . . . . . . . . . . . . . . . . . . . . . . . . . . . . . 6-28
Inflation - Tire Pressure . . . . . . . . . . . . . . . . . . . . . . . . 6-28
Tire Pressure Monitor Operation . . . . . . . . . . . . . . . 6-29
Tire Inspection and Rotation . . . . . . . . . . . . . . . . . . . 6-33
Tire Chains . . . . . . . . . . . . . . . . . . . . . . . . . . . . . . . . . . . . 6-34
If a Tire Goes Flat . . . . . . . . . . . . . . . . . . . . . . . . . . . . . 6-34
Tire Sealant and Compressor Kit (Without Selector Switch) . . . . . . . . . . . . . . . . . . . . 6-35
Tire Sealant and Compressor Kit (With Selector Switch) . . . . . . . . . . . . . . . . . . . . . . . 6-45
Tire Sealant and Compressor Kit Storage . . . . . . 6-55
Appearance Care . . . . . . . . . . . . . . . . . . . . . . . . . . . . . . . . . 6-56
Vehicle Care/Appearance Materials . . . . . . . . . . . . 6-56
Capacities and Specifications . . . . . . . . . . . . . . . . . . .6-57
6-1
Page 58 of 120
Service
Doing Your Own Service Work
{WARNING:
Never try to do your own service on hybrid
components. You can be injured and the vehicle
can be damaged if you try to do your own service
work. Service and repair of these hybrid
components should only be performed by a
trained service technician with the proper
knowledge and tools.
{WARNING:
You can be injured and the vehicle could be
damaged if you try to do service work on a vehicle
without knowing enough about it.
.Be sure you have sufficient knowledge,
experience, the proper replacement parts,
and tools before attempting any vehicle
maintenance task.
.Be sure to use the proper nuts, bolts, and
other fasteners. English and metric fasteners
can be easily confused. If the wrong fasteners
are used, parts can later break or fall off. You
could be hurt.
6-2
Page 59 of 120

If doing some of your own service work, use the proper
service manual. It tells you much more about how to
service the vehicle than this manual can. To order the
proper service manual, see“Service Publications
Ordering Information” in the owner manual.
This vehicle has an airbag system. Before attempting
to do your own service work, see “Servicing Your
Airbag‐Equipped Vehicle” in the owner manual.
Keep a record with all parts receipts and list the
mileage and the date of any service work performed.
See “Maintenance Record” in the owner manual.Checking Things Under
the Hood
High Voltage Devices and Wiring
{WARNING:
Exposure to high voltage can cause shock, burns,
and even death. The high voltage systems in your
vehicle can only be serviced by technicians with
special training.
High voltage devices are identified by labels.
Do not remove, open, take apart, or modify these
devices. High voltage cable or wiring has orange
covering. Do not probe, tamper with, cut, or
modify high voltage cable or wiring.
6-3
Page 60 of 120
Engine Compartment Overview
When you open the hood on your vehicle, you will see:
6-4
Page 61 of 120
. See Drive Motor/Generator Control Module
(DMCM) Cooling System on page 6‑9.
C. Engine Oil D")
A. See“Engine Air Cleaner/Filter” in the owner
manual.
B. Drive Motor/Generator Control Module (DMCM). See Drive Motor/Generator Control Module
(DMCM) Cooling System on page 6‑9.
C. Engine Oil Dipstick. See “Engine Oil”in the owner
manual.
D. Automatic Transmission Fluid Dipstick. See Automatic Transmission Fluid on page 6‑5.
E. Brake Fluid Reservoir. See Brakes on page 6‑13.
F. See “Underhood Fuse Block” in the owner manual.
G. See “Windshield Washer Fluid” in the owner
manual.
H. Hybrid Auxiliary Fuse Block. See Underhood Fuse
Block on page 6‑26.
I. DMCM Coolant Surge Tank Pressure Cap. See Drive Motor/Generator Control Module (DMCM)
Coolant Surge Tank Pressure Cap on page 6‑8.
J. See “Coolant Surge Tank Pressure Cap” in the
owner manual.
K. Engine Oil Fill Cap. See “Engine Oil”in the owner
manual.Automatic Transmission Fluid
When to Check and Change Automatic
Transmission Fluid
It is usually not necessary to check the transmission
fluid level. The only reason for fluid loss is a
transmission leak or overheating the transmission.
If you suspect a small leak, then use the following
checking procedures to check the fluid level. However,
if there is a large leak, then it may be necessary to have
the vehicle towed to a dealer/retailer service department
and have it repaired before driving the vehicle further.
Notice: Use of the incorrect automatic transmission
fluid may damage the vehicle, and the damages may
not be covered by the vehicle's warranty. Always
use the automatic transmission fluid listed in
Recommended Fluids and Lubricants on page 7‑2.
Change the fluid and filter at the intervals listed in the
Maintenance Schedule. See Scheduled Maintenance in
the owner manual. Be sure to use the transmission fluid
listed in Recommended Fluids and Lubricants
on
page 7‑2.
6-5
Page 62 of 120

How to Check Automatic Transmission
Fluid
Notice:Too much or too little fluid can damage your
transmission. Too much can mean that some of the
fluid could come out and fall on hot engine parts or
exhaust system parts, starting a fire. Too little fluid
could cause the transmission to overheat. Be sure
to get an accurate reading if you check your
transmission fluid.
Before checking the fluid level, prepare the vehicle as
follows:
1. Start the engine and park the vehicle on a level surface. Keep the engine running.
2. Apply the parking brake and place the shift lever in P (Park).
3. With your foot on the brake pedal, move the shift lever through each gear range, pausing for about
three seconds in each range. Then, move the shift
lever back to P (Park).
4. Allow the engine to idle (500 –800 RPM) for at
least one minute. Slowly release the brake pedal.
5. Keep the engine running and press the Trip/Fuel button or trip odometer reset stem until TRANS
TEMP (Transmission Temperature) displays on the
Driver Information Center (DIC). 6. Using the TRANS TEMP reading, determine and
perform the appropriate check procedure. If the
TRANS TEMP reading is not within the required
temperature ranges, allow the vehicle to cool,
or operate the vehicle until the appropriate
transmission fluid temperature is reached.
Cold Check Procedure
Use this procedure only as a reference to determine if
the transmission has enough fluid to be operated safely
until a hot check procedure can be made. The hot
check procedure is the most accurate method to check
the fluid level. Perform the hot check procedure at the
first opportunity. Use this cold check procedure to check
fluid level when the transmission temperature is
between 24°C and 34°C (75°F and 93°F).
1. Locate the
transmission dipstick at
the rear of the engine
compartment, on the
passenger side of the
vehicle.
See Engine Compartment Overview
on page 6‑4for more information.
2. Pull out the dipstick and wipe it with a clean rag or paper towel.
6-6
Page 63 of 120

3. Install the dipstick by pushing it back in all the way,wait three seconds, and then pull it back out again.
4. Check both sides of the dipstick and read the lower level. Repeat the check procedure to verify the
reading.
5. If the fluid level is below the COLD check band,add only enough fluid as necessary to bring the
level into the COLD band. It does not take much
fluid, generally less than 0.5 Liter (1 Pint). Do not
overfill.
6. Perform a hot check at the first opportunity after the transmission reaches a normal operating
temperature between 60°C and 75°C (140°F
and 167°F).
7. If the fluid level is in the acceptable range, push the dipstick back in all the way.
Hot Check Procedure
Use this procedure to check the transmission fluid level
when the transmission fluid temperature is between
60°C and 75°C (140°F and 167°F).
The hot check is the most accurate method to check
the fluid level. The hot check should be performed at
the first opportunity in order to verify the cold check.
The fluid level rises as fluid temperature increases, so it
is important to ensure the transmission temperature is
within range.
1. Locate thetransmission dipstick at
the rear of the engine
compartment, on the
passenger side of the
vehicle.
See Engine Compartment Overview
on page 6‑4for more information.
2. Pull out the dipstick and wipe it with a clean rag or paper towel.
3. Install the dipstick by pushing it back in all the way, wait three seconds, and then pull it back out again.
4. Check both sides of the dipstick and read the lower level. Repeat the check procedure to verify the
reading.
6-7
Page 64 of 120
5. Safe operating level is within the HOT cross hatchband on the dipstick. If the fluid level is not within
the HOT band, and the transmission temperature
is between 60°C and 75°C (140°F and 167°F),
add or drain fluid as necessary to bring the level
into the HOT band. If the fluid level is low, add only
enough fluid to bring the level into the HOT band.
It does not take much fluid, generally less than
0.5 Liter (1 Pint). Do not overfill.
6. If the fluid level is in the acceptable range, push the dipstick back in all the way.
Consistency of Readings
Always check the fluid level at least twice using the
procedure described previously. Consistency
(repeatable readings) is important to maintaining proper
fluid level. If readings are still inconsistent, contact your
dealer/retailer.
Drive Motor/Generator Control
Module (DMCM) Coolant Surge Tank
Pressure Cap
See Engine Compartment
Overviewon page 6‑4for more information on
location.
6-8
 1
1 2
2 3
3 4
4 5
5 6
6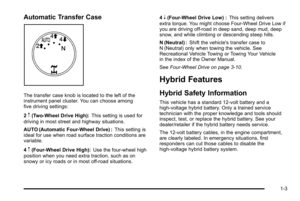 7
7 8
8 9
9 10
10 11
11 12
12 13
13 14
14 15
15 16
16 17
17 18
18 19
19 20
20 21
21 22
22 23
23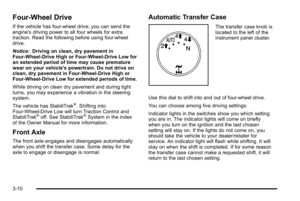 24
24 25
25 26
26 27
27 28
28 29
29 30
30 31
31 32
32 33
33 34
34 35
35 36
36 37
37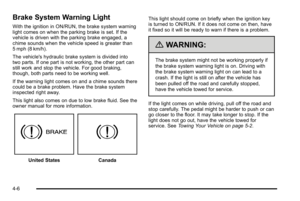 38
38 39
39 40
40 41
41 42
42 43
43 44
44 45
45 46
46 47
47 48
48 49
49 50
50 51
51 52
52 53
53 54
54 55
55 56
56 57
57 58
58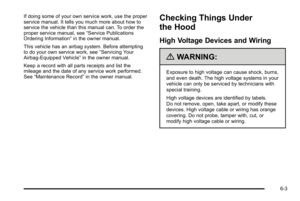 59
59 60
60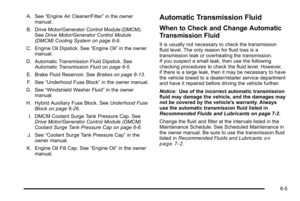 61
61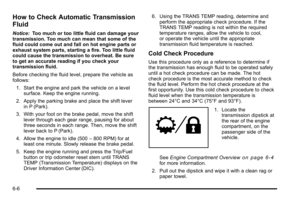 62
62 63
63 64
64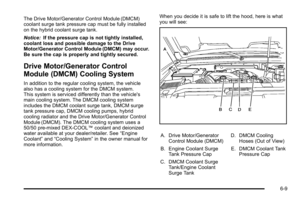 65
65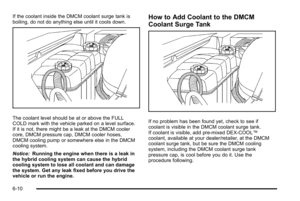 66
66 67
67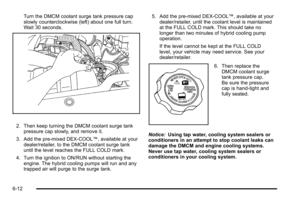 68
68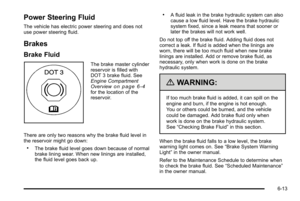 69
69 70
70 71
71 72
72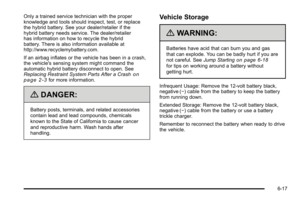 73
73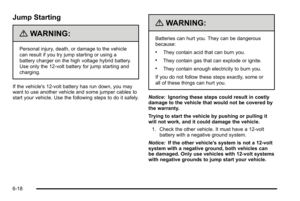 74
74 75
75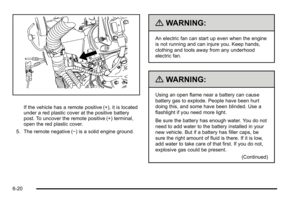 76
76 77
77 78
78 79
79 80
80 81
81 82
82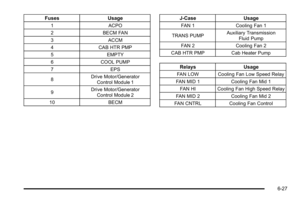 83
83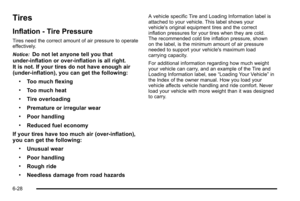 84
84 85
85 86
86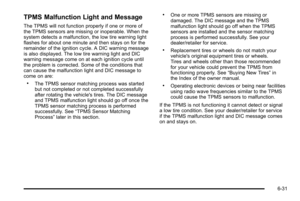 87
87 88
88 89
89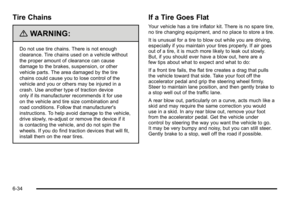 90
90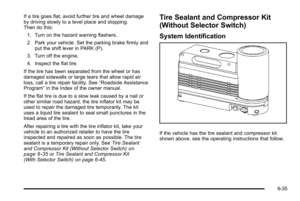 91
91 92
92 93
93 94
94 95
95 96
96 97
97 98
98 99
99 100
100 101
101 102
102 103
103 104
104 105
105 106
106 107
107 108
108 109
109 110
110 111
111 112
112 113
113 114
114 115
115 116
116 117
117 118
118 119
119

