Page 359 of 630

Battery Replacement
To change the remote control batteries, do the following:1. Slide the rear cover back on the remote control.
2. Replace the two batteries in the compartment. Make sure they are installed correctly using the
diagram on the inside of the remote control.
3. Replace the battery cover.
If the remote control is to be stored for a long period of
time, remove the batteries and keep them in a cool,
dry place.
Tips and Troubleshooting Chart
Problem Recommended Action
No power. The ignition might not be
turned ON/RUN or in
ACC/ACCESSORY.
The picture does not fill the
screen. There are black
borders on the top and
bottom or on both sides or
it looks stretched out. Check the display mode
settings in the setup menu
by pressing the display
menu button on the
remote control.
Tips and Troubleshooting Chart (cont'd)
Problem
Recommended Action
In auxiliary mode, the
picture moves or scrolls. Check the auxiliary input
connections at both
devices.
The remote control does
not work. Check to make sure there
is no obstruction between
the remote control and the
transmitter window.
Check the batteries to
make sure they are not
dead or installed
incorrectly.
After stopping the player,
I push Play but sometimes
the DVD starts where I left
off and sometimes at the
beginning. If the stop button was
pressed one time, the
DVD player resumes
playing where the DVD
was stopped. If the stop
button was pressed two
times the DVD player
begins to play from the
beginning of the DVD.
4-141
Page 372 of 630

Avoid needless heavy braking. Some people drive in
spurts, heavy acceleration followed by heavy braking,
rather than keeping pace with traffic. This is a mistake.
The brakes might not have time to cool between hard
stops. The brakes will wear out much faster with a lot
of heavy braking. Keeping pace with the traffic and
allowing realistic following distances eliminates a lot of
unnecessary braking. That means better braking and
longer brake life.
If the engine ever stops while the vehicle is being
driven, brake normally but do not pump the brakes.
If the brakes are pumped, the pedal could get harder to
push down. If the engine stops, there will still be some
power brake assist but it will be used when the brake is
applied. Once the power assist is used up, it can take
longer to stop and the brake pedal will be harder
to push.
Adding non‐dealer/non‐retailer accessories can affect
vehicle performance. SeeAccessories and
Modifications on page 6‑4.Antilock Brake System (ABS)
This vehicle has the Antilock Brake System (ABS), an
advanced electronic braking system that helps prevent
a braking skid.
When the engine is started and the vehicle begins to
drive away, ABS checks itself. A momentary motor or
clicking noise might be heard while this test is going on.
This is normal.
If there is a problem with
ABS, this warning light
stays on. See Antilock
Brake System (ABS)
Warning Light
on
page 4‑40.
Along with ABS, the vehicle has a Dynamic Rear
Proportioning (DRP) system. If there is a DRP problem,
both the brake and ABS warning lights come on
accompanied by a 10‐second chime. The lights and
chime will come on each time the ignition is turned on
until the problem is repaired. See your dealer/retailer
for service.
5-4
Page 390 of 630

Driving in Water
{WARNING:
Driving through rushing water can be dangerous.
Deep water can sweep your vehicle downstream
and you and your passengers could drown. If it is
only shallow water, it can still wash away the
ground from under your tires, and you could lose
traction and roll the vehicle over. Do not drive
through rushing water.
Heavy rain can mean flash flooding, and flood waters
demand extreme caution.
Find out how deep the water is before driving through
it. Do not try it if it is deep enough to cover the wheel
hubs, axles, or exhaust pipe —you probably will not
get through. Deep water can damage the axle and
other vehicle parts. If the water is not too deep, drive slowly through it. At
faster speeds, water splashes on the ignition system
and the vehicle can stall. Stalling can also occur if you
get the tailpipe under water. If the tailpipe is under
water, you will never be able to start the engine. When
going through water, remember that when the brakes
get wet, it might take longer to stop. See
Driving in Rain
and on Wet Roads on page 5‑23.
After Off-Road Driving
Remove any brush or debris that has collected on the
underbody, chassis, or under the hood. These
accumulations can be a fire hazard.
After operation in mud or sand, have the brake linings
cleaned and checked. These substances can cause
glazing and uneven braking. Check the body structure,
steering, suspension, wheels, tires, and exhaust system
for damage and check the fuel lines and cooling system
for any leakage.
The vehicle requires more frequent service due to
off-road use. Refer to the Maintenance Schedule for
additional information.
5-22
Page 393 of 630

Hill and Mountain Roads
Driving on steep hills or through mountains is different
than driving on flat or rolling terrain. Tips for driving in
these conditions include:
.Keep the vehicle serviced and in good shape.
.Check all fluid levels and brakes, tires, cooling
system, and transmission.
.Going down steep or long hills, shift to a
lower gear.
{WARNING:
If you do not shift down, the brakes could get so
hot that they would not work well. You would then
have poor braking or even none going down a hill.
You could crash. Shift down to let the engine
assist the brakes on a steep downhill slope.
{WARNING:
Coasting downhill in N (Neutral) or with the
ignition off is dangerous. The brakes will have to
do all the work of slowing down and they could
get so hot that they would not work well. You
would then have poor braking or even none going
down a hill. You could crash. Always have the
engine running and the vehicle in gear when
going downhill.
.Stay in your own lane. Do not swing wide or cut
across the center of the road. Drive at speeds that
let you stay in your own lane.
.Top of hills: Be alert—something could be in your
lane (stalled car, accident).
.Pay attention to special road signs (falling rocks
area, winding roads, long grades, passing or
no-passing zones) and take appropriate action.
See Off-Road Driving
on page 5‑11for information
about driving off-road.
5-25
Page 413 of 630

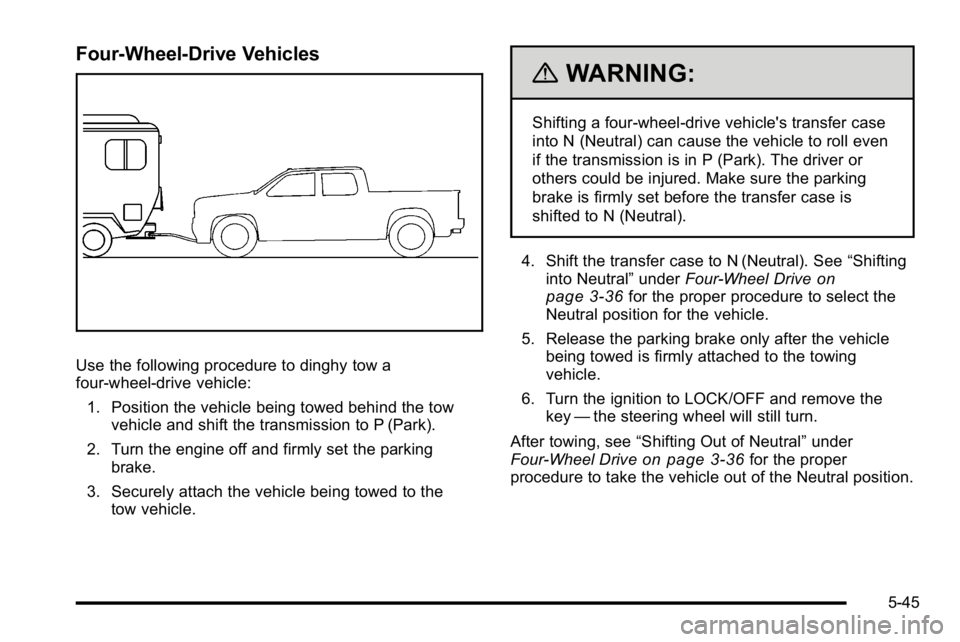
Four-Wheel-Drive Vehicles
Use the following procedure to dinghy tow a
four-wheel-drive vehicle:1. Position the vehicle being towed behind the tow vehicle and shift the transmission to P (Park).
2. Turn the engine off and firmly set the parking brake.
3. Securely attach the vehicle being towed to the tow vehicle.
{WARNING:
Shifting a four-wheel-drive vehicle's transfer case
into N (Neutral) can cause the vehicle to roll even
if the transmission is in P (Park). The driver or
others could be injured. Make sure the parking
brake is firmly set before the transfer case is
shifted to N (Neutral).
4. Shift the transfer case to N (Neutral). See “Shifting
into Neutral” underFour-Wheel Drive
on
page 3‑36for the proper procedure to select the
Neutral position for the vehicle.
5. Release the parking brake only after the vehicle being towed is firmly attached to the towing
vehicle.
6. Turn the ignition to LOCK/OFF and remove the key —the steering wheel will still turn.
After towing, see “Shifting Out of Neutral” under
Four-Wheel Drive
on page 3‑36for the proper
procedure to take the vehicle out of the Neutral position.
5-45
Page 415 of 630

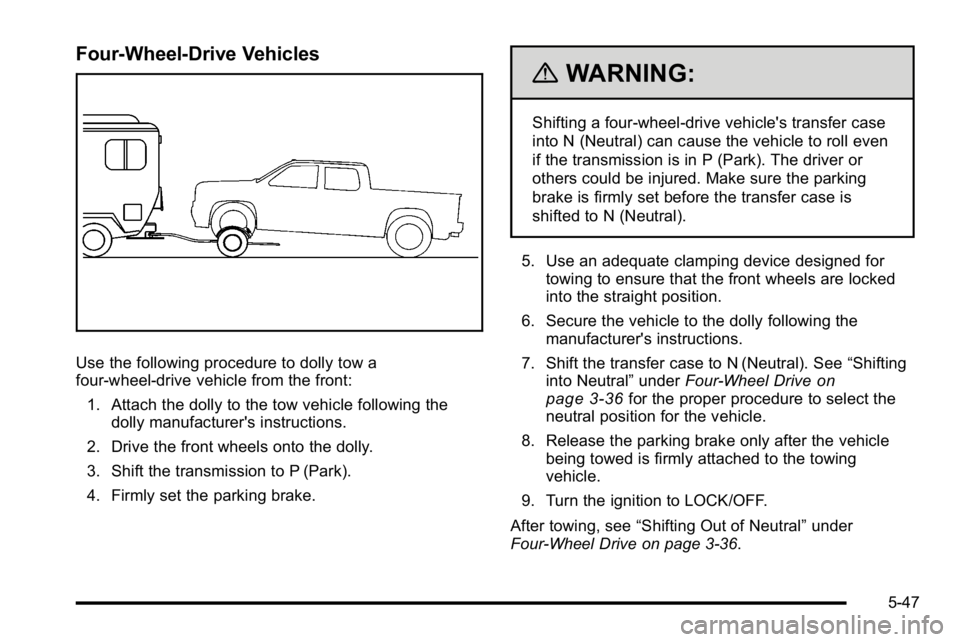
Four-Wheel-Drive Vehicles
Use the following procedure to dolly tow a
four-wheel-drive vehicle from the front:1. Attach the dolly to the tow vehicle following the dolly manufacturer's instructions.
2. Drive the front wheels onto the dolly.
3. Shift the transmission to P (Park).
4. Firmly set the parking brake.
{WARNING:
Shifting a four-wheel-drive vehicle's transfer case
into N (Neutral) can cause the vehicle to roll even
if the transmission is in P (Park). The driver or
others could be injured. Make sure the parking
brake is firmly set before the transfer case is
shifted to N (Neutral).
5. Use an adequate clamping device designed for towing to ensure that the front wheels are locked
into the straight position.
6. Secure the vehicle to the dolly following the manufacturer's instructions.
7. Shift the transfer case to N (Neutral). See “Shifting
into Neutral” underFour-Wheel Drive
on
page 3‑36for the proper procedure to select the
neutral position for the vehicle.
8. Release the parking brake only after the vehicle being towed is firmly attached to the towing
vehicle.
9. Turn the ignition to LOCK/OFF.
After towing, see “Shifting Out of Neutral” under
Four-Wheel Drive on page 3‑36.
5-47
Page 416 of 630
Rear Towing
(Rear Wheels Off the Ground)Two‐Wheel‐Drive Vehicles
Use the following procedure to dolly tow a
two-wheel-drive vehicle from the rear:
1. Attach the dolly to the tow vehicle following the dolly manufacturer's instructions.
2. Drive the rear wheels onto the dolly.
3. Firmly set the parking brake. See Parking Brake
on page 3‑50.
4. Put the transmission in P (Park).
5. Secure the vehicle to the dolly following the manufacturer's instructions.
6. Use an adequate clamping device designed for towing to ensure that the front wheels are locked
into the straight position.
7. Turn the ignition to LOCK/OFF.
5-48
Page 417 of 630

Four‐Wheel‐Drive Vehicles
Use the following procedure to dolly tow a
four-wheel-drive vehicle from the rear:1. Attach the dolly to the tow vehicle following the dolly manufacturer's instructions.
2. Drive the rear wheels onto the dolly.
3. Firmly set the parking brake. See Parking Brake
on page 3‑50.
4. Put the transmission in P (Park).
5. Secure the vehicle to the dolly following the manufacturer's instructions.
6. Use an adequate clamping device designed for towing to ensure that the front wheels are locked
into the straight position.
{WARNING:
Shifting a four-wheel-drive vehicle's transfer case
into N (Neutral) can cause the vehicle to roll even
if the transmission is in P (Park). The driver or
others could be injured. Make sure the parking
brake is firmly set before the transfer case is
shifted to N (Neutral).
7. Shift the transfer case to N (Neutral). See “Shifting
into Neutral” underFour-Wheel Drive
on
page 3‑36for the proper procedure to select the
neutral position for the vehicle.
8. Turn the ignition to LOCK/OFF.
After towing, see “Shifting Out of Neutral” under
Four-Wheel Drive on page 3‑36.
5-49