2010 GMC SIERRA DENALI light
[x] Cancel search: lightPage 441 of 550

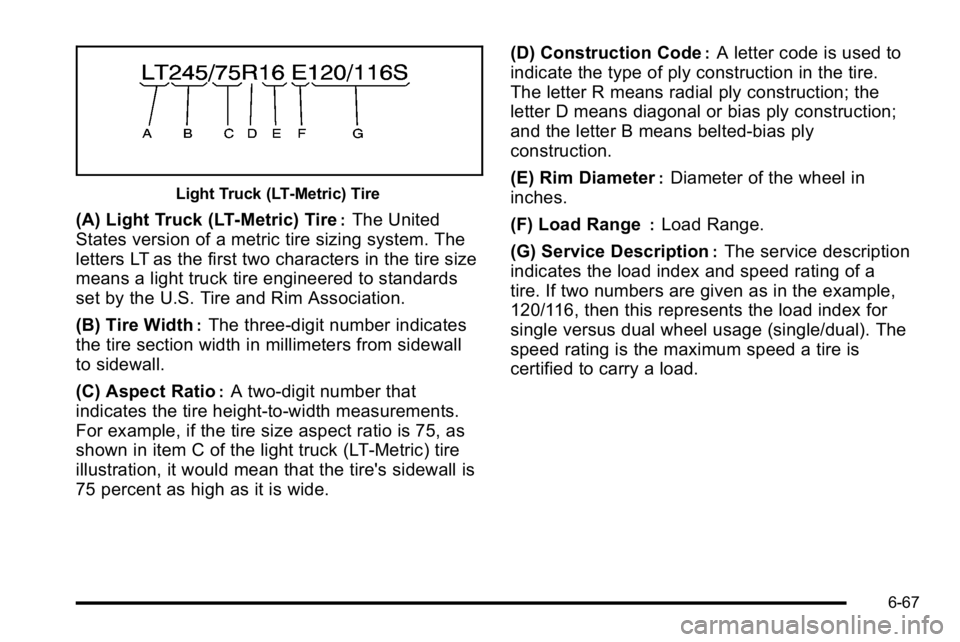
Light Truck (LT‐Metric) Tire
(A) Light Truck (LT‐Metric) Tire:The United
States version of a metric tire sizing system. The
letters LT as the first two characters in the tire size
means a light truck tire engineered to standards
set by the U.S. Tire and Rim Association.
(B) Tire Width
:The three‐digit number indicates
the tire section width in millimeters from sidewall
to sidewall.
(C) Aspect Ratio
:A two‐digit number that
indicates the tire height‐to‐width measurements.
For example, if the tire size aspect ratio is 75, as
shown in item C of the light truck (LT‐Metric) tire
illustration, it would mean that the tire's sidewall is
75 percent as high as it is wide. (D) Construction Code
:A letter code is used to
indicate the type of ply construction in the tire.
The letter R means radial ply construction; the
letter D means diagonal or bias ply construction;
and the letter B means belted‐bias ply
construction.
(E) Rim Diameter
:Diameter of the wheel in
inches.
(F) Load Range
:Load Range.
(G) Service Description
:The service description
indicates the load index and speed rating of a
tire. If two numbers are given as in the example,
120/116, then this represents the load index for
single versus dual wheel usage (single/dual). The
speed rating is the maximum speed a tire is
certified to carry a load.
6-67
Page 443 of 550

Intended Outboard Sidewall:The side of an
asymmetrical tire, that must always face outward
when mounted on a vehicle.
Kilopascal (kPa)
:The metric unit for air
pressure.
Light Truck (LT‐Metric) Tire
:A tire used on light
duty trucks and some multipurpose passenger
vehicles.
Load Index
:An assigned number ranging from
1 to 279 that corresponds to the load carrying
capacity of a tire.
Maximum Inflation Pressure
:The maximum air
pressure to which a cold tire can be inflated. The
maximum air pressure is molded onto the
sidewall.
Maximum Load Rating
:The load rating for a tire
at the maximum permissible inflation pressure for
that tire.
Maximum Loaded Vehicle Weight
:The sum of
curb weight, accessory weight, vehicle capacity
weight, and production options weight. Normal Occupant Weight
:The number of
occupants a vehicle is designed to seat multiplied
by 150 lbs (68 kg). See Loading the Vehicle
on
page 5‑31
.
Occupant Distribution
:Designated seating
positions.
Outward Facing Sidewall
:The side of an
asymmetrical tire that has a particular side that
faces outward when mounted on a vehicle. The
side of the tire that contains a whitewall, bears
white lettering, or bears manufacturer, brand, and/
or model name molding that is higher or deeper
than the same moldings on the other sidewall of
the tire.
Passenger (P-Metric) Tire
:A tire used on
passenger cars and some light duty trucks and
multipurpose vehicles.
Recommended Inflation Pressure
:Vehicle
manufacturer's recommended tire inflation
pressure as shown on the tire placard. See
Inflation - Tire Pressure
on page 6‑71and Loading
the Vehicle
on page 5‑31.
6-69
Page 448 of 550

When the malfunction indicator is illuminated, the
system may not be able to detect or signal low tire
pressure as intended. TPMS malfunctions may occur
for a variety of reasons, including the installation of
replacement or alternate tires or wheels on the vehicle
that prevent the TPMS from functioning properly.
Always check the TPMS malfunction telltale after
replacing one or more tires or wheels on your vehicle to
ensure that the replacement or alternate tires and
wheels allow the TPMS to continue to function properly.
SeeTire Pressure Monitor Operation
on page 6‑74for
additional information.
Federal Communications Commission
(FCC) and Industry and Science Canada
See Radio Frequency Statementon page 8‑20for
information regarding Part 15 of the Federal
Communications Commission (FCC) Rules and
RSS-210/211 of Industry and Science Canada.
Tire Pressure Monitor Operation
This vehicle may have a Tire Pressure Monitor System
(TPMS). The TPMS is designed to warn the driver when
a low tire pressure condition exists. TPMS sensors are
mounted onto each tire and wheel assembly, excluding
the spare tire and wheel assembly. The TPMS sensors
monitor the air pressure in the vehicle's tires and
transmits the tire pressure readings to a receiver
located in the vehicle.
When a low tire pressure
condition is detected, the
TPMS illuminates the low
tire pressure warning light
located on the instrument
panel cluster.
6-74
Page 449 of 550

At the same time a message to check the pressure in a
specific tire appears on the Driver Information Center
(DIC) display. The low tire pressure warning light and
the DIC warning message come on at each ignition
cycle until the tires are inflated to the correct inflation
pressure. Using the DIC, tire pressure levels can be
viewed by the driver. For additional information and
details about the DIC operation and displays seeDIC
Operation and Displays (Using Trip Odometer Reset
Stem)
on page 4‑44or DIC Operation and Displays
(Using DIC Buttons)on page 4‑48and DIC Warnings
and Messages on page 4‑57.
The low tire pressure warning light may come on in cool
weather when the vehicle is first started, and then turn
off as you start to drive. This could be an early indicator
that the air pressure in the tire(s) are getting low and
need to be inflated to the proper pressure. A Tire and Loading Information label, attached to your
vehicle, shows the size of your vehicle's original
equipment tires and the correct inflation pressure for
your vehicle's tires when they are cold. See
Loading the
Vehicle
on page 5‑31, for an example of the Tire and
Loading Information label and its location on your
vehicle. Also see Inflation - Tire Pressure on page 6‑71.
Your vehicle's TPMS can warn you about a low tire
pressure condition but it does not replace normal tire
maintenance. See Tire Inspection and Rotation
on
page 6‑78and Tires on page 6‑62.
Notice: Liquid tire sealants could damage the Tire
Pressure Monitor System (TPMS) sensors. Sensor
damage caused by using a tire sealant is not
covered by your warranty. Do not use liquid tire
sealants.
6-75
Page 450 of 550

TPMS Malfunction Light and Message
The TPMS will not function properly if one or more of
the TPMS sensors are missing or inoperable. When the
system detects a malfunction, the low tire warning light
flashes for about one minute and then stays on for the
remainder of the ignition cycle. A DIC warning message
is also displayed. The low tire warning light and DIC
warning message come on at each ignition cycle until
the problem is corrected. Some of the conditions that
can cause the malfunction light and DIC message to
come on are:
.One of the road tires has been replaced with the
spare tire. The spare tire does not have a TPMS
sensor. The TPMS malfunction light and DIC
message should go off once you re‐install the road
tire containing the TPMS sensor.
.The TPMS sensor matching process was started
but not completed or not completed successfully
after rotating the vehicle's tires. The DIC message
and TPMS malfunction light should go off once the
TPMS sensor matching process is performed
successfully. See“TPMS Sensor Matching
Process” later in this section.
.One or more TPMS sensors are missing or
damaged. The DIC message and the TPMS
malfunction light should go off when the TPMS
sensors are installed and the sensor matching
process is performed successfully. See your
dealer/retailer for service.
.Replacement tires or wheels do not match your
vehicle's original equipment tires or wheels. Tires
and wheels other than those recommended for
your vehicle could prevent the TPMS from
functioning properly. See Buying New Tires
on
page 6‑80.
.Operating electronic devices or being near facilities
using radio wave frequencies similar to the TPMS
could cause the TPMS sensors to malfunction.
If the TPMS is not functioning it cannot detect or signal
a low tire condition. See your dealer/retailer for service
if the TPMS malfunction light and DIC message comes
on and stays on.
6-76
Page 456 of 550

Different Size Tires and Wheels
If you add wheels or tires that are a different size than
your original equipment wheels and tires, this could
affect the way your vehicle performs, including its
braking, ride and handling characteristics, stability, and
resistance to rollover. Additionally, if your vehicle has
electronic systems such as anti‐lock brakes, rollover
airbags, traction control, and electronic stability control,
the performance of these systems can be affected.
{WARNING:
If you add different sized wheels, your vehicle
may not provide an acceptable level of
performance and safety if tires not recommended
for those wheels are selected. You may increase
the chance that you will crash and suffer serious
injury. Only use GM specific wheel and tire
systems developed for your vehicle, and have
them properly installed by a GM certified
technician.
See Buying New Tires
on page 6‑80andAccessories
and Modificationson page 6‑4for additional
information.
Uniform Tire Quality Grading
Quality grades can be found where applicable on
the tire sidewall between tread shoulder and
maximum section width. For example:
Treadwear 200 Traction AA
Temperature A
The following information relates to the system
developed by the United States National Highway
Traffic Safety Administration (NHTSA), which
grades tires by treadwear, traction, and
temperature performance. This applies only to
vehicles sold in the United States. The grades are
molded on the sidewalls of most passenger car
tires. The Uniform Tire Quality Grading (UTQG)
system does not apply to deep tread, winter-type
snow tires, space-saver, or temporary use spare
tires, tires with nominal rim diameters of
10 to 12 inches (25 to 30 cm), or to some
limited-production tires.
While the tires available on General Motors
passenger cars and light trucks may vary with
respect to these grades, they must also conform
to federal safety requirements and additional
General Motors Tire Performance Criteria (TPC)
standards.
6-82
Page 462 of 550

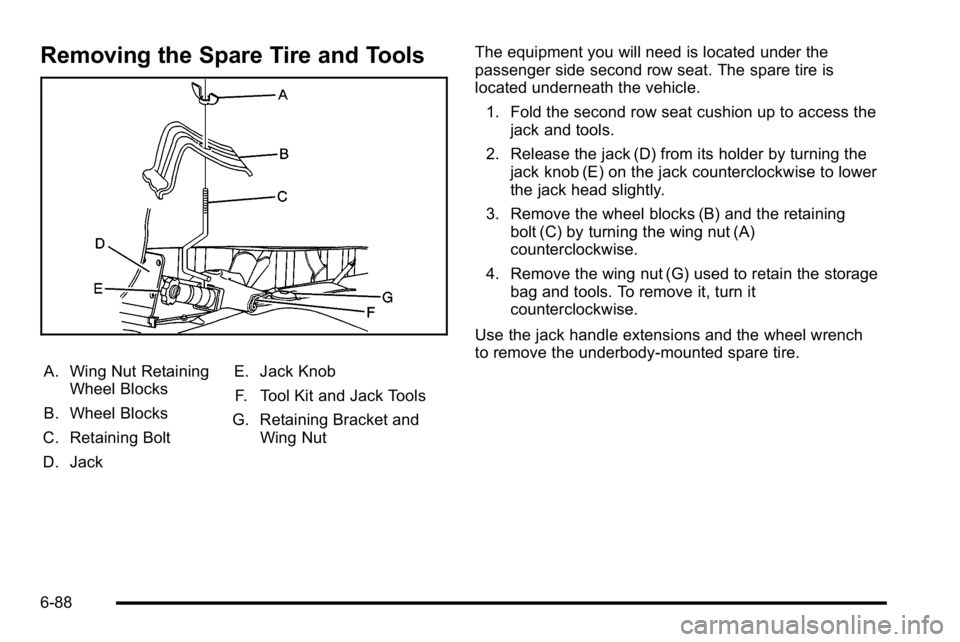
Removing the Spare Tire and Tools
A. Wing Nut RetainingWheel Blocks
B. Wheel Blocks
C. Retaining Bolt
D. Jack E. Jack Knob
F. Tool Kit and Jack Tools
G. Retaining Bracket and Wing Nut The equipment you will need is located under the
passenger side second row seat. The spare tire is
located underneath the vehicle.
1. Fold the second row seat cushion up to access the jack and tools.
2. Release the jack (D) from its holder by turning the jack knob (E) on the jack counterclockwise to lower
the jack head slightly.
3. Remove the wheel blocks (B) and the retaining bolt (C) by turning the wing nut (A)
counterclockwise.
4. Remove the wing nut (G) used to retain the storage bag and tools. To remove it, turn it
counterclockwise.
Use the jack handle extensions and the wheel wrench
to remove the underbody-mounted spare tire.
6-88
Page 479 of 550

Appearance Care
Interior Cleaning
The vehicle's interior will continue to look its best if it is
cleaned often. Although not always visible, dust and dirt
can accumulate on the upholstery. Dirt can damage
carpet, fabric, leather, and plastic surfaces. Regular
vacuuming is recommended to remove particles from
the upholstery. It is important to keep the upholstery
from becoming and remaining heavily soiled. Soils
should be removed as quickly as possible. The
vehicle's interior may experience extremes of heat that
could cause stains to set rapidly.
Lighter colored interiors may require more frequent
cleaning. Use care because newspapers and garments
that transfer color to home furnishings may also transfer
color to the vehicle's interior.
When cleaning the vehicle's interior, only use cleaners
specifically designed for the surfaces being cleaned.
Permanent damage may result from using cleaners on
surfaces for which they were not intended. Use glass
cleaner only on glass. Remove any accidental
over-spray from other surfaces immediately. To prevent
over-spray, apply cleaner directly to the cleaning cloth.Notice:
Using abrasive cleaners when cleaning
glass surfaces on the vehicle, could scratch the
glass and/or cause damage to the rear window
defogger. When cleaning the glass on the vehicle,
use only a soft cloth and glass cleaner.
Many cleaners contain solvents that may become
concentrated in the vehicle's breathing space. Before
using cleaners, read and adhere to all safety
instructions on the label. While cleaning the vehicle's
interior, maintain adequate ventilation by opening the
vehicle's doors and windows.
Dust may be removed from small buttons and knobs
using a small brush with soft bristles.
Products that remove odors from the vehicle's
upholstery and clean the vehicle's glass can be
obtained from your dealer/retailer.
Do not clean the vehicle using:
.A knife or any other sharp object to remove a soil
from any interior surface.
.A stiff brush. It can cause damage to the vehicle's
interior surfaces.
.Heavy pressure or aggressive rubbing with a
cleaning cloth. Use of heavy pressure can damage
the interior and does not improve the effectiveness
of soil removal.
6-105