Page 57 of 226
Rear lamps
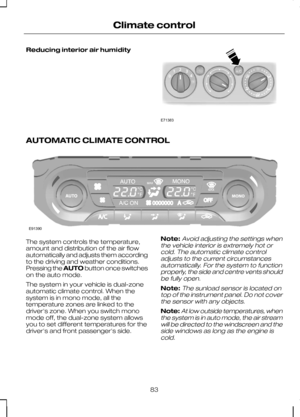
Direction indicator and reverse
lamp
1. Remove the trim panel.
Direction indicator
A
Reverse lamp
B
2. Disconnect the electrical connector.
3. Turn the bulb holder anti-clockwise and
remove it.
4. Remove the bulb. Tail lamp and brake lamp
1. Remove the trim panel.
2. Remove the nut.
55
Lighting1E99407 ABE99408 3E99411 2E99412
Page 58 of 226
3. Gently press the bulb into the bulb
holder, turn it anti-clockwise and
remove it.
Central high mounted brake
lamp
Note:The LED board is not a serviceable
item, please consult your dealer if this fails.
Number plate lamp 1. Carefully release the spring clip.
2. Remove the lamp.
3. Remove the bulb. Interior lamp
Vehicles without interior sensors
1. Carefully prise out the lamp.
2. Turn the bulb holder anti-clockwise
and remove it.
3. Remove the bulb.
Vehicles with interior sensors 1. Carefully prise out the lens.
2. Remove the lens.
3. Remove the bulb.
56
LightingE99413 E72789321 E99452231 E7278723
Page 59 of 226
Reading lamps
Vehicles without interior sensors
1. Carefully prise out the lamp.
2. Turn the bulb holder anti-clockwise
and remove it.
3. Remove the bulb.
Vehicles with interior sensors 1. Carefully prise out the lamp.
2. Turn the bulb holder anti-clockwise
and remove it. 3. Remove the bulb.
Vanity mirror lamp
1. Carefully prise out the lamp.
2. Remove the bulb.
57
LightingE99453231 E72786221 E739393 E72785
Page 60 of 226
Luggage compartment lamp 1. Carefully prise out the lamp.
2. Remove the bulb.
BULB SPECIFICATION CHART Power (watt)
Specification
Lamp
21
H21W
Front direction indicator
55
H7
Headlamp main beam
55
H7
Headlamp dipped beam
5
W5W
Side repeater
35
H8
Front fog lamp
5
W5W
Side lamp
19
PSY19W
Rear direction indicator
21/5
W21/5W
Brake and tail lamp
21
P21W
Rear fog lamp
21
P21W
Reversing lamp
1.4
1 x LED board
Central high mounted brake lamp
5
W5W
Number plate lamp
6
W6W
Interior lamp
5
W5W
Reading lamp
5
W5W
Vanity mirror lamp
58
LightingE9942912
Page 61 of 226
Power (watt)
Specification
Lamp
10
Festoon
Luggage compartment lamp
59
Lighting
Page 62 of 226

ELECTRIC WINDOWS
WARNING
Do not operate the electric windows
unless they are free from
obstruction.
Note:If you operate the switches often
during a short period of time, the system might become inoperable for a certaintime to prevent damage due tooverheating.
Switch on the ignition to operate the
electric windows.
Global opening and closing
You can also operate the electric
windows with the ignition off via the global
opening and closing function. See Locks
(page 29).
Driver's door switches
You can operate all the windows with the
switches on the door trim panel of the
driver’s door. Opening and closing the
windows automatically
Press or lift the switch to the second
action point and release it completely.
Press or lift it again to stop the windows.
Safety switch for rear windows
Note:
You can always operate the rear
windows from the driver’s door. A switch in the driver’s door disables the
rear electric window switches.
The light in the switch comes on and the
lights in the rear window switches go off
when the rear windows are disabled.
Anti-trap function
WARNING
Careless closing of the windows can
override the protection function and
cause injuries.
The electric windows will stop
automatically while closing and reverse
some distance if there is an obstacle in
the way.
60
Windows and mirrorsE70848 E70850
Page 63 of 226

Overriding the anti-trap function
CAUTION
While you close the window for the
third time, the anti-trap function is
disabled. Make sure there are no
obstacles in the way of the closing
window. To override this protection function when
there is a resistance, e.g. in the winter,
proceed as follows:
1. Close the window twice until it
reaches the resistance and let it
reverse.
2. Close the window a third time to the resistance. The anti-trap function is
disabled and you cannot close the
window automatically. The window will
override the resistance and you can
close it fully.
3. If the window does not close after the third attempt, have it checked by an
expert.
Resetting the memory of the
electric windows WARNING
The anti-trap function is deactivated
until you have reset the memory.
After the battery has been disconnected
from the vehicle you must reset the
memory separately for each window:
1. Lift and hold the switch until the
window is fully closed.
2. Release the switch.
3. Lift the switch again for one more second.
4. Push and hold the switch until the window is fully open.
5. Release the switch. 6. Lift and hold the switch until the
window is fully closed.
7. Open the window and try to close it automatically.
8. Reset and repeat procedure if the window does not close automatically.
EXTERIOR MIRRORS WARNING
Do not overestimate the distance
of the objects that you see in the
convex mirror. Objects seen in
convex mirrors will appear smaller and
further away than they actually are. Manual folding mirrors
Folding
Push the mirror towards the door window
glass.
Unfolding
Make sure that you fully engage the mirror
in its support when returning it to its
original position.
61
Windows and mirrors
Page 64 of 226
ELECTRIC EXTERIOR
MIRRORS
Left-hand mirror
A
OffB
Right-hand mirror
C
Mirror tilting positions The electric exterior mirrors are fitted with
a heating element that will defrost or
demist the mirror glass. See
Heated
windows and mirrors (page 86).Electric folding mirrors
Note:When the mirrors are operated
often during a short period of time, the system may become inoperable for aperiod of time to prevent damage due tooverheating.
Note:The switch must be in position B.
The electric folding mirrors operate with
the ignition on. Press the button to fold or unfold the
mirrors.
If you press the switch again while the
mirrors are moving, they will stop and
reverse the direction of movement.
AUTO-DIMMING MIRROR
The auto-dimming mirror will adjust
automatically when hit by glaring light from
behind. It will not work when you have
selected reverse gear.
62
Windows and mirrorsACBE70846 E70847 E122706 E71028