Page 114 of 404
Replacing front parking lamp/turn signal/sidemarker bulbs
1. Turn off the headlamps and open
the hood.
2. Remove three screws from the
headlamp assembly and pull
headlamp forward.
3. Rotate the bulb socket
counterclockwise and remove it
from the lamp assembly.
4. Pull the bulb straight out of the
socket.
Reverse steps to reinstall bulb(s).
Replacing tail/brake/turn/backup lamp bulbs
1. Turn the headlamps off and open
the liftgate.
2. Remove the two bolts from the
lamp assembly.
3. Remove the lamp assembly by
pulling it away from the vehicle at
an angle to disengage the two snap
attachments.
Lights
114
2010 Explorer(exp)
Owners Guide(own2002), 1st Printing
USA(fus)
Page 115 of 404
4. Rotate the bulb socket
counterclockwise and remove it
from the lamp assembly.
5. Pull the bulb straight out of the
socket.
Reverse steps to reinstall bulb(s).
Replacing fog lamp bulbs
1. Make sure the headlamp switch is
off.
2. Remove the bulb socket from the
fog lamp by turning it
counterclockwise.
3. Disconnect the electrical
connector.
Reverse steps to reinstall bulb(s).
Replacing license plate lamp bulbs
1. Make sure the headlamp switch is
off.
2. Remove the lamp assembly by
pressing the small tab and rocking
the lamp assembly out.
3. Remove the bulb socket from the
lamp assembly by turning
counterclockwise and pull the bulb
straight out.
Reverse steps to reinstall bulb(s).
Lights
115
2010 Explorer(exp)
Owners Guide(own2002), 1st Printing
USA(fus)
Page 118 of 404
O (off) — Rear wiper and washer off.
For rear wash cycle, rotate (and hold as desired) the rear wiper/washer
control to either
position.
From either position, the control will automatically return to the INT 2
or O (off) position.
TILT STEERING COLUMN
Pull the lever down and release, to
unlock the steering column tilt lock.
With the lever in the down position,
tilt the steering column and wheel
to its desired orientation. Do not
push or pull the lever while tilting
the wheel.
Lift the lever back to its original
position to lock the steering column.
WARNING:Never adjust
the steering column when
the vehicle is moving.
ILLUMINATED VISOR MIRROR
(IF EQUIPPED)
Lift the mirror cover to turn on the
visor mirror lamp.
Driver Controls
118
2010 Explorer(exp)
Owners Guide(own2002), 1st Printing
USA(fus)
Page 124 of 404
 press the
right side of the control. Press the")
Window lock
The window lock feature allows only
the driver to operate the power
windows.
To lock out all the window controls
(except for the driver’s) press the
right side of the control. Press the
left side to restore the window
controls.
Accessory delay
With accessory delay, the audio system, power windows and moon roof
(if equipped) operate for up to 10 minutes after the ignition switch is
turned from the on to the off position or until either front door is
opened.
INTERIOR MIRROR
The interior rear view mirror has two pivot points on the support arm
which lets you adjust the mirror up or down and from side to side.
WARNING:Do not adjust the mirror while the vehicle is in
motion.
Automatic dimming interior rear view mirror (if equipped)
Your vehicle may be equipped with an interior rear view mirror which
has an auto-dimming function. The electronic day/night mirror will
change from the normal (high reflective) state to the non-glare
(darkened) state when bright lights (glare) reach the mirror. When the
mirror detects bright light from behind the vehicle, it will automatically
adjust (darken) to minimize glare.
The mirror will automatically return to the normal state whenever the
vehicle is placed in R (Reverse) to ensure a bright clear view when
backing up.
Do not block the sensors on the front and back of the interior
rear view mirror since this may impair proper mirror
performance.
Do not clean the housing or glass of any mirror with harsh
abrasives, fuel or other petroleum-based cleaning products.
Driver Controls
124
2010 Explorer(exp)
Owners Guide(own2002), 1st Printing
USA(fus)
Page 125 of 404

EXTERIOR MIRRORS
Power side view mirrors
WARNING:Do not adjust the mirror while the vehicle is in
motion.
The ignition must be in the accessory or on position to adjust the power
side view mirrors.
To adjust your mirrors:
1. Rotate the control clockwise to
adjust the right mirror and rotate
the control counterclockwise to
adjust the left mirror.
2. Move the control in the direction
you wish to tilt the mirror.
3. Return to the center position to lock mirrors in place.
Fold-away mirrors
Fold the side mirrors in carefully
when driving through a narrow
space, like an automatic car wash.
Heated outside mirrors
(if equipped)
Both mirrors are heated
automatically to remove ice, mist
and fog when the rear window
defrost is activated.
Do not remove ice from the
mirrors with a scraper or
attempt to readjust the mirror
glass if it is frozen in place.
These actions could cause
damage to the glass and mirrors.
Do not clean the housing or glass of any mirror with harsh
abrasives, fuel or other petroleum-based cleaning products.
Driver Controls
125
2010 Explorer(exp)
Owners Guide(own2002), 1st Printing
USA(fus)
Page 127 of 404
, the running boards will move to
the st")
Enable/disable:
To enable/disable the power running board feature, refer toMessage
centerin theInstrument Clusterchapter.
•When this feature is disabled (OFF), the running boards will move to
the stowed position regardless of the position of the doors.
•When this feature is enabled (AUTO), the running boards will move
back to the correct positions based off of the door positions.
Bounce-back:
•If an object is in the way of the moving running board, the running
board will automatically bounce back in the reverse direction and
move to the end of travel.
Note:The running boards may operate slower in cooler temperatures. In
adverse conditions, debris such as mud, dirt, and salt may become
trapped in the running board mechanism, possibly leading to unwanted
noise. If this occurs, manually set the running boards to the deployed
position and flush the system (in particular the front and rear hinge
arms) with a high-pressure car wash wand.
Note:Do not use the running boards, front and rear hinge assemblies,
running board motors, or the running board under body mounts to lift
the vehicle when jacking. Please utilize proper jacking points. Refer to
Changing the tiresin theRoadside Emergencieschapter.
WARNING:In extreme climates, excessive ice buildup may
occur, causing the running boards not to deploy. Be sure that the
running boards have deployed, and have finished moving before
attempting to step on them. Note: The running boards will resume
normal function once the blockage is cleared.
WARNING:Turn off the running boards before jacking or
placing any object under the vehicle. Never place your hand
between the extended running board and the vehicle. A moving
running board may cause injury.
Driver Controls
127
2010 Explorer(exp)
Owners Guide(own2002), 1st Printing
USA(fus)
Page 134 of 404

The HomeLink�Wireless Control System, located on the overhead
console or on the driver’s visor, provides a conve")
HomeLink�
Car2U�Home Automation
System
HomeLink�Wireless Control System (if equipped)
The HomeLink�Wireless Control System, located on the overhead
console or on the driver’s visor, provides a convenient way to replace up
to three hand-held transmitters with a single built-in device. This feature
will learn the radio frequency codes of most transmitters to operate
garage doors, entry gate operators, security systems, entry door locks,
and home or office lighting.
WARNING:When programming your HomeLink�Wireless
Control System to a garage door or gate, be sure that people and
objects are out of the way to prevent potential injury or damage.
Do not use the HomeLink�Wireless Control System with any garage
door opener that lacks safety stop and reverse features as required by
U.S. federal safety standards (this includes any garage door opener
model manufactured before April 1, 1982). A garage door which cannot
detect an object, signaling the door to stop and reverse, does not meet
current U.S. federal safety standards. For more information, contact
HomeLink�at:www.homelink.comor1–800–355–3515.
Retain the original transmitter for use in other vehicles as well as for
future programming procedures (i.e. new HomeLink�equipped vehicle
purchase). It is also suggested that upon the sale of the vehicle, the
programmed Homelink�buttons be erased for security purposes, refer to
Programmingin this section.
Driver Controls
134
2010 Explorer(exp)
Owners Guide(own2002), 1st Printing
USA(fus)
Page 138 of 404
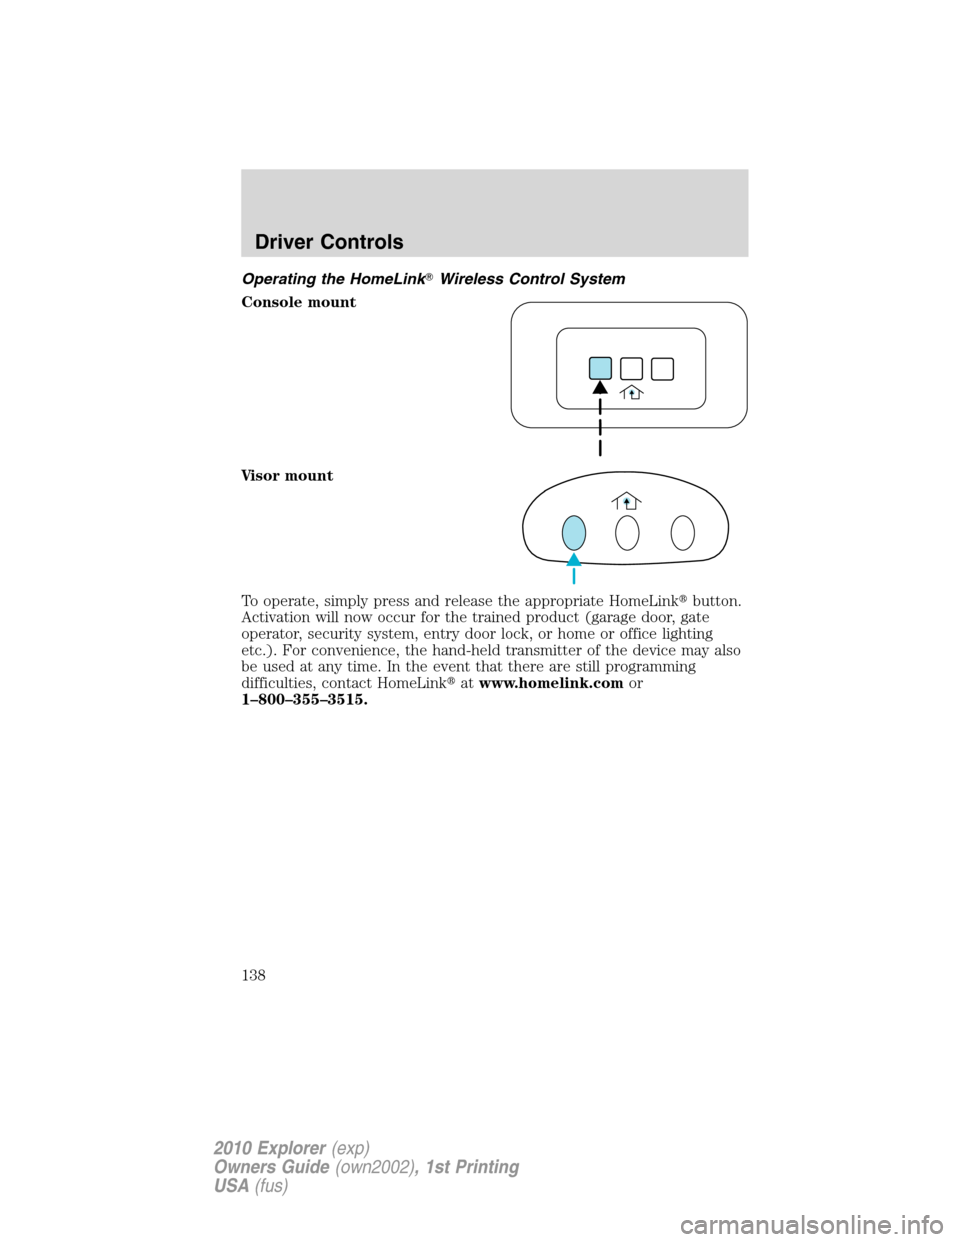
Operating the HomeLink�Wireless Control System
Console mount
Visor mount
To operate, simply press and release the appropriate HomeLink�button.
Activation will now occur for the trained product (garage door, gate
operator, security system, entry door lock, or home or office lighting
etc.). For convenience, the hand-held transmitter of the device may also
be used at any time. In the event that there are still programming
difficulties, contact HomeLink�atwww.homelink.comor
1–800–355–3515.
Driver Controls
138
2010 Explorer(exp)
Owners Guide(own2002), 1st Printing
USA(fus)

.
Replacing fog lamp bulbs
1. Make sure")
 — Rear wiper and washer off.
For rear wash cycle, rotate (and hold as desired) the rear wiper/washer
control to either
position.
From either position, the control will automatically return t")