Page 323 of 420
DRIVING THROUGH WATER
If driving through deep or standing
water is unavoidable, proceed very
slowly especially when the depth is
not known. Never drive through
water that is higher than the bottom
of the wheel rims (for cars) or the
bottom of the hubs (for trucks).
When driving through water, traction or brake capability may be limited.
Also, water may enter your engine’s air intake and severely damage your
engine or your vehicle may stall.Driving through deep water where
the transmission vent tube is submerged may allow water into the
transmission and cause internal transmission damage.
Once through the water, always dry the brakes by moving your
vehicle slowly while applying light pressure on the brake pedal.
Wet brakes do not stop the vehicle as quickly as dry brakes.
Driving
323
2010 Expedition(exd)
Owners Guide(own2002), 1st Printing
USA(fus)
Page 329 of 420

The fuses are coded as follows:
Fuse/Relay
LocationFuse Amp
RatingProtected Circuits
1 30A Smart window #1
2 15A Driver side memory module
3 15A Family entertainment system,
Audio rear seat controls, Satellite
radio, SYNC�
4 30A Smart window #2
5 10A Keypad illumination, 3rd row seat
enable, Brake shift interlock
(BSI), Passenger compartment
fuse panel
6 20A Turn signals
7 10A Low beam headlamps (left)
8 10A Low beam headlamps (right)
9 15A Interior lights
10 15A Switch backlighting, Puddle lamps
11 10A Not used (spare)
12 7.5A Power mirrors, Driver seat
memory switch
13 5A Not used (spare)
14 10A Power liftgate module – keep-alive
power
15 10A Climate control, Global positioning
satellite module
16 15A Not used (spare)
17 20A Door locks, Liftgate release,
Liftglass release
18 20A Second row heated seats
19 25A Rear wiper
20 15A Adjustable pedals, Datalink
21 15A Fog lamps
22 15A Park lamps
Roadside Emergencies
329
2010 Expedition(exd)
Owners Guide(own2002), 1st Printing
USA(fus)
Page 334 of 420
Fuse/Relay
LocationFuse Amp
RatingProtected Circuits
59 15A* Heated mirrors
60 — One-touch start diode
61 — Fuel pump diode
62 — Not used
63 25A** Electronic fan
64 30A** Moon roof
65 20A** Auxiliary power point 2
66 20A** Auxiliary power point 3
67 40A** Climate controlled seats
68 60A** ABS valves
69 60A** ABS pump
70 40A** Third row power fold seat
71 20A** Auxiliary power point/cigar
lighter
72 20A** Auxiliary power point 4
73 — Not used
74 30A** Driver power seat
75 20A* Vehicle power1–PCM
76 20A* Vehicle power2–PCM
77 15A* Vehicle power4–ignition coils
78 — Not used
79 20A* Vehicle power3–PCM
80 — Not used
81 — Not used
82 — Not used
83 — Not used
84 — Not used
85 — Wiper motor relay
* Mini Fuses ** Cartridge Fuses
Roadside Emergencies
334
2010 Expedition(exd)
Owners Guide(own2002), 1st Printing
USA(fus)
Page 335 of 420

CHANGING THE TIRES
If you get a flat tire while driving, do not apply the brake heavily.
Instead, gradually decrease your speed. Hold the steering wheel firmly
and slowly move to a safe place on the side of the road.
Note:The tire pressure monitoring system (TPMS) indicator light will
illuminate when the spare tire is in use. To restore the full functionality
of the monitoring system, all road wheels equipped with tire pressure
monitoring sensors must be mounted on the vehicle.
Have a flat serviced by an authorized dealer in order to prevent damage
to the TPMS sensors, refer toTire pressure monitoring system
(TPMS)in theTires, Wheels and Loadingchapter. Replace the spare
tire with a road tire as soon as possible. During repairing or replacing of
the flat tire, have the authorized dealer inspect the TPMS sensor for
damage.
WARNING:The use of tire sealants may damage your Tire
Pressure Monitoring System and should not be used.
WARNING:Refer toTire pressure monitoring system (TPMS)
in theTires, Wheels and Loadingchapter for important
information. If the tire pressure monitor sensor becomes damaged, it
will no longer function.
Dissimilar spare tire/wheel information
WARNING:Failure to follow these guidelines could result in an
increased risk of loss of vehicle control, injury or death.
If you have a dissimilar spare tire/wheel, then it is intended for
temporary use only. This means that if you need to use it, you should
replace it as soon as possible with a road tire/wheel that is the same size
and type as the road tires and wheels that were originally provided by
Ford. If the dissimilar spare tire or wheel is damaged, it should be
replaced rather than repaired.
A dissimilar spare tire/wheel is defined as a spare tire and/or wheel that
is different in brand, size or appearance from the road tires and wheels
and can be one of three types:
1.T-type mini-spare:This spare tire begins with the letter “T” for tire
size and may have “Temporary Use Only” molded in the sidewall
Roadside Emergencies
335
2010 Expedition(exd)
Owners Guide(own2002), 1st Printing
USA(fus)
Page 338 of 420

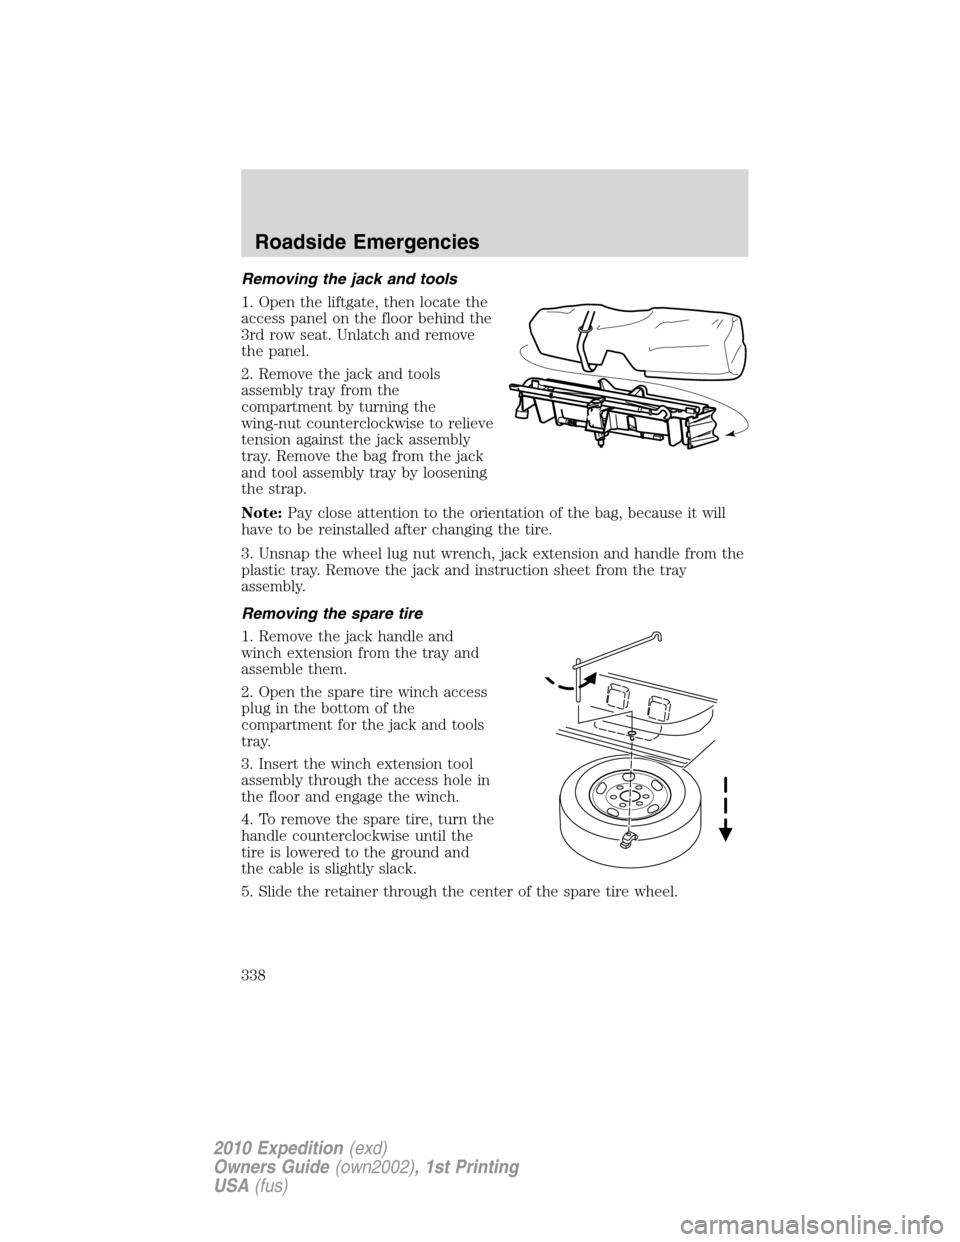
Removing the jack and tools
1. Open the liftgate, then locate the
access panel on the floor behind the
3rd row seat. Unlatch and remove
the panel.
2. Remove the jack and tools
assembly tray from the
compartment by turning the
wing-nut counterclockwise to relieve
tension against the jack assembly
tray. Remove the bag from the jack
and tool assembly tray by loosening
the strap.
Note:Pay close attention to the orientation of the bag, because it will
have to be reinstalled after changing the tire.
3. Unsnap the wheel lug nut wrench, jack extension and handle from the
plastic tray. Remove the jack and instruction sheet from the tray
assembly.
Removing the spare tire
1. Remove the jack handle and
winch extension from the tray and
assemble them.
2. Open the spare tire winch access
plug in the bottom of the
compartment for the jack and tools
tray.
3. Insert the winch extension tool
assembly through the access hole in
the floor and engage the winch.
4. To remove the spare tire, turn the
handle counterclockwise until the
tire is lowered to the ground and
the cable is slightly slack.
5. Slide the retainer through the center of the spare tire wheel.
Roadside Emergencies
338
2010 Expedition(exd)
Owners Guide(own2002), 1st Printing
USA(fus)
Page 346 of 420
Connecting the jumper cables
1. Connect the positive (+) jumper cable to the positive (+) terminal of
the discharged battery.
Note:In the illustrations,lightning boltsare used to designate the
assisting (boosting) battery.
2. Connect the other end of the positive (+) cable to the positive (+)
terminal of the assisting battery.
3. Connect the negative (-) cable to the negative (-) terminal of the
assisting battery.
+–+–
+–+–
+–+–
Roadside Emergencies
346
2010 Expedition(exd)
Owners Guide(own2002), 1st Printing
USA(fus)
Page 348 of 420
Jump starting
1. Start the engine of the booster vehicle and run the engine at
moderately increased speed.
2. Start the engine of the disabled vehicle.
3. Once the disabled vehicle has been started, run both engines for an
additional three minutes before disconnecting the jumper cables.
Removing the jumper cables
Remove the jumper cables in the reverse order that they were
connected.
1. Remove the jumper cable from the jump starting stud.
Note:In the illustrations,lightning boltsare used to designate the
assisting (boosting) battery.
+–+–
Roadside Emergencies
348
2010 Expedition(exd)
Owners Guide(own2002), 1st Printing
USA(fus)
Page 359 of 420

WASHING THE EXTERIOR
Wash your vehicle regularly with cool or lukewarm water and a neutral
pH shampoo, such as Motorcraft Detail Wash (ZC-3-A), which is available
from your authorized dealer.
•Never use strong household detergents or soap, such as dish washing
or laundry liquid. These products can discolor and spot painted
surfaces.
•Never wash a vehicle that is “hot to the touch” or during exposure to
strong, direct sunlight.
•Always use a clean sponge or car wash mitt with plenty of water for
best results.
•Dry the vehicle with a chamois or soft terry cloth towel in order to
eliminate water spotting.
•It is especially important to wash the vehicle regularly during the
winter months, as dirt and road salt are difficult to remove and cause
damage to the vehicle.
•Immediately remove items such as gasoline, diesel fuel, bird droppings
and insect deposits because they can cause damage to the vehicle’s
paintwork and trim over time. Use Motorcraft Bug and Tar Remover
(ZC-42), which is available from your authorized dealer.
•Remove any exterior accessories, such as antennas, before entering a
car wash.
•Suntan lotions and insect repellents can damage any painted
surface; if these substances come in contact with your vehicle,
wash off as soon as possible.
•If your vehicle is equipped with running boards, do not use
rubber, plastic and vinyl protectant products on the running
board surface, as the area may become slippery.
Exterior chrome
•Wash the vehicle first, using cool or lukewarm water and a neutral pH
shampoo, such as Motorcraft Detail Wash (ZC-3-A).
•Use Motorcraft Custom Bright Metal Cleaner (ZC-15), available from
your authorized dealer. Apply the product as you would a wax to
clean bumpers and other chrome parts; allow the cleaner to dry for a
few minutes, then wipe off the haze with a clean, dry rag.
•Never use abrasive materials such as steel wool or plastic pads
as they can scratch the chrome surface.
Cleaning
359
2010 Expedition(exd)
Owners Guide(own2002), 1st Printing
USA(fus)