Page 106 of 420
•During extreme high ambient temperatures when idling stationary for
extended periods of time in gear, it is recommended to run the A/C in
the MAX A/C position, turn off the rear A/C unit, reduce blower fan
speed from the highest setting and put the vehicle’s transmission into
the P (Park) position to continue to receive cool air from your A/C
system.
•Do not put objects under the front seats that will interfere with the
airflow to the back seats.
•Remove any snow, ice or leaves from the air intake area at the base of
the windshield.
To aid in side window defogging/demisting in cold weather:
1. Select
.
2. Select A/C.
3. Adjust the temperature control to maintain comfort.
4. Set the fan speed to the highest setting.
5. Direct the outer instrument panel vents towards the side windows.
To increase airflow to the outer instrument panel vents, close the vents
located in the middle of the instrument panel.
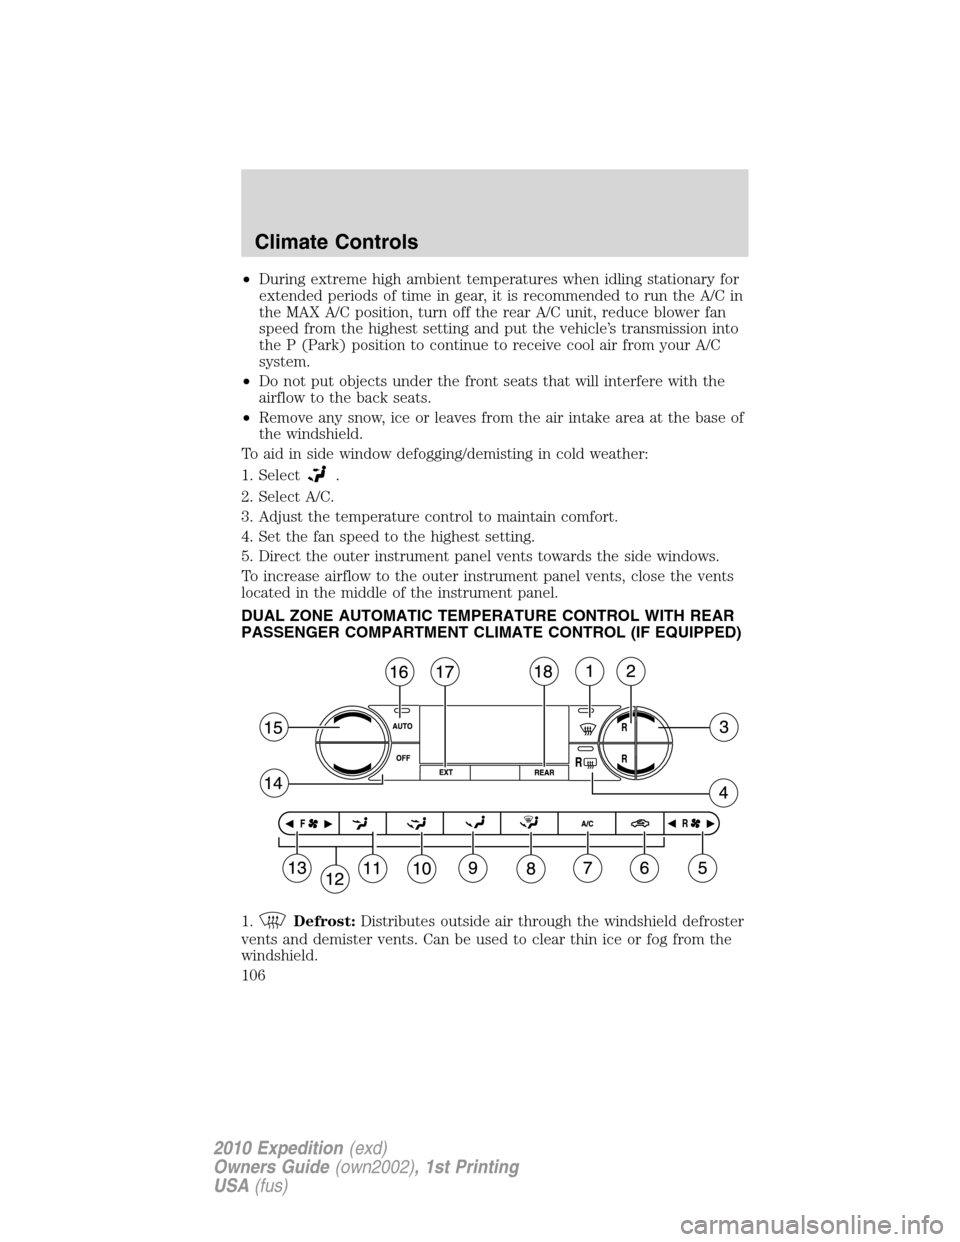
DUAL ZONE AUTOMATIC TEMPERATURE CONTROL WITH REAR
PASSENGER COMPARTMENT CLIMATE CONTROL (IF EQUIPPED)
1.
Defrost:Distributes outside air through the windshield defroster
vents and demister vents. Can be used to clear thin ice or fog from the
windshield.
Climate Controls
106
2010 Expedition(exd)
Owners Guide(own2002), 1st Printing
USA(fus)
Page 112 of 420
•For maximum cooling performance, (MAX A/C):
In AUTO: Press AUTO control and set to desired temperature.
In Manual Override: Press the
(panel), A/C, and recirculated
air
, set the temperature to 60°F (16°C) and the fan to the highest
blower setting.
•Do not put objects under the front seats that will interfere with the
airflow to the back seats.
•Remove any snow, ice or leaves from the air intake area at the base of
the windshield.
To aid in side window defogging/demisting in cold weather:
1. Select
.
2. Select A/C.
3. Adjust the temperature control to maintain comfort.
4. Set the fan speed to the highest setting.
5. Direct the outer instrument panel vents towards the side windows.
To increase airflow to the outer instrument panel vents, close the vents
located in the middle of the instrument panel.
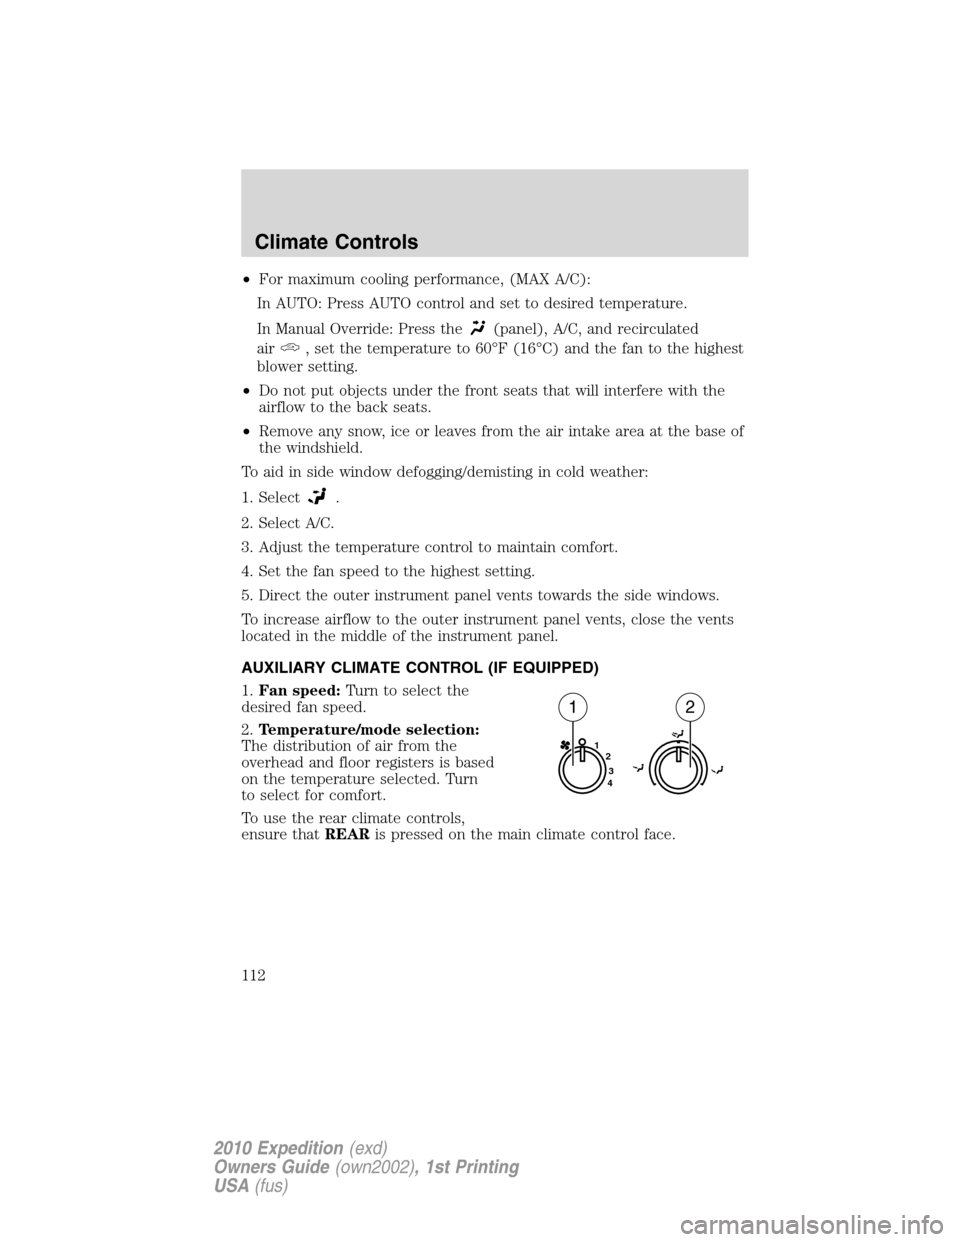
AUXILIARY CLIMATE CONTROL (IF EQUIPPED)
1.Fan speed:Turn to select the
desired fan speed.
2.Temperature/mode selection:
The distribution of air from the
overhead and floor registers is based
on the temperature selected. Turn
to select for comfort.
To use the rear climate controls,
ensure thatREARis pressed on the main climate control face.
1
2
3
4
12
Climate Controls
112
2010 Expedition(exd)
Owners Guide(own2002), 1st Printing
USA(fus)
Page 192 of 420
Climate controlled seats air filter replacement (if equipped)
The climate controlled seat system includes air filters that must be
replaced periodically. Refer to thescheduled maintenance information
for more information.
•There is a filter located under
each front seat.
•The filter can be accessed from the second row seat. Move the front
seats all the way forward and up to ease access.
To remove an air filter:
1. Remove key from ignition.
2. Push up on the outside rigid edge
of the filter and rotate toward the
front of the vehicle once tabs are
released.
3. Remove filter.
Seating and Safety Restraints
192
2010 Expedition(exd)
Owners Guide(own2002), 1st Printing
USA(fus)
Page 208 of 420
Combination lap and shoulder belts
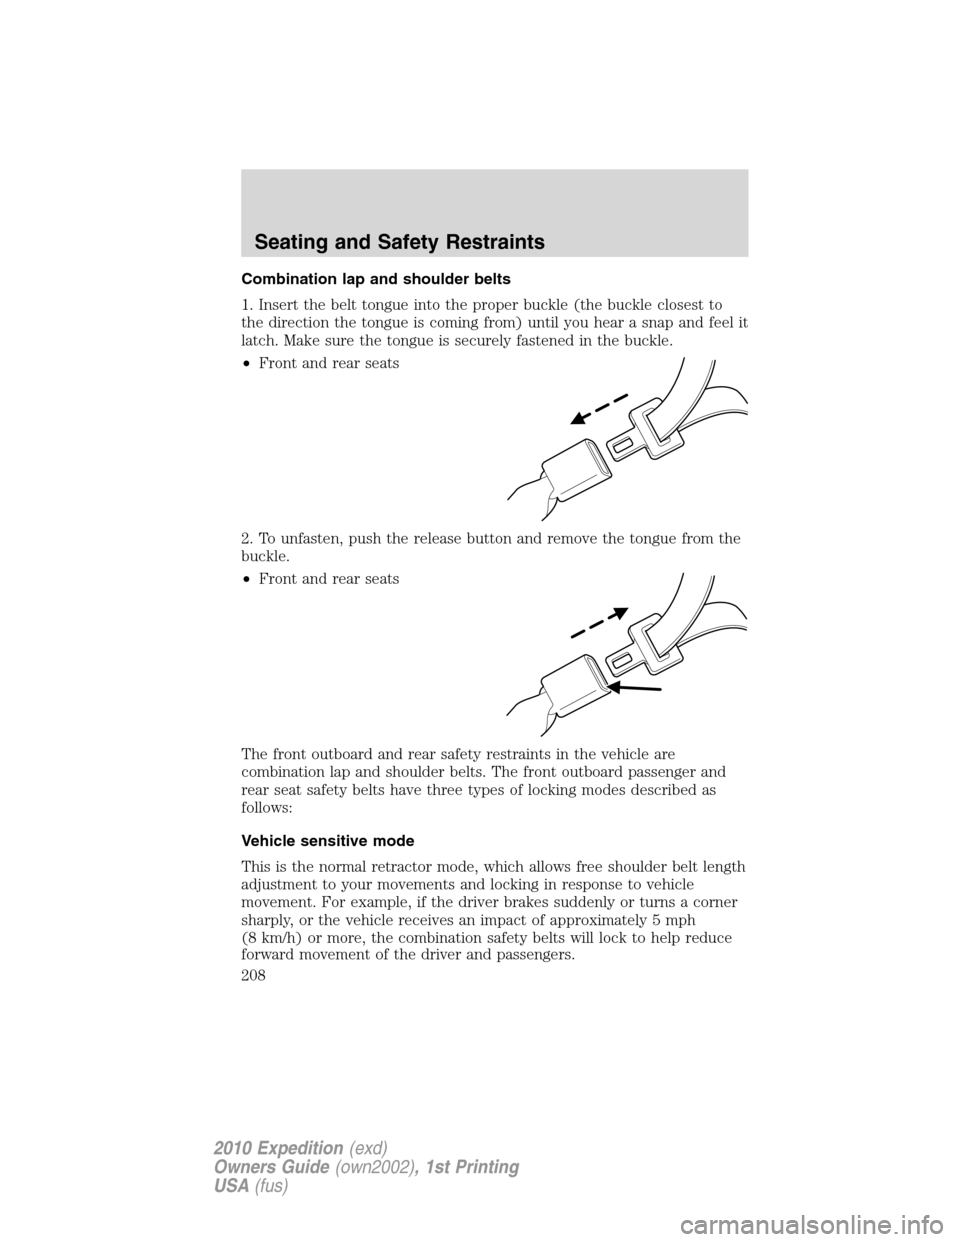
1. Insert the belt tongue into the proper buckle (the buckle closest to
the direction the tongue is coming from) until you hear a snap and feel it
latch. Make sure the tongue is securely fastened in the buckle.
•Front and rear seats
2. To unfasten, push the release button and remove the tongue from the
buckle.
•Front and rear seats
The front outboard and rear safety restraints in the vehicle are
combination lap and shoulder belts. The front outboard passenger and
rear seat safety belts have three types of locking modes described as
follows:
Vehicle sensitive mode
This is the normal retractor mode, which allows free shoulder belt length
adjustment to your movements and locking in response to vehicle
movement. For example, if the driver brakes suddenly or turns a corner
sharply, or the vehicle receives an impact of approximately 5 mph
(8 km/h) or more, the combination safety belts will lock to help reduce
forward movement of the driver and passengers.
Seating and Safety Restraints
208
2010 Expedition(exd)
Owners Guide(own2002), 1st Printing
USA(fus)
Page 209 of 420

Webbing extraction sensitive mode
The webbing sensitive locking mode locks the webbing and prevents
more belt from being pulled out if the belt is pulled out too quickly. The
belt will unlock when you stop pulling on it.
Automatic locking mode
In this mode, the shoulder belt is pre-locked. The belt will still retract to
remove any slack in the shoulder belt.
The automatic locking mode is not available on the driver safety belt.
When to use the automatic locking mode
•Anytimea child safety seat (except a booster) is installed in the
vehicle. Children 12 years old and under should be properly restrained
in the rear seat whenever possible. Refer toSafety restraints for
childrenorSafety seats for childrenlater in this chapter.
How to use the automatic locking mode
1. Buckle the combination lap and
shoulder belt.
2. Grasp the shoulder portion and
pull downward until the entire belt
is pulled out.
3. Allow the belt to retract. As the belt retracts, you will hear a clicking
sound. This indicates the safety belt is now in the automatic locking
mode.
Seating and Safety Restraints
209
2010 Expedition(exd)
Owners Guide(own2002), 1st Printing
USA(fus)
Page 210 of 420
How to disengage the automatic locking mode
Unbuckle the combination lap and shoulder belt and allow it to retract
completely to disengage the automatic locking mode and return to the
vehicle sensitive (emergency) locking mode.
WARNING:After any vehicle collision, the combination lap and
shoulder belt system at all passenger seating positions must be
checked by an authorized dealer to verify that the “automatic locking
retractor” feature for child seats is still functioning properly, in addition
to other checks for proper safety belt system function.
WARNING:BELT AND RETRACTOR ASSEMBLY MUST BE
REPLACED if the safety belt assembly “automatic locking
retractor” feature or any other safety belt function is not operating
properly. In addition, all safety belts should be checked for proper
function. Failure to replace the belt and retractor assembly could
increase the risk of injury in collisions.
Safety belt pretensioner
Your vehicle is equipped with safety belt pretensioners at the driver and
right front passenger seating positions.
The safety belt pretensioner removes some slack from the safety belt
system at the start of a crash. The safety belt pretensioner uses the
same crash sensor system as the front airbags and Safety Canopy�
system. When the safety belt pretensioner deploys, the lap and shoulder
belt are tightened.
When the Safety Canopy�system and/or the front airbags are activated,
the safety belt pretensioners for the driver and right front passenger
seating positions will be activated when the respective seatbelt is
properly buckled.
WARNING:The driver and the right front passenger safety belt
system (including retractors, buckles and height adjusters) must
be replaced if the vehicle is involved in a collision that results in
deployment of front airbags or Safety Canopy�and safety belt
pretensioners.
Refer to theSafety belt maintenancesection in this chapter.
Seating and Safety Restraints
210
2010 Expedition(exd)
Owners Guide(own2002), 1st Printing
USA(fus)
Page 234 of 420
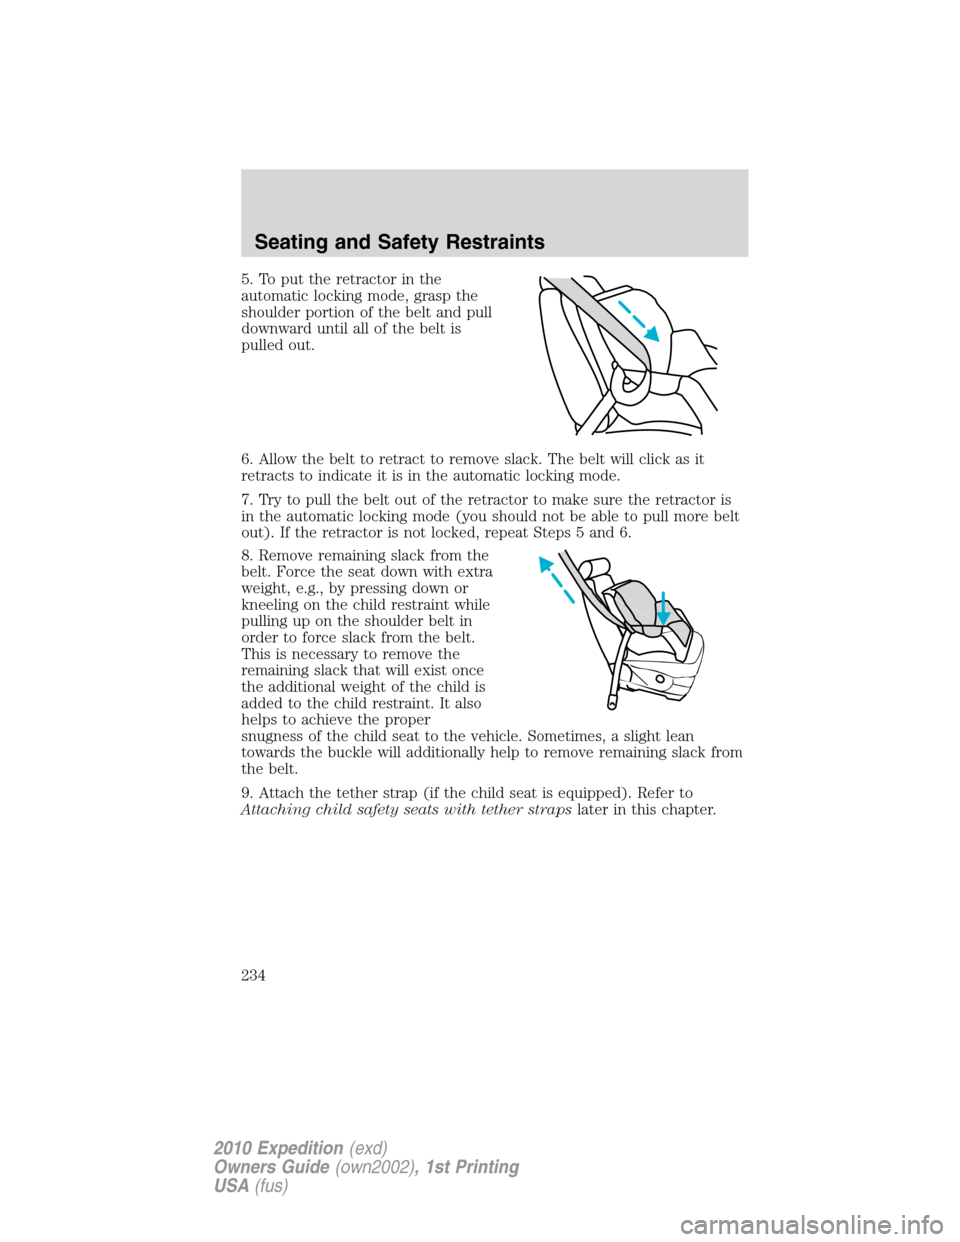
5. To put the retractor in the
automatic locking mode, grasp the
shoulder portion of the belt and pull
downward until all of the belt is
pulled out.
6. Allow the belt to retract to remove slack. The belt will click as it
retracts to indicate it is in the automatic locking mode.
7. Try to pull the belt out of the retractor to make sure the retractor is
in the automatic locking mode (you should not be able to pull more belt
out). If the retractor is not locked, repeat Steps 5 and 6.
8. Remove remaining slack from the
belt. Force the seat down with extra
weight, e.g., by pressing down or
kneeling on the child restraint while
pulling up on the shoulder belt in
order to force slack from the belt.
This is necessary to remove the
remaining slack that will exist once
the additional weight of the child is
added to the child restraint. It also
helps to achieve the proper
snugness of the child seat to the vehicle. Sometimes, a slight lean
towards the buckle will additionally help to remove remaining slack from
the belt.
9. Attach the tether strap (if the child seat is equipped). Refer to
Attaching child safety seats with tether strapslater in this chapter.
Seating and Safety Restraints
234
2010 Expedition(exd)
Owners Guide(own2002), 1st Printing
USA(fus)
Page 243 of 420
Types of booster seats
There are generally two types of belt-positioning booster seats: backless
and high back. Always use booster seats in conjunction with the vehicle
lap/shoulder belt.
•Backless booster seats
If your backless booster seat has a
removable shield, remove the
shield. If a vehicle seating position
has a low seat back or no head
restraint, a backless booster seat
may place your child’s head (as
measured at the tops of the ears)
above the top of the seat. In this
case, move the backless booster
to another seating position with a
higher seat back or head restraint and lap/shoulder belts, or consider
using a high back booster seat.
•High back booster seats
If, with a backless booster seat,
you cannot find a seating position
that adequately supports your
child’s head, a high back booster
seat would be a better choice.
Seating and Safety Restraints
243
2010 Expedition(exd)
Owners Guide(own2002), 1st Printing
USA(fus)