Page 145 of 315
STARTING AND OPERATING
CONTENTS
�Starting Procedures .................... 144
▫ Normal Starting ..................... 144
▫ If Engine Fails To Start ................ 146
▫ After Starting ....................... 147
� Manual Transmission ................... 147
▫ Recommended Shift Speeds ............. 149
▫ Skip Shift Indicator Light ............... 150
� Driving On Slippery Surfaces ............. 151
▫ Acceleration ........................ 151 ▫
Traction ........................... 151
� Driving Through Water ................. 151
▫ Flowing/Rising Water ................. 152
▫ Shallow Standing Water ............... 152
� Power Steering ....................... 154
▫ Power Steering Fluid Check ............. 154
� Parking Brake ........................ 155
� Brake System ........................ 157
▫ Brake Pad Break-In ................... 157
5
Page 157 of 315

•Driving through standing water may cause dam-
age to your vehicle’s drivetrain components. Al-
ways inspect your vehicle’s fluids (i.e., engine oil,
transmission, axle, etc")
CAUTION! (Continued)
•Driving through standing water may cause dam-
age to your vehicle’s drivetrain components. Al-
ways inspect your vehicle’s fluids (i.e., engine oil,
transmission, axle, etc.) for signs of contamination
(i.e., fluid that is milky or foamy in appearance)
after driving through standing water. Do not con-
tinue to operate the vehicle if any fluid appears
contaminated, as this may result in further dam-
age. Such damage is not covered by the New
Vehicle Limited Warranty.
•Getting water inside your vehicle’s engine can
cause it to lock up and stall out, and cause serious
internal damage to the engine. Such damage is not
covered by the New Vehicle Limited Warranty.
WARNING!
•Driving through standing water limits your vehi-
cle’s traction capabilities. Do not exceed 5 mph
(8 km/h) when driving through standing water.
•Driving through standing water limits your vehi-
cle’s braking capabilities, which increases stop-
ping distances. Therefore, after driving through
standing water, drive slowly and lightly press on
the brake pedal several times to dry the brakes.
•Getting water inside your vehicle’s engine can
cause it to lock up and stall out, and leave you
stranded.
•Failure to follow these warnings may result in
injuries that are serious or fatal to you, your
passengers, and others around you.
5
STARTING AND OPERATING 153
Page 159 of 315

checked if a leak is suspected, abnormal noises are
apparent, and/or the system is not functioning as antici-
pated. Coordinate inspection efforts through an autho-
rized dealer.
CAUTION!
Do not use chemical flushes in your power steering
system as the chemicals can damage your power
steering components. Such damage is not covered by
the New Vehicle Limited Warranty.
WARNING!
Fluid level should be checked on a level surface and
with the engine off to prevent injury from moving
parts and to ensure accurate fluid level reading. Do
not overfill. Use only manufacturer’s recommended
power steering fluid.
If necessary, add fluid to restore to the proper indicated
level. With a clean cloth, wipe any spilled fluid from all
surfaces. Refer to “Fluids, Lubricants, and Genuine Parts”
in “Maintaining Your Vehicle” for further information.
PARKING BRAKE
The parking brake should always be applied when the
driver is not in the vehicle.
WARNING!
Before leaving the vehicle, make sure you fully apply
the parking brake and shift the transmission into
REVERSE. Failure to do so may cause the vehicle to
roll and cause damage or injury.
As an added precaution when parking the vehicle, turn
the front wheels toward the curb on a downhill grade
and away from the curb on an uphill grade.
5
STARTING AND OPERATING 155
Page 201 of 315
 and then remove the
yellow cap from the fitting at the end of the hose.
4. Place the TIREFIT kit flat on the ground next to the
deflated tire.
5. Remove the cap from the")
3. Uncoil the Sealant Hose (6) and then remove the
yellow cap from the fitting at the end of the hose.
4. Place the TIREFIT kit flat on the ground next to the
deflated tire.
5. Remove the cap from the valve stem and then screw
the fitting at the end of the Sealant Hose (6) onto the
valve stem.
6. Uncoil the Power Plug (8) and then insert the plug into
the vehicle’s 12 Volt power outlet.
NOTE:Do not remove foreign objects (e.g., screws or
nails) from the tire.
(C) Injecting TIREFIT Sealant into the deflated
tire:
•
Always start the engine before turning ON the TIRE-
FIT kit. NOTE:
Manual transmission vehicles must have the
parking brake engaged and the shifter in NEUTRAL.
•After pressing the Power Button (4), the sealant (white
fluid) will flow from the Sealant Bottle (1) through the
Sealant Hose (6) and into the tire.
NOTE: Sealant may leak out through the puncture in
the tire.
If the sealant (white fluid) does not flow within 0 –
10 seconds through the Sealant Hose (6):
1. Press the Power Button (4) to turn OFF the TIREFIT
kit. Disconnect the Sealant Hose (6) from the valve stem.
Make sure the valve stem is free of debris. Reconnect the
Sealant Hose (6) to the valve stem. Check that the Mode
Select Knob (5) is in the sealant mode position and not air
mode. Press the Power Button (4) to turn ON the TIREFIT
kit.
6
WHAT TO DO IN EMERGENCIES 197
Page 212 of 315

▫Manual Transmission ................. 235
▫ Hydraulic Clutch .................... 236
▫ Rear Axle .......................... 237
▫ Appearance Care And Protection From
Corrosion .......................... 237
▫ Aero Group — If Equipped ............. 241
� Fuses .............................. 244
▫ Power Distribution Center .............. 244
▫ Mini-Power Distribution Center .......... 247
� Vehicle Storage ....................... 247
� Replacement Bulbs .................... 250
� Bulb Replacement ..................... 251
▫
Auxiliary High Beam Headlamp, Front Park/
Turn Signal Lamp, Front Side Marker Lamp
. . 251 ▫
High Intensity
Discharge Headlamps (HID) ............ 252
▫ Front Fog Lamp ..................... 253
▫ Taillamp, Tail/Stop Lamp, Rear Marker
Lamp ............................. 254
▫ Taillamp, Tail/Stop Lamp, Rear Marker
Lamp (Coupe Models) ................. 255
▫ Backup Lamp, Rear Turn Signal Lamp ..... 256
▫ License Lamp ....................... 259
� Fluid Capacities ...................... 260
� Fluids, Lubricants, And Genuine Parts ....... 261
▫ Engine ............................ 261
▫ Chassis ........................... 262
208 MAINTAINING YOUR VEHICLE
Page 217 of 315

NOTE:Intentional tampering with emissions control
systems may void your warranty and could result in civil
penalties being assessed against you.
WARNING!
You can be badly injured working on or around a
motor vehicle. Only do service work for which you
have the knowledge and the proper equipment. If
you have any doubt about your ability to perform a
service job, take your vehicle to a competent me-
chanic.
MAINTENANCE PROCEDURES
The pages that follow contain the maintenance service
recommendations by the engineers who designed your
vehicle.
Besides those maintenance items specified in the fixed
maintenance schedule, there are other components which
may require servicing or replacement in the future.
CAUTION!
•Failure to properly maintain your vehicle or per-
form repairs and service when necessary could
result in more costly repairs, damage to other
components or negatively impact vehicle perfor-
mance. Immediately have potential malfunctions
examined by an authorized Chrysler Group LLC
dealership or qualified repair center.
•Your vehicle has been built with improved fluids
that protect the performance and durability of
your vehicle and also allow extended maintenance
intervals. Do not use chemical flushes in these
components as the chemicals can damage your
engine, transmission, power steering or air condi-
tioning. Such damage is not covered by the New
Vehicle Limited Warranty. If a flush is needed
because of component malfunction, use only the
specified fluid for the flushing procedure.
7
MAINTAINING YOUR VEHICLE 213
Page 239 of 315

•Do not allow petroleum based fluid to contami-
nate the brake fluid. Brake seal components could
be damaged, causing partial or complete brake
failure. This could result in an")
WARNING! (Continued)
•Do not allow petroleum based fluid to contami-
nate the brake fluid. Brake seal components could
be damaged, causing partial or complete brake
failure. This could result in an accident.
Change Brake Fluid
Brake fluid will tend to absorb moisture from the atmo-
sphere over time. If the fluid becomes contaminated with
water, brake performance will deteriorate. Therefore, the
brake fluid must be changed at the intervals specified in
the “Maintenance Schedule.” Refer to “Maintenance
Schedule” for further information. See your authorized
dealer for service.
Manual Transmission
Transmission Fluid Level Check
Check the fluid in the transmission when performing
other underhood services.Check the fluid level by removing the fill plug located on
the left side of the transmission. The fluid level should be
at the bottom of the fill hole. Add fluid, if necessary, to
maintain the proper level. Refer to “Fluids, Lubricants,
and Genuine Parts” in “Maintaining Your Vehicle” for
further information.
CAUTION!
Using a transmission fluid other than the manufac-
turer’s recommended fluid may cause deterioration
in transmission shift quality and/or damage to the
transmission. Refer to “Fluids, Lubricants, and
Genuine Parts” in “Maintaining Your Vehicle” for
further information.
Change Transmission Fluid
Refer to “Maintenance Schedule” for the proper mainte-
nance intervals. If contaminated with water, change the
fluid immediately. See your authorized dealer for service.
7
MAINTAINING YOUR VEHICLE 235
Page 266 of 315
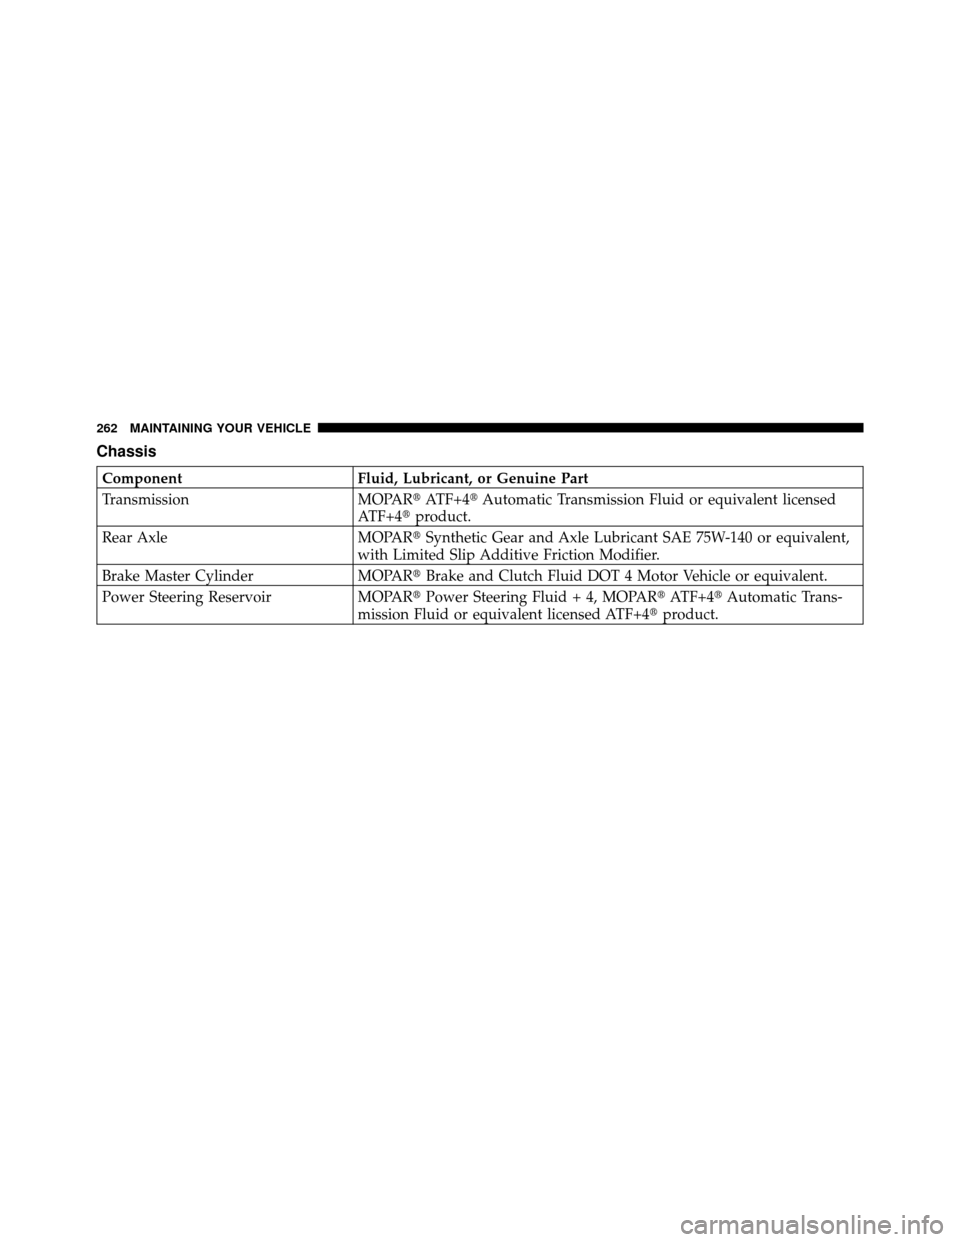
Chassis
ComponentFluid, Lubricant, or Genuine Part
Transmission MOPAR�ATF+4�Automatic Transmission Fluid or equivalent licensed
ATF+4� product.
Rear Axle MOPAR�Synthetic Gear and Axle Lubricant SAE 75W-140 or equivalent,
with Limited Slip Additive Friction Modifier.
Brake Master Cylinder MOPAR�Brake and Clutch Fluid DOT 4 Motor Vehicle or equivalent.
Power Steering Reservoir MOPAR�Power Steering Fluid + 4, MOPAR� ATF+4�Automatic Trans-
mission Fluid or equivalent licensed ATF+4� product.
262 MAINTAINING YOUR VEHICLE