Page 81 of 235

76
Practical information
Mat fitting/removal
When removing the front mat, push the
seats as far back as possible and remove
the fixings.
When refitting, position the mat correctly on
the pins and clip the fixings. Check that the
mat is secured correctly.
Areas for toll cards/car park tickets
The athermic windscreen has two non-
reflective zones located either side of the
base of the interior mirror.
They are intended for affixing toll cards
and/or car park tickets.
SEATING AREA LAYOUT
Depending on the vehicle's equipment, the
various fittings below enhance your seating
area.
12 volt socket
This operates with the ignition on.
Maximum power: 120 W.
To prevent the mat from becoming caught
under the pedals:
- only use mats suited to the fixings already present in the vehicle. It is
imperative that these fixings are used.
- never fit one mat on top of another.
Grab handle Cup holders
Any liquid transported in a cup (mug or
similar), which may spill, presents a risk.
"Take care".
Page 82 of 235
Practical information
EASE OF USE and COMFORT
3
Nets on the back of the outer seats Fittings/storage compartments Load retaining net fixing
Raise the flap to gain access to the load
retaining net fixings. Storage tray and bottle holder (0.5 L)
Coat hooks
Page 83 of 235
Practical information
Load space cover
To install:
- position one end of the load space cover roller in its notch,
- compress the opposite end of the roller and put it in place,
- release it so that it engages,
- unroll the load space cover to the pillars,
- fix the two hooks on the pillars.
Stowing rings
Use the stowing rings on the rear floor to fix
the net, your loads or luggage.
For safety reasons, on sharp braking, it is
recommended that heavy objects are placed
as far forward as possible. To remove:
- pull the load space cover towards you to
disengage it from its fixings,
- reinsert the load space cover in its roller,
- compress it and remove it from its support.
You are advised to immobilise the load
by securing it firmly using the stowing
rings on the floor.
Page 84 of 235

79
Instruments and controls
EASE OF USE and COMFORT
3
Metal suspension
This equipment adopts long movement limiters
which make it possible to guarantee stable
behaviour both when loaded and when empty.
No action on your part is required except to
ensure that maintenance is carried out and that
the authorised loads are complied with. the increasing or lightening of the load on
the vehicle's platform is detected by two
height sensors. When all of the doors are
closed, the sensors trigger the automatic
compensation and determine the optimum
height of the sill for the vehicle's driving
conditions.
Deactivation of the automatic correction
The control which permits deactivation of the
automatic control is located on the right-
hand side, at the rear of the vehicle.
Two types of suspension are offered.
You must deactivate the automatic
correction manually in the following
situations:
- when working underneath the vehicle,
- when changing a wheel,
- when the vehicle is being transported by lorry, train, ferry, boat, ...
Rear suspension with pneumatic compensation
If fitted on your vehicle, this type of
suspension regulates the variations in the
height of the rear platform of your vehicle
irrespective of the weight of the load, within
the limit of the authorised values. On board, Two functions
1. Automatic correction
2. Manual correction
1 - Automatic correction of the height of the rear sill
The pneumatic suspension automatically
regulates the variations in the height of the
rear platform of your vehicle.
The automatic compensation is temporarily
inactive:
- if a door/the tailgate is open,
- when braking or when stopped at a red
light (brake pedal pressed). With the vehicle stationary:
- press and hold,
- release the control.
Return to automatic correction With the vehicle stationary:
- press and hold,
- release the control.
According to the configurations, a bleep may
be heard during these operations.
A red warning light on your
i n s t r u m e n t p a n e l fl a s h e s i f t h e
height is not at its optimum level and
requires correction, drive slowly until
this warning light is switched off.
Return to automatic correction is confirmed
by the diode which is switched off.
Deactivation is confirmed by the diode
which is lit. It remains lit for approximately
30 seconds.
Page 85 of 235

80
Instruments and controls
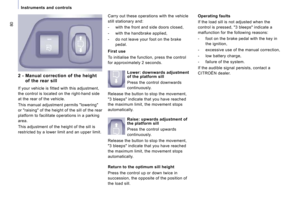
2 - Manual correction of the height of the rear sill
If your vehicle is fitted with this adjustment,
the control is located on the right-hand side
at the rear of the vehicle.
This manual adjustment permits "lowering"
or "raising" of the height of the sill of the rear
platform to facilitate operations in a parking
area.
This adjustment of the height of the sill is
restricted by a lower limit and an upper limit. First use
To initialise the function, press the control
for approximately 2 seconds.
Operating faults
If the load sill is not adjusted when the
control is pressed, "3 bleeps" indicate a
malfunction for the following reasons:
- foot on the brake pedal with the key in
the ignition,
- excessive use of the manual correction,
- low battery charge,
- failure of the system.
If the audible signal persists, contact a
CITROËN dealer.
Carry out these operations with the vehicle
still stationary and:
- with the front and side doors closed,
- with the handbrake applied,
- do not leave your foot on the brake
pedal.
Lower: downwards adjustment
of the platform sill
Press the control downwards
continuously.
Release the button to stop the movement,
"3 bleeps" indicate that you have reached
the maximum limit, the movement stops
automatically.
Raise: upwards adjustment of
the platform sill
Press the control upwards
continuously.
Release the button to stop the movement,
"3 bleeps" indicate that you have reached
the maximum limit, the movement stops
automatically.
Return to the optimum sill height
Press the control up or down twice in
succession, the opposite of the position of
the load sill.
Page 86 of 235

81
Instruments and controls
EASE OF USE and COMFORT
3
Deactivation of the manual correction Good practice
When stationary and with the ignition key
removed, excessive use of the system
consumes battery charge. Parking for a long duration
Avoid parking for a long duration on ground
which could present a potential obstacle as
your vehicle could lower.
Following a long period out of use, the
height of the platform may change due to the
automatic compensation on unlocking or on
opening one of your vehicle's doors.
With the vehicle stationary:
- press and hold,
- release the control.
Deactivation is confirmed by
the diode which is lit. It remains lit for
approximately 30 seconds.
Return to manual correction
You must deactivate the manual
correction in the following situations:
- when working underneath the vehicle,
- when changing a wheel,
- when the vehicle is being transported by lorry, train, ferry, boat, ... Driving with the height of the rear platform:
- too low, risks damaging the technical
components underneath the vehicle,
- too high, risks unstable driving.
If you start and the warning light flashes,
to switch it off:
- correct the position of the manual control which is still at the lower or
upper limit,
- or drive slowly at above 6 mph (10 km/h), until the compensation returns to
automatic mode. Warning light
Refer to the "Instruments and controls"
section of chapter 2.
With the vehicle stationary:
- press and hold,
- release the control.
Return to manual correction is
confirmed by the diode which is switched off.
According to the configurations, a bleep may
be heard during these operations.
Page 87 of 235

82
Mirrors and windows
MIRRORS
If fitted on your vehicle, the mirror is
supplemented by a 2nd lower mirror. This
mirror is spherical to broaden the field of
side vision. Objects observed are, in reality,
closer than they appear. Therefore, take this
into account in order to judge the distance
correctly.
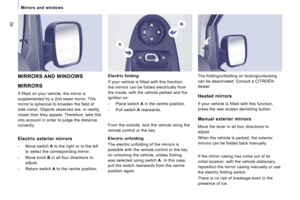
MIRRORS AND WINDOWS Electric folding
If your vehicle is fitted with this function,
the mirrors can be folded electrically from
the inside, with the vehicle parked and the
ignition on:
- Place switch A in the centre position.
- Pull switch A rearwards.
Heated mirrors
If your vehicle is fitted with this function,
press the rear screen demisting button.
The folding/unfolding on locking/unlocking
can be deactivated. Consult a CITROËN
dealer.
Electric exterior mirrors
- Move switch
A to the right or to the left
to select the corresponding mirror.
- Move knob B in all four directions to
adjust.
- Return switch A to the centre position. From the outside, lock the vehicle using the
remote control or the key.
Electric unfolding
The electric unfolding of the mirrors is
possible with the remote control or the key
on unlocking the vehicle, unless folding
was selected using switch
A . In this case,
pull the switch rearwards from the centre
position again.
Manual exterior mirrors
Move the lever in all four directions to
adjust.
When the vehicle is parked, the exterior
mirrors can be folded back manually.
If the mirror casing has come out of its
initial location, with the vehicle stationary,
reposition the mirror casing manually or use
the electric folding switch.
There is no risk of breakage even in the
presence of ice.
Page 88 of 235
Mirrors and windows
EASE OF USE and COMFORT
3
Manual interior mirror
The interior mirror has two positions:
- day (normal),
- night (anti-dazzle).
To change from one to the other, push or
pull the lever on the lower edge of the mirror.
MONITORING MIRROR
This mirror, placed on top of the central
mirror, enables the driver or front passenger
to observe all the rear seats.
Fitted on its own ball joint, it's manual
adjustment is simple and provides a view of
the rear interior of the vehicle.
It can also be adjusted for improved visibility
during manoeuvres or when overtaking.
REAR WINDOWS
2nd row side windows
If fitted on your vehicle, the 2nd row side
windows can be opened.
Squeeze the two controls then move the
window sideways. 4 notches are available.
While driving, the window must be closed or
secured on one of the 4 notches.
3rd row rear quarter lights
These are fixed.