Page 25 of 60

• After adjusting the hours, press the right side TUNE/AUDIO control knob and theminutes will begin to blink.
• Adjust the minutes using the right side TUNE/AUDIO control knob, then press the TUNE/AUDIO control knob to save the time change.
• To exit, press any button/knob or wait five seconds.
Station Presets
• Press the SET/RND button once and SET 1 will show in the display. Then select the button (1–6).
• A second station may be added to each push button. Press the SET/RND button twice and SET 2 will show in the display, then select button (1–6)
ELECTRONIC VEHICLE INFORMATION CENTER (EVIC)
• The EVIC features a driver interactive display that is located in the instrumentcluster. For additional information, refer to Programmable Features in this guide.
• Press the EVIC button, located below the left of the speedometer, until one of the following functions is displayed on the EVIC:
• Compass/Temperature/Audio
• Average Fuel Economy
• Distance To Empty (DTE)
• Elapsed Time
• Tire Pressure Monitor (TPM)
• Personal Settings
• Pressing and holding the EVIC button once will clear the function currently being displayed.
• To reset all resettable functions, press and release the EVIC button a second time within three seconds of resetting the currently displayed function. Reset ALL will
be displayed during this three-second window.
UNIVERSAL GARAGE DOOR OPENER
Programming HomeLink®
Begin Programming
• The HomeLink®buttons are located in the
sun visor.
• Erase all channels before you begin training by holding the two outside buttons
for up to 20 seconds until the red indicator
flashes.
23
ELECTRONICS
Page 26 of 60
 from the HomeLink
®buttons
while keeping the")
• Park your vehicle outside of the garage and turn the ignition switch to the ON/RUNposition.
• Place the hand-held transmitter 1 to 3 in (3 to 8 cm) from the HomeLink
®buttons
while keeping the indicator light in view.
• Simultaneously, press and hold both the chosen HomeLink
®button and the
hand-held transmitter button until the HomeLink®indicator flash rate changes
from a slow to a rapidly blinking light, then release both the HomeLink®and the
hand-held transmitter buttons. This may take up to 30 seconds, or longer in rare
cases.
• Press and hold the just-trained HomeLink
®button; if the indicator light stays on
constantly, programming is complete and the garage door should open.
WARNING!
• Your motorized door or gate will open and close while you are training the universal transceiver. Do not train the transceiver if people or pets are in the
path of the door or gate. Only use this transceiver with a garage door opener
that has a “stop and reverse” feature as required by Federal safety standards.
This includes most garage door opener models manufactured after 1982. Do not
use a garage door opener without these safety features. Call toll-free
1–800–355–3515 or, on the Internet, at www.HomeLink.com for safety
information or assistance.
• Vehicle exhaust contains Carbon Monoxide (CO), a dangerous gas. Do not run your vehicle in the garage while training the transceiver. Exhaust gas can cause
serious injury or death.
NOTE: If you are having difficulty training your HomeLink
®and your garage door
opener was manufactured after 1995, you may have a rolling code. Follow the steps
below for Programming A Rolling Code System.
Programming A Rolling Code System
• At the garage door opener motor (in the garage), locate the “learn” or “training” button. This can usually be found where the hanging antenna wire is attached to
the garage door opener motor (it is NOT the button normally used to open and
close the door).
• Firmly press and release the “learn” or “training” button. The name and color of the button may vary by manufacturer. Within 30 seconds, return to the vehicle and
press the programmed HomeLink
®button twice (holding the button for two
seconds each time). If the device is plugged in and activates, programming is
complete.
• If the device does not activate, press the button a third time (for two seconds) to complete the training.
ELECTRONICS
24
Page 27 of 60
Using HomeLink®
• To operate, simply press and release the programmed HomeLink®button and the
trained device will operate.
• Refer to your Owner’s Manual on the DVD for further details. If you have any problems programming HomeLink
®, or require assistance, please call toll-free
1–800–355–3515 or, on the Internet, at www.HomeLink.com.
POWER OUTLET
• There is one 12–volt power outlet located in the center console below the radio. The outlet on the has power available when the ignition switch in the ON or ACC
position.
• A second 12–volt power outlet, if equipped, is located in the right rear cargo area. This outlet has power available when the ignition switch is in the ON or ACC
position.
NOTE: Do not exceed the maximum power of 160–watts (13–amps) at 12–volts. If the
160–watt (13–amp) power rating is exceeded, the fuse protecting the system will need
to be replaced.
25
ELECTRONICS
Page 28 of 60

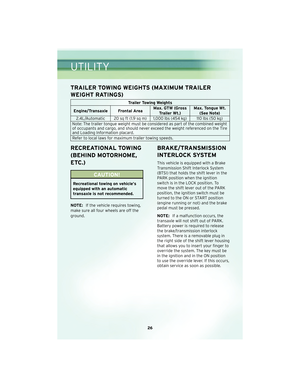
Trailer Towing Weights
Engine/Transaxle Frontal Area Max. GTW (Gross
Trailer Wt.) Max. Tongue Wt.
(See Note)
2.4L/Automatic 20 sq ft (1.9 sq m)")
TRAILER TOWING WEIGHTS (MAXIMUM TRAILER
WEIGHT RATINGS)
Trailer Towing Weights
Engine/Transaxle Frontal Area Max. GTW (Gross
Trailer Wt.) Max. Tongue Wt.
(See Note)
2.4L/Automatic 20 sq ft (1.9 sq m) 1,000 lbs (454 kg) 110 lbs (50 kg)
Note: The trailer tongue weight must be considered as part of the combined weight
of occupants and cargo, and should never exceed the weight referenced on the Tire
and Loading Information placard.
Refer to local laws for maximum trailer towing speeds.
RECREATIONAL TOWING
(BEHIND MOTORHOME,
ETC.)
CAUTION!
Recreational towing on vehicle’s
equipped with an automatic
transaxle is not recommended.
NOTE: If the vehicle requires towing,
make sure all four wheels are off the
ground.
BRAKE/TRANSMISSION
INTERLOCK SYSTEM
This vehicle is equipped with a Brake
Transmission Shift Interlock System
(BTSI) that holds the shift lever in the
PARK position when the ignition
switch is in the LOCK position. To
move the shift lever out of the PARK
position, the ignition switch must be
turned to the ON or START position
(engine running or not) and the brake
pedal must be pressed.
NOTE: If a malfunction occurs, the
transaxle will not shift out of PARK.
Battery power is required to release
the brake/tr ansmission interlock
system. There is a removable plug in
the right side of the shift lever housing
that allows you to insert your finger to
override the system. The key must be
in the ignition and in the ON position
to use the override lever. If this occurs,
obtain service as soon as possible.
UTILITY
26
Page 29 of 60

24 HOUR TOWING ASSISTANCE - U.S. ONLY
• Dial toll-free 1-800-521-2779.
• Provide your name, vehicle identification number and license plate number.
• Provide your location, including telephone number, from which you are calling.
• Briefly describe the nature of the problem and answer a few simple questions.
• You will be given the name of the service provider and an estimated time of arrival.If you feel you are in an “unsafe situation”, please let us know. With your consent,
we will contact local police or safety authorities.
INSTRUMENT CLUSTER WARNING LIGHTS
- Traction Control System (TCS) Indicator Light
• If this indicator light flashes during acceleration, apply as little throttle as possible.While driving, ease up on the accelerator. Adapt your speed and driving to the
prevailing road conditions. To improve the vehicle’s traction when starting off in
deep snow, sand or gravel, it may be desirable to switch the TCS system off.
- Tire Pressure Monitoring System (TPMS) Light
• A Tire Pressure Monitoring Light and a “low tire” message will display in yourinstrument cluster along with an audible chime if one or more of your vehicle’s four
road tires are significantly under-inflated.
• Check the inflation pressure of each tire and inflate to the recommended pressure for your vehicle. The tire pressures recommended for your vehicle are found on the
“Tire and Loading Information” label located on the driver’s side door opening. The
TPMS light should not be used as a tire pressure gauge when adjusting your tire
pressure.
• It is recommended that you check the tire pressure in the morning when tires are cool; inflate each tire to the recommended pressure for your vehicle. The light will
turn off after your vehicle’s tire pressures are properly inflated and the pressure
has been recognized. The vehicle may need to be driven for up to 20 minutes
above 15 mph (25 km/h) before the light will turn off.
• Temperature changes can affect tire pressure, causing the TPMS light to turn on. Tire pressures will also increase as the vehicle is driven – this is normal and you
should not adjust for this increased pressure.
• Driving on under-inflated tires reduces your vehicle’s fuel efficiency and tire tread life. If a spare tire is in use on the vehicle, the TPMS light may turn on.
- Brake Warning Light
• The Brake Warning light illuminates when there is either a system malfunction orthe parking brake is applied. If the light is on and the parking brake is not applied, it
indicates a possible brake hydraulic malfunction, brake booster problem or an
Anti-Lock Brake System problem.
27
WHAT TO DO IN EMERGENCIES
Page 30 of 60

• We recommend you drive to the nearest Service Center and have the vehicleserviced immediately.
WARNING!
Driving a vehicle with the red brake light on is dangerous. Part of the brake system
may have failed. It will take longer to stop the vehicle. You could have an accident.
Have the vehicle checked immediately.
- Malfunction Indicator Light (MIL)
• Certain conditions, such as a loose or missing gas cap, poor fuel quality, etc., mayilluminate the MIL after engine start. The vehicle should be serviced if the light
stays on through several typical driving cycles. In most situations, the vehicle will
drive normally and not require towing.
• If the MIL flashes when the engine is running, serious conditions may exist that could lead to immediate loss of power or severe catalytic converter damage. We
recommend you do not operate the vehicle. Have the vehicle serviced as soon as
possible if this occurs.
- Charging System Light
• This light shows the status of the electrical charging system. If the charging systemlight remains on, it means that the vehicle is experiencing a problem with the
charging system.
• We recommend you do not continue driving if the charging system light is on. Have the vehicle serviced immediately.
- Oil Pressure Warning Light
• This light indicates low engine oil pressure. If the light turns on while driving, stopthe vehicle and shut off the engine as soon as possible. A chime will sound for four
minutes when this light turns on.
• We recommend you do not operate the vehicle or engine damage will occur. Have the vehicle serviced immediately.
- Anti-Lock Brake (ABS) Light
• This light monitors the Anti-Lock Brake System (ABS).
• If the light is not on during starting, stays on, or turns on while driving, werecommend you drive to the nearest Service Center and have the system serviced
as soon as possible.
- Airbag Warning Light
• If the light is not on during starting, stays on, or turns on while driving, werecommend you drive to the nearest Service Center and have the system serviced
as soon as possible.
WHAT TO DO IN EMERGENCIES
28
Page 31 of 60
 appears, tighten the gas cap until a“clicking” sound is heard.
• If the message continues to appear for more than")
Fuel Cap/Loose Gas Cap Message
• If a “gas cap” message (shown as gASCAP) appears, tighten the gas cap until a“clicking” sound is heard.
• If the message continues to appear for more than three days after tightening the gas cap, see your authorized dealer.
IF YOUR ENGINE OVERHEATS
• In any of the following situations, you can reduce the potential for overheating bytaking the appropriate action.
• On the highways — slow down.
• In city traffic — while stopped, shift transmission into NEUTRAL, but do not increase engine idle speed.
NOTE: There are steps that you can take to slow down an impending overheat
condition:
• If your air conditioner (A/C) is on, turn it off. The A/C system adds heat to the engine cooling system and turning the A/C off can help remove this heat.
• You can also turn the Temperature Control to maximum heat, the Mode Control to floor and the Fan Control to high. This allows the heater core to act as a
supplement to the radiator and aids in removing heat from the engine cooling
system.
• If the temperature reading does not return to normal, turn the engine off immediately.
• We recommend that you do not operate the vehicle or engine damage will occur. Have the vehicle serviced immediately.
CAUTION!
Driving with a hot cooling system could damage your vehicle. If the temperature
gauge reads HOT (H), pull over and stop the vehicle. Idle the vehicle with the air
conditioner turned off until the pointer drops back into the normal range. If the
pointer remains on HOT (H), and you hear continuous chimes, turn the engine off
immediately and call for service.
WARNING!
You or others can be badly burned by hot engine coolant (antifreeze) or steam
from your radiator. If you see or hear steam coming from under the hood, do not
open the hood until the radiator has had time to cool. Never try to open a cooling
system pressure cap when the radiator or coolant bottle is hot.
29
WHAT TO DO IN EMERGENCIES
Page 32 of 60

JACKING AND TIRE CHANGING
WARNING!
• Being under a jacked-up vehicle is dangerous. The vehicle could slip off the jackand fall on you. You could be crushed. Never put any part of your body under a
vehicle that is on a jack. Never start or run the engine while the vehicle is on a
jack. If you need to get under a raised vehicle, take it to a service center where it
can be raised on a lift.
• The jack is designed to use as a tool for changing tires only. The jack should not be used to lift the vehicle for service purposes. The vehicle should be jacked on a
firm, level surface only. Avoid ice or slippery areas.
Jack Location
• The jack and jack-handle are stowed behind the right rear side trim panel in the
cargo area.
• Do not attempt to raise this vehicle using a bumper jack.
Spare Tire Stowage
• The compact spare tire is stowed under the rear of the vehicle by means of ahook/basket mechanism. To remove or stow the compact spare, use the jack handle
to rotate the “spare tire drive” nut. The nut is located under the rear scuff plate at
the right rear of the cargo area, just inside the liftgate opening.
WHAT TO DO IN EMERGENCIES
30