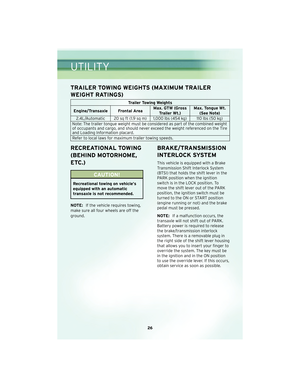
Page 17 of 60

TURN SIGNAL/LIGHTS LEVER
Headlights/Parking Lights
• Rotate the end of the lever to the first detent for parking lightsand to the
second detent for headlights
.
Instrument Panel Dimmer
• Rotate the center portion of the lever to the extreme bottom position to fully dim the instrument panel lights and prevent the interior lights from illuminating when a
door is opened.
• Rotate the center portion of the lever up to increase the brightness of the instrument panel lights when the parking lights or headlights are on.
• Rotate the center portion of the lever upward to the next detent position to brighten the odometer and radio controls when the parking lights or headlights are
on.
• Rotate the center portion of the lever upward to the last detent to turn on the interior lighting.
Flash To Pass
• Pull the lever toward you to activate the high beams. The high beams will remain onuntil the lever is released.
High Beam Operation
• Push the lever forward to activate the high beams.
NOTE: For safe driving, turn off high beams when oncoming traffic is present to
prevent headlight glare and as a courtesy to other motorists.
Fog Lights
• Turn on the parking lights or low beam headlights and pull out the end of the lever.
15
OPERATING YOUR VEHICLE
Page 18 of 60
Turn Signals/Lane Change Assist
• Tap the lever up or down once and the turn signal (right or left) will flash threetimes and automatically turn off.
WIPER/WASHER LEVER
Front Wipers
Intermittent, Low And High Operation
• Rotate the end of the lever to the first detent position for one of five intermittentsettings, the second detent for low wiper operation and the third detent for high
wiper operation.
Washer Operation
• Pull the lever toward you and hold for as long as spray is desired.
Mist
• Pull down on the lever and release when a single wipe is desired.
Rear Wiper
Wiper Operation
• Rotate the center portion of the lever forward to the first detent for rear wiperoperation.
Washer Operation
• Rotate the center portion of the lever past the first detent to activate the rearwasher.
OPERATING YOUR VEHICLE
16
Page 19 of 60

SPEED CONTROL LEVER
Cruise ON/OFF
• Push the ON/OFF button to activate theSpeed Control.
• CRUISE will appear on the instrument cluster to indicate the Speed Control is on.
• Push the ON/OFF button a second time to turn the system off.
WARNING!
Leaving the Electronic Speed Control system on when not in use is dangerous. You
could accidentally set the system or cause it to go faster than you want. You could
lose control and have an accident. Always leave the Electronic Speed Control
system off when you are not using it.
Set
• With Speed Control on, push down and release the lever to set a desired speed.
WARNING!
Electronic Speed Control can be dangerous where the system cannot maintain a
constant speed. Your vehicle could go too fast for the conditions, and you could
lose control. An accident could be the result. Do not use Electronic Speed Control
in heavy traffic or on roads that are winding, icy, snow-covered or slippery.
Accel/Decel
• Push and hold the lever up to accelerate or down to decelerate the vehicle; releasethe lever to save the new set speed.
• Once a speed is set, tapping the lever up or down will increase or decrease the set speed approximately 1 mph (2 km/h).
Cancel
• Pull the lever toward you or apply the brakes to cancel the set speed and maintainthe set speed in memory.
• Push the ON/OFF button to turn the system off and erase the set speed memory.
Resume
• To resume a previously selected speed in memory, push the lever up and release.
17
OPERATING YOUR VEHICLE
Page 20 of 60
POWER WINDOWS
• The front controls for all power windows are located on the instrument panel.
• Press the window lock switch, located between the window switches, down todisable the rear window switches.
• Both front windows have an Auto Down feature. Push the switch down past the detent and immediately release to fully lower the window.
• The rear controls are located on the back of the center console.
• Push the switch down to lower to a desired setting.
• Push the switch up to raise to a desired setting.
SLIDING CENTER ARMREST
• The Sliding Center Armr est, located on the
center console, provides two unique
storage compartments. The armrest is also
able to slide forward and rearward.
• Slide the Center Armrest forward or rearward to the desired position.
• Push the upper or lower buttons on the front of the Sliding Center Armrest to
access the storage compartment.
OPERATING YOUR VEHICLE
18
Page 21 of 60
TUMBLING REAR SEAT/SEAT REMOVAL
• The rear seats can be removed to increasestorage capacity.
• Push and hold the folding rear seat button to fold the rear seatback down (toward the
front of the vehicle).
• Pull the release strap located on the outboard side of the seat. Lift up the seat
and tumble the seat forward.
• Attach the tether, located at the base of the seat cushion, onto the hook bar on the
center trim panel to hold the seat in place.
• To remove the seat, lift up on the release levers located at the base of the rear seat.
• Using the handles located at the top of the tumbled seat, lift and remove the seat
through the rear of the vehicle.
19
OPERATING YOUR VEHICLE
Page 22 of 60

CLIMATE CONTROLS
Air Recirculation
• For maximum cooling, rotate the temperature control to the MAX A/C position,then push the A/C and recirculation buttons.
• For window defogging, turn the recirculation button off.
• Recirculation is not allowe d in defrost, floor, defrost/f loor (mix) modes.
POWER SUNROOF
• The power sunroof switch is located on the overhead console.
WARNING!
• Never leave children in a vehicle with the key in the ignition switch. Occupants,
particularly unattended children, can become entrapped by the power sunroof
while operating the power sunroof switch. Such entrapment may result in
serious injury or death.
• In an accident, there is a greater risk of being thrown from a vehicle with an open sunroof. You could also be seriously injured or killed. Always fasten your
seat belt properly and make sure all passengers are properly secured too.
• Do not allow small children to operate the sunroof. Never allow your fingers, other body parts, or any object to project through the sunroof opening. Injury
may result.
Opening Sunroof
Express
• Press the switch rearward and release. The sunroof will fully open and stop
automatically.
OPERATING YOUR VEHICLE
20
Page 23 of 60

Closing Sunroof
Express
• Press the switch forward and release. The sunroof will close automatically from anyposition.
Manual Open/Close
• Press and hold the switch rearward to open or forward to close the sunroof. Anyrelease of the switch will stop the movement, and the sunroof will remain in a
partially open or cl osed position until the swit ch is pressedagain.
Venting Sunroof
• Press and release the “VENT“ button, and the sunroof will open to the vent
position. This is called “Express Vent” and will occur regardless of sunroof position.
During Express Vent operation, any movement of the switch will stop the sunroof.
Pinch Protection Feature
• This feature will detect an obstruction in the opening of the sunroof during ExpressClose operation. If an obstruction in the path of the sunroof is detected, the
sunroof will automatically return to the open position.
NOTE: Pinch protection is disabled while the s witch ispressed and held during
manual opening and closing of the sunroof.
WIND BUFFETING
• Wind buffeting can be described as a helicopter-type percussion sound. If buffeting occurs with the rear windows open, adjust the front and rear windows together.
• If buffeting occurs with the sunroof open, adjust the sunroof opening, or adjust any window. This will minimize buffeting.
21
OPERATING YOUR VEHICLE
Page 24 of 60
NON-TOUCH-SCREEN RADIO
Sales Code REF
• The radio sales code is located on the lower right side of the radio faceplate.
Seek Up/Down Button
• Press and release to search for and stop at the next listenable station in AM/FMmode.
• Press the right side of the button to seek up and the left side of the button to seek down.
• Holding the button will bypass stations without stopping until you release it.
Setting Tone, Balance And Fade
• Push the Tune control knob and BASS, MID, Treble, Balance and Fade will display. Rotate the TUNE/AUDIO control knob to select the desired setting.
Auxiliary Mode
• The auxiliary (AUX) jack allows a portable device, such as an MP3 player or acassette player, to be plugged into the radio and utilize the vehicle’s audio system
and play through the vehicle speakers.
Clock Setting
• Press and hold the TIME button until the hours blink.
• Adjust the hours by turning the right side TUNE/AUDIO control knob.
ELECTRONICS
22


 will flash threetimes and automatically turn off.
WIPER/WASHER LEVER
Front Wipers
Intermittent, Lo")


