Page 382 of 626
Approaching a Hill
When you approach a hill, decide if it is too steep to
climb, descend, or cross. Steepness can be hard to
judge. On a very small hill, for example, there may be a
smooth, constant incline with only a small change in
elevation where you can easily see all the way to the
top. On a large hill, the incline may get steeper as you
near the top, but you might not see this because the
crest of the hill is hidden by bushes, grass, or shrubs.
Consider this as you approach a hill:
.Is there a constant incline, or does the hill get
sharply steeper in places?
.Is there good traction on the hillside, or will the
surface cause tire slipping?
.Is there a straight path up or down the hill so you
will not have to make turning maneuvers?
.Are there obstructions on the hill that can block
your path, such as boulders, trees, logs, or ruts?
.What is beyond the hill? Is there a cliff, an
embankment, a drop-off, a fence? Get out and
walk the hill if you do not know. It is the smart way
to find out.
.Is the hill simply too rough? Steep hills often have
ruts, gullies, troughs, and exposed rocks because
they are more susceptible to the effects of erosion.
Driving Uphill
Once you decide it is safe to drive up the hill:
.Use a low gear and get a firm grip on the steering
wheel.
.Get a smooth start up the hill and try to maintain
speed. Not using more power than needed can
avoid spinning the wheels or sliding.
{WARNING:
Turning or driving across steep hills can be
dangerous. You could lose traction, slide
sideways, and possibly roll over. You could be
seriously injured or killed. When driving up hills,
always try to go straight up.
.Try to drive straight up the hill if at all possible.
If the path twists and turns, you might want to find
another route.
.Ease up on the speed as you approach the top of
the hill.
.Attach a flag to the vehicle to be more visible to
approaching traffic on trails or hills.
5-16
Page 383 of 626
.Sound the horn as you approach the top of the hill
to let opposing traffic know you are there.
.Use headlamps even during the day to make the
vehicle more visible to oncoming traffic.
{WARNING:
Driving to the top (crest) of a hill at full speed can
cause an accident. There could be a drop-off,
embankment, cliff, or even another vehicle. You
could be seriously injured or killed. As you near
the top of a hill, slow down and stay alert.
If the vehicle stalls, or is about to stall, and you cannot
make it up the hill:
.Push the brake pedal to stop the vehicle and keep
it from rolling backwards and apply the parking
brake.
.If the engine is still running, shift the transmission
to R (Reverse), release the parking brake, and
slowly back down the hill in R (Reverse).
.If the engine has stopped running, you need to
restart it. With the brake pedal pressed and the
parking brake still applied, shift the transmission to
P (Park) and restart the engine. Then, shift to
R (Reverse), release the parking brake, and slowly
back down the hill as straight as possible in
R (Reverse).
.While backing down the hill, put your left hand on
the steering wheel at the 12 o'clock position so you
can tell if the wheels are straight and can
maneuver as you back down. It is best to back
down the hill with the wheels straight rather than in
the left or right direction. Turning the wheel too far
to the left or right will increase the possibility of a
rollover.
Things not to do if the vehicle stalls, or is about to stall,
when going up a hill:
.Never attempt to prevent a stall by shifting into
N (Neutral) to rev-up the engine and regain forward
momentum. This will not work. The vehicle can roll
backward very quickly and could go out of control.
.Never try to turn around if about to stall when
going up a hill. If the hill is steep enough to stall
the vehicle, it is steep enough to cause it to roll
over. If you cannot make it up the hill, back straight
down the hill.
5-17
Page 391 of 626
Winter Driving
Driving on Snow or Ice
Drive carefully when there is snow or ice between the
tires and the road, creating less traction or grip. Wet ice
can occur at about 0°C (32°F) when freezing rain
begins to fall, resulting in even less traction. Avoid
driving on wet ice or in freezing rain until roads can be
treated with salt or sand.
Drive with caution, whatever the condition. Accelerate
gently so traction is not lost. Accelerating too quickly
causes the wheels to spin and makes the surface under
the tires slick, so there is even less traction.
Try not to break the fragile traction. If you accelerate too
fast, the drive wheels will spin and polish the surface
under the tires even more.The
StabiliTrak
®Systemon page 5‑6improves the
ability to accelerate on slippery roads, but slow down
and adjust your driving to the road conditions. When
driving through deep snow, turn off the traction control
part of the StabiliTrak
®System to help maintain vehicle
motion at lower speeds.
The Antilock Brake System (ABS)
on page 5‑4improves vehicle stability during hard stops on slippery
roads, but apply the brakes sooner than when on dry
pavement.
Allow greater following distance on any slippery road
and watch for slippery spots. Icy patches can occur on
otherwise clear roads in shaded areas. The surface of a
curve or an overpass can remain icy when the
surrounding roads are clear. Avoid sudden steering
maneuvers and braking while on ice.
Turn off cruise control, if equipped, on slippery surfaces.
5-25
Page 392 of 626
Blizzard Conditions
Being stuck in snow can be in a serious situation. Stay
with the vehicle unless there is help nearby. If possible,
use theRoadside Assistance Program
on page 8‑7.
To get help and keep everyone in the vehicle safe:
.Turn on the Hazard Warning Flasherson
page 4‑3.
.Tie a red cloth to an outside mirror.
{WARNING:
Snow can trap engine exhaust under the vehicle.
This may cause exhaust gases to get inside.
Engine exhaust contains carbon monoxide (CO)
which cannot be seen or smelled. It can cause
unconsciousness and even death.
If the vehicle is stuck in the snow:
.Clear away snow from around the base of
your vehicle, especially any that is blocking
the exhaust pipe.
.Check again from time to time to be sure
snow does not collect there.
(Continued)
WARNING: (Continued)
.Open a window about 5 cm (two inches) on
the side of the vehicle that is away from the
wind to bring in fresh air.
.Fully open the air outlets on or under the
instrument panel.
.Adjust the Climate Control system to a setting
that circulates the air inside the vehicle and
set the fan speed to the highest setting. See
Climate Control System in the Index.
For more information about carbon monoxide, see
Engine Exhaust on page 3‑54.
Snow can trap exhaust gases under your vehicle.
This can cause deadly CO (carbon monoxide) gas
to get inside. CO could overcome you and kill you.
You cannot see it or smell it, so you might not
know it is in your vehicle. Clear away snow from
around the base of your vehicle, especially any
that is blocking the exhaust.
Run the engine for short periods only as needed to
keep warm, but be careful.
5-26
Page 396 of 626
Tire and Loading Information Label
Label Example
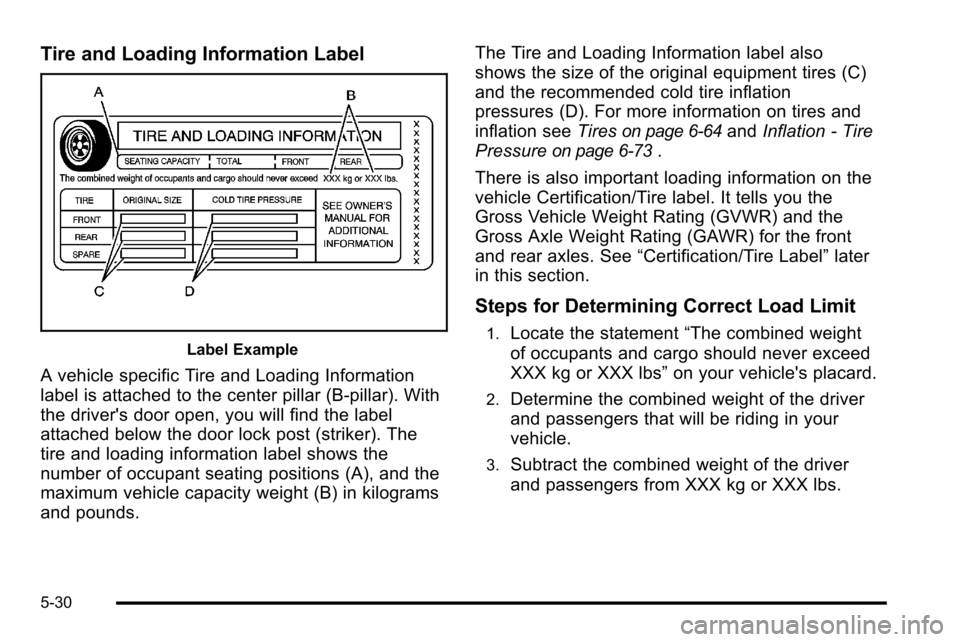
A vehicle specific Tire and Loading Information
label is attached to the center pillar (B-pillar). With
the driver's door open, you will find the label
attached below the door lock post (striker). The
tire and loading information label shows the
number of occupant seating positions (A), and the
maximum vehicle capacity weight (B) in kilograms
and pounds.The Tire and Loading Information label also
shows the size of the original equipment tires (C)
and the recommended cold tire inflation
pressures (D). For more information on tires and
inflation see
Tires
on page 6‑64andInflation - Tire
Pressure
on page 6‑73.
There is also important loading information on the
vehicle Certification/Tire label. It tells you the
Gross Vehicle Weight Rating (GVWR) and the
Gross Axle Weight Rating (GAWR) for the front
and rear axles. See “Certification/Tire Label” later
in this section.
Steps for Determining Correct Load Limit
1.Locate the statement “The combined weight
of occupants and cargo should never exceed
XXX kg or XXX lbs” on your vehicle's placard.
2.Determine the combined weight of the driver
and passengers that will be riding in your
vehicle.
3.Subtract the combined weight of the driver
and passengers from XXX kg or XXX lbs.
5-30
Page 412 of 626
2. Turn the engine off and firmly set the parkingbrake.
3. Securely attach the vehicle being towed to the tow vehicle.
{WARNING:
Shifting a four-wheel-drive vehicle's transfer case
into N (Neutral) can cause the vehicle to roll even
if the transmission is in P (Park). The driver or
others could be injured. Make sure the parking
brake is firmly set before the transfer case is
shifted to N (Neutral). 4. Shift the transfer case to N (Neutral). See
“Shifting
into Neutral” underFour-Wheel Drive
on
page 3‑36for the proper procedure to select the
Neutral position for the vehicle.
5. Release the parking brake only after the vehicle being towed is firmly attached to the towing
vehicle.
6. Turn the ignition to LOCK/OFF and remove the key —the steering wheel will still turn.
After towing, see “Shifting Out of Neutral” under
Four-Wheel Drive
on page 3‑36for the proper
procedure to take the vehicle out of the Neutral position.
5-46
Page 414 of 626
Four-Wheel-Drive Vehicles
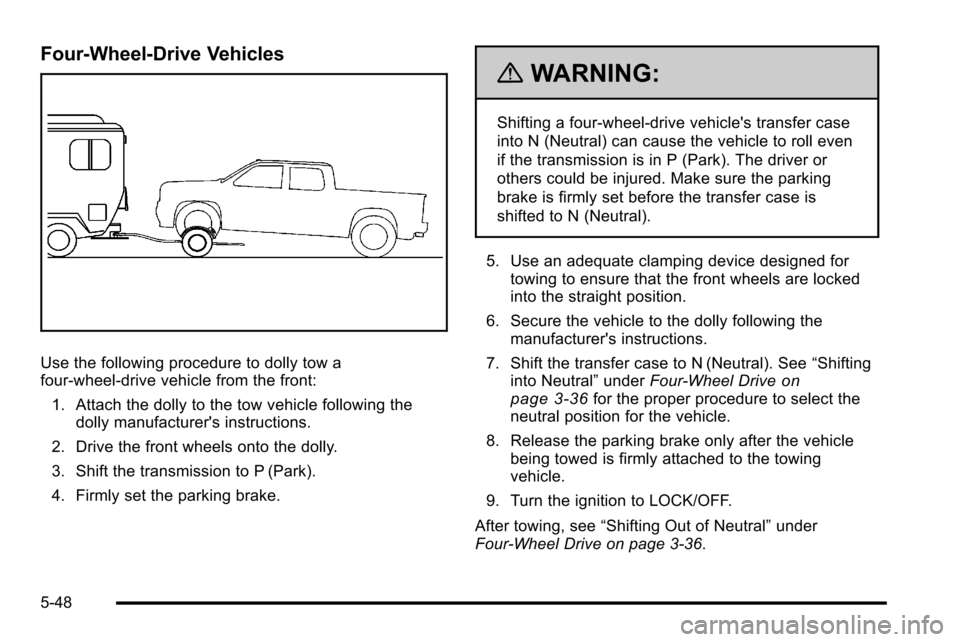
Use the following procedure to dolly tow a
four-wheel-drive vehicle from the front:1. Attach the dolly to the tow vehicle following the dolly manufacturer's instructions.
2. Drive the front wheels onto the dolly.
3. Shift the transmission to P (Park).
4. Firmly set the parking brake.
{WARNING:
Shifting a four-wheel-drive vehicle's transfer case
into N (Neutral) can cause the vehicle to roll even
if the transmission is in P (Park). The driver or
others could be injured. Make sure the parking
brake is firmly set before the transfer case is
shifted to N (Neutral).
5. Use an adequate clamping device designed for towing to ensure that the front wheels are locked
into the straight position.
6. Secure the vehicle to the dolly following the manufacturer's instructions.
7. Shift the transfer case to N (Neutral). See “Shifting
into Neutral” underFour-Wheel Drive
on
page 3‑36for the proper procedure to select the
neutral position for the vehicle.
8. Release the parking brake only after the vehicle being towed is firmly attached to the towing
vehicle.
9. Turn the ignition to LOCK/OFF.
After towing, see “Shifting Out of Neutral” under
Four-Wheel Drive on page 3‑36.
5-48
Page 415 of 626
Rear Towing (Rear Wheels Off the
Ground)
Two‐Wheel‐Drive Vehicles
Use the following procedure to dolly tow a
two-wheel-drive vehicle from the rear:
1. Attach the dolly to the tow vehicle following the dolly manufacturer's instructions.
2. Drive the rear wheels onto the dolly. 3. Firmly set the parking brake. See
Parking Brake
on page 3‑50.
4. Put the transmission in P (Park).
5. Secure the vehicle to the dolly following the manufacturer's instructions.
6. Use an adequate clamping device designed for towing to ensure that the front wheels are locked
into the straight position.
7. Turn the ignition to LOCK/OFF.
5-49