2010 CHEVROLET SILVERADO lock
[x] Cancel search: lockPage 416 of 626
Four‐Wheel‐Drive Vehicles
Use the following procedure to dolly tow a
four-wheel-drive vehicle from the rear:1. Attach the dolly to the tow vehicle following the dolly manufacturer's instructions.
2. Drive the rear wheels onto the dolly.
3. Firmly set the parking brake. See Parking Brake
on page 3‑50.
4. Put the transmission in P (Park).
5. Secure the vehicle to the dolly following the manufacturer's instructions.
6. Use an adequate clamping device designed for towing to ensure that the front wheels are locked
into the straight position.
{WARNING:
Shifting a four-wheel-drive vehicle's transfer case
into N (Neutral) can cause the vehicle to roll even
if the transmission is in P (Park). The driver or
others could be injured. Make sure the parking
brake is firmly set before the transfer case is
shifted to N (Neutral).
7. Shift the transfer case to N (Neutral). See “Shifting
into Neutral” underFour-Wheel Drive
on
page 3‑36for the proper procedure to select the
neutral position for the vehicle.
8. Turn the ignition to LOCK/OFF.
After towing, see “Shifting Out of Neutral” under
Four-Wheel Drive on page 3‑36.
5-50
Page 432 of 626
Integrated Trailer Brake Control System
The vehicle may have an
Integrated Trailer Brake
Control (ITBC) system for
electric trailer brakes.
This symbol is located on the Trailer Brake Control
Panel on vehicles with an Integrated Trailer Brake
Control System. The power output to the trailer brakes
is based on the amount of brake pressure being applied
by the vehicle’ s brake system. This available power
output to the trailer brakes can be adjusted to a wide
range of trailering situations.
The ITBC system is integrated with the vehicle’s brake,
anti‐lock brake and StabiliTrak (if equipped) systems. In
trailering conditions that cause the vehicle’s anti‐lock
brake or StabiliTrak systems to activate, power sent to
the trailer's brakes will be automatically adjusted to
minimize trailer wheel lock-up. This does not imply that
the trailer has the StabiliTrak system. If the vehicle’s brake, anti‐lock brake or StabiliTrak
systems are not functioning properly, the ITBC system
may not be fully functional or may not function at all.
Make sure all of these systems are fully operational to
ensure full functionality of the ITBC system.
The ITBC system is powered through the vehicle's
electrical system. Turning the ignition off will also turn
off the ITBC system. The ITBC system is fully functional
only when the ignition is in ON or in RUN.
The ITBC system can only be used with trailers with
electric brakes.
{WARNING:
Connecting a trailer that is not compatible with the
ITBC system may result in reduced or complete
loss of trailer braking. There may be an increase
in stopping distance or trailer instability which
could result in personal injury or damage to the
vehicle, trailer, or other property. An aftermarket
controller may be available for use with trailers
with surge, air or electric‐over‐hydraulic trailer
brake systems. To determine the type of brakes
on the trailer and the availability of controllers,
check with your trailer manufacturer or dealer.
5-66
Page 435 of 626
The Trailer Output will indicate“- - - - - -“on the Trailer
Brake Display Page whenever the following occur:
.No trailer is connected.
.A trailer without electric brakes is connected (no
DIC message is displayed).
.A trailer with electric brakes has become
disconnected (a CHECK TRAILER WIRING
message will also be displayed on the DIC).
.There is a fault present in the wiring to the electric
trailer brakes (a CHECK TRAILER WIRING
message will also be displayed on the DIC).
.There is a fault in the ITBC system (a SERVICE
TRAILER BRAKE SYSTEM message will also be
displayed in the DIC).
Manual Trailer Brake Apply
The Manual Trailer Brake Apply Lever is located on the
Trailer Brake Control Panel and is used to apply the
trailer ’s electric brakes independent of the vehicle’ s
brakes. This lever is used in the Trailer Gain Adjustment
Procedure to properly adjust the power output to the
trailer brakes. Sliding the lever to the left will apply only
the trailer brakes. The power output to the trailer is
indicated in the Trailer Brake Display Page in the DIC.
If the vehicle’s service brakes are applied while using
the Manual Trailer Brake Apply Lever, the trailer output
power will be the greater of the two. The trailer and the vehicle's brake lamps will come on
when either vehicle braking or manual trailer brakes are
applied.
Trailer Gain Adjustment Procedure
Trailer Gain should be set for a specific trailering
condition and must be adjusted any time vehicle
loading, trailer loading or road surface conditions
change.
Setting the Trailer Gain properly is needed for the best
trailer stopping performance. A trailer that is
over-gained may result in locked trailer brakes. A trailer
that is under-gained may result in not enough trailer
braking. Both of these conditions may result in poorer
stopping and stability of the vehicle and trailer.
Use the following procedure to correctly adjust Trailer
Gain for each towing condition:
1. Make sure the trailer brakes are in proper working condition.
2. Connect a properly loaded trailer to the vehicle and make all necessary mechanical and electrical
connections. See Loading the Vehicle
on
page 5‑29for more information.
5-69
Page 436 of 626
3. After the electrical connection is made to a trailerequipped with electric brakes:
.A TRAILER CONNECTED message will be
briefly displayed on the DIC display.
.The Trailer Brake Display Page will appear on
the DIC showing TRAILER GAIN and TRAILER
OUTPUT.
.In the Trailer Output display on the
DIC, “- - - - - -“ will disappear if there is no
error present. Connecting a trailer without
electric brakes will not clear the six dashed
lines.
4. Adjust the Trailer Gain by using the gain adjustment (+ / -) buttons on the Trailer Brake
Control Panel.
5. Drive the vehicle with the trailer attached on a level road surface representative of the towing condition
and free of traffic at about 20 to 25 mph (32 to
40 km/h) and fully apply the Manual Trailer Brake
Apply lever.
Adjusting trailer gain at speeds lower than 20 to
25 mph (32 to 40 km/h) may result in an incorrect
gain setting. 6. Adjust the Trailer Gain to just below the point of
trailer wheel lock-up, indicated by trailer wheel
squeal or tire smoke when a trailer wheel locks.
Trailer wheel lock-up may not occur if towing a
heavily loaded trailer. In this case, adjust the
Trailer Gain to the highest allowable setting for the
towing condition.
7. Re-adjust Trailer Gain any time vehicle loading, trailer loading or road surface conditions change or
if trailer wheel lock-up is noticed at any time while
towing.
Other ITBC Related DIC Messages
In addition to displaying TRAILER GAIN and TRAILER
OUTPUT through the DIC, trailer connection and ITBC
system status is displayed in the DIC.
TRAILER CONNECTED –This message will be briefly
displayed when a trailer with electric brakes is first
connected to the vehicle. This message will
automatically turn off in about ten seconds. The driver
can also acknowledge this message before it
automatically turns off.
5-70
Page 447 of 626
Section 6 Service and Appearance Care
Aluminum or Chrome-Plated Wheelsand Trim . . . . . . . . . . . . . . . . . . . . . . . . . . . . . . . . . . . . 6-115
Tires . . . . . . . . . . . . . . . . . . . . . . . . . . . . . . . . . . . . . . . . . . 6-116
Sheet Metal Damage . . . . . . . . . . . . . . . . . . . . . . . . . 6-116
Finish Damage . . . . . . . . . . . . . . . . . . . . . . . . . . . . . . . 6-116
Underbody Maintenance . . . . . . . . . . . . . . . . . . . . . . 6-116
Chemical Paint Spotting . . . . . . . . . . . . . . . . . . . . . . 6-116
Vehicle Identification . . . . . . . . . . . . . . . . . . . . . . . . . . . . 6-117
Vehicle Identification Number (VIN) . . . . . . . . . . . 6-117
Service Parts Identification Label . . . . . . . . . . . . . 6-117 Electrical System
. . . . . . . . . . . . . . . . . . . . . . . . . . . . . . . . 6-117
Add-On Electrical Equipment . . . . . . . . . . . . . . . . . 6-117
Windshield Wiper Fuses . . . . . . . . . . . . . . . . . . . . . . 6-118
Power Windows and Other Power Options . . . 6-118
Fuses and Circuit Breakers . . . . . . . . . . . . . . . . . . . 6-118
Instrument Panel Fuse Block . . . . . . . . . . . . . . . . . 6-119
Center Instrument Panel Fuse Block . . . . . . . . . 6-121
Underhood Fuse Block . . . . . . . . . . . . . . . . . . . . . . . 6-122
Capacities and Specifications . . . . . . . . . . . . . . . . . .6-126
6-3
Page 448 of 626
Service
For service and parts needs, visit your dealer. You will
receive genuine GM parts and GM-trained and
supported service people.
Genuine GM parts have one of these marks:
Accessories and Modifications
When non‐dealer/non‐retailer accessories are added to
the vehicle, they can affect vehicle performance and
safety, including such things as airbags, braking,
stability, ride and handling, emissions systems,
aerodynamics, durability, and electronic systems like
antilock brakes, traction control, and stability control.
Some of these accessories could even cause
malfunction or damage not covered by the vehicle
warranty.
Damage to vehicle components resulting from the
installation or use of non‐GM certified parts, including
control module modifications, is not covered under the
terms of the vehicle warranty and may affect remaining
warranty coverage for affected parts.
GM Accessories are designed to complement and
function with other systems on the vehicle. Your GM
dealer can accessorize the vehicle using genuine GM
Accessories. When you go to your GM dealer and ask
for GM Accessories, you will know that GM-trained and
supported service technicians will perform the work
using genuine GM Accessories.
Also, seeAdding Equipment to Your Airbag-Equipped
Vehicle on page 2‑92.
6-4
Page 456 of 626
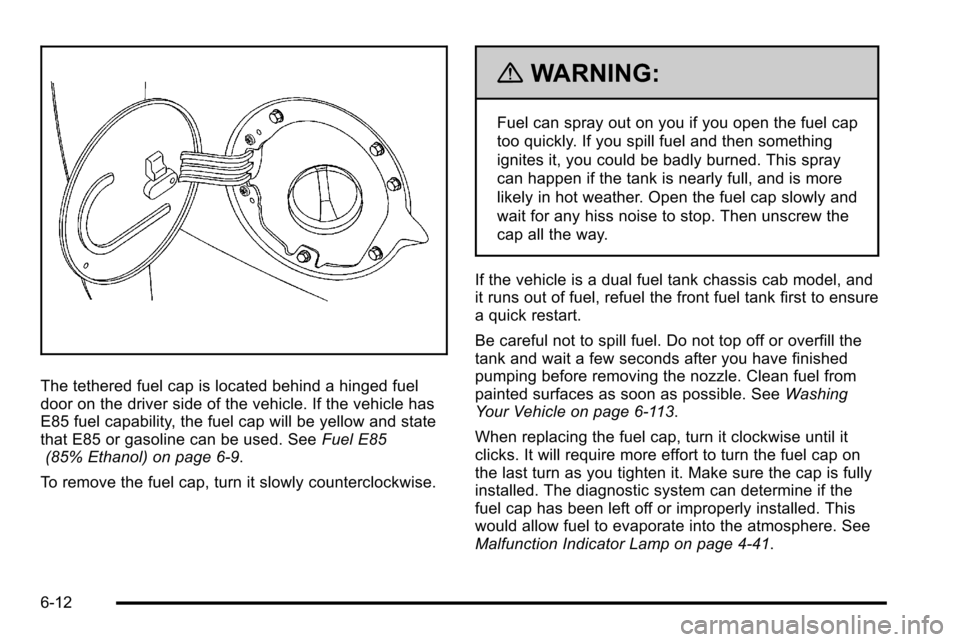
The tethered fuel cap is located behind a hinged fuel
door on the driver side of the vehicle. If the vehicle has
E85 fuel capability, the fuel cap will be yellow and state
that E85 or gasoline can be used. SeeFuel E85
(85% Ethanol) on page 6‑9.
To remove the fuel cap, turn it slowly counterclockwise.
{WARNING:
Fuel can spray out on you if you open the fuel cap
too quickly. If you spill fuel and then something
ignites it, you could be badly burned. This spray
can happen if the tank is nearly full, and is more
likely in hot weather. Open the fuel cap slowly and
wait for any hiss noise to stop. Then unscrew the
cap all the way.
If the vehicle is a dual fuel tank chassis cab model, and
it runs out of fuel, refuel the front fuel tank first to ensure
a quick restart.
Be careful not to spill fuel. Do not top off or overfill the
tank and wait a few seconds after you have finished
pumping before removing the nozzle. Clean fuel from
painted surfaces as soon as possible. See Washing
Your Vehicle on page 6‑113.
When replacing the fuel cap, turn it clockwise until it
clicks. It will require more effort to turn the fuel cap on
the last turn as you tighten it. Make sure the cap is fully
installed. The diagnostic system can determine if the
fuel cap has been left off or improperly installed. This
would allow fuel to evaporate into the atmosphere. See
Malfunction Indicator Lamp on page 4‑41.
6-12
Page 461 of 626

A.Engine Air Cleaner/Filter on page 6‑21.
B. Coolant Surge Tank and Pressure Cap. See Cooling System on page 6‑29.
C. Positive (+) Terminal. See Jump Starting
on
page 6‑44.
D. Battery on page 6‑43.
E. Engine Oil Fill Cap. See “When to Add Engine Oil”
under Engine Oil on page 6‑18.
F. Automatic Transmission Dipstick. See “Checking
the Fluid Level” underAutomatic Transmission
Fluid (4-Speed Transmission)
on page 6‑23or
Automatic Transmission Fluid (6-Speed
Transmission) on page 6‑26.
G. Remote Negative (−) Terminal (Out of View). See Jump Starting on page 6‑44. H. Engine Oil Dipstick (Out of View). See
“Checking
Engine Oil” underEngine Oil on page 6‑18.
I. Engine Cooling Fan. See Cooling System
on
page 6‑29.
J. Power Steering Fluid Reservoir. See Power
Steering Fluid on page 6‑37.
K. Brake Master Cylinder Reservoir. See “Brake
Fluid” under Brakes on page 6‑39.
L. Underhood Fuse Block on page 6‑122.
M. Windshield Washer Fluid Reservoir. See “Adding
Washer Fluid” underWindshield Washer Fluid
on
page 6‑38.
6-17