2010 CHEVROLET IMPALA change wheel
[x] Cancel search: change wheelPage 241 of 432
Antilock Brake System (ABS)The vehicle might have the Antilock Brake System
(ABS), an advanced electronic braking system that helps
prevent a braking skid.
If the vehicle has ABS, this
warning light on the
instrument panel cluster
comes on briefly when the
vehicle is started.
When the engine is started, or when the vehicle begins
to drive away, ABS checks itself. A momentary motor
or clicking noise might be heard while this test is going
on, and it might even be noticed that the brake pedal
moves or pulses a little. This is normal.Let us say the road is wet and you are driving safely.
Suddenly, an animal jumps out in front of you. You slam
on the brakes and continue braking. Here is what
happens with ABS:
A computer senses that the wheels are slowing down.
If one of the wheels is about to stop rolling, the computer
will separately work the brakes at each front wheel
and at both rear wheels.
ABS can change the brake pressure to each wheel, as
required, faster than any driver could. This can help
the driver steer around the obstacle while braking hard.
As the brakes are applied, the computer keeps
receiving updates on wheel speed and controls braking
pressure accordingly.
Remember: ABS does not change the time needed to
get a foot up to the brake pedal or always decrease
stopping distance. If you get too close to the vehicle in
front of you, there will not be enough time to apply
the brakes if that vehicle suddenly slows or stops.
Always leave enough room up ahead to stop, even
with ABS.
5-5
Page 248 of 432

SkiddingIn a skid, a driver can lose control of the vehicle.
Defensive drivers avoid most skids by taking reasonable
care suited to existing conditions, and by not overdriving
those conditions. But skids are always possible.
The three types of skids correspond to the vehicle’s
three control systems. In the braking skid, the wheels
are not rolling. In the steering or cornering skid, too
much speed or steering in a curve causes tires to slip
and lose cornering force. And in the acceleration
skid, too much throttle causes the driving wheels
to spin.
If the vehicle starts to slide, ease your foot off the
accelerator pedal and quickly steer the way you want
the vehicle to go. If you start steering quickly enough,
the vehicle may straighten out. Always be ready for
a second skid if it occurs.
Of course, traction is reduced when water, snow, ice,
gravel, or other material is on the road. For safety, slow
down and adjust your driving to these conditions. It is
important to slow down on slippery surfaces because
stopping distance will be longer and vehicle control more
limited.While driving on a surface with reduced traction, try your
best to avoid sudden steering, acceleration, or braking,
including reducing vehicle speed by shifting to a lower
gear. Any sudden changes could cause the tires to
slide. You may not realize the surface is slippery until
the vehicle is skidding. Learn to recognize warning
clues — such as enough water, ice, or packed snow on
the road to make a mirrored surface — and slow down
when you have any doubt.
If the vehicle has the Antilock Brake System (ABS),
remember: It helps avoid only the braking skid. If
the vehicle does not have ABS, then in a braking skid,
where the wheels are no longer rolling, release
enough pressure on the brakes to get the wheels rolling
again. This restores steering control. Push the brake
pedal down steadily when you have to stop suddenly. As
long as the wheels are rolling, you will have steering
control.
5-12
Page 256 of 432
Rocking Your Vehicle to Get It OutTurn the steering wheel left and right to clear the
area around the front wheels. Turn off any traction
system. Shift back and forth between R (Reverse) and a
forward gear, spinning the wheels as little as possible.
To prevent transmission wear, wait until the wheels stop
spinning before shifting gears. Release the accelerator
pedal while shifting, and press lightly on the accelerator
pedal when the transmission is in gear. Slowly
spinning the wheels in the forward and reverse
directions causes a rocking motion that could free the
vehicle. If that does not get the vehicle out after a
few tries, it might need to be towed out. If the vehicle
does need to be towed out, seeTowing Your Vehicle on
page 5-26.
Loading the VehicleIt is very important to know how much weight your
vehicle can carry. Two labels on your vehicle
show how much weight it may properly carry, the
Tire and Loading Information label and the
Vehicle Certification label.
{
WARNING:
Do not load the vehicle any heavier than the
Gross Vehicle Weight Rating (GVWR), or
either the maximum front or rear Gross Axle
Weight Rating (GAWR). If you do, parts on the
vehicle can break, and it can change the way
your vehicle handles. These could cause you
to lose control and crash. Also, overloading
can shorten the life of the vehicle.
5-20
Page 264 of 432

6. Secure the vehicle to the dolly following the
manufacturer’s instructions.
7. Release the parking brake only after the vehicle
being towed is firmly attached to the towing
vehicle.
8. Turn the ignition to LOCK/OFF and remove the key.Towing a Trailer
{
WARNING:
The driver can lose control when pulling a trailer if
the correct equipment is not used or the vehicle is
not driven properly. For example, if the trailer is
too heavy, the brakes may not work well — or
even at all. The driver and passengers could be
seriously injured. The vehicle may also be
damaged; the resulting repairs would not be
covered by the vehicle warranty. Pull a trailer only
if all the steps in this section have been followed.
Ask your dealer/retailer for advice and information
about towing a trailer with the vehicle.Notice:Pulling a trailer improperly can damage the
vehicle and result in costly repairs not covered
by the vehicle warranty. To pull a trailer correctly,
follow the advice in this section and see your
dealer/retailer for important information about
towing a trailer with the vehicle.
The vehicle can tow a trailer if it is equipped with the
proper trailer towing equipment. To identify the trailering
capacity of the vehicle, read the information in “Weight of
the Trailer” that appears later in this section. Trailering is
different than just driving the vehicle by itself. Trailering
means changes in handling, acceleration, braking,
durability and fuel economy. Successful, safe trailering
takes correct equipment, and it has to be used properly.
The following information has many time-tested,
important trailering tips and safety rules. Many of these
are important for the safety of the driver and the
passengers. So please read this section carefully before
pulling a trailer.
Load-pulling components such as the engine,
transmission, axles, wheel assemblies and tires are
forced to work harder against the drag of the added
weight. The engine is required to operate at relatively
higher speeds and under greater loads, generating extra
heat. The trailer also adds considerably to wind
resistance, increasing the pulling requirements.
5-28
Page 269 of 432
Turn Signals When Towing a TrailerThe arrows on the instrument panel flash whenever
signaling a turn or lane change. Properly hooked up, the
trailer lamps also flash, telling other drivers the vehicle
is turning, changing lanes or stopping.
When towing a trailer, the arrows on the instrument
panel flash for turns even if the bulbs on the trailer are
burned out. For this reason you may think other
drivers are seeing the signal when they are not. It is
important to check occasionally to be sure the
trailer bulbs are still working.Driving on GradesNotice:Do not tow on steep continuous grades
exceeding 6 miles (9.6 km). Extended, higher
than normal engine and transmission temperatures
may result and damage the vehicle. Frequent
stops are very important to allow the engine and
transmission to cool.
Reduce speed and shift to a lower gearbeforestarting
down a long or steep downgrade. If the transmission is
not shifted down, the brakes might have to be used so
much that they would get hot and no longer work well.
On a long uphill grade, shift down and reduce the
vehicle’s speed to around 45 mph (70 km/h) to reduce
the possibility of the engine and the transmission
overheating. If the engine does overheat, seeEngine
Overheating on page 6-29.
Parking on Hills
{
WARNING:
Parking the vehicle on a hill with the trailer
attached can be dangerous. If something goes
wrong, the rig could start to move. People can be
injured, and both the vehicle and the trailer can be
damaged. When possible, always park the rig on a
flat surface.
If parking the rig on a hill:
1. Press the brake pedal, but do not shift into P (Park)
yet. Turn the wheels into the curb if facing downhill
or into traffic if facing uphill.
2. Have someone place chocks under the trailer
wheels.
3. When the wheel chocks are in place, release the
brake pedal until the chocks absorb the load.
4. Reapply the brake pedal. Then apply the parking
brake and shift the transmission into P (Park).
5. Release the brake pedal.
5-33
Page 307 of 432
{
WARNING:
The brake wear warning sound means that soon
the brakes will not work well. That could lead to an
accident. When the brake wear warning sound is
heard, have the vehicle serviced.
Notice:Continuing to drive with worn-out brake
pads could result in costly brake repair.
Some driving conditions or climates can cause a brake
squeal when the brakes are first applied or lightly
applied. This does not mean something is wrong with
the brakes.
Properly torqued wheel nuts are necessary to help
prevent brake pulsation. When tires are rotated, inspect
brake pads for wear and evenly tighten wheel nuts in
the proper sequence to torque specifications in
Capacities and Specifications on page 6-100.
Brake linings should always be replaced as complete
axle sets.
Brake Pedal TravelSee your dealer/retailer if the brake pedal does not
return to normal height, or if there is a rapid increase in
pedal travel. This could be a sign that brake service
might be required.Brake AdjustmentEvery time the brakes are applied, with or without the
vehicle moving, the brakes adjust for wear.Replacing Brake System PartsThe braking system on a vehicle is complex. Its many
parts have to be of top quality and work well together if
the vehicle is to have really good braking. The vehicle
was designed and tested with top-quality brake parts.
When parts of the braking system are replaced — for
example, when the brake linings wear down and new
ones are installed — be sure to get new approved
replacement parts. If this is not done, the brakes might
not work properly. For example, if someone puts in
brake linings that are wrong for the vehicle, the balance
between the front and rear brakes can change — for the
worse. The braking performance expected can change in
many other ways if the wrong replacement brake parts
are installed.
6-37
Page 336 of 432
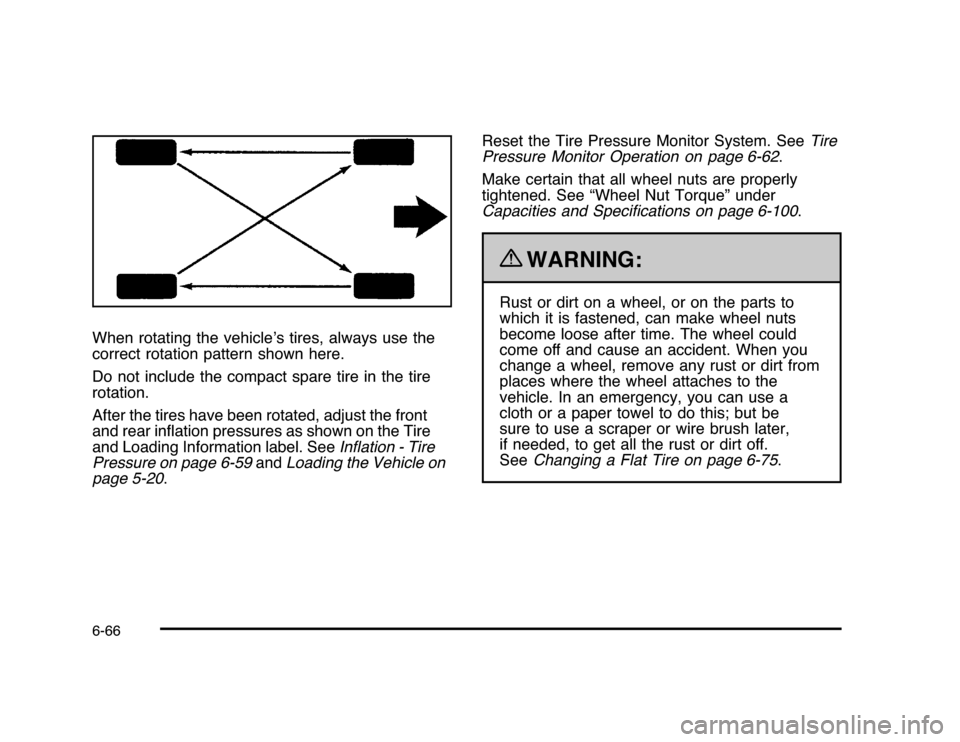
When rotating the vehicle’s tires, always use the
correct rotation pattern shown here.
Do not include the compact spare tire in the tire
rotation.
After the tires have been rotated, adjust the front
and rear inflation pressures as shown on the Tire
and Loading Information label. SeeInflation - Tire
Pressure on page 6-59andLoading the Vehicle on
page 5-20.Reset the Tire Pressure Monitor System. SeeTire
Pressure Monitor Operation on page 6-62.
Make certain that all wheel nuts are properly
tightened. See “Wheel Nut Torque” under
Capacities and Specifications on page 6-100.
{
WARNING:
Rust or dirt on a wheel, or on the parts to
which it is fastened, can make wheel nuts
become loose after time. The wheel could
come off and cause an accident. When you
change a wheel, remove any rust or dirt from
places where the wheel attaches to the
vehicle. In an emergency, you can use a
cloth or a paper towel to do this; but be
sure to use a scraper or wire brush later,
if needed, to get all the rust or dirt off.
SeeChanging a Flat Tire on page 6-75.
6-66
Page 344 of 432
If a Tire Goes FlatIt is unusual for a tire to blowout while you are driving,
especially if you maintain your vehicle’s tires properly.
If air goes out of a tire, it is much more likely to leak out
slowly. But if you should ever have a blowout, here
are a few tips about what to expect and what to do:
If a front tire fails, the flat tire creates a drag that pulls
the vehicle toward that side. Take your foot off the
accelerator pedal and grip the steering wheel firmly.
Steer to maintain lane position, and then gently brake to
a stop well out of the traffic lane.
A rear blowout, particularly on a curve, acts much like a
skid and may require the same correction you would
use in a skid. In any rear blowout remove your foot from
the accelerator pedal. Get the vehicle under control
by steering the way you want the vehicle to go. It may
be very bumpy and noisy, but you can still steer. Gently
brake to a stop, well off the road if possible.
{
WARNING:
Lifting a vehicle and getting under it to do
maintenance or repairs is dangerous without the
appropriate safety equipment and training. If a jack
is provided with the vehicle, it is designed only for
changing a flat tire. If it is used for anything else,
you or others could be badly injured or killed if the
vehicle slips off the jack. If a jack is provided with
the vehicle, only use it for changing a flat tire.
If a tire goes flat, the next part shows how to use the
jacking equipment to change a flat tire safely.
6-74