2010 CHEVROLET HHR window
[x] Cancel search: windowPage 362 of 480
Tire Terminology and Definitions
Air Pressure:The amount of air inside the tire
pressing outward on each square inch of the tire.
Air pressure is expressed in pounds per square
inch (psi) or kilopascal (kPa).
Accessory Weight
:This means the combined
weight of optional accessories. Some examples of
optional accessories are, automatic transmission,
power steering, power brakes, power windows,
power seats, and air conditioning.
Aspect Ratio
:The relationship of a tire's height to
its width.
Belt
:A rubber coated layer of cords that is
located between the plies and the tread. Cords
may be made from steel or other reinforcing
materials.
Bead
:The tire bead contains steel wires wrapped
by steel cords that hold the tire onto the rim.
Bias Ply Tire
:A pneumatic tire in which the plies
are laid at alternate angles less than 90 degrees
to the centerline of the tread. Cold Tire Pressure
:The amount of air pressure
in a tire, measured in pounds per square inch (psi)
or kilopascals (kPa) before a tire has built up heat
from driving. See Inflation - Tire Pressure
on
page 6‑63
.
Curb Weight
:The weight of a motor vehicle with
standard and optional equipment including the
maximum capacity of fuel, oil, and coolant, but
without passengers and cargo.
DOT Markings
:A code molded into the sidewall
of a tire signifying that the tire is in compliance
with the U.S. Department of Transportation (DOT)
motor vehicle safety standards. The DOT code
includes the Tire Identification Number (TIN), an
alphanumeric designator which can also identify
the tire manufacturer, production plant, brand, and
date of production.
GVWR
:Gross Vehicle Weight Rating. See
Loading the Vehicle
on page 5‑24.
GAWR FRT
:Gross Axle Weight Rating for the
front axle. See Loading the Vehicle
on page 5‑24.
6-60
Page 383 of 480
Always do a safety check first. SeeIf a Tire Goes Flaton page 6‑77. Do not remove any objects that have
penetrated the tire.
1. Remove the tire sealant and compressor kit from its storage location. See Tire Sealant and
Compressor Kit Storage on page 6‑87.
2. Unwrap the sealant/air hose (F) and the power plug (G).
3. Place the kit on the ground.
Make sure the tire valve stem is positioned close
to the ground so the hose will reach it.
4. Remove the valve stem cap from the flat tire by turning it counterclockwise.
5. Attach the sealant/air hose (F) onto the tire valve stem. Turn it clockwise until it is tight. 6. Plug the power plug (G) into the accessory power
outlet in the vehicle. Unplug all items from other
accessory power outlets. See Accessory Power
Outlet(s) on page 4‑16.
If the vehicle has an accessory power outlet, do
not use the cigarette lighter.
If the vehicle only has a cigarette lighter, use the
cigarette lighter.
Do not pinch the power plug cord in the door or
window.
7. Start the vehicle. The vehicle must be running while using the air compressor.
8. Turn the selector switch (B) clockwise to the Sealant + Air position.
6-81
Page 386 of 480
Using the Tire Sealant and Compressor
Kit without Sealant to Inflate a Tire
(Not Punctured)
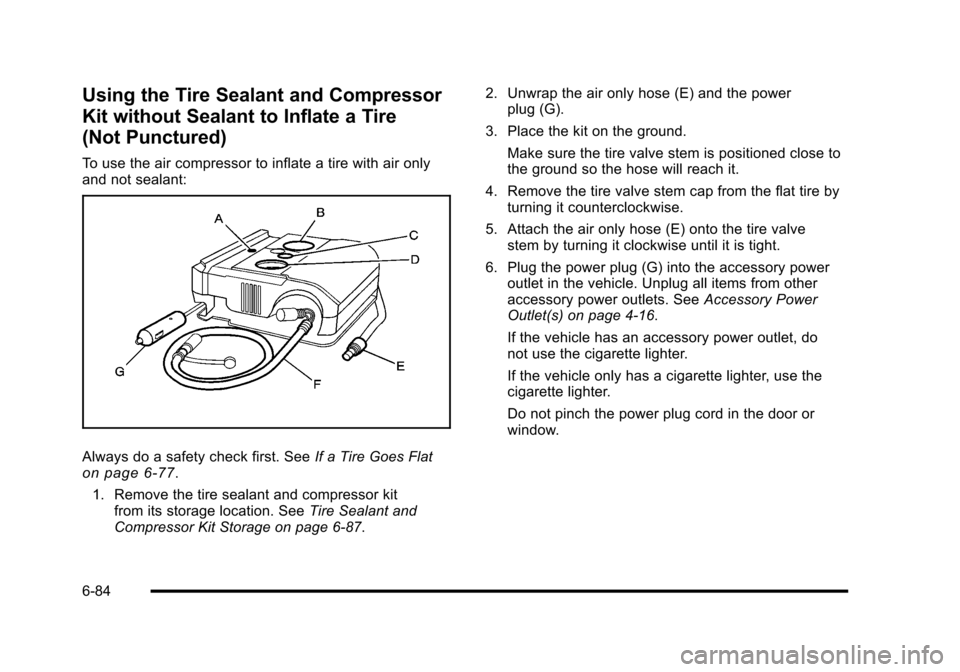
To use the air compressor to inflate a tire with air only
and not sealant:
Always do a safety check first. SeeIf a Tire Goes Flaton page 6‑77.
1. Remove the tire sealant and compressor kit from its storage location. See Tire Sealant and
Compressor Kit Storage on page 6‑87. 2. Unwrap the air only hose (E) and the power
plug (G).
3. Place the kit on the ground. Make sure the tire valve stem is positioned close to
the ground so the hose will reach it.
4. Remove the tire valve stem cap from the flat tire by turning it counterclockwise.
5. Attach the air only hose (E) onto the tire valve stem by turning it clockwise until it is tight.
6. Plug the power plug (G) into the accessory power outlet in the vehicle. Unplug all items from other
accessory power outlets. See Accessory Power
Outlet(s) on page 4‑16.
If the vehicle has an accessory power outlet, do
not use the cigarette lighter.
If the vehicle only has a cigarette lighter, use the
cigarette lighter.
Do not pinch the power plug cord in the door or
window.
6-84
Page 413 of 480
Appearance Care
Interior Cleaning
The vehicle's interior will continue to look its best if it is
cleaned often. Although not always visible, dust and dirt
can accumulate on the upholstery. Dirt can damage
carpet, fabric, leather, and plastic surfaces. Regular
vacuuming is recommended to remove particles from
the upholstery. It is important to keep the upholstery
from becoming and remaining heavily soiled. Soils
should be removed as quickly as possible. The
vehicle's interior may experience extremes of heat that
could cause stains to set rapidly.
Lighter colored interiors may require more frequent
cleaning. Use care because newspapers and garments
that transfer color to home furnishings may also transfer
color to the vehicle's interior.
When cleaning the vehicle's interior, only use cleaners
specifically designed for the surfaces being cleaned.
Permanent damage may result from using cleaners on
surfaces for which they were not intended. Use glass
cleaner only on glass. Remove any accidental
over-spray from other surfaces immediately. To prevent
over-spray, apply cleaner directly to the cleaning cloth.Notice:
Using abrasive cleaners when cleaning
glass surfaces on the vehicle, could scratch the
glass and/or cause damage to the rear window
defogger. When cleaning the glass on the vehicle,
use only a soft cloth and glass cleaner.
Many cleaners contain solvents that may become
concentrated in the vehicle's breathing space. Before
using cleaners, read and adhere to all safety
instructions on the label. While cleaning the vehicle's
interior, maintain adequate ventilation by opening the
vehicle's doors and windows.
Dust may be removed from small buttons and knobs
using a small brush with soft bristles.
Products that remove odors from the vehicle's
upholstery and clean the vehicle's glass can be
obtained from your dealer/retailer.
Do not clean the vehicle using:
.A knife or any other sharp object to remove a soil
from any interior surface.
.A stiff brush. It can cause damage to the vehicle's
interior surfaces.
.Heavy pressure or aggressive rubbing with a
cleaning cloth. Use of heavy pressure can damage
the interior and does not improve the effectiveness
of soil removal.
6-111
Page 421 of 480
The vehicle has an airbag system. Before attempting to
add anything electrical to the vehicle, seeServicing
Your Airbag-Equipped Vehicle
on page 2‑76and
Adding Equipment to Your Airbag-Equipped Vehicleon
page 2‑77.
Headlamp Wiring
The headlamp wiring is protected by fuses in the fuse
block. An electrical overload will cause the lamps to turn
off. If this happens, have the headlamp wiring checked
right away.
Windshield Wiper Fuses
The windshield wiper motor is protected by a circuit
breaker and a fuse. If the motor overheats due to heavy
snow, etc., the wiper will stop until the motor cools.
If the overload is caused by some electrical problem,
have it fixed.
Power Windows and Other Power
Options
Fuses in the fuse block protect the power windows.
When the current load is too heavy, the fuse opens
protecting the circuit until the problem is fixed.
Fuses and Circuit Breakers
The wiring circuits in the vehicle are protected from
short circuits by a combination of fuses, circuit breakers
and fusible thermal links. This greatly reduces the
chance of damage caused by electrical problems.
Look at the silver-colored band inside the fuse. If the
band is broken or melted, replace the fuse. Be sure you
replace a bad fuse with a new one of the identical size
and rating.
If you ever have a problem on the road and do not have
a spare fuse, you can “borrow”one that has the
same amperage. Just pick some feature of the vehicle
that you can get along without —like the radio or
cigarette lighter —and use its fuse if it is the
correct amperage. Replace it as soon as you can.
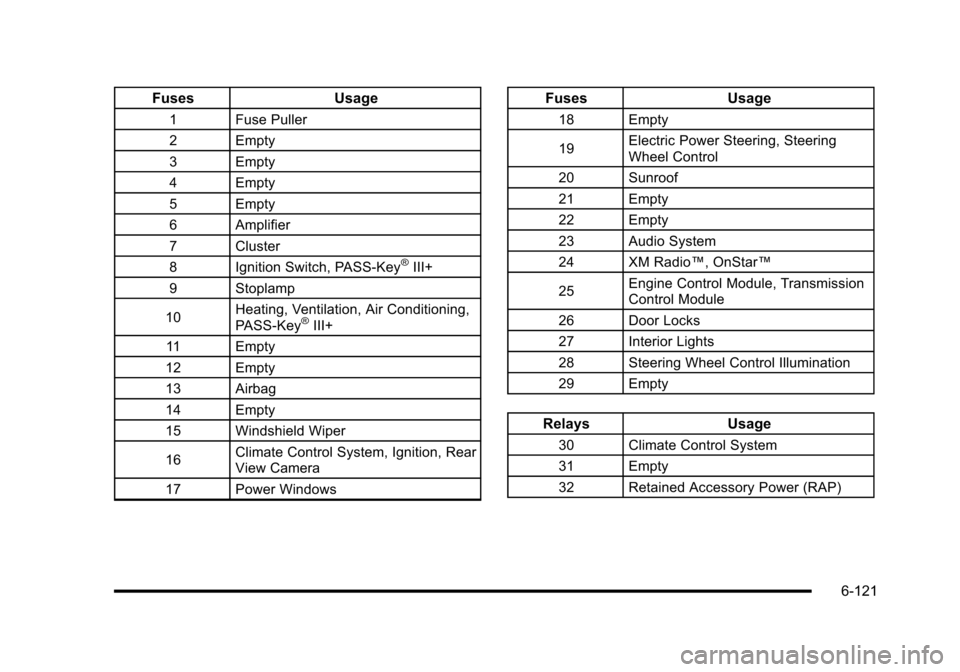
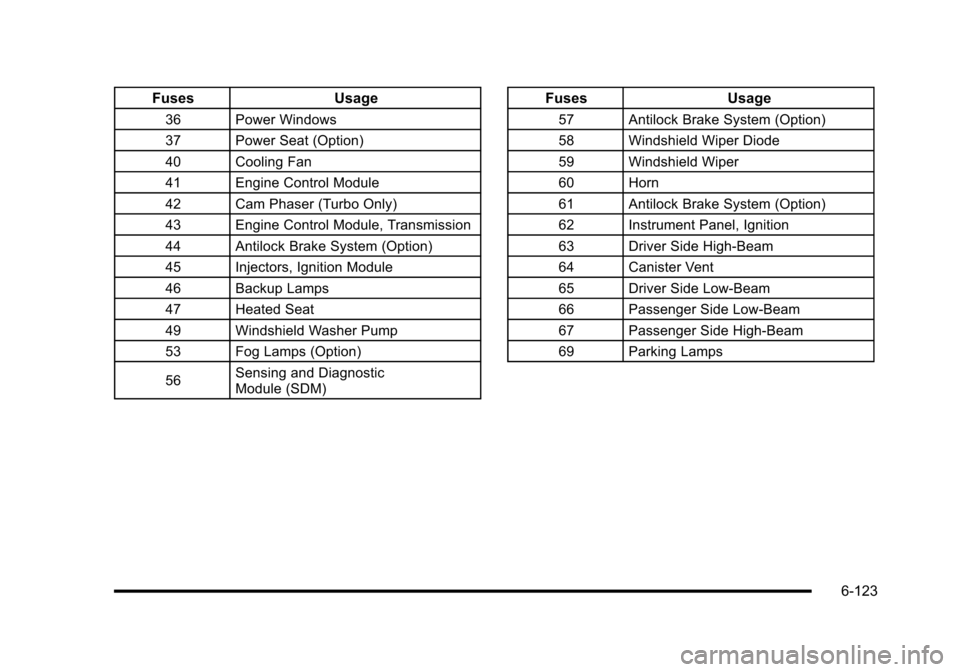
There are two fuse blocks in the vehicle: the floor
console fuse block and the engine compartment fuse
block.
There are also one or two fuses located at the back of
the vehicle near the battery.
6-119
Page 423 of 480
FusesUsage
1 Fuse Puller
2 Empty
3 Empty
4 Empty
5 Empty
6 Amplifier
7 Cluster
8 Ignition Switch, PASS-Key
®III+
9 Stoplamp
10 Heating, Ventilation, Air Conditioning,
PASS-Key
®III+
11 Empty
12 Empty
13 Airbag
14 Empty
15 Windshield Wiper
16 Climate Control System, Ignition, Rear
View Camera
17 Power Windows
Fuses Usage
18 Empty
19Electric Power Steering, Steering
Wheel Control
20 Sunroof
21 Empty
22 Empty
23 Audio System
24 XM Radio™, OnStar™
25 Engine Control Module, Transmission
Control Module
26 Door Locks
27 Interior Lights
28 Steering Wheel Control Illumination
29 Empty
Relays Usage
30 Climate Control System
31 Empty
32 Retained Accessory Power (RAP)
6-121
Page 425 of 480
FusesUsage
36 Power Windows
37 Power Seat (Option)
40 Cooling Fan
41 Engine Control Module
42 Cam Phaser (Turbo Only)
43 Engine Control Module, Transmission
44 Antilock Brake System (Option)
45 Injectors, Ignition Module
46 Backup Lamps
47 Heated Seat
49 Windshield Washer Pump
53 Fog Lamps (Option)
56Sensing and Diagnostic
Module (SDM)
Fuses
Usage
57 Antilock Brake System (Option)
58 Windshield Wiper Diode
59 Windshield Wiper
60 Horn
61 Antilock Brake System (Option)
62 Instrument Panel, Ignition
63 Driver Side High-Beam
64 Canister Vent
65 Driver Side Low-Beam
66 Passenger Side Low-Beam
67 Passenger Side High-Beam
69 Parking Lamps
6-123
Page 467 of 480

E
E85 Fuel . . . . . . . . . . . . . . . . . . . . . . . . . . . . . . . . . . . . . . . . . . . . .6-8
EDR . . . . . . . . . . . . . . . . . . . . . . . . . . . . . . . . . . . . . . . . . . . . . . . 8-15
Electrical Equipment, Add-On . . . . . . . . . . . . . . . . . . . . 6-118
Electrical SystemEngine Compartment Fuse Block . . . . . . . . . . . . . . . .6-122
Floor Console Fuse Block . . . . . . . . . . . . . . . . . . . . . . .6-120
Fuses and Circuit Breakers . . . . . . . . . . . . . . . . . . . . . . 6-119
Headlamp Wiring . . . . . . . . . . . . . . . . . . . . . . . . . . . . . . . . 6-119
Power Windows and Other Power Options . . . . . . 6-119
Windshield Wiper Fuses . . . . . . . . . . . . . . . . . . . . . . . . . 6-119
Electronic Immobilizer PASS-Key
®III+ . . . . . . . . . . . . . . . . . . . . . . . . . . . . . . . . . . . 3-20
Electronic Immobilizer Operation PASS-Key
®III+ . . . . . . . . . . . . . . . . . . . . . . . . . . . . . . . . . . . 3-20
Electronic Stability Control . . . . . . . . . . . . . . . . . . . . . . . . . . .5-6
Electronic Stability Control Indicator Light . . . . . . . . . . 4-33
Engine
Air Cleaner/Filter . . . . . . . . . . . . . . . . . . . . . . . . . . . . . . . . . 6-25
Check and Service Engine Soon Lamp . . . . . . . . . . . 4-35
Compartment Overview . . . . . . . . . . . . . . . . . . . . . . . . . . . 6-16
Coolant . . . . . . . . . . . . . . . . . . . . . . . . . . . . . . . . . . . . . . . . . . . 6-29
Coolant Heater . . . . . . . . . . . . . . . . . . . . . . . . . . . . . . . . . . . 3-27
Coolant Temperature Gauge . . . . . . . . . . . . . . . . . . . . . . 4-34
Coolant Temperature Warning Light . . . . . . . . . . . . . . 4-34
Cooling System . . . . . . . . . . . . . . . . . . . . . . . . . . . . . . . . . . . 6-28
Drive Belt Routing . . . . . . . . . . . . . . . . . . . . . . . . . . . . . . . . 7-13 Engine (cont.)
Exhaust . . . . . . . . . . . . . . . . . . . . . . . . . . . . . . . . . . . . . . . . . . 3-39
Oil . . . . . . . . . . . . . . . . . . . . . . . . . . . . . . . . . . . . . . . . . . . . . . . . 6-19
Overheating . . . . . . . . . . . . . . . . . . . . . . . . . . . . . . . . . . . . . . 6-34
Starting . . . . . . . . . . . . . . . . . . . . . . . . . . . . . . . . . . . . . . . . . . . 3-25
Engine Oil Life System . . . . . . . . . . . . . . . . . . . . . . . . . . . . . . . . . . . . . . . 6-23
Enhanced Traction System (ETS) Active Light . . . . . 5-11
Enhanced Traction System (ETS) Indicator/ Warning Light . . . . . . . . . . . . . . . . . . . . . . . . . . . . . . . . . . . . 4-32
Entry/Exit Lighting . . . . . . . . . . . . . . . . . . . . . . . . . . . . . . . . . 4-14
Event Data Recorders . . . . . . . . . . . . . . . . . . . . . . . . . . . . . 8-16
Extender, Safety Belt . . . . . . . . . . . . . . . . . . . . . . . . . . . . . . 2-34F
Filter Engine Air Cleaner . . . . . . . . . . . . . . . . . . . . . . . . . . . . . . . 6-25
Finish Damage . . . . . . . . . . . . . . . . . . . . . . . . . . . . . . . . . . . 6-117
Fixed Mast Antenna . . . . . . . . . . . . . . . . . . . . . . . . . . . . . . . 4-95
Flash-to-Pass . . . . . . . . . . . . . . . . . . . . . . . . . . . . . . . . . . . . . . . .4-5
Flashers, Hazard Warning . . . . . . . . . . . . . . . . . . . . . . . . . . .4-3
Flat Tire . . . . . . . . . . . . . . . . . . . . . . . . . . . . . . . . . . . . . . . . . . . 6-77
Flat Tire, Changing . . . . . . . . . . . . . . . . . . . . . . . . . . . . . . . . 6-88
Flat Tire, Storing . . . . . . . . . . . . . . . . . . . . . . . . . . . . . . . . . . 6-106
Fluid Automatic Transmission . . . . . . . . . . . . . . . . . . . . . . . . . . 6-27
Windshield Washer . . . . . . . . . . . . . . . . . . . . . . . . . . . . . . . 6-36
i - 5