Page 21 of 480
Vehicle Features
Radio(s)
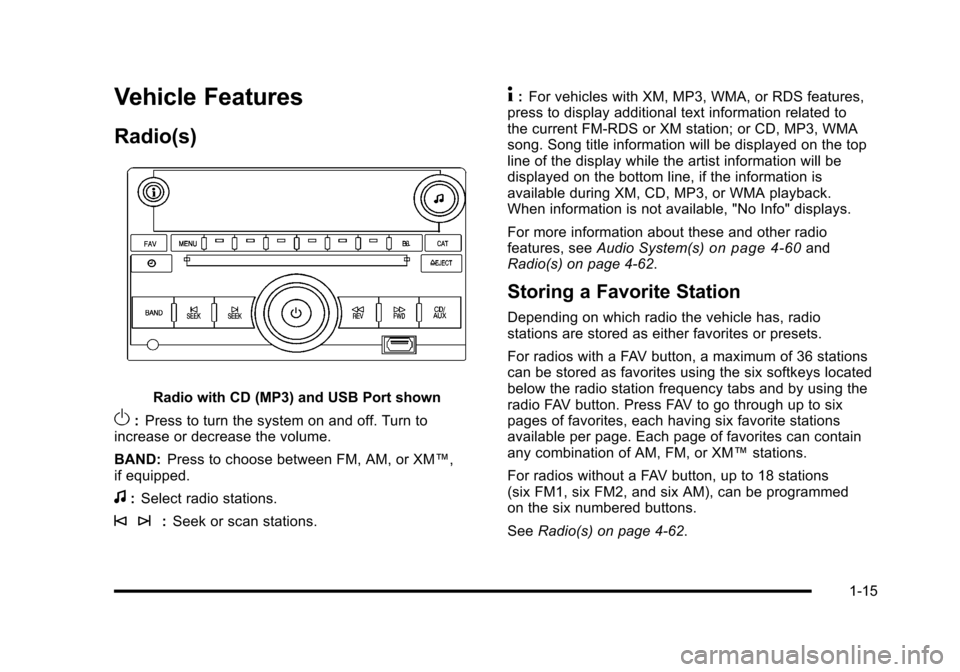
Radio with CD (MP3) and USB Port shown
O:Press to turn the system on and off. Turn to
increase or decrease the volume.
BAND: Press to choose between FM, AM, or XM™,
if equipped.
f: Select radio stations.
© ¨: Seek or scan stations.
4:For vehicles with XM, MP3, WMA, or RDS features,
press to display additional text information related to
the current FM-RDS or XM station; or CD, MP3, WMA
song. Song title information will be displayed on the top
line of the display while the artist information will be
displayed on the bottom line, if the information is
available during XM, CD, MP3, or WMA playback.
When information is not available, "No Info" displays.
For more information about these and other radio
features, see Audio System(s)
on page 4‑60and
Radio(s) on page 4‑62.
Storing a Favorite Station
Depending on which radio the vehicle has, radio
stations are stored as either favorites or presets.
For radios with a FAV button, a maximum of 36 stations
can be stored as favorites using the six softkeys located
below the radio station frequency tabs and by using the
radio FAV button. Press FAV to go through up to six
pages of favorites, each having six favorite stations
available per page. Each page of favorites can contain
any combination of AM, FM, or XM™ stations.
For radios without a FAV button, up to 18 stations
(six FM1, six FM2, and six AM), can be programmed
on the six numbered buttons.
See Radio(s) on page 4‑62.
1-15
Page 22 of 480
Setting the Clock
To set the time and date for the Radio with CD (MP3)
and USB port or Radio with a Single CD (MP3) player:1. Turn the ignition key to ACC/ACCESSORY or ON/RUN.
2. Press
Oto turn the radio on.
3. Press
Hand the HR, MIN, MM, DD, YYYY
(hour, minute, month, day, and year) displays.
4. Press the softkey located below any one of the tabs that you want to change.
5. Increase or decrease the time or date by turning
fclockwise or counterclockwise.
For detailed instructions on setting the clock for your
specific audio system, see Setting the Clock
on
page 4‑61.
Satellite Radio
XM is a satellite radio service that is based in the
48 contiguous United States and 10 Canadian
provinces. XM satellite radio has a wide variety of
programming and commercial-free music,
coast-to-coast, and in digital-quality sound.
A fee is required to receive the XM service.
For more information, refer to:
.www.xmradio.com or call 1-800-929-2100 (U.S.)
.www.xmradio.ca or call 1-877-438-9677 (Canada)
See “XM Satellite Radio Service” underRadio(s)
on
page 4‑62.
Portable Audio Devices (Auxiliary
Input or USB Port)
This vehicle may have an auxiliary input jack and a
USB port, located on the audio faceplate. External
devices such as iPods
®, laptop computers, MP3
players, CD changers, USB storage devices, etc. can
be connected to the auxiliary input jack using a 3.5 mm
(1/8 in) cable or the USB port depending on the audio
system.
1-16
Page 24 of 480
Driver Information Center (DIC)
The DIC display is located at the bottom of the
instrument panel cluster. It shows the status of
many vehicle systems and enables access to the
personalization menu.
The DIC buttons are
located on the left side
of the steering wheel.
INFO: Press to scroll through the vehicle information
displays.
r: Press to reset some vehicle information displays,
select a personalization setting, or acknowledge a
warning message.
For more information, see Driver Information Center
(DIC) on page 4‑46.
Vehicle Personalization
Some vehicle features can be programmed by using the
DIC buttons on the left side of the steering wheel.
These features include:
.Oil Life Reset
.Units
.RKE Lock and Unlock Feedback
.Door Lock and Unlock Settings
.Language
See DIC Vehicle Personalization on page 4‑54.
1-18
Page 27 of 480
Performance and Maintenance
Traction Control System (TCS)
The traction control system limits wheel spin. The
system turns on automatically every time the vehicle is
started.
.To turn off traction control, press and releasedon
the instrument panel.
Filluminates and the
appropriate DIC message displays. See DIC
Warnings and Messages on page 4‑48.
.Press and release the button again to turn on
traction control.
For more information, see Traction Control System
(TCS) on page 5‑9.
Electronic Stability Control (ESC)
The Electronic Stability Control system assists with
directional control of the vehicle in difficult driving
conditions. The system turns on automatically every
time the vehicle is started.
.To turn off both traction control and Electronic
Stability Control, press and hold
duntilF
illuminates and the appropriate DIC message
displays. See DIC Warnings and Messageson
page 4‑48.
.Press and release the button again to turn on both
systems.
For more information, see Electronic Stability Control
(ESC) on page 5‑6.
1-21
Page 29 of 480
Engine Oil Life System
The engine oil life system calculates engine oil life
based on vehicle use and displays a DIC message
when it is necessary to change the engine oil and filter.
The oil life system should be reset to 100% only
following an oil change.
Resetting the Oil Life System
1. Turn the ignition to ON/RUN, with the engine off.
2. Press the information and reset buttons on theDriver Information Center (DIC) at the same time
to enter the personalization menu.
3. Press the information button to scroll through the available personalization menu modes until the
DIC display shows OIL-LIFE RESET.
4. Press and hold the reset button until the DIC display shows ACKNOWLEDGED. This will tell
you the system has been reset.
5. Turn the key to LOCK/OFF. For vehicles with the 2.2L (VIN Code V) or
2.4L (VIN Code B) engines, you can also reset
the system as follows:
1. Turn the ignition key to ON/RUN with the engine off.
2. Fully press and release the accelerator pedal slowly three times within five seconds.
3. Turn the key to LOCK/OFF, then start the engine.
See Engine Oil Life System on page 6‑23.
Fuel E85 (85% Ethanol)
Vehicles that have the 2.2L L4 engine (VIN Code B) or
the 2.4L L4 engine (VIN Code V) have a yellow fuel cap
and can use either unleaded gasoline or ethanol fuel
containing up to 85% ethanol (E85). See Fuel E85
(85% Ethanol)
on page 6‑8. In all other engines,
use only the unleaded gasoline described under
Gasoline Octane on page 6‑6.
1-23
Page 118 of 480
Remote Rear Door Operation (Panel)
*:Press and hold for about one second to open the
rear driver side door.
+: Press and hold for about one second to open the
rear passenger side door.
Programming Transmitters to the
Vehicle
Only RKE transmitters programmed to the vehicle will
work. If a transmitter is lost or stolen, a replacement
can be purchased and programmed through your
dealer/retailer. When the replacement transmitter is
programmed to the vehicle, all remaining transmitters
must also be programmed. Any lost or stolen
transmitters no longer work once the new transmitter
is programmed. Each vehicle can have up to four
transmitters programmed to it.
Battery Replacement
Replace the battery if the KEY FOB BATT LOW
message displays in the DIC. See “KEY FOB BATT
LOW” underDIC Warnings and Messages
on
page 4‑48for additional information.
Notice: When replacing the battery, do not touch
any of the circuitry on the transmitter. Static from
your body could damage the transmitter.
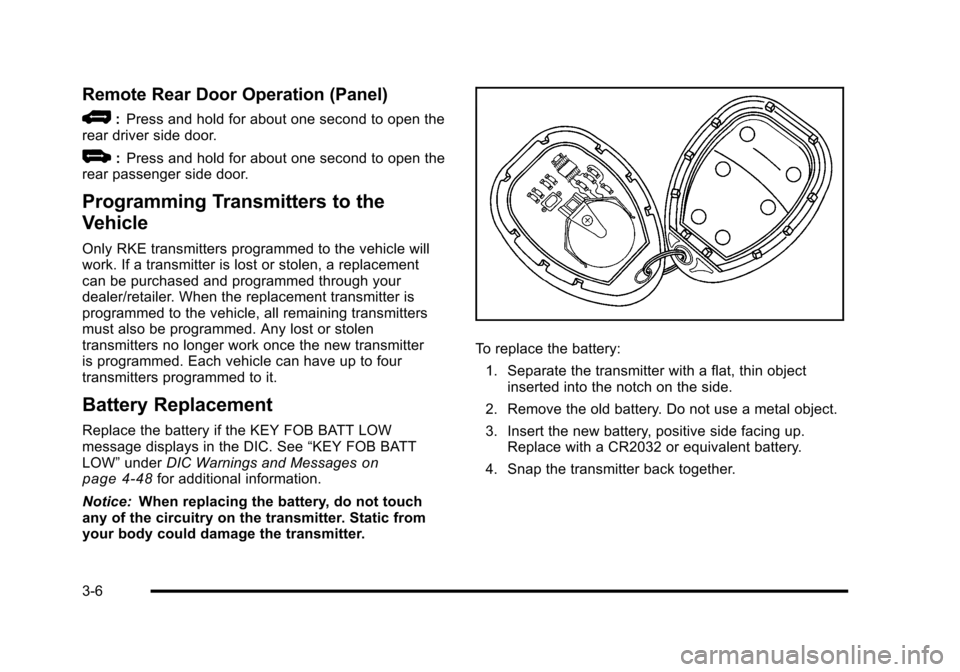
To replace the battery:
1. Separate the transmitter with a flat, thin object inserted into the notch on the side.
2. Remove the old battery. Do not use a metal object.
3. Insert the new battery, positive side facing up. Replace with a CR2032 or equivalent battery.
4. Snap the transmitter back together.
3-6
Page 136 of 480
R(ON/RUN): This is the position in which you can
operate the electrical accessories and to display some
instrument panel cluster warning and indicator lights.
The switch stays in this position when the engine is
running.
If you leave the key in the ACC/ACCESSORY or
ON/RUN position with the engine off, the battery could
be drained. You may not be able to start the vehicle if
the battery is allowed to drain for an extended period
of time.
/ (START): This position starts the engine. When the
engine starts, release the key. The ignition switch will
return to ON/RUN for driving.
A warning tone will sound when the driver door is
opened, the ignition is in LOCK/OFF or ACC/
ACCESSORY and the key is in the ignition.Column Lock Release
For vehicles with an automatic transmission, the
following procedure allows the ignition to be turned to
LOCK/OFF and ignition key to be removed in case of a
dead battery or low voltage battery.
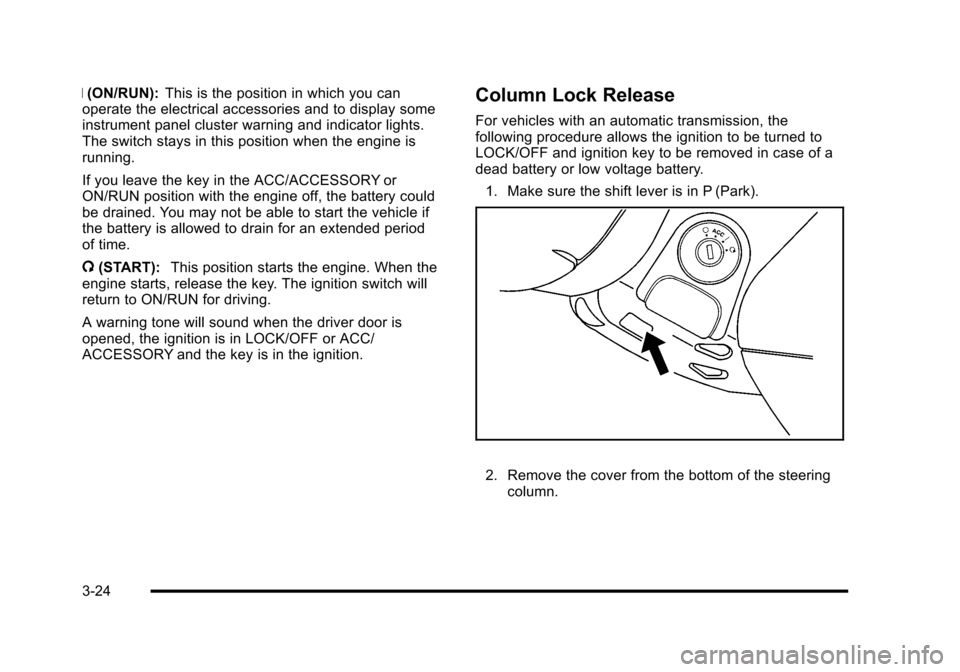
1. Make sure the shift lever is in P (Park).
2. Remove the cover from the bottom of the steering column.
3-24
Page 147 of 480
{WARNING:
If the front passenger seat back is folded down,
the armrest may make it awkward to grab and
pull up the parking brake lever. If the lever is not
pulled up far enough, the vehicle may roll and you
or others could be injured. Move your hand lower
on the lever or raise the seat back so that you can
set the brake.
To set the parking brake, hold the brake pedal down
and pull up on the parking brake lever. If the ignition is
on, the brake system warning light will come on. See
Brake System Warning Light on page 4‑30. To release the parking brake, hold the brake pedal
down. Pull the parking brake lever up until you can
press the release button. Hold the release button in
as you move the brake lever all the way down.
If you forget to release your parking brake, a chime will
sound and a warning message will be displayed when
the parking brake is applied and the vehicle is moving
faster than 5 mph (8 km/h). See
DIC Warnings and
Messages on page 4‑48.
Notice: Driving with the parking brake on can
overheat the brake system and cause premature
wear or damage to brake system parts. Make sure
that the parking brake is fully released and the
brake warning light is off before driving.
3-35