2010 CHEVROLET EQUINOX warning
[x] Cancel search: warningPage 110 of 394
4-24 Instruments and Controls
Cruise Control Light
The cruise control light is white
whenever the cruise control is set
and turns green when the cruise
control is active.
The light turns off when the cruise
control is turned off. SeeCruise
Control
on page 8‑44for more
information.
Information Displays
Driver Information
Center (DIC)
The vehicle may have a Driver
Information Center (DIC). It displays
information about the vehicle and
warning messages if there is a
system problem detected. DIC
messages display in the center of
the instrument panel cluster. See
Vehicle Messages
on page 4‑27for
more information.
The vehicle may also have features
that can be customized through the
controls on the radio. See Vehicle
Personalization
on page 4‑34for
more information.
DIC Operation and Displays
Use the DIC buttons located in the
center of the instrument panel to
access different displays. The DIC
displays trip, fuel, vehicle system
information, and warning messages. It also shows the shift lever position,
the odometer, and the direction the
vehicle is driving.
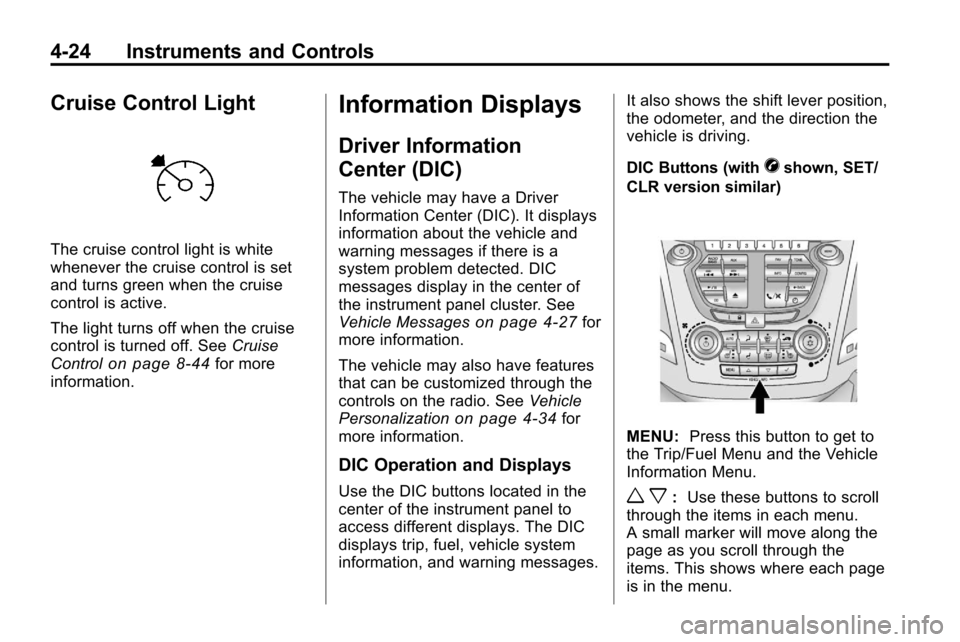
DIC Buttons (with
Vshown, SET/
CLR version similar)
MENU: Press this button to get to
the Trip/Fuel Menu and the Vehicle
Information Menu.
w x: Use these buttons to scroll
through the items in each menu.
A small marker will move along the
page as you scroll through the
items. This shows where each page
is in the menu.
Page 117 of 394
Instruments and Controls 4-31
Key and Lock Messages
Replace Battery In Remote Key
This message displays when the
battery in the Remote Keyless Entry
(RKE) transmitter needs to be
replaced.
Transport Mode On
This message displays when the
ignition is held in START for
15 seconds. The battery light may
also be flashing when this message
is displayed. To turn this message
off, start the vehicle and hold the
key in the START position for
15 seconds.
Object Detection System
Messages
Park Assist Off
This message is displayed when the
park assist system has been turned
off. SeeUltrasonic Parking Assist
on page 8‑46.
Service Park Assist
This message is displayed if there is
a problem with the park assist
system. Take the vehicle to your
dealer for service.
Ride Control System
Messages
All Wheel Drive Off
If your vehicle has the All-Wheel
Drive (AWD) system, this message
displays when the rear drive system
is overheating. This message turns
off when the rear drive system cools
down. If the warning message stays
on for a while, you need to reset the
warning message. To reset the
warning message, turn the ignition
off and then back on again. If the
message stays on, see your dealer
right away. See All-Wheel Drive
on
page 8‑38for more information.
Service All Wheel Drive
If your vehicle has the All-Wheel
Drive (AWD) system, this message
displays if a problem occurs with
this system. If this message
appears, stop as soon as possible
and turn off the vehicle. Restart the
vehicle and check for the message
on the DIC display. If the message
is still displayed or appears again
when you begin driving, the AWD
system needs service. See your
dealer.
Service Traction Control
This message displays when there
is a problem with the Traction
Control System (TCS). When this
message is displayed, the system
will not limit wheel spin. Adjust your
driving accordingly. See your dealer
for service.
Page 119 of 394

Instruments and Controls 4-33
Tire Messages
Service Tire Monitor System
This message displays if there is a
problem with the Tire Pressure
Monitor System (TPMS). SeeTire
Pressure Monitor Operation
on
page 9‑49for more information.
Tire Learning Active
This message displays when the
system is learning new tires. See
Tire Pressure Monitor Operation
on
page 9‑49for more information.
Tire Low Add Air To Tire
On vehicles with the Tire Pressure
Monitor System (TPMS), this
message displays when the
pressure in one or more of the
vehicle's tires is low.
This message also displays “Left
Front”, “Right Front”, “Left Rear”,
or “Right Rear” to indicate the
location of the low tire. The low tire pressure warning light
will also come on. See
Tire
Pressure Light on page 4‑21.
If a tire pressure message appears
on the DIC, stop as soon as you
can. Inflate the tires by adding air
until the tire pressure is equal to the
values shown on the Tire Loading
Information label. See Tires
on
page 9‑40, Vehicle Load Limitson
page 8‑24, and Tire Pressureon
page 9‑46.
You can receive more than one tire
pressure message at a time. To
read the other messages that may
have been sent at the same time,
press the set/reset button. The DIC
also shows the tire pressure values.
See Driver Information Center (DIC)
on page 4‑24.
Transmission Messages
Service Transmission
This message displays if there is a
problem with the transmission. See
your dealer.
Shift To Park
This message displays when the
transmission needs to be shifted to
P (Park). This may appear when
attempting to remove the key from
the ignition if the vehicle is not in
P (Park).
Transmission Hot –Idle
Engine
This message displays and a chime
sounds if the transmission fluid in
the vehicle gets hot. Driving with the
transmission fluid temperature high
can cause damage to the vehicle.
Stop the vehicle and let it idle to
allow the transmission to cool. This
message clears when the fluid
temperature reaches a safe level.
Page 127 of 394
Lighting 5-1
Lighting
Exterior Lighting
Exterior Lamp Controls . . . . . . . . 5-1
Headlamp High/Low-BeamChanger . . . . . . . . . . . . . . . . . . . . . 5-1
Flash-to-Pass . . . . . . . . . . . . . . . . . 5-2
Daytime Running Lamps (DRL) . . . . . . . . . . . . . . . . 5-2
Hazard Warning Flashers . . . . . 5-2
Turn and Lane-Change Signals . . . . . . . . . . . . . . . . . . . . . . 5-3
Fog Lamps . . . . . . . . . . . . . . . . . . . . 5-3
Interior Lighting
Instrument Panel Illumination Control . . . . . . . . . . . . . . . . . . . . . . 5-4
Dome Lamps . . . . . . . . . . . . . . . . . 5-4
Reading Lamps . . . . . . . . . . . . . . . 5-4
Lighting Features
Entry Lighting . . . . . . . . . . . . . . . . . 5-4
Exterior Lighting
Exterior Lamp Controls
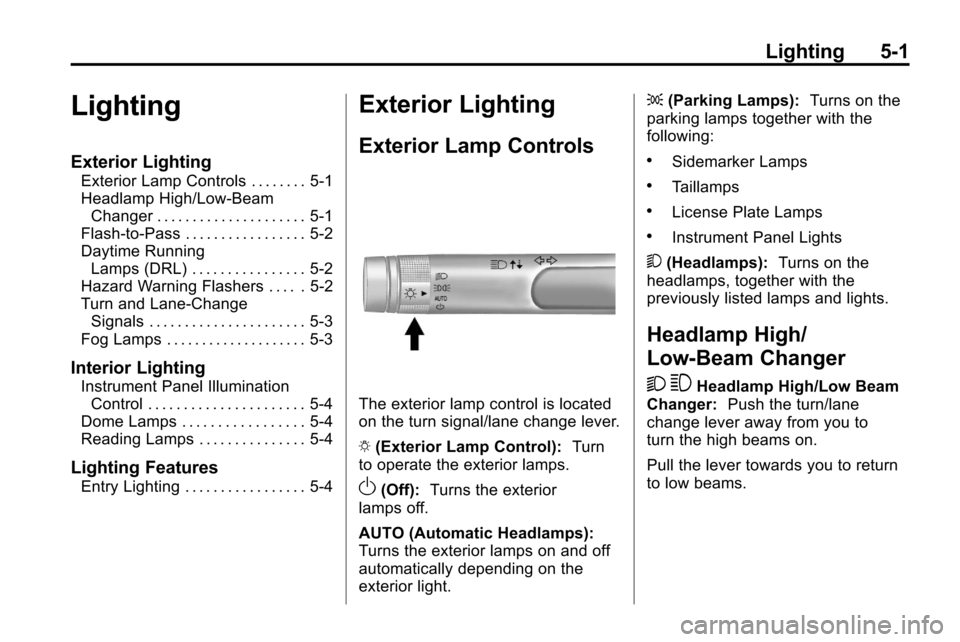
The exterior lamp control is located
on the turn signal/lane change lever.
O (Exterior Lamp Control): Turn
to operate the exterior lamps.
O(Off): Turns the exterior
lamps off.
AUTO (Automatic Headlamps):
Turns the exterior lamps on and off
automatically depending on the
exterior light. ;
(Parking Lamps): Turns on the
parking lamps together with the
following:
.Sidemarker Lamps
.Taillamps
.License Plate Lamps
.Instrument Panel Lights
5 (Headlamps): Turns on the
headlamps, together with the
previously listed lamps and lights.
Headlamp High/
Low-Beam Changer
2 3
Headlamp High/Low Beam
Changer: Push the turn/lane
change lever away from you to
turn the high beams on.
Pull the lever towards you to return
to low beams.
Page 128 of 394
5-2 Lighting
This indicator light turns on in the
instrument panel cluster when the
high beam headlamps are on.
Flash-to-Pass
The flash‐to‐pass feature works with
the low‐beams or Daytime Running
Lamps (DRL) on or off.
To flash the high beams, pull the
turn signal/lane change lever all the
way towards you. Then release it.
Daytime Running
Lamps (DRL)
Daytime Running Lamps (DRL)
system makes the low-beam
headlamps come on at a reduced
brightness in daylight when the
following conditions are met:
.The ignition is on.
.The exterior lamp band is in the
automatic position.
.The transmission is not in
P (Park).
.The light sensor determines it is
daytime.
.The parking brake is released.
Fully functional Daytime Running
Lamps (DRL) are required on all
vehicles first sold in Canada.
When the DRL are on the taillamps,
sidemarker, instrument panel lights
and other lamps will not be on. The
instrument panel cluster will be lit. When the exterior lamp band is
turned to the headlamp position, the
low-beam headlamps come on. The
other lamps that come on with the
headlamps will also come on.
To idle your vehicle with the DRL
off, move the shift lever to P (Park).
The DRL will stay off until the shift
lever is moved out of the P (Park)
position.
The regular headlamp system
should be turned on when needed.
Hazard Warning Flashers
|
(Hazard Warning Flasher):
Press this button, located on the
center of the instrument panel, to
make the front and rear turn signal
lamps flash on and off. This warns
others that you are having trouble.
Press
|again to turn the
flashers off.
Page 131 of 394

Infotainment System 6-1
Infotainment
System
Introduction
Introduction . . . . . . . . . . . . . . . . . . . 6-1
Theft-Deterrent Feature . . . . . . . 6-2
Overview (Radio with CD) . . . . . 6-3
Overview (Radio withCD/DVD/MEM) . . . . . . . . . . . . . 6-5
Operation . . . . . . . . . . . . . . . . . . . . . 6-7
Radio
AM-FM Radio . . . . . . . . . . . . . . . . 6-11
Satellite Radio . . . . . . . . . . . . . . . 6-14
Radio Reception . . . . . . . . . . . . . 6-18
Multi-Band Antenna . . . . . . . . . . 6-18
Audio Players
CD Player . . . . . . . . . . . . . . . . . . . 6-19
CD/DVD Player . . . . . . . . . . . . . . 6-21
Mass Storage Media (MEM) . . . . . . . . . . . . . . . 6-25
Auxiliary Devices (Radio
with CD) . . . . . . . . . . . . . . . . . . . . 6-28
Auxiliary Devices (Radio with CD/DVD/MEM) . . . . . . . 6-31
Rear Seat Infotainment
Rear Seat Entertainment(RSE) System . . . . . . . . . . . . . . 6-33
Phone
Bluetooth (Overview) . . . . . . . . 6-42
Bluetooth (InfotainmentControls) . . . . . . . . . . . . . . . . . . . 6-43
Bluetooth (Voice Recognition) . . . . . . . . . . . . . . . 6-46
Bluetooth (Navigation) . . . . . . . 6-58
Introduction
Read the following pages to
become familiar with the audio
system's features.
{WARNING
Taking your eyes off the road for
extended periods could cause a
crash resulting in injury or death
to you or others. Do not give
extended attention to
entertainment tasks while driving.
This system provides access to
many audio and non audio listings.
To minimize taking your eyes off the
road while driving, do the following
while the vehicle is parked:
.Become familiar with the
operation and controls of the
audio system.
.Set up the tone, speaker
adjustments, and preset radio
stations.
Page 207 of 394
Driving and Operating 8-3
Defensive Driving
Defensive driving means“always
expect the unexpected.” The first
step in driving defensively is to wear
your safety belt, see Safety Belts
on
page 2‑9.
{WARNING
Assume that other road users
(pedestrians, bicyclists, and other
drivers) are going to be careless
and make mistakes. Anticipate
what they might do and be ready.
In addition:
.Allow enough following
distance between you and
the driver in front of you.
.Focus on the task of driving.
Driver distraction can cause
collisions resulting in injury or
possible death. These simple
defensive driving techniques
could save your life.
Drunk Driving
{WARNING
Drinking and then driving is very
dangerous. Your reflexes,
perceptions, attentiveness, and
judgment can be affected by even
a small amount of alcohol. You
can have a serious —or even
fatal —collision if you drive after
drinking. Do not drink and drive or
ride with a driver who has been
drinking. Ride home in a cab; or if
you are with a group, designate a
driver who will not drink.
Death and injury associated with
drinking and driving is a global
tragedy.
Alcohol affects four things that
anyone needs to drive a vehicle:
judgment, muscular coordination,
vision, and attentiveness. Police records show that almost
40 percent of all motor
vehicle-related deaths involve
alcohol. In most cases, these
deaths are the result of someone
who was drinking and driving.
In recent years, more than
17,000 annual motor vehicle-related
deaths have been associated with
the use of alcohol, with about
250,000 people injured.
For persons under 21, it is against
the law in every U.S. state to drink
alcohol. There are good medical,
psychological, and developmental
reasons for these laws.
The obvious way to eliminate the
leading highway safety problem is
for people never to drink alcohol
and then drive.
Page 208 of 394
8-4 Driving and Operating
Medical research shows that
alcohol in a person's system can
make crash injuries worse,
especially injuries to the brain,
spinal cord, or heart. This means
that when anyone who has been
drinking—driver or passenger —is
in a crash, that person's chance of
being killed or permanently disabled
is higher than if the person had not
been drinking.
Control of a Vehicle
The following three systems
help to control the vehicle while
driving —brakes, steering, and
accelerator. At times, as when
driving on snow or ice, it is easy to
ask more of those control systems
than the tires and road can provide.
Meaning, you can lose control of the
vehicle. See StabiliTrak System
on
page 8‑43.
Adding non‐dealer/non‐retailer
accessories can affect vehicle
performance. See Accessories
and Modifications on page 9‑4.
Braking
See Brake System Warning Lighton page 4‑19.
Braking action involves perception
time and reaction time. Deciding to
push the brake pedal is perception
time. Actually doing it is
reaction time.
Average reaction time is about
three‐fourths of a second. But that is
only an average. It might be less
with one driver and as long as two
or three seconds or more with
another. Age, physical condition,
alertness, coordination, and
eyesight all play a part. So do
alcohol, drugs, and frustration. But
even in three‐fourths of a second, a
vehicle moving at 100 km/h
(60 mph) travels 20 m (66 ft). That
could be a lot of distance in an
emergency, so keeping enough
space between the vehicle and
others is important. And, of course, actual stopping
distances vary greatly with the
surface of the road, whether it is
pavement or gravel; the condition of
the road, whether it is wet, dry,
or icy; tire tread; the condition of the
brakes; the weight of the vehicle;
and the amount of brake force
applied.
Avoid needless heavy
braking. Some people drive in
spurts
—heavy acceleration
followed by heavy braking —rather
than keeping pace with traffic. This
is a mistake. The brakes might not
have time to cool between hard
stops. The brakes will wear out
much faster with a lot of heavy
braking. Keeping pace with the
traffic and allowing realistic
following distances eliminates a lot
of unnecessary braking. That means
better braking and longer brake life.