2010 CHEVROLET EQUINOX light
[x] Cancel search: lightPage 167 of 394
Infotainment System 6-37
Video Screens
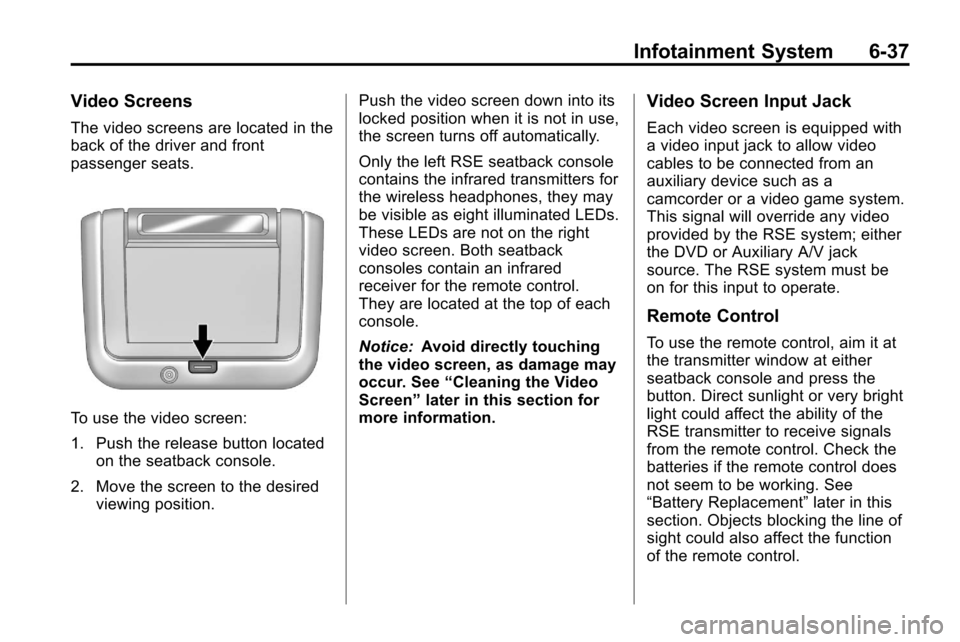
The video screens are located in the
back of the driver and front
passenger seats.
To use the video screen:
1. Push the release button locatedon the seatback console.
2. Move the screen to the desired viewing position. Push the video screen down into its
locked position when it is not in use,
the screen turns off automatically.
Only the left RSE seatback console
contains the infrared transmitters for
the wireless headphones, they may
be visible as eight illuminated LEDs.
These LEDs are not on the right
video screen. Both seatback
consoles contain an infrared
receiver for the remote control.
They are located at the top of each
console.
Notice:
Avoid directly touching
the video screen, as damage may
occur. See “Cleaning the Video
Screen” later in this section for
more information.
Video Screen Input Jack
Each video screen is equipped with
a video input jack to allow video
cables to be connected from an
auxiliary device such as a
camcorder or a video game system.
This signal will override any video
provided by the RSE system; either
the DVD or Auxiliary A/V jack
source. The RSE system must be
on for this input to operate.
Remote Control
To use the remote control, aim it at
the transmitter window at either
seatback console and press the
button. Direct sunlight or very bright
light could affect the ability of the
RSE transmitter to receive signals
from the remote control. Check the
batteries if the remote control does
not seem to be working. See
“Battery Replacement” later in this
section. Objects blocking the line of
sight could also affect the function
of the remote control.
Page 168 of 394
6-38 Infotainment System
If a CD, DVD, or MP3 disc is in the
Radio DVD slot, the remote control
Obutton can be used to turn on the
video screen display and start the
disc. The infotainment system can
also turn on the video screen
display. See CD/DVD Player
on
page 6‑21or the separate
navigation system manual for
more information.
Notice: Storing the remote
control in a hot area or in direct
sunlight can damage it, and the
repairs will not be covered by the
warranty. Storage in extreme cold
can weaken the batteries. Keep
the remote control stored in a
cool, dry place.
Remote Control Buttons
O(Power): Press to turn the
video screens on and off.
P(Illumination): Press to turn the
remote control backlight on. The
backlight times out after several
seconds if no other button is
pressed.
v(Title): Press to return to the
main menu of the DVD. This
function could vary for each disc.
y(Main Menu): Press to access
the DVD menu. The DVD menu is
different on every DVD. Use the
navigation arrows to move the
cursor. After making a selection
press the enter button. This button
only operates when using a DVD.
n,q,p,o(Menu Navigation
Arrows): Use the arrow buttons to
navigate through a menu.
r(Enter): Press to select the
highlighted choice in any menu.
z(Display Menu): Press to adjust
the brightness, screen display
mode, and display the
language menu.
q(Return): Press to exit the
current active menu and return to
the previous menu. This button
operates only when the display
menu or a DVD menu is active.
c(Stop): Press to stop playing,
rewinding, or fast forwarding a DVD.
Press twice to return to the
beginning of the DVD.
s(Play/Pause): Press to start
playing a DVD. Press to pause a
DVD while it is playing. Press again
to continue playing.
Depending on the infotainment
system in the vehicle, DVD
playback may be slowed down by
pressing
sthen[. Reverse slow
play by pressing
sthenr. Press
sagain to cancel slow play.
t(Previous Track/Chapter):
Press to go to the start of the
current track or chapter. Press again
to go to the previous track or
chapter. This button may not work
when the DVD is playing the
copyright information or the
previews.
Page 174 of 394
6-44 Infotainment System
Pairing a Phone
1. Press the CONFIG button.
2. Select Phone Settings.
3. Select Bluetooth.
4. Select Pair Device (Phone).A four digit PIN number appears
on the display.
If the “Add new GPS device”
option is selected, the system
will start a search for Bluetooth
“Handsfree” profile devices just
like if “Add new Phone” was
selected . The additional GPS
location feature which would
provide the vehicle's GPS
location through the Bluetooth
Serial Port Profile is not
available.
5. Start the pairing process on the cell phone that will be paired to
the vehicle. Reference the cell
phone manufacturers user guide
for information on this process. Locate the device named
“General Motors”
in the list on
the cell phone and follow the
instructions on the cell phone to
enter the four digit PIN number
provided by the system.
6. The system prompts for a name for the phone and confirms the
name provided. This name is
used to indicate which phone is
connected.
7. The system responds with “
successfully paired” after the
pairing process is complete.
8. Repeat Steps 1 through 7 to pair additional phones.
Listing All Paired and Connected
Phones
1. Press the CONFIG button.
2. Select Phone Settings.
3. Select Bluetooth.
4. Select Device List. Deleting a Paired Phone
1. Press the CONFIG button.
2. Select Phone Settings.
3. Select Bluetooth.
4. Select Device List.
5. Select the phone to delete and
follow the on screen prompts.
Linking to a Different Phone
To link to a different phone, the new
phone must be in the vehicle and
available to be connected to the
bluetooth system before the process
is started.
1. Press the CONFIG button.
2. Select Phone Settings.
3. Select Bluetooth.
4. Select Device List.
5. Select the new phone to link to and follow the on screen
prompts.
If delete is selected, the
highlighted phone will be
deleted.
Page 198 of 394
7-2 Climate Controls
Air Delivery Mode Control:To
change the current mode, select
one of the following:
F (Vent): Air is directed to the
instrument panel outlets.
* (Bi-Level): Air is directed to the
instrument panel outlets and the
floor outlets.
7 (Floor): Air is directed to the
floor outlets.
W(Defog): Clears the windows of
fog or moisture. Air is directed to the
windshield and floor outlets.
0(Defrost): Clears the
windshield of fog or frost more
quickly. Air is directed to the
windshield and side window outlets.
For best results, clear all snow and
ice from the windshield before
defrosting.
Do not drive the vehicle until all the
windows are clear.
Air Conditioning
#(Air Conditioning): Press to
turn the air conditioning on or off.
If the fan is turned off or the outside
temperature falls below freezing, the
air conditioning will not work.
h(Recirculation): Press to turn
on the recirculation. An indicator
light comes on. Air is recirculated
inside the vehicle. It helps to quickly
cool the air inside the vehicle or
prevent outside air and odors from
entering.
%(Outside Air): Press to turn
on the outside air. An indicator light
comes on. Outside air is circulated
throughout the vehicle.
Rear Window Defogger
<(Rear Defogger): Press to turn
the rear window defogger on or off.
The rear window defogger turns off
after about 10 minutes. It can also
be turned off by turning the ignition
to ACC/ACCESSORY or LOCK/
OFF. If turned on again, it runs for
about five minutes before
turning off.
Do not drive the vehicle until all the
windows are clear.
Notice: Do not use a razor blade
or sharp object to clear the inside
rear window. Do not adhere
anything to the defogger grid
lines in the rear glass. These
actions may damage the rear
defogger. Repairs would not be
covered by your warranty.
Page 200 of 394
7-4 Climate Controls
With Heated Seats
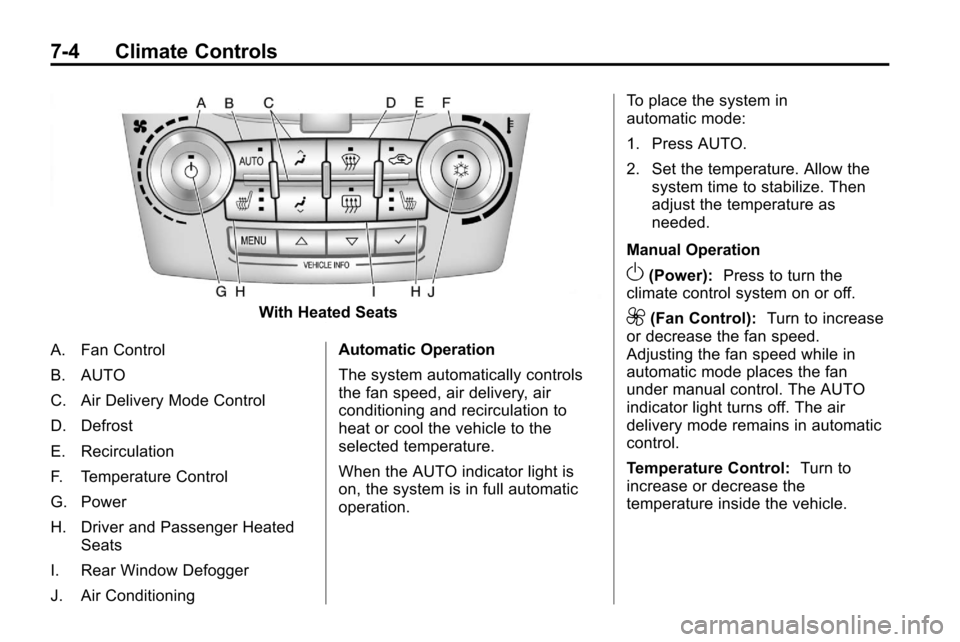
A. Fan Control
B. AUTO
C. Air Delivery Mode Control
D. Defrost
E. Recirculation
F. Temperature Control
G. Power
H. Driver and Passenger Heated Seats
I. Rear Window Defogger
J. Air Conditioning Automatic Operation
The system automatically controls
the fan speed, air delivery, air
conditioning and recirculation to
heat or cool the vehicle to the
selected temperature.
When the AUTO indicator light is
on, the system is in full automatic
operation.To place the system in
automatic mode:
1. Press AUTO.
2. Set the temperature. Allow the
system time to stabilize. Then
adjust the temperature as
needed.
Manual Operation
O(Power): Press to turn the
climate control system on or off.
9(Fan Control): Turn to increase
or decrease the fan speed.
Adjusting the fan speed while in
automatic mode places the fan
under manual control. The AUTO
indicator light turns off. The air
delivery mode remains in automatic
control.
Temperature Control: Turn to
increase or decrease the
temperature inside the vehicle.
Page 201 of 394
Climate Controls 7-5
H/G(Air Delivery Mode
Control): Press mode up or mode
down to cycle through the different
air delivery modes. The current
mode is shown on the display.
Select from the following:
F (Vent): Air is directed to the
instrument panel outlets.
* (Bi-Level): Air is directed to the
instrument panel outlets and the
floor outlets.
7 (Floor): Air is directed to the
floor outlets.
W(Defog): Clears the windows of
fog or moisture. Air is directed to the
windshield and floor outlets.
0(Defrost): Clears the
windshield of fog or frost more
quickly. Air is directed to the
windshield and side window outlets.
Selecting defrost disables the
automatic mode.
For best results, clear all snow and
ice from the windshield before
defrosting. Do not drive the vehicle until all the
windows are clear.
Air Conditioning
#(Air Conditioning):
Press to
turn the air conditioning on or off.
If the fan is turned off or the outside
temperature falls below freezing, the
air conditioning will not work. When
in AUTO, the air conditioning will
come on automatically as needed.
h(Recirculation): Press to turn
on the recirculation. Press to
alternate between recirculation and
outside air, if the vehicle does not
have a separate outside air button.
The indicator light turns on when
recirculation is selected. Air is
recirculated inside the vehicle.
It helps quickly cool the air inside
the vehicle or prevent outside air
and odors from entering.
%(Outside Air, If Equipped):
Press to turn on the outside air. An
indicator light comes on. Outside air
is circulated throughout the vehicle.
Rear Window Defogger
<(Rear Defogger): Press to turn
the rear window defogger on or off.
The rear window defogger turns off
after about 10 minutes. It can also
be turned off by turning the ignition
to ACC/ACCESSORY or LOCK/
OFF. If turned on again, it runs
for about five minutes before
turning off.
Do not drive the vehicle until all the
windows are clear.
Notice: Do not use a razor blade
or sharp object to clear the inside
rear window. Do not adhere
anything to the defogger grid
lines in the rear glass. These
actions may damage the rear
defogger. Repairs would not be
covered by your warranty.
L/M(Driver and Passenger
Heated Seats): For vehicles with
heated seats, see Heated Front
Seats on page 2‑7.
Page 208 of 394
8-4 Driving and Operating
Medical research shows that
alcohol in a person's system can
make crash injuries worse,
especially injuries to the brain,
spinal cord, or heart. This means
that when anyone who has been
drinking—driver or passenger —is
in a crash, that person's chance of
being killed or permanently disabled
is higher than if the person had not
been drinking.
Control of a Vehicle
The following three systems
help to control the vehicle while
driving —brakes, steering, and
accelerator. At times, as when
driving on snow or ice, it is easy to
ask more of those control systems
than the tires and road can provide.
Meaning, you can lose control of the
vehicle. See StabiliTrak System
on
page 8‑43.
Adding non‐dealer/non‐retailer
accessories can affect vehicle
performance. See Accessories
and Modifications on page 9‑4.
Braking
See Brake System Warning Lighton page 4‑19.
Braking action involves perception
time and reaction time. Deciding to
push the brake pedal is perception
time. Actually doing it is
reaction time.
Average reaction time is about
three‐fourths of a second. But that is
only an average. It might be less
with one driver and as long as two
or three seconds or more with
another. Age, physical condition,
alertness, coordination, and
eyesight all play a part. So do
alcohol, drugs, and frustration. But
even in three‐fourths of a second, a
vehicle moving at 100 km/h
(60 mph) travels 20 m (66 ft). That
could be a lot of distance in an
emergency, so keeping enough
space between the vehicle and
others is important. And, of course, actual stopping
distances vary greatly with the
surface of the road, whether it is
pavement or gravel; the condition of
the road, whether it is wet, dry,
or icy; tire tread; the condition of the
brakes; the weight of the vehicle;
and the amount of brake force
applied.
Avoid needless heavy
braking. Some people drive in
spurts
—heavy acceleration
followed by heavy braking —rather
than keeping pace with traffic. This
is a mistake. The brakes might not
have time to cool between hard
stops. The brakes will wear out
much faster with a lot of heavy
braking. Keeping pace with the
traffic and allowing realistic
following distances eliminates a lot
of unnecessary braking. That means
better braking and longer brake life.
Page 210 of 394
8-6 Driving and Operating
Steering in Emergencies
There are times when steering can
be more effective than braking. For
example, you come over a hill and
find a truck stopped in your lane,
or a car suddenly pulls out from
nowhere, or a child darts out from
between parked cars and stops right
in front of you. These problems can
be avoided by braking—if you can
stop in time. But sometimes you
cannot stop in time because there is
no room. That is the time for
evasive action —steering around
the problem.
The vehicle can perform very well
in emergencies like these. First
apply the brakes. See Braking
on
page 8‑4. It is better to remove as
much speed as possible from a
collision. Then steer around the
problem, to the left or right
depending on the space available.
An emergency like this requires
close attention and a quick decision.
If holding the steering wheel at the
recommended 9 and 3 o'clock
positions, it can be turned a full
180 degrees very quickly without
removing either hand. But you have
to act fast, steer quickly, and just as
quickly straighten the wheel once
you have avoided the object.
The fact that such emergency
situations are always possible is a
good reason to practice defensive
driving at all times and wear safety
belts properly.
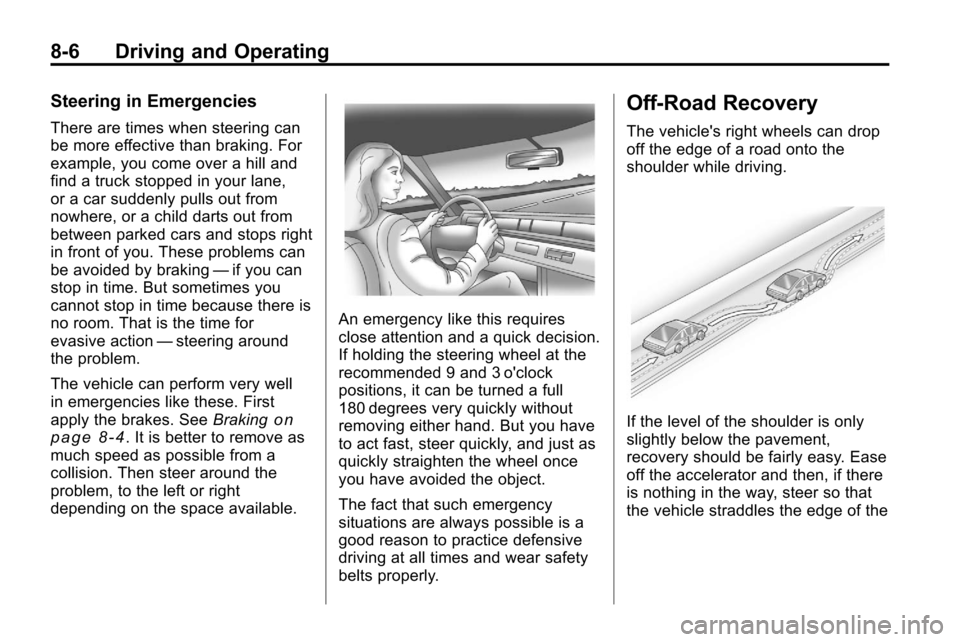
Off-Road Recovery
The vehicle's right wheels can drop
off the edge of a road onto the
shoulder while driving.
If the level of the shoulder is only
slightly below the pavement,
recovery should be fairly easy. Ease
off the accelerator and then, if there
is nothing in the way, steer so that
the vehicle straddles the edge of the