2010 CHEVROLET CORVETTE wheel
[x] Cancel search: wheelPage 311 of 472
If you put things inside your vehicle—like
suitcases, tools, packages or anything
else —they will go as fast as the vehicle goes.
If you have to stop or turn quickly, or if there is
a crash, they will keep going.
{WARNING:
Things you put inside your vehicle can strike
and injure people in a sudden stop or turn,
or in a crash.
.Put things in the rear area of your
vehicle. Try to spread the weight evenly.
.Never stack heavier things, like
suitcases, inside the vehicle so that some
of them are above the tops of the seats.
.Do not leave an unsecured child restraint
in your vehicle.
.When you carry something inside the
vehicle, secure it whenever you can.
Towing
Towing Your Vehicle
To avoid damage, the disabled vehicle should be
towed with all four wheels off the ground. Consult your
dealer/retailer or a professional towing service if the
disabled vehicle must be towed. See Roadside
Assistance Program on page 8‑7.
Recreational Vehicle Towing
Notice: Dolly towing or dinghy towing the vehicle
may cause damage because of reduced ground
clearance. Always put the vehicle on a flatbed truck
or trailer.
The vehicle was neither designed nor intended to be
towed with any of its wheels on the ground. If the
vehicle must be towed, see “Towing Your Vehicle”
earlier in this section.
Towing a Trailer
The vehicle is neither designed nor intended to
tow a trailer.
5-33
Page 314 of 472
Section 6 Service and Appearance Care
Run-Flat Tires . . . . . . . . . . . . . . . . . . . . . . . . . . . . . . . . . 6-69
Inflation - Tire Pressure . . . . . . . . . . . . . . . . . . . . . . . . 6-70
High-Speed Operation . . . . . . . . . . . . . . . . . . . . . . . . . 6-72
Tire Pressure Monitor System . . . . . . . . . . . . . . . . . 6-72
Tire Pressure Monitor Operation . . . . . . . . . . . . . . . 6-74
Tire Inspection and Rotation . . . . . . . . . . . . . . . . . . . 6-76
When It Is Time for New Tires . . . . . . . . . . . . . . . . . 6-76
Buying New Tires . . . . . . . . . . . . . . . . . . . . . . . . . . . . . . 6-77
Different Size Tires and Wheels . . . . . . . . . . . . . . . 6-79
Uniform Tire Quality Grading . . . . . . . . . . . . . . . . . . . 6-79
Wheel Alignment and Tire Balance . . . . . . . . . . . . 6-81
Wheel Replacement . . . . . . . . . . . . . . . . . . . . . . . . . . . 6-81
Tire Chains . . . . . . . . . . . . . . . . . . . . . . . . . . . . . . . . . . . . 6-84
Lifting the Vehicle . . . . . . . . . . . . . . . . . . . . . . . . . . . . . . 6-84
If a Tire Goes Flat . . . . . . . . . . . . . . . . . . . . . . . . . . . . . 6-89
Appearance Care . . . . . . . . . . . . . . . . . . . . . . . . . . . . . . . . . 6-90
Interior Cleaning . . . . . . . . . . . . . . . . . . . . . . . . . . . . . . 6-90
Fabric/Carpet . . . . . . . . . . . . . . . . . . . . . . . . . . . . . . . . . . 6-91
Coated Moldings . . . . . . . . . . . . . . . . . . . . . . . . . . . . . . . 6-92
Leather . . . . . . . . . . . . . . . . . . . . . . . . . . . . . . . . . . . . . . . . 6-92
Instrument Panel, Vinyl, and Other Plastic Surfaces . . . . . . . . . . . . . . . . . . . . . . . . . . . . . . . . . . . . . 6-93
Cargo Cover and Convenience Net . . . . . . . . . . . . 6-93
Care of Safety Belts . . . . . . . . . . . . . . . . . . . . . . . . . . . 6-93
Weatherstrips . . . . . . . . . . . . . . . . . . . . . . . . . . . . . . . . . . 6-93
Washing Your Vehicle . . . . . . . . . . . . . . . . . . . . . . . . . 6-94 Cleaning Exterior Lamps/Lenses . . . . . . . . . . . . . . 6-94
Finish Care . . . . . . . . . . . . . . . . . . . . . . . . . . . . . . . . . . . . 6-95
Windshield and Wiper Blades . . . . . . . . . . . . . . . . . . 6-96
Removable Roof Panel . . . . . . . . . . . . . . . . . . . . . . . . 6-96
Convertible Top . . . . . . . . . . . . . . . . . . . . . . . . . . . . . . . . 6-97
Aluminum or Chrome-Plated Wheels
and Trim . . . . . . . . . . . . . . . . . . . . . . . . . . . . . . . . . . . . . 6-97
Tires . . . . . . . . . . . . . . . . . . . . . . . . . . . . . . . . . . . . . . . . . . . 6-98
Finish Damage . . . . . . . . . . . . . . . . . . . . . . . . . . . . . . . . 6-98
Underbody Maintenance . . . . . . . . . . . . . . . . . . . . . . . 6-98
Fiberglass Springs (Composite Springs) . . . . . . . 6-99
Chemical Paint Spotting . . . . . . . . . . . . . . . . . . . . . . . 6-99
Vehicle Identification . . . . . . . . . . . . . . . . . . . . . . . . . . . . . 6-99
Vehicle Identification Number (VIN) . . . . . . . . . . . . 6-99
Service Parts Identification Label . . . . . . . . . . . . . 6-100
Electrical System . . . . . . . . . . . . . . . . . . . . . . . . . . . . . . . . 6-100
Add-On Electrical Equipment . . . . . . . . . . . . . . . . . 6-100
Headlamp Wiring . . . . . . . . . . . . . . . . . . . . . . . . . . . . . 6-100
Windshield Wiper Fuses . . . . . . . . . . . . . . . . . . . . . . 6-100
Power Windows and Other Power Options . . . 6-100
Fuses and Circuit Breakers . . . . . . . . . . . . . . . . . . . 6-101
Instrument Panel Fuse Block . . . . . . . . . . . . . . . . . 6-101
Engine Compartment Fuse Block . . . . . . . . . . . . . 6-104
Capacities and Specifications . . . . . . . . . . . . . . . . . . 6-108
6-2
Page 322 of 472
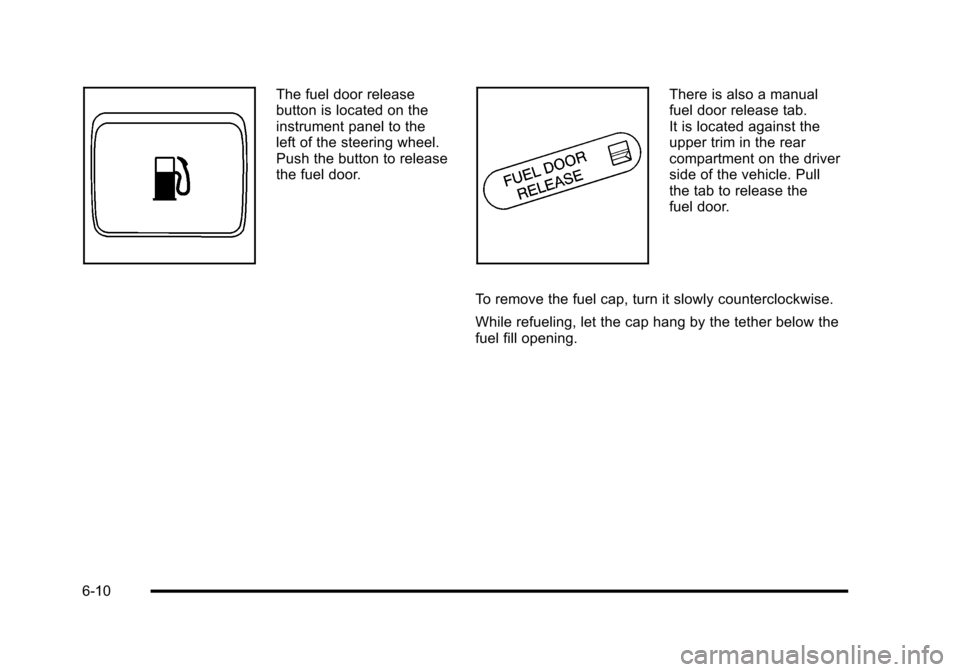
The fuel door release
button is located on the
instrument panel to the
left of the steering wheel.
Push the button to release
the fuel door. There is also a manual
fuel door release tab.
It is located against the
upper trim in the rear
compartment on the driver
side of the vehicle. Pull
the tab to release the
fuel door.
To remove the fuel cap, turn it slowly counterclockwise.
While refueling, let the cap hang by the tether below the
fuel fill opening.
6-10
Page 358 of 472
Brake Wear (ZR1 Only)
The ZR1 model does not have built-in brake pad wear
indicators and periodic visual inspection of the brake
pads is required to determine when to replace the
brake pads.
Notice: Continuing to drive with worn-out brake
pads could result in costly brake repair.
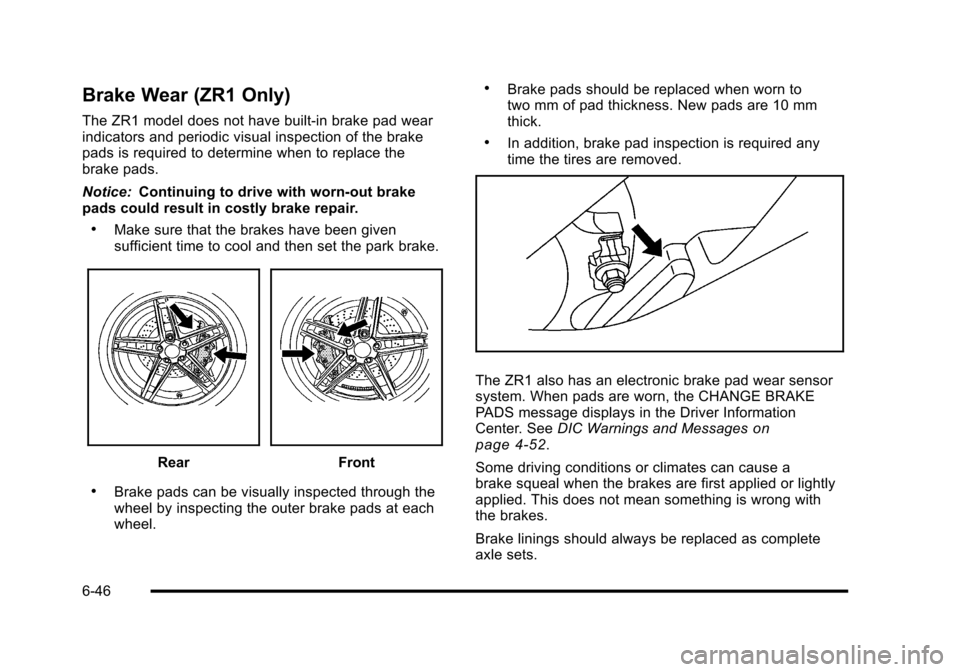
.Make sure that the brakes have been given
sufficient time to cool and then set the park brake.
RearFront
.Brake pads can be visually inspected through the
wheel by inspecting the outer brake pads at each
wheel.
.Brake pads should be replaced when worn to
two mm of pad thickness. New pads are 10 mm
thick.
.In addition, brake pad inspection is required any
time the tires are removed.
The ZR1 also has an electronic brake pad wear sensor
system. When pads are worn, the CHANGE BRAKE
PADS message displays in the Driver Information
Center. See DIC Warnings and Messages
on
page 4‑52.
Some driving conditions or climates can cause a
brake squeal when the brakes are first applied or lightly
applied. This does not mean something is wrong with
the brakes.
Brake linings should always be replaced as complete
axle sets.
6-46
Page 359 of 472
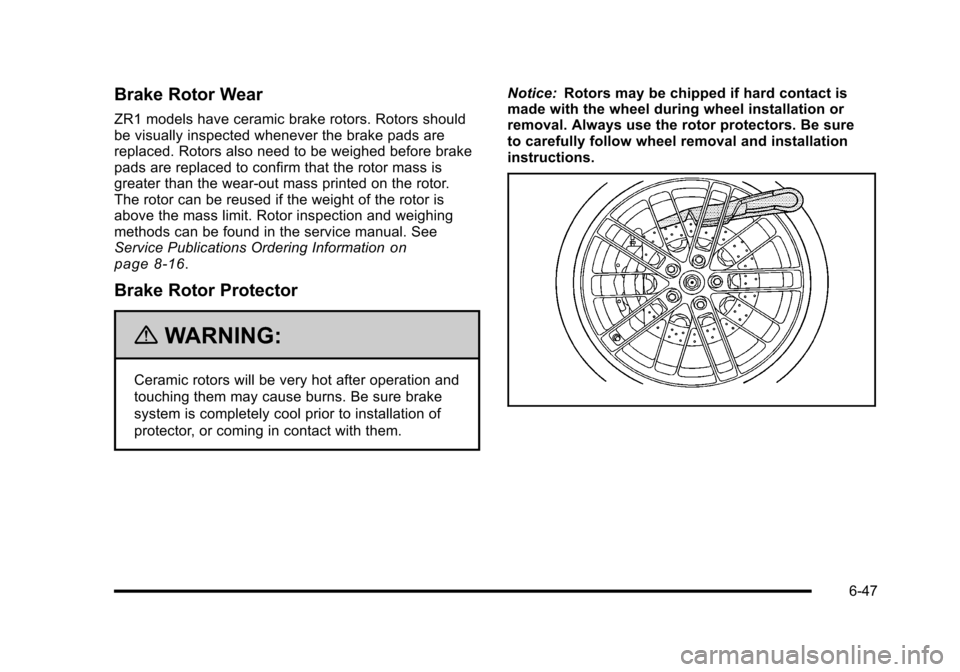
Brake Rotor Wear
ZR1 models have ceramic brake rotors. Rotors should
be visually inspected whenever the brake pads are
replaced. Rotors also need to be weighed before brake
pads are replaced to confirm that the rotor mass is
greater than the wear‐out mass printed on the rotor.
The rotor can be reused if the weight of the rotor is
above the mass limit. Rotor inspection and weighing
methods can be found in the service manual. See
Service Publications Ordering Information
on
page 8‑16.
Brake Rotor Protector
{WARNING:
Ceramic rotors will be very hot after operation and
touching them may cause burns. Be sure brake
system is completely cool prior to installation of
protector, or coming in contact with them. Notice:
Rotors may be chipped if hard contact is
made with the wheel during wheel installation or
removal. Always use the rotor protectors. Be sure
to carefully follow wheel removal and installation
instructions.
6-47
Page 360 of 472
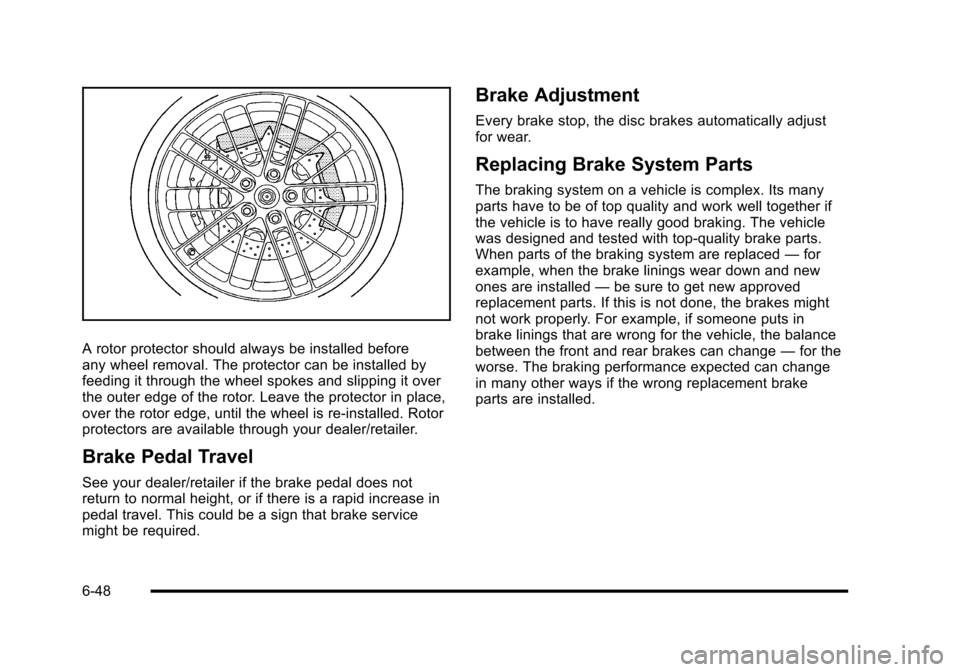
A rotor protector should always be installed before
any wheel removal. The protector can be installed by
feeding it through the wheel spokes and slipping it over
the outer edge of the rotor. Leave the protector in place,
over the rotor edge, until the wheel is re‐installed. Rotor
protectors are available through your dealer/retailer.
Brake Pedal Travel
See your dealer/retailer if the brake pedal does not
return to normal height, or if there is a rapid increase in
pedal travel. This could be a sign that brake service
might be required.
Brake Adjustment
Every brake stop, the disc brakes automatically adjust
for wear.
Replacing Brake System Parts
The braking system on a vehicle is complex. Its many
parts have to be of top quality and work well together if
the vehicle is to have really good braking. The vehicle
was designed and tested with top-quality brake parts.
When parts of the braking system are replaced —for
example, when the brake linings wear down and new
ones are installed —be sure to get new approved
replacement parts. If this is not done, the brakes might
not work properly. For example, if someone puts in
brake linings that are wrong for the vehicle, the balance
between the front and rear brakes can change —for the
worse. The braking performance expected can change
in many other ways if the wrong replacement brake
parts are installed.
6-48
Page 369 of 472
If the low-beam headlamp needs to be replaced, see
your dealer/retailer. See High Intensity Discharge (HID)
Lighting
on page 6‑56for more information.
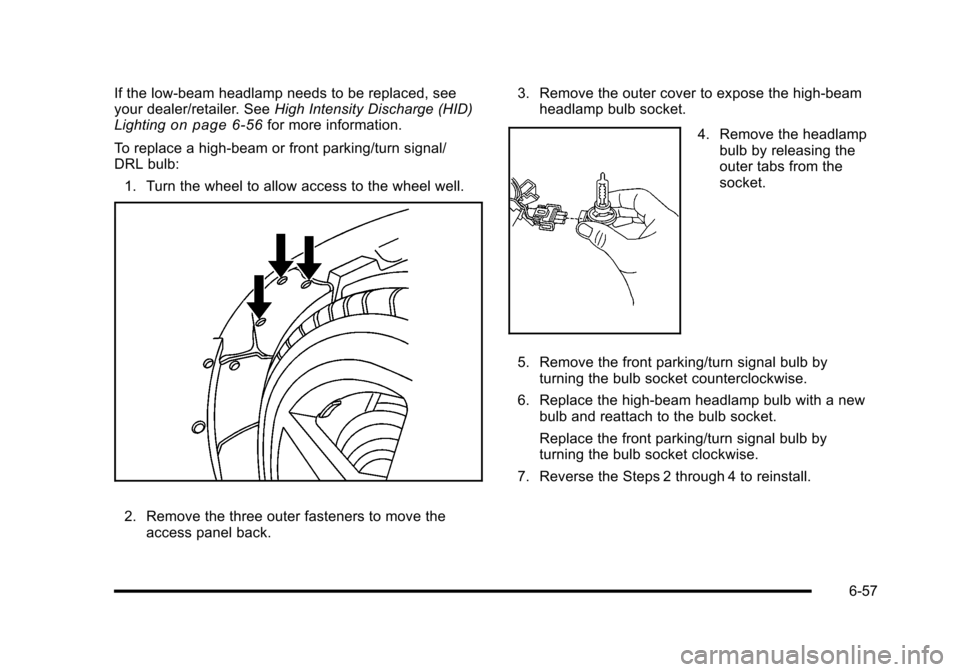
To replace a high-beam or front parking/turn signal/
DRL bulb: 1. Turn the wheel to allow access to the wheel well.
2. Remove the three outer fasteners to move the access panel back. 3. Remove the outer cover to expose the high-beam
headlamp bulb socket.
4. Remove the headlamp
bulb by releasing the
outer tabs from the
socket.
5. Remove the front parking/turn signal bulb by turning the bulb socket counterclockwise.
6. Replace the high-beam headlamp bulb with a new bulb and reattach to the bulb socket.
Replace the front parking/turn signal bulb by
turning the bulb socket clockwise.
7. Reverse the Steps 2 through 4 to reinstall.
6-57
Page 375 of 472
Low‐Profile Performance Tire
The original equipment tires on your vehicle are
classified as low‐profile performance tires. These
tires are designed for very responsive driving on
wet or dry pavement. You may also notice more
road noise with low‐profile tires and that they tend
to wear faster.
Notice:If the vehicle has low‐profile tires, they
are more susceptible to damage from road
hazards or curb impact than standard profile
tires. Tire and/or wheel assembly damage can
occur when coming into contact with road
hazards like, potholes, or sharp edged objects,
or when sliding into a curb. The vehicle
warranty does not cover this type of damage.
Keep tires set to the correct inflation pressure
and, when possible avoid contact with curbs,
potholes, and other road hazards.
Winter Tires
If you expect to drive on snow or ice covered roads
often, you may want to get winter tires for your vehicle.
All season tires provide good overall performance on
most surfaces but they may not offer the traction you
would like or the same level of performance as winter
tires on snow or ice covered roads. Winter tires, in general, are designed for increased
traction on snow and ice covered roads. With winter
tires, there may be decreased dry road traction,
increased road noise, and shorter tread life. After
switching to winter tires, be alert for changes in
vehicle handling and braking.
See your dealer/retailer for details regarding winter tire
availability and proper tire selection. Also, see
Buying
New Tires on page 6‑77.
If you choose to use winter tires:
.Use tires of the same brand and tread type on all
four wheel positions.
.Use only radial ply tires of the same size, load
range, and speed rating as the original equipment
tires.
Winter tires with the same speed rating as your original
equipment tires may not be available for H, V, W, Y, and
ZR speed rated tires. If you choose winter tires with a
lower speed rating, never exceed the tire's maximum
speed capability.
6-63