2010 CHEVROLET CORVETTE washer fluid
[x] Cancel search: washer fluidPage 331 of 472
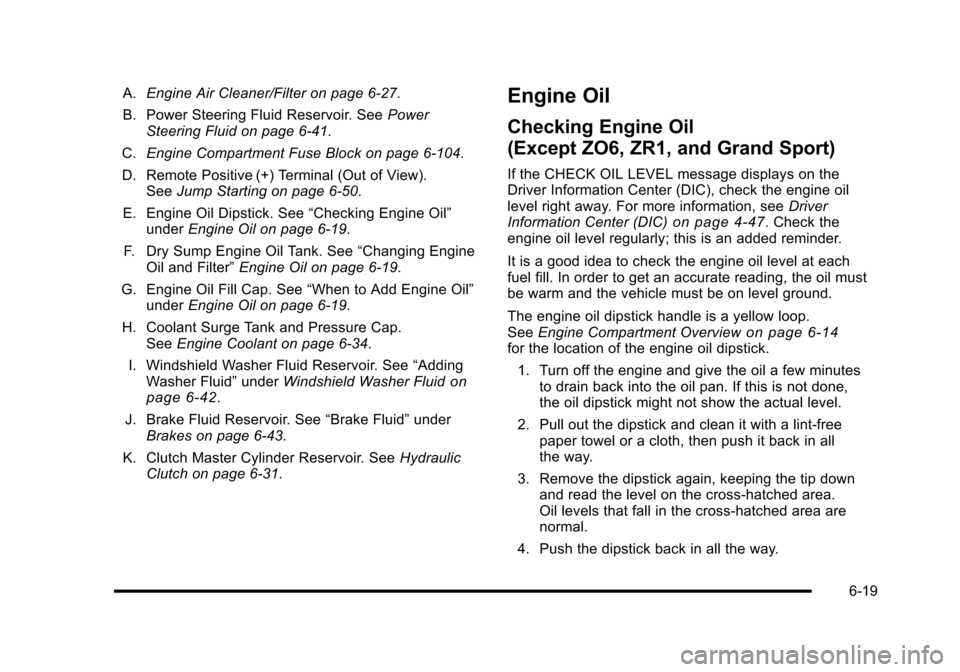
A.Engine Air Cleaner/Filter on page 6‑27.
B. Power Steering Fluid Reservoir. See Power
Steering Fluid on page 6‑41.
C. Engine Compartment Fuse Block on page 6‑104.
D. Remote Positive (+) Terminal (Out of View). See Jump Starting on page 6‑50.
E. Engine Oil Dipstick. See “Checking Engine Oil”
under Engine Oil on page 6‑19.
F. Dry Sump Engine Oil Tank. See “Changing Engine
Oil and Filter” Engine Oil on page 6‑19.
G. Engine Oil Fill Cap. See “When to Add Engine Oil”
under Engine Oil on page 6‑19.
H. Coolant Surge Tank and Pressure Cap. See Engine Coolant on page 6‑34.
I. Windshield Washer Fluid Reservoir. See “Adding
Washer Fluid” underWindshield Washer Fluid
on
page 6‑42.
J. Brake Fluid Reservoir. See “Brake Fluid”under
Brakes on page 6‑43.
K. Clutch Master Cylinder Reservoir. See Hydraulic
Clutch on page 6‑31.
Engine Oil
Checking Engine Oil
(Except ZO6, ZR1, and Grand Sport)
If the CHECK OIL LEVEL message displays on the
Driver Information Center (DIC), check the engine oil
level right away. For more information, see Driver
Information Center (DIC)
on page 4‑47. Check the
engine oil level regularly; this is an added reminder.
It is a good idea to check the engine oil level at each
fuel fill. In order to get an accurate reading, the oil must
be warm and the vehicle must be on level ground.
The engine oil dipstick handle is a yellow loop.
See Engine Compartment Overview
on page 6‑14for the location of the engine oil dipstick.
1. Turn off the engine and give the oil a few minutes to drain back into the oil pan. If this is not done,
the oil dipstick might not show the actual level.
2. Pull out the dipstick and clean it with a lint‐free paper towel or a cloth, then push it back in all
the way.
3. Remove the dipstick again, keeping the tip down and read the level on the cross‐hatched area.
Oil levels that fall in the cross‐hatched area are
normal.
4. Push the dipstick back in all the way.
6-19
Page 354 of 472
How to Check Power Steering Fluid
To check the power steering fluid: 1. Turn the ignition off and let the engine compartment cool down.
2. Wipe the cap and the top of the reservoir clean.
3. Unscrew the cap and wipe the dipstick with a clean rag.
4. Replace the cap and completely tighten it.
5. Remove the cap again and look at the fluid level on the dipstick. There are markings on both sides
of the dipstick.
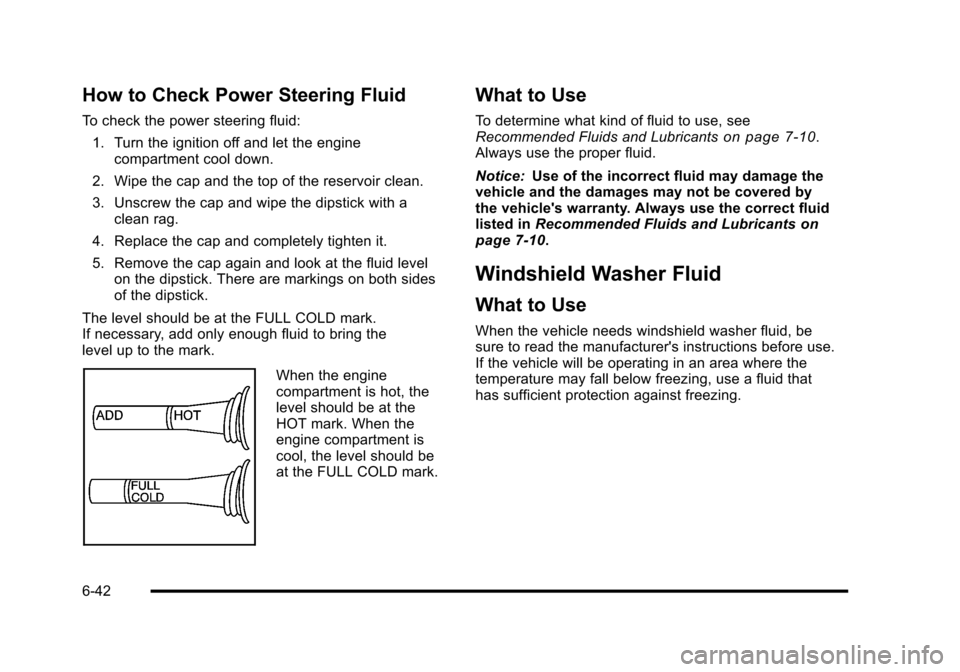
The level should be at the FULL COLD mark.
If necessary, add only enough fluid to bring the
level up to the mark.
When the engine
compartment is hot, the
level should be at the
HOT mark. When the
engine compartment is
cool, the level should be
at the FULL COLD mark.
What to Use
To determine what kind of fluid to use, see
Recommended Fluids and Lubricantson page 7‑10.
Always use the proper fluid.
Notice: Use of the incorrect fluid may damage the
vehicle and the damages may not be covered by
the vehicle's warranty. Always use the correct fluid
listed in Recommended Fluids and Lubricants
on
page 7‑10.
Windshield Washer Fluid
What to Use
When the vehicle needs windshield washer fluid, be
sure to read the manufacturer's instructions before use.
If the vehicle will be operating in an area where the
temperature may fall below freezing, use a fluid that
has sufficient protection against freezing.
6-42
Page 355 of 472
Adding Washer Fluid
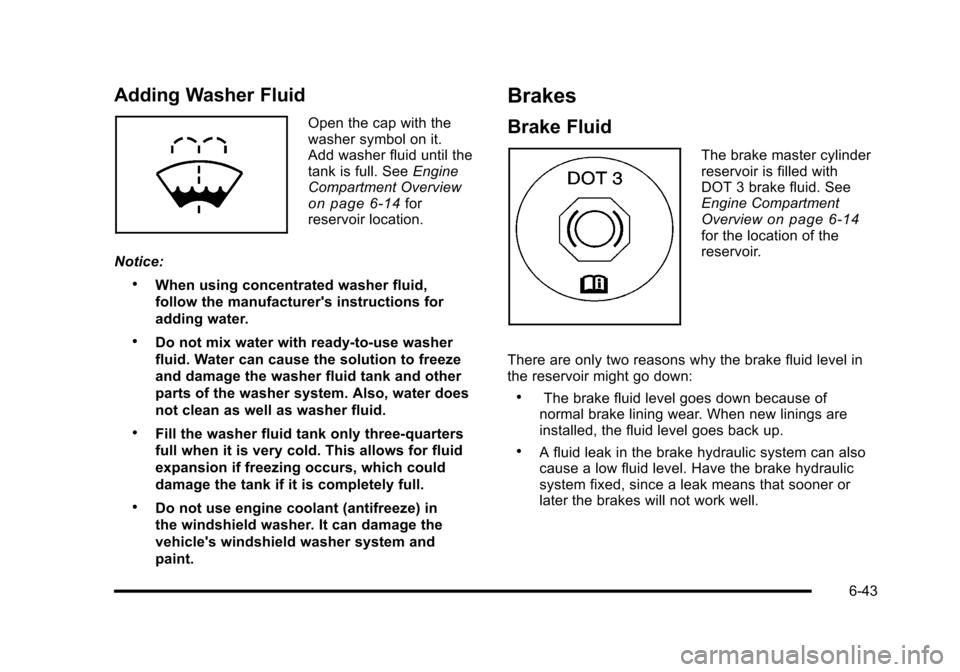
Open the cap with the
washer symbol on it.
Add washer fluid until the
tank is full. See Engine
Compartment Overview
on page 6‑14for
reservoir location.
Notice:
.When using concentrated washer fluid,
follow the manufacturer's instructions for
adding water.
.Do not mix water with ready-to-use washer
fluid. Water can cause the solution to freeze
and damage the washer fluid tank and other
parts of the washer system. Also, water does
not clean as well as washer fluid.
.Fill the washer fluid tank only three-quarters
full when it is very cold. This allows for fluid
expansion if freezing occurs, which could
damage the tank if it is completely full.
.Do not use engine coolant (antifreeze) in
the windshield washer. It can damage the
vehicle's windshield washer system and
paint.
Brakes
Brake Fluid
The brake master cylinder
reservoir is filled with
DOT 3 brake fluid. See
Engine Compartment
Overview
on page 6‑14for the location of the
reservoir.
There are only two reasons why the brake fluid level in
the reservoir might go down:
.The brake fluid level goes down because of
normal brake lining wear. When new linings are
installed, the fluid level goes back up.
.A fluid leak in the brake hydraulic system can also
cause a low fluid level. Have the brake hydraulic
system fixed, since a leak means that sooner or
later the brakes will not work well.
6-43
Page 408 of 472
Windshield and Wiper Blades
Clean the outside of the windshield with glass cleaner.
Clean the rubber blades using a lint free cloth or paper
towel soaked with windshield washer fluid or a mild
detergent. Wash the windshield thoroughly when
cleaning the blades. Bugs, road grime, sap, and a
buildup of vehicle wash/wax treatments may cause
wiper streaking. Replace the wiper blades if they are
worn or damaged.
Wipers can be damaged by:
.Extreme dusty conditions
.Sand and salt
.Heat and sun
.Snow and ice, without proper removal
Removable Roof Panel
Notice: If you use a glass treatment and/or
conditioner that contains ethyl alcohol or ethyl
sulfate on the roof panel, you could damage the
panel. The repairs would not be covered by your
warranty. Only use a GM-approved glass cleaner
on the roof panel.
Special care is necessary when cleaning, removing,
and/or storing the roof panel.
.Flush with water to remove dust and dirt, then dry
the panel.
.Clean a transparent roof panel with GM Glass
Cleaner. Leave the cleaner on the panel for
one minute, then wipe the panel with a soft,
lint-free cloth. Do not use glass cleaner on a
painted roof panel.
.Do not use abrasive cleaning materials on either
type of panel.
If water drops are frequently allowed to dry on the roof
panel, impurities in the water will adhere to the top.
These impurities may etch or mar the finish. When the
panel gets wet, dry it off.
6-96
Page 425 of 472
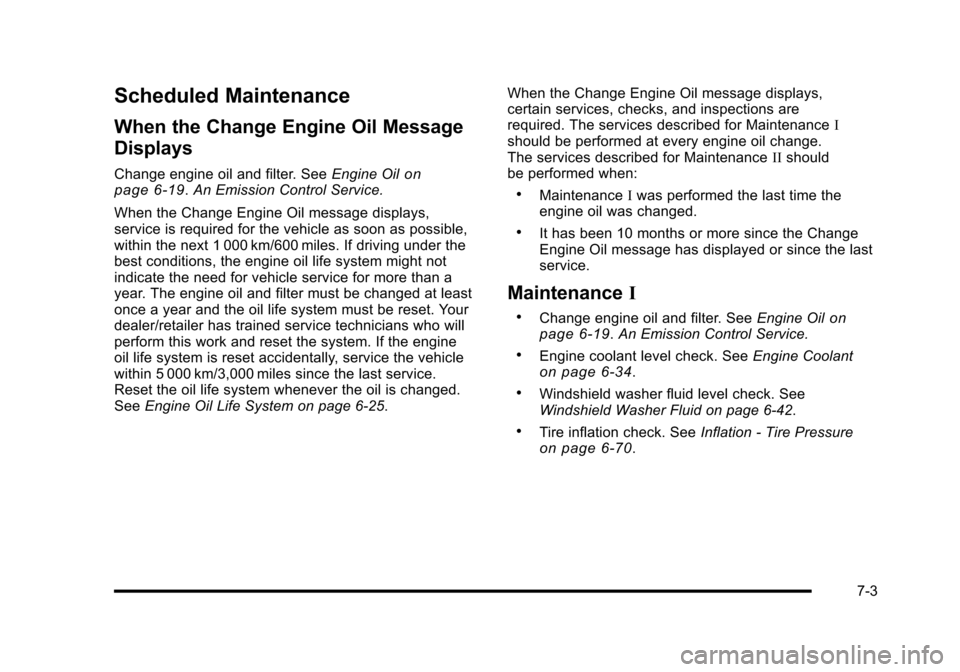
Scheduled Maintenance
When the Change Engine Oil Message
Displays
Change engine oil and filter. See Engine Oilon
page 6‑19. An Emission Control Service.
When the Change Engine Oil message displays,
service is required for the vehicle as soon as possible,
within the next 1 000 km/600 miles. If driving under the
best conditions, the engine oil life system might not
indicate the need for vehicle service for more than a
year. The engine oil and filter must be changed at least
once a year and the oil life system must be reset. Your
dealer/retailer has trained service technicians who will
perform this work and reset the system. If the engine
oil life system is reset accidentally, service the vehicle
within 5 000 km/3,000 miles since the last service.
Reset the oil life system whenever the oil is changed.
See Engine Oil Life System on page 6‑25. When the Change Engine Oil message displays,
certain services, checks, and inspections are
required. The services described for Maintenance
I
should be performed at every engine oil change.
The services described for Maintenance IIshould
be performed when:.Maintenance Iwas performed the last time the
engine oil was changed.
.It has been 10 months or more since the Change
Engine Oil message has displayed or since the last
service.
Maintenance I
.Change engine oil and filter. See Engine Oilon
page 6‑19. An Emission Control Service.
.Engine coolant level check. See Engine Coolanton page 6‑34.
.Windshield washer fluid level check. See
Windshield Washer Fluid on page 6‑42.
.Tire inflation check. See Inflation - Tire Pressureon page 6‑70.
7-3
Page 426 of 472
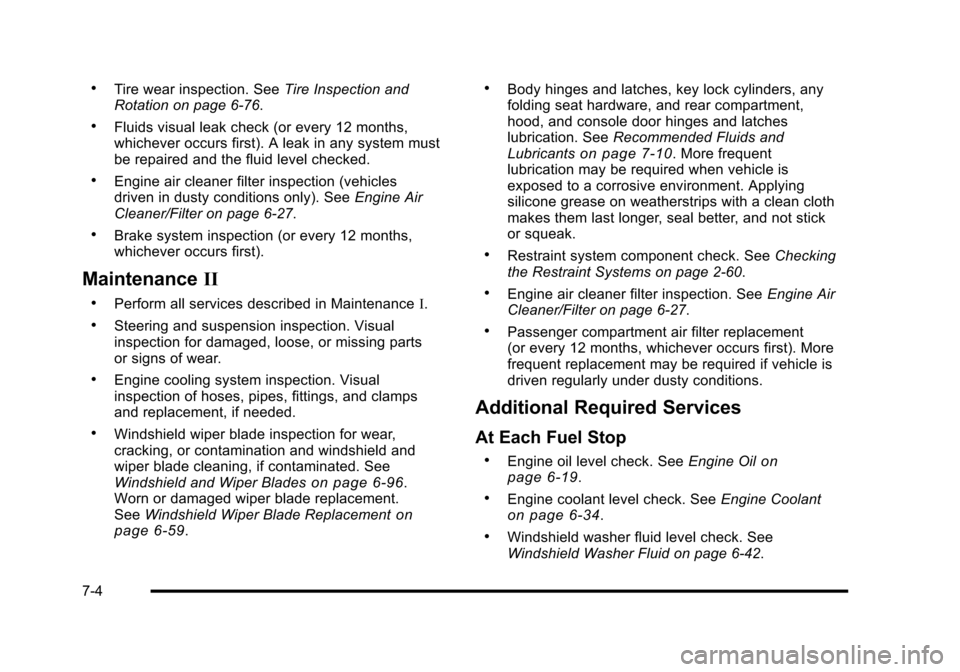
.Tire wear inspection. SeeTire Inspection and
Rotation on page 6‑76.
.Fluids visual leak check (or every 12 months,
whichever occurs first). A leak in any system must
be repaired and the fluid level checked.
.Engine air cleaner filter inspection (vehicles
driven in dusty conditions only). See Engine Air
Cleaner/Filter on page 6‑27.
.Brake system inspection (or every 12 months,
whichever occurs first).
Maintenance II
.Perform all services described in Maintenance I.
.Steering and suspension inspection. Visual
inspection for damaged, loose, or missing parts
or signs of wear.
.Engine cooling system inspection. Visual
inspection of hoses, pipes, fittings, and clamps
and replacement, if needed.
.Windshield wiper blade inspection for wear,
cracking, or contamination and windshield and
wiper blade cleaning, if contaminated. See
Windshield and Wiper Blades
on page 6‑96.
Worn or damaged wiper blade replacement.
See Windshield Wiper Blade Replacement
on
page 6‑59.
.Body hinges and latches, key lock cylinders, any
folding seat hardware, and rear compartment,
hood, and console door hinges and latches
lubrication. See Recommended Fluids and
Lubricants
on page 7‑10. More frequent
lubrication may be required when vehicle is
exposed to a corrosive environment. Applying
silicone grease on weatherstrips with a clean cloth
makes them last longer, seal better, and not stick
or squeak.
.Restraint system component check. See Checking
the Restraint Systems on page 2‑60.
.Engine air cleaner filter inspection. See Engine Air
Cleaner/Filter on page 6‑27.
.Passenger compartment air filter replacement
(or every 12 months, whichever occurs first). More
frequent replacement may be required if vehicle is
driven regularly under dusty conditions.
Additional Required Services
At Each Fuel Stop
.Engine oil level check. See Engine Oilon
page 6‑19.
.Engine coolant level check. See Engine Coolanton page 6‑34.
.Windshield washer fluid level check. See
Windshield Washer Fluid on page 6‑42.
7-4
Page 429 of 472
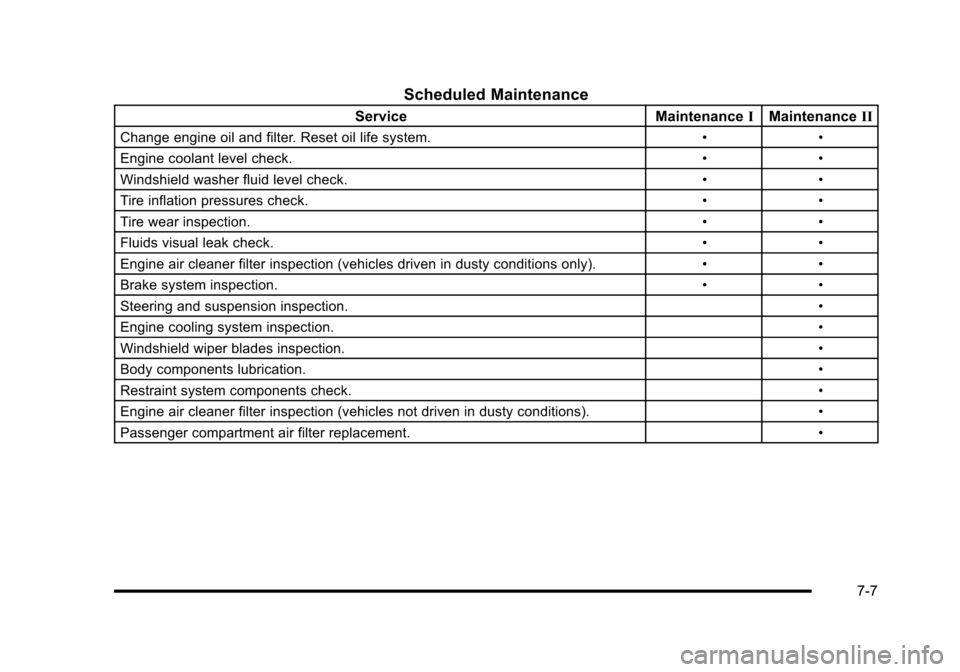
Scheduled Maintenance
ServiceMaintenanceIMaintenance II
Change engine oil and filter. Reset oil life system. ••
Engine coolant level check. ••
Windshield washer fluid level check. ••
Tire inflation pressures check. ••
Tire wear inspection. ••
Fluids visual leak check. ••
Engine air cleaner filter inspection (vehicles driven in dusty conditions only). ••
Brake system inspection. ••
Steering and suspension inspection. •
Engine cooling system inspection. •
Windshield wiper blades inspection. •
Body components lubrication. •
Restraint system components check. •
Engine air cleaner filter inspection (vehicles not driven in dusty conditions). •
Passenger compartment air filter replacement. •
7-7
Page 432 of 472
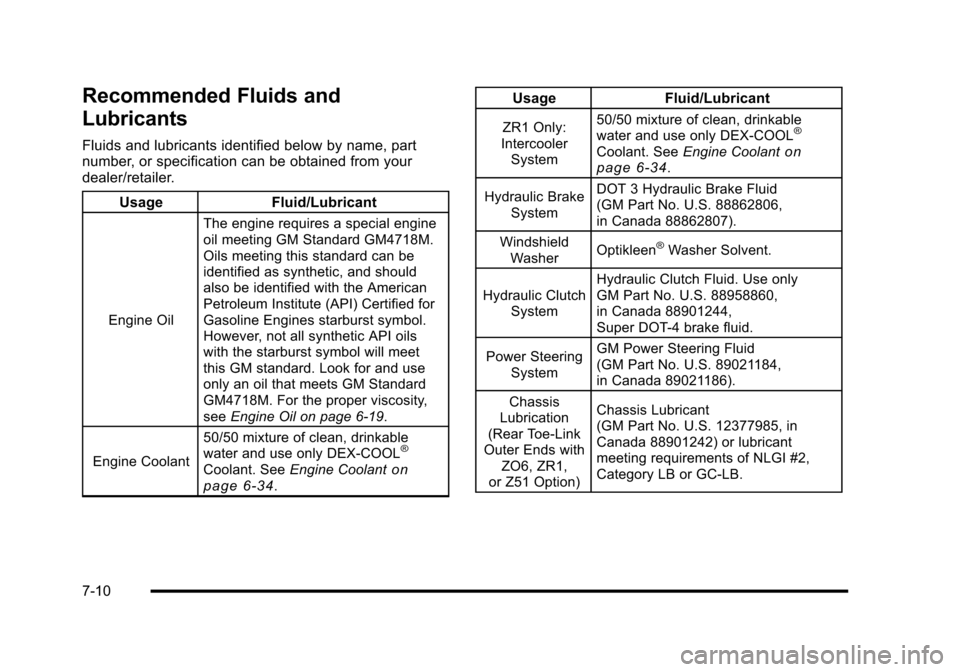
Recommended Fluids and
Lubricants
Fluids and lubricants identified below by name, part
number, or specification can be obtained from your
dealer/retailer. Usage Fluid/Lubricant
Engine Oil The engine requires a special engine
oil meeting GM Standard GM4718M.
Oils meeting this standard can be
identified as synthetic, and should
also be identified with the American
Petroleum Institute (API) Certified for
Gasoline Engines starburst symbol.
However, not all synthetic API oils
with the starburst symbol will meet
this GM standard. Look for and use
only an oil that meets GM Standard
GM4718M. For the proper viscosity,
see
Engine Oil on page 6‑19.
Engine Coolant 50/50 mixture of clean, drinkable
water and use only DEX-COOL
®
Coolant. See
Engine Coolanton
page 6‑34.
Usage Fluid/Lubricant
ZR1 Only:
Intercooler System 50/50 mixture of clean, drinkable
water and use only DEX-COOL®
Coolant. See
Engine Coolanton
page 6‑34.
Hydraulic Brake System DOT 3 Hydraulic Brake Fluid
(GM Part No. U.S. 88862806,
in Canada 88862807).
Windshield Washer Optikleen
®Washer Solvent.
Hydraulic Clutch System Hydraulic Clutch Fluid. Use only
GM Part No. U.S. 88958860,
in Canada 88901244,
Super DOT-4 brake fluid.
Power Steering System GM Power Steering Fluid
(GM Part No. U.S. 89021184,
in Canada 89021186).
Chassis
Lubrication
(Rear Toe‐Link
Outer Ends with
ZO6, ZR1,
or Z51 Option) Chassis Lubricant
(GM Part No. U.S. 12377985, in
Canada 88901242) or lubricant
meeting requirements of NLGI #2,
Category LB or GC-LB.
7-10