Page 351 of 414

Vehicle Care 9-69
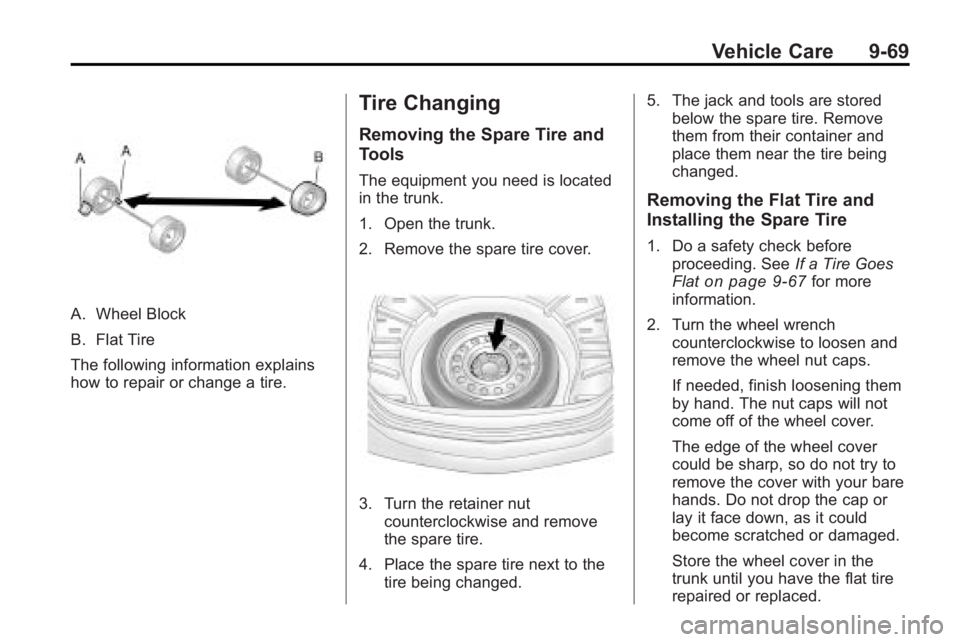
A. Wheel Block
B. Flat Tire
The following information explains
how to repair or change a tire.
Tire Changing
Removing the Spare Tire and
Tools
The equipment you need is located
in the trunk.
1. Open the trunk.
2. Remove the spare tire cover.
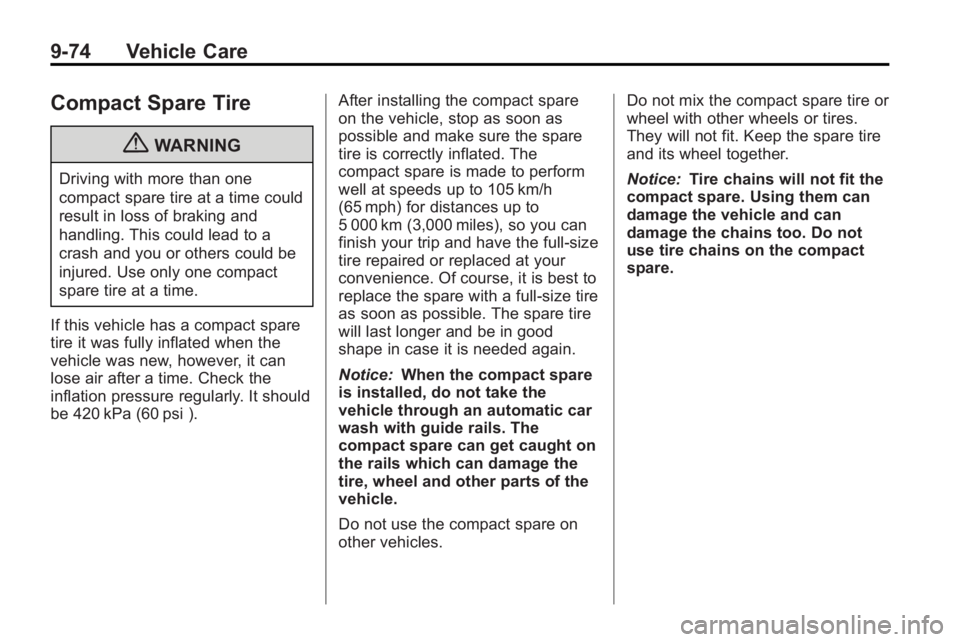
3. Turn the retainer nutcounterclockwise and remove
the spare tire.
4. Place the spare tire next to the tire being changed. 5. The jack and tools are stored
below the spare tire. Remove
them from their container and
place them near the tire being
changed.
Removing the Flat Tire and
Installing the Spare Tire
1. Do a safety check before
proceeding. See If a Tire Goes
Flat
on page 9‑67for more
information.
2. Turn the wheel wrench counterclockwise to loosen and
remove the wheel nut caps.
If needed, finish loosening them
by hand. The nut caps will not
come off of the wheel cover.
The edge of the wheel cover
could be sharp, so do not try to
remove the cover with your bare
hands. Do not drop the cap or
lay it face down, as it could
become scratched or damaged.
Store the wheel cover in the
trunk until you have the flat tire
repaired or replaced.
Page 353 of 414
Vehicle Care 9-71
{WARNING
Raising your vehicle with the jack
improperly positioned can
damage the vehicle and even
make the vehicle fall. To help
avoid personal injury and vehicle
damage, be sure to fit the jack lift
head into the proper location
before raising the vehicle.
{WARNING
Lifting a vehicle and getting under
it to do maintenance or repairs is
dangerous without the
appropriate safety equipment and
training. If a jack is provided with
the vehicle, it is designed only for
changing a flat tire. If it is used for
anything else, you or others could
be badly injured or killed if the
vehicle slips off the jack. If a jack
is provided with the vehicle, only
use it for changing a flat tire.
6. Turn the jack handle clockwiseto raise the vehicle far enough
off the ground for the compact
spare to fit under the vehicle.7. Remove all of the wheel nuts.
8. Remove the flat tire.
Page 354 of 414

9-72 Vehicle Care
{WARNING
Rust or dirt on a wheel, or on the
parts to which it is fastened, can
make wheel nuts become loose
after time. The wheel could come
off and cause an accident. When
changing a wheel, remove any
rust or dirt from places where the
wheel attaches to the vehicle. In
an emergency, use a cloth or a
paper towel to do this; but be sure
to use a scraper or wire brush
later, if needed, to get all the rust
or dirt off. SeeIf a Tire Goes Flat
on page 9‑67.
9. Remove any rust or dirt from the
wheel bolts, mounting surfaces,
and spare wheel.
10. Install the compact spare tire.
{WARNING
Never use oil or grease on bolts
or nuts because the nuts might
come loose. The vehicle's wheel
could fall off, causing a crash. 11. Put the wheel nuts back on
with the rounded end of the
nuts toward the wheel. Turn
each nut clockwise by hand
until the wheel is held against
the hub.
12. Lower the vehicle by turning the jack handle
counterclockwise. Lower the
jack completely.
{WARNING
Wheel nuts that are improperly or
incorrectly tightened can cause
the wheels to become loose or
come off. The wheel nuts should
be tightened with a torque wrench
to the proper torque specification
after replacing. Follow the torque
specification supplied by the
aftermarket manufacturer when
using accessory locking wheel
nuts. See Capacities and
Specifications
on page 11‑2for
original equipment wheel nut
torque specifications.
Page 355 of 414

Vehicle Care 9-73
Notice:Improperly tightened
wheel nuts can lead to brake
pulsation and rotor damage. To
avoid expensive brake repairs,
evenly tighten the wheel nuts in
the proper sequence and to the
proper torque specification. See
Capacities and Specifications
on
page 11‑2for the wheel nut
torque specification.
13. Tighten the wheel nuts firmly in a crisscross sequence, as
shown. 14. Lower the jack all the way and
remove the jack from under the
vehicle.
15. Tighten the wheel nuts firmly with the wheel wrench.
Notice: Wheel covers will not fit
on your vehicle's compact spare.
If you try to put a wheel cover on
the compact spare, the cover or
the spare could be damaged.
Storing a Flat or Spare Tire
and Tools
{WARNING
Storing a jack, a tire, or other
equipment in the passenger
compartment of the vehicle could
cause injury. In a sudden stop or
collision, loose equipment could
strike someone. Store all these in
the proper place. To store the flat or spare tire and
tools:
1. Place the jack and tools in the
rear storage compartment.
2. Place the flat or spare tire in the storage compartment below the
floor covering.
Secure it with the retainer nut.
If the wheel is larger than the
spare, place the floor cover on
the projecting wheel.
The compact spare is for temporary
use only. Replace the compact
spare tire with a full-size tire as
soon as you can.
Page 356 of 414

9-74 Vehicle Care
Compact Spare Tire
{WARNING
Driving with more than one
compact spare tire at a time could
result in loss of braking and
handling. This could lead to a
crash and you or others could be
injured. Use only one compact
spare tire at a time.
If this vehicle has a compact spare
tire it was fully inflated when the
vehicle was new, however, it can
lose air after a time. Check the
inflation pressure regularly. It should
be 420 kPa (60 psi ). After installing the compact spare
on the vehicle, stop as soon as
possible and make sure the spare
tire is correctly inflated. The
compact spare is made to perform
well at speeds up to 105 km/h
(65 mph) for distances up to
5 000 km (3,000 miles), so you can
finish your trip and have the full-size
tire repaired or replaced at your
convenience. Of course, it is best to
replace the spare with a full-size tire
as soon as possible. The spare tire
will last longer and be in good
shape in case it is needed again.
Notice:
When the compact spare
is installed, do not take the
vehicle through an automatic car
wash with guide rails. The
compact spare can get caught on
the rails which can damage the
tire, wheel and other parts of the
vehicle.
Do not use the compact spare on
other vehicles. Do not mix the compact spare tire or
wheel with other wheels or tires.
They will not fit. Keep the spare tire
and its wheel together.
Notice:
Tire chains will not fit the
compact spare. Using them can
damage the vehicle and can
damage the chains too. Do not
use tire chains on the compact
spare.
Page 373 of 414

Service and Maintenance 10-3
If the engine oil life system is reset
accidentally, service the vehicle
within 5 000 km/3,000 miles since
the last service. Reset the oil life
system whenever the oil is changed.
SeeEngine Oil Life System
on
page 9‑13.
When the Change Engine Oil Soon
message displays, certain services,
checks, and inspections are
required. The services described
for Maintenance Ishould be
performed at every engine oil
change. The services described
for Maintenance IIshould be
performed when:
.Maintenance Iwas performed
the last time the engine oil was
changed.
.It has been 10 months or more
since the Change Engine Oil
Soon message has displayed or
since the last service.
Maintenance I
.Change engine oil and filter.
SeeEngine Oilon page 9‑11.
An Emission Control Service.
.Engine coolant level check. See
Engine Coolant on page 9‑18.
.Windshield washer fluid level
check. See Washer Fluidon
page 9‑23.
.Tire inflation check. See Tire
Pressure on page 9‑53.
.Tire wear inspection. See Tire
Inspection on page 9‑59.
.Rotate tires. See Tire Rotationon page 9‑59.
.Fluids visual leak check
(or every 12 months, whichever
occurs first). A leak in any
system must be repaired and
the fluid level checked.
.Engine air cleaner filter
inspection (vehicles driven
in dusty conditions only).
SeeEngine Air Cleaner/Filter
on
page 9‑15.
.Brake system inspection
(or every 12 months, whichever
occurs first).
Maintenance II
.Perform all services described in
MaintenanceI.
.Steering and suspension
inspection. Visual inspection for
damaged, loose, or missing
parts or signs of wear.
.Engine cooling system
inspection. Visual inspection
of hoses, pipes, fittings, and
clamps and replacement,
if needed.
Page 374 of 414

10-4 Service and Maintenance
.Windshield wiper blade
inspection for wear, cracking,
or contamination and windshield
and wiper blade cleaning,
if contaminated. SeeExterior
Care
on page 9‑82. Worn or
damaged wiper blade
replacement. See Wiper Blade
Replacement on page 9‑29.
.Body hinges and latches, key
lock cylinders, folding seat
hardware, and sunroof
(if equipped) lubrication.
See Recommended Fluids and
Lubricants
on page 10‑7.
More frequent lubrication may
be required when vehicle is
exposed to a corrosive
environment. Applying silicone
grease on weatherstrips with a
clean cloth makes them last
longer, seal better, and not stick
or squeak.
.Restraint system component
check. See Safety System
Check on page 2‑23.
.Automatic transmission fluid
level check and adding fluid,
if needed. See Automatic
Transmission Fluid
on
page 9‑15.
.Engine air cleaner filter
inspection. See Engine Air
Cleaner/Filter on page 9‑15.
.Passenger compartment air
filter replacement (or every
12 months, whichever occurs
first). More frequent replacement
may be required if vehicle is
driven regularly under dusty
conditions.
Additional Required Services
At Each Fuel Stop
.Engine oil level check. See
Engine Oil on page 9‑11.
.Engine coolant level check. See
Engine Coolant on page 9‑18.
.Windshield washer fluid level
check. See Washer Fluidon
page 9‑23.
Once a Month
.Tire inflation check. See Tire
Pressure on page 9‑53.
.Tire wear inspection. See Tire
Inspection on page 9‑59.
Once a Year
.See Starter Switch Checkon
page 9‑27.
.See Automatic Transmission
Shift Lock Control System
Check on page 9‑27.
Page 376 of 414
10-6 Service and Maintenance
ServiceMaintenanceIMaintenance
II
Change engine oil and filter. Reset oil life system. ••
Engine coolant level check. ••
Windshield washer fluid level check. ••
Tire inflation pressures check. ••
Tire wear inspection. ••
Rotate tires. ••
Fluids visual leak check. ••
Engine air cleaner filter inspection (vehicles driven in dusty conditions only). ••
Brake system inspection. ••
Steering and suspension inspection. •
Engine cooling system inspection. •
Windshield wiper blades inspection. •
Body components lubrication. •
Restraint system components check. •
Automatic transmission fluid level check. •
Engine air cleaner filter inspection (vehicles not driven in dusty conditions). •
Passenger compartment air filter replacement. •