2010 BMW M3 oil temperature
[x] Cancel search: oil temperaturePage 14 of 196

Cockpit
12
Instrument cluster
1Speedometer
2Indicator lamps for turn signals
3Indicator and warning lamps13
4Displays for active cruise control
*55
5Tachometer61
6Engine oil temperature
*62
Energy Control
*62
7Display for
>Clock61
>Outside temperature61
>Indicator and warning lamps678Display for
>Position of automatic transmission
*48
>Computer63
>Date of next scheduled service, and
remaining distance to be driven65
>Odometer and trip odometer61
>High-beam assistant
*81
>Initializing the Flat Tire Monitor
*72
>Resetting the Tire Pressure
Monitor
*74
>Checking engine oil level
*137
>Settings and information64
>There is a Check Control
message67
9Fuel gauge62
10Resetting the trip odometer61
Page 64 of 196

Controls overview
62
Coolant temperature
A warning lamp will come on if the coolant, and
therefore the engine, becomes too hot.
Check coolant level, refer to page140.
Energy Control*
Displays the current fuel consumption. This
allows you to see whether your current driving
style is conducive to fuel economy with mini-
mum exhaust emissions.
Engine oil temperature*
When the engine is at normal operating temper-
ature, the engine oil temperature is between
approx. 2107/1006 and approx. 3007/
1506.
If the engine oil temperature is too high, a warn-
ing lamp comes on in the instrument cluster.
Fuel gauge
Fuel tank capacity: approx. 16.1 gallons/
61 liters.
You can find information on refueling on
page115.
If the tilt of the vehicle varies for a longer period,
when you are driving in mountainous areas, for
example, the indicator may fluctuate slightly.
Reserve
Once the fuel level has fallen to the reserve
zone of approx. 2.1 US gallons/8 liters for gaso-
line engines and approx. 1.7 US gallons/
6.5 liters for diesel engines, the indicator lamp
and the cruising range for the remaining
amount of fuel are displayed briefly. The indica-
tor lamp remains permanently on when the
remaining range is less than approx. 30 miles/
50 km.
Refuel as soon as possible once your
cruising range falls below 30 miles/
50 km; otherwise, engine functions are not
ensured and damage can occur.<
Page 66 of 196
Controls overview
64
Settings and information
Operating principle
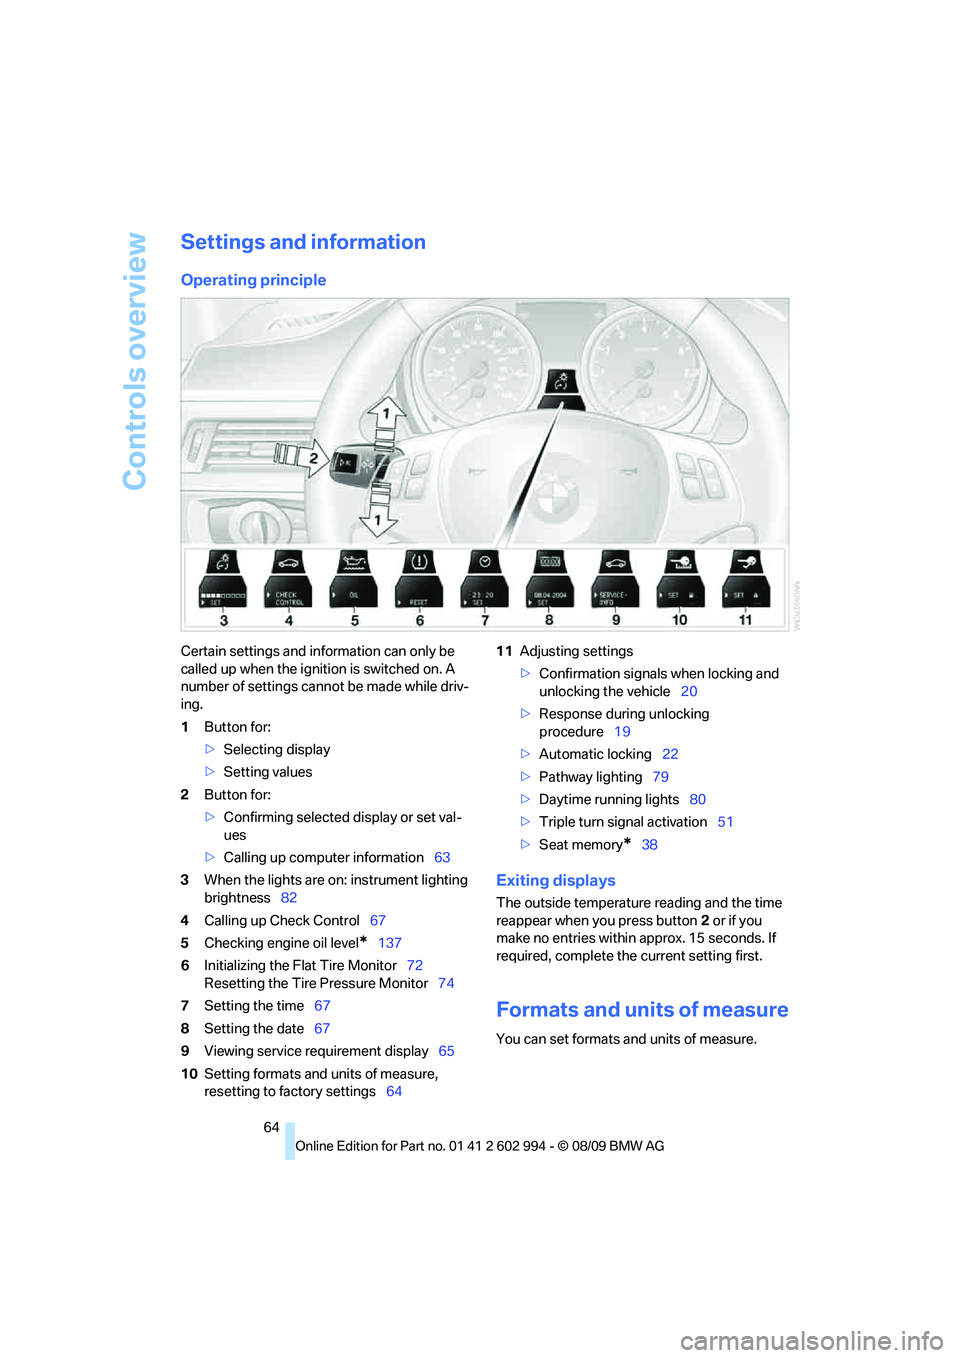
Certain settings and information can only be
called up when the ignition is switched on. A
number of settings cannot be made while driv-
ing.
1Button for:
>Selecting display
>Setting values
2Button for:
>Confirming selected display or set val-
ues
>Calling up computer information63
3When the lights are on: instrument lighting
brightness82
4Calling up Check Control67
5Checking engine oil level
*137
6Initializing the Flat Tire Monitor72
Resetting the Tire Pressure Monitor74
7Setting the time67
8Setting the date67
9Viewing service requirement display65
10Setting formats and units of measure,
resetting to factory settings6411Adjusting settings
>Confirmation signals when locking and
unlocking the vehicle20
>Response during unlocking
procedure19
>Automatic locking22
>Pathway lighting79
>Daytime running lights80
>Triple turn signal activation51
>Seat memory
*38
Exiting displays
The outside temperature reading and the time
reappear when you press button2 or if you
make no entries within approx. 15 seconds. If
required, complete the current setting first.
Formats and units of measure
You can set formats and units of measure.
Page 137 of 196
Reference
At a glance
Controls
Driving tips
Mobility
135
Recommended tire brands
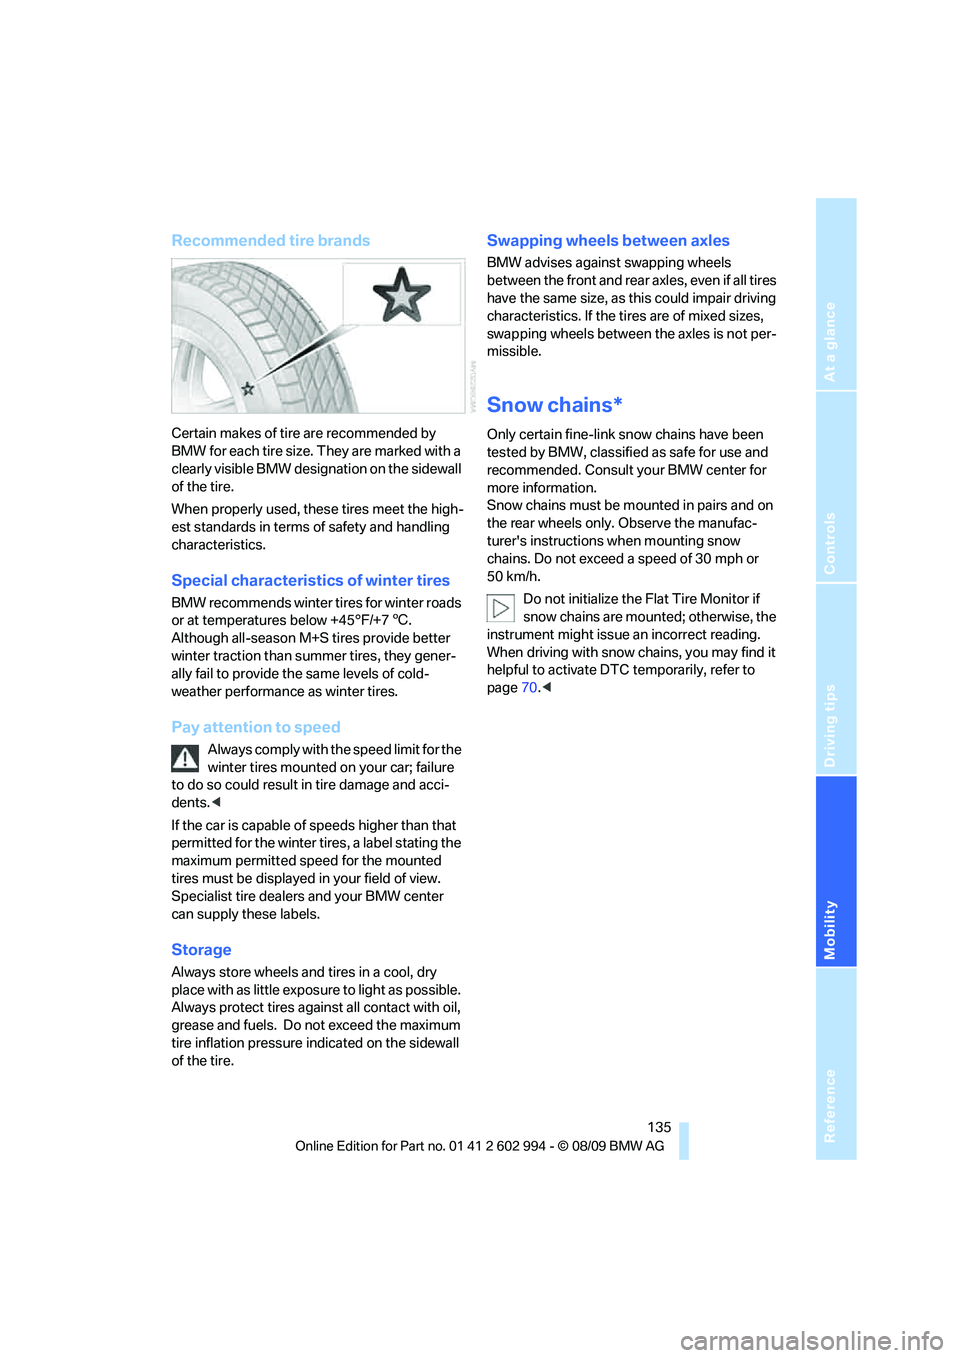
Certain makes of tire are recommended by
BMW for each tire size. They are marked with a
clearly visible BMW designation on the sidewall
of the tire.
When properly used, these tires meet the high-
est standards in terms of safety and handling
characteristics.
Special characteristics of winter tires
BMW recommends winter tires for winter roads
or at temperatures below +45°F/+76.
Although all-season M+S tires provide better
winter traction than summer tires, they gener-
ally fail to provide the same levels of cold-
weather performance as winter tires.
Pay attention to speed
Always comply with the speed limit for the
winter tires mounted on your car; failure
to do so could result in tire damage and acci-
dents.<
If the car is capable of speeds higher than that
permitted for the winter tires, a label stating the
maximum permitted speed for the mounted
tires must be displayed in your field of view.
Specialist tire dealers and your BMW center
can supply these labels.
Storage
Always store wheels and tires in a cool, dry
place with as little exposure to light as possible.
Always protect tires against all contact with oil,
grease and fuels. Do not exceed the maximum
tire inflation pressure indicated on the sidewall
of the tire.
Swapping wheels between axles
BMW advises against swapping wheels
between the front and rear axles, even if all tires
have the same size, as this could impair driving
characteristics. If the tires are of mixed sizes,
swapping wheels between the axles is not per-
missible.
Snow chains*
Only certain fine-link snow chains have been
tested by BMW, classified as safe for use and
recommended. Consult your BMW center for
more information.
Snow chains must be mounted in pairs and on
the rear wheels only. Observe the manufac-
turer's instructions when mounting snow
chains. Do not exceed a speed of 30 mph or
50 km/h.
Do not initialize the Flat Tire Monitor if
snow chains are mounted; otherwise, the
instrument might issue an incorrect reading.
When driving with snow chains, you may find it
helpful to activate DTC temporarily, refer to
page70.<
Page 139 of 196
Reference
At a glance
Controls
Driving tips
Mobility
137
Important parts of the engine compartment
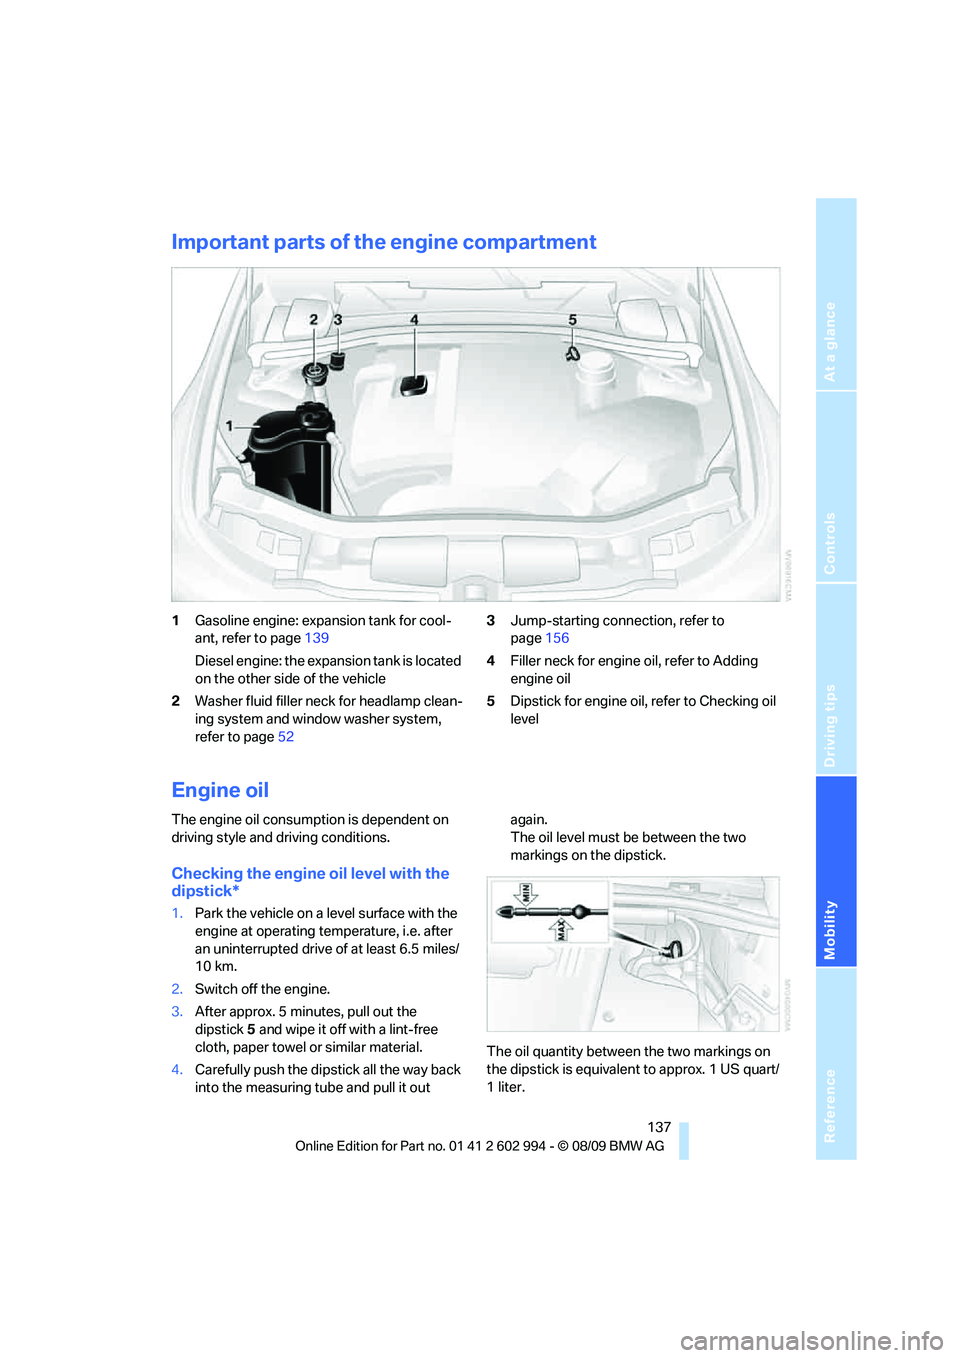
1Gasoline engine: expansion tank for cool-
ant, refer to page139
Diesel engine: the expansion tank is located
on the other side of the vehicle
2Washer fluid filler neck for headlamp clean-
ing system and window washer system,
refer to page523Jump-starting connection, refer to
page156
4Filler neck for engine oil, refer to Adding
engine oil
5Dipstick for engine oil, refer to Checking oil
level
Engine oil
The engine oil consumption is dependent on
driving style and driving conditions.
Checking the engine oil level with the
dipstick*
1.Park the vehicle on a level surface with the
engine at operating temperature, i.e. after
an uninterrupted drive of at least 6.5 miles/
10 km.
2.Switch off the engine.
3.After approx. 5 minutes, pull out the
dipstick5 and wipe it off with a lint-free
cloth, paper towel or similar material.
4.Carefully push the dipstick all the way back
into the measuring tube and pull it out again.
The oil level must be between the two
markings on the dipstick.
The oil quantity between the two markings on
the dipstick is equivalent to approx. 1 US quart/
1liter.
Page 140 of 196
Under the hood
138 The oil level must not be above the upper
marking of the dipstick. Too much oil will
harm the engine.<
Checking the engine oil level
electronically*
Your car is equipped with an electronic oil-level
monitor.
For a precise measurement and display of the
oil level, it is necessary that the engine be at
operating temperature, i.e. after uninterrupted
driving for at least approx. 6.5 miles/10 km. You
can have the oil level displayed while you are
driving, or while the vehicle is at a standstill on a
level surface and the engine is running.
You can have the oil level reading displayed in
the instrument cluster.
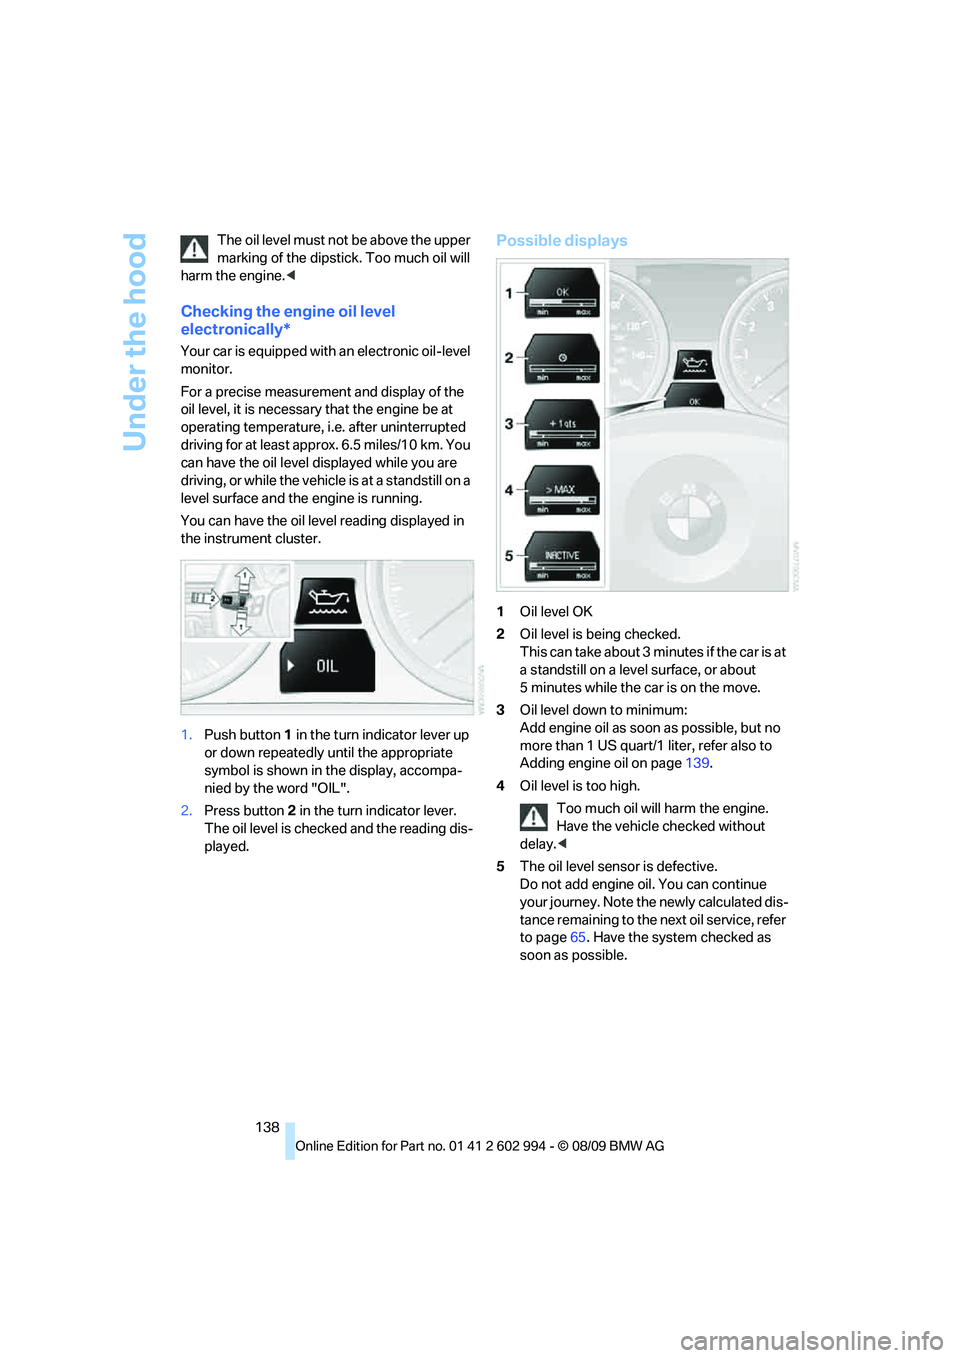
1.Push button 1 in the turn indicator lever up
or down repeatedly until the appropriate
symbol is shown in the display, accompa-
nied by the word "OIL".
2.Press button 2 in the turn indicator lever.
The oil level is checked and the reading dis-
played.
Possible displays
1Oil level OK
2Oil level is being checked.
This can take about 3 minutes if the car is at
a standstill on a level surface, or about
5 minutes while the car is on the move.
3Oil level down to minimum:
Add engine oil as soon as possible, but no
more than 1 US quart/1 liter, refer also to
Adding engine oil on page139.
4Oil level is too high.
Too much oil will harm the engine.
Have the vehicle checked without
delay.<
5The oil level sensor is defective.
Do not add engine oil. You can continue
your journey. Note the newly calculated dis-
tance remaining to the next oil service, refer
to page65. Have the system checked as
soon as possible.
Page 145 of 196
Reference
At a glance
Controls
Driving tips
Mobility
143
Care
Care products
Regular cleaning and care contributes signifi-
cantly to the value retention of your BMW.
BMW recommends cleaning and caring for your
vehicle with products that are approved by
BMW for this purpose.
Your BMW center will be happy to advise you on
the products and services available for cleaning
and caring for your BMW.
Original BMW Care Products have been
material tested, laboratory checked and
proven in the field, and offer optimal care and
protection for your vehicle.<
Do not use cleaners that contain alcohol
or solvents as these may result in dam-
age.<
Cleaning agents can contain substances
that are dangerous or hazardous to your
health. Therefore, follow the warning and safety
instructions on the packaging. When cleaning
inside the vehicle, always open the doors or
windows of the vehicle. In enclosed areas, pro-
vide for sufficient ventilation. Only use products
designed for cleaning vehicles.<
Exterior care
Washing the vehicle
Especially during the winter months,
ensure that the vehicle is washed more
frequently. Heavy soiling and road salt can lead
to vehicle damage.<
After washing the vehicle, apply the
brakes briefly to dry them; otherwise,
water can reduce braking efficiency over the
short term and the brake discs can corrode.<
Automatic car washes
Preference should be given to cloth car washes.
Before driving into a car wash, ensure that it is
suitable for your BMW. Check the following:>Dimensions of your vehicle, refer to
page175.
>If necessary: fold in the exterior mirrors,
refer to page39.
>Maximum permissible tire width.
Avoid car washes with guide rail heights
over 4 in/10 cm; otherwise, there is the
danger of damaging chassis parts.<
Preparations before driving into an automatic
car wash:
>Unscrew the rod antenna
*.
>Deactivate the rain sensor
* to prevent unin-
tentional wiping.
>Sports Wagon: deactivate the rear window
wiper and protect it against damage. If nec-
essary, ask the operator of the car wash
about protective measures you should take.
>Remove additional add-on parts, e.g. spoil-
ers or phone antennas, if they could be
damaged.
Automatic transmission
Before driving into an automatic car wash, per-
form the following steps to ensure that the vehi-
cle can roll:
1.Insert the remote control into the ignition
lock, even with Comfort Access.
2.Move the selector lever to position N.
3.Release the parking brake.
4.Switch off the engine.
5.Leave the remote control in the ignition lock
so that the vehicle can roll.
Steam jets/high-pressure washers
When using steam jets or high-pressure
washers, ensure that you maintain suffi-
cient clearance to the vehicle and do not exceed
a temperature of 1407/606.
Insufficient clearance or excessive pressure or
temperature can lead to component damage or
Page 185 of 196

Reference
At a glance
Controls
Driving tips
Mobility
183
Defect
– door lock22
– fuel filler flap114
– glass roof30
– panorama glass roof32
Defogging windows86
Defrost, windows86
Defrosting windows and
removing condensation
– air conditioner86
Defrosting windshield, refer to
Defrosting windows86
Defrost position, refer to
Defrosting windows86
Diesel exhaust fluid117
Diesel fuel115
Diesel particulate filter107
Digital clock61
Digital compass93
Dimensions175
Dipstick, engine oil137
Directional indicators, refer to
Turn signals50
Displacement, refer to Engine
data174
Display lighting, refer to
Instrument lighting82
Displays, refer to Instrument
cluster12
Displays and controls10
Disposal
– coolant139
– remote control battery28
– vehicle battery153
Distance control, refer to
Active cruise control55
Distance remaining to service,
refer to Service
requirements65
Distance warning, refer to
Park Distance Control
PDC69
Door key, refer to Remote
control with integrated
key18
Door lock21
Doors, emergency
operation22
DOT Quality Grades132Draft-free ventilation86,89
Drinks holders, refer to
Cupholders95
Drive-off assistance, refer to
Dynamic Stability Control
DSC70
Drive-off assistant72
Driving lamps, refer to Parking
lamps/low beams79
Driving notes106
Driving off on hills, refer to
Drive-off assistant72
Driving stability control
systems70
Driving through water
108
Driving tips, refer to Driving
notes106
Dry air, refer to Cooling
function89
DSC Dynamic Stability
Control70
DTC Dynamic Traction
Control70
– indicator/warning lamp70
Dynamic Brake Control
DBC70
Dynamic Stability Control
DSC70
– indicator/warning lamp70
Dynamic Traction Control
DTC
– indicator/warning lamp71
E
EBV Electronic brake-force
distribution70
Electrical malfunction
– door lock22
– driver's door22
– fuel filler flap114
– glass roof30
– panorama glass roof32
– trunk lid24
Electric seat adjustment34
Electric steering wheel lock
– with Comfort Access27
Electronic brake-force
distribution EBV70Electronic oil level check138
Electronic Stability Program
ESP, refer to Dynamic
Stability Control DSC70
Emergency actuation,
automatic transmission,
refer to Overriding selector
lever lock50
Emergency operation
– fuel filler flap, manual
release114
Emergency operation, refer to
Closing manually
– glass roof30
– panorama glass roof32
Emergency operation, refer to
Manual operation
– door lock22
Emergency release
– trunk lid from inside24
Emergency Request155
Emergency services, refer to
Roadside Assistance155
Energy, saving
– saving fuel106
Energy-conscious driving,
refer to Energy Control62
Energy Control62
Engine
– breaking in106
– data174
– overheated, refer to Coolant
temperature62
– speed174
– starting47
– starting, Comfort Access26
– switching off47
Engine compartment137
Engine coolant, refer to
Coolant139