2010 BMW M3 height
[x] Cancel search: heightPage 36 of 196
Adjustments
34
Seats
Note before adjusting
Never attempt to adjust your seat while
the vehicle is moving. The seat could
respond with unexpected movement, and the
ensuing loss of vehicle control could lead to an
accident.
On the front passenger seat as well, do not
incline the backrest too far to the rear while the
vehicle is being driven; otherwise, there is a
danger in the event of an accident of sliding
under the safety belt, eliminating the protection
normally provided by the belt.<
Comply with the instructions on head restraint
height on page35, and on damaged safety
belts on page39.
Manual adjustment
Observe the adjustment instructions on
page34 to ensure the best possible per-
sonal protection.<
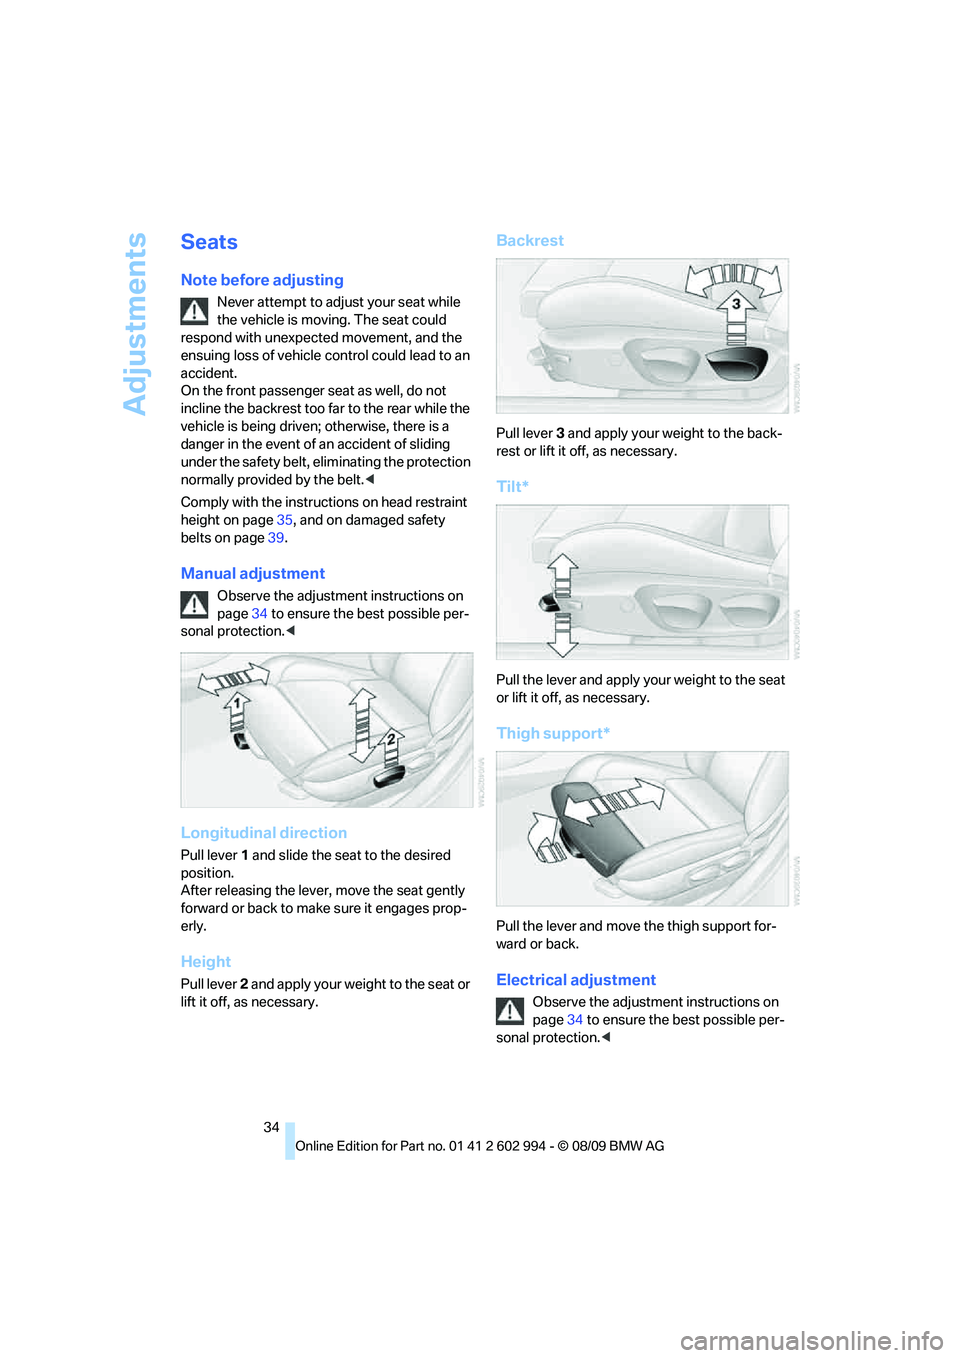
Longitudinal direction
Pull lever 1 and slide the seat to the desired
position.
After releasing the lever, move the seat gently
forward or back to make sure it engages prop-
erly.
Height
Pull lever 2 and apply your weight to the seat or
lift it off, as necessary.
Backrest
Pull lever 3 and apply your weight to the back-
rest or lift it off, as necessary.
Tilt*
Pull the lever and apply your weight to the seat
or lift it off, as necessary.
Thigh support*
Pull the lever and move the thigh support for-
ward or back.
Electrical adjustment
Observe the adjustment instructions on
page34 to ensure the best possible per-
sonal protection.<
Page 37 of 196
Reference
At a glance
Controls
Driving tips
Mobility
35
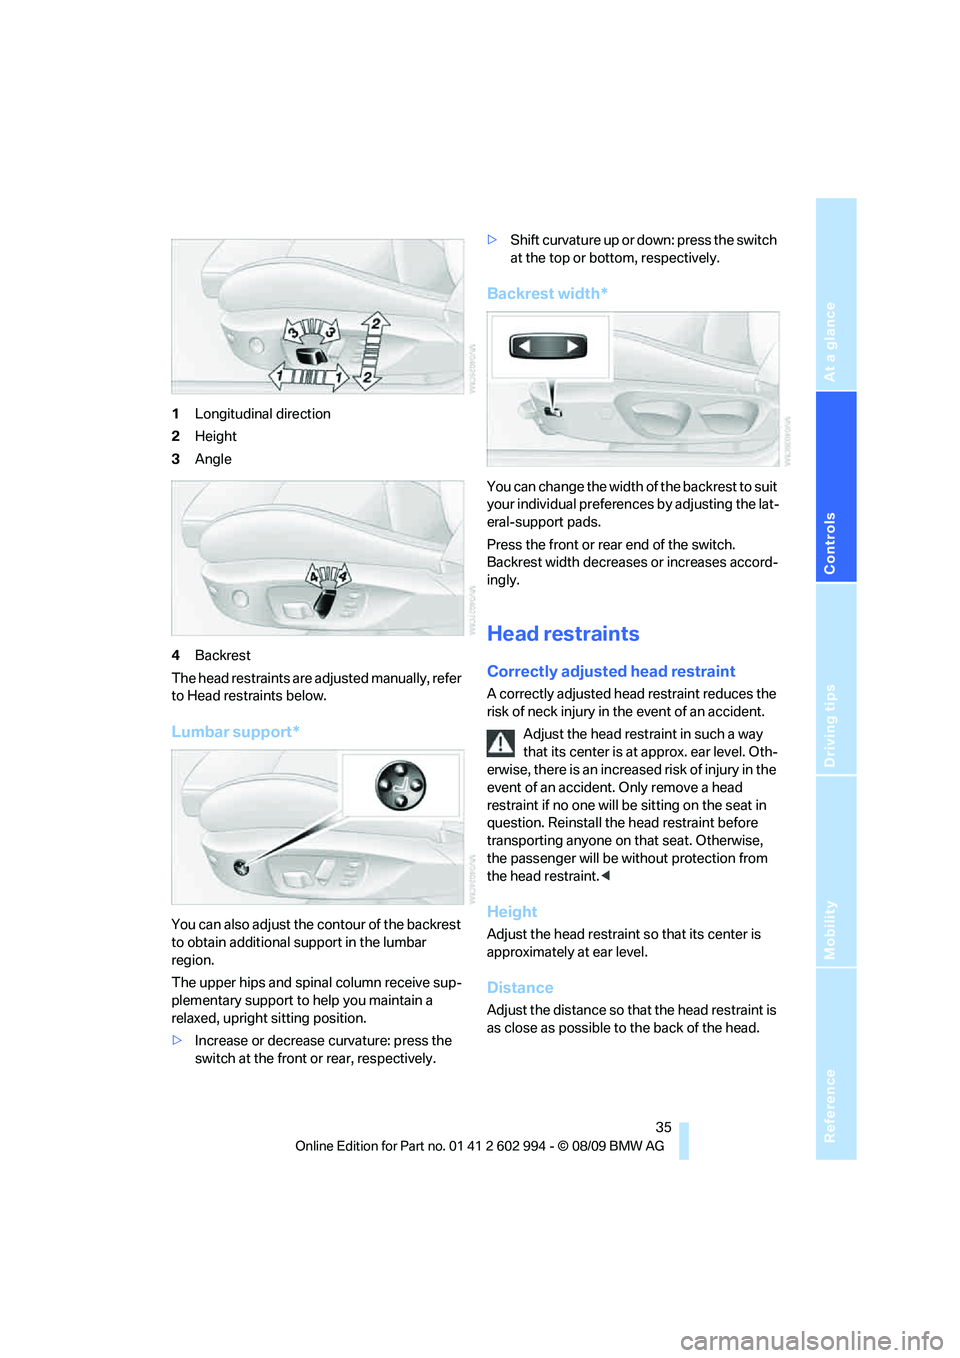
1Longitudinal direction
2Height
3Angle
4Backrest
The head restraints are adjusted manually, refer
to Head restraints below.
Lumbar support*
You can also adjust the contour of the backrest
to obtain additional support in the lumbar
region.
The upper hips and spinal column receive sup-
plementary support to help you maintain a
relaxed, upright sitting position.
>Increase or decrease curvature: press the
switch at the front or rear, respectively.>Shift curvature up or down: press the switch
at the top or bottom, respectively.
Backrest width*
You can change the width of the backrest to suit
your individual preferences by adjusting the lat-
eral-support pads.
Press the front or rear end of the switch.
Backrest width decreases or increases accord-
ingly.
Head restraints
Correctly adjusted head restraint
A correctly adjusted head restraint reduces the
risk of neck injury in the event of an accident.
Adjust the head restraint in such a way
that its center is at approx. ear level. Oth-
erwise, there is an increased risk of injury in the
event of an accident. Only remove a head
restraint if no one will be sitting on the seat in
question. Reinstall the head restraint before
transporting anyone on that seat. Otherwise,
the passenger will be without protection from
the head restraint.<
Height
Adjust the head restraint so that its center is
approximately at ear level.
Distance
Adjust the distance so that the head restraint is
as close as possible to the back of the head.
Page 38 of 196
Adjustments
36
Front active head restraints
In a rear collision of a sufficient strength, the
active head restraint reduces the distance to
the head.
Do not use seat or head restraint covers
that could impair the function of the active
head restraint. Otherwise, the protective func-
tion of the active head restraint will not be
ensured and its full potential in reducing the risk
of injury in the event of a rear collision may not
be realized.
In the event of malfunctions, deactivation or
triggering of the active head restraints, have the
testing, repair and removal executed only by a
BMW center or a workshop that works accord-
ing to repair procedures of BMW with corre-
spondingly trained personnel and that has the
required explosives licenses. Unprofessional
attempts to work on the system could lead to
failure in an emergency or to undesired airbag
activation, either of which could result in per-
sonal injury.<
For technical reasons, the head restraint
cannot be removed.<
Front seats
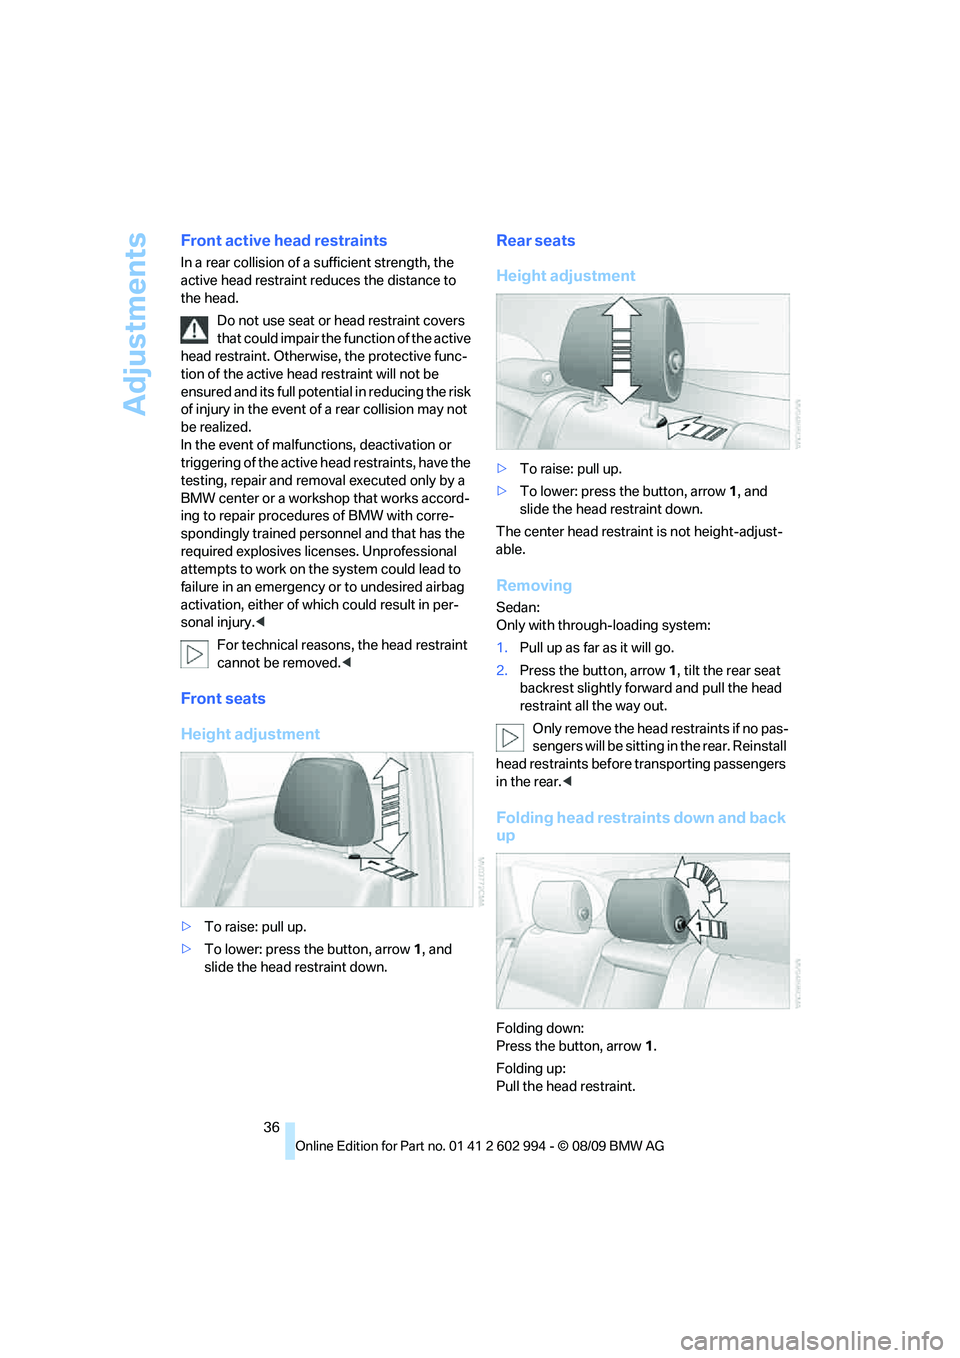
Height adjustment
>To raise: pull up.
>To lower: press the button, arrow1, and
slide the head restraint down.
Rear seats
Height adjustment
>To raise: pull up.
>To lower: press the button, arrow1, and
slide the head restraint down.
The center head restraint is not height-adjust-
able.
Removing
Sedan:
Only with through-loading system:
1.Pull up as far as it will go.
2.Press the button, arrow 1, tilt the rear seat
backrest slightly forward and pull the head
restraint all the way out.
O nly remove the head restraints if no pas-
sengers will be sitting in the rear. Reinstall
head restraints before transporting passengers
in the rear.<
Folding head restraints down and back
up
Folding down:
Press the button, arrow1.
Folding up:
Pull the head restraint.
Page 43 of 196
Reference
At a glance
Controls
Driving tips
Mobility
41
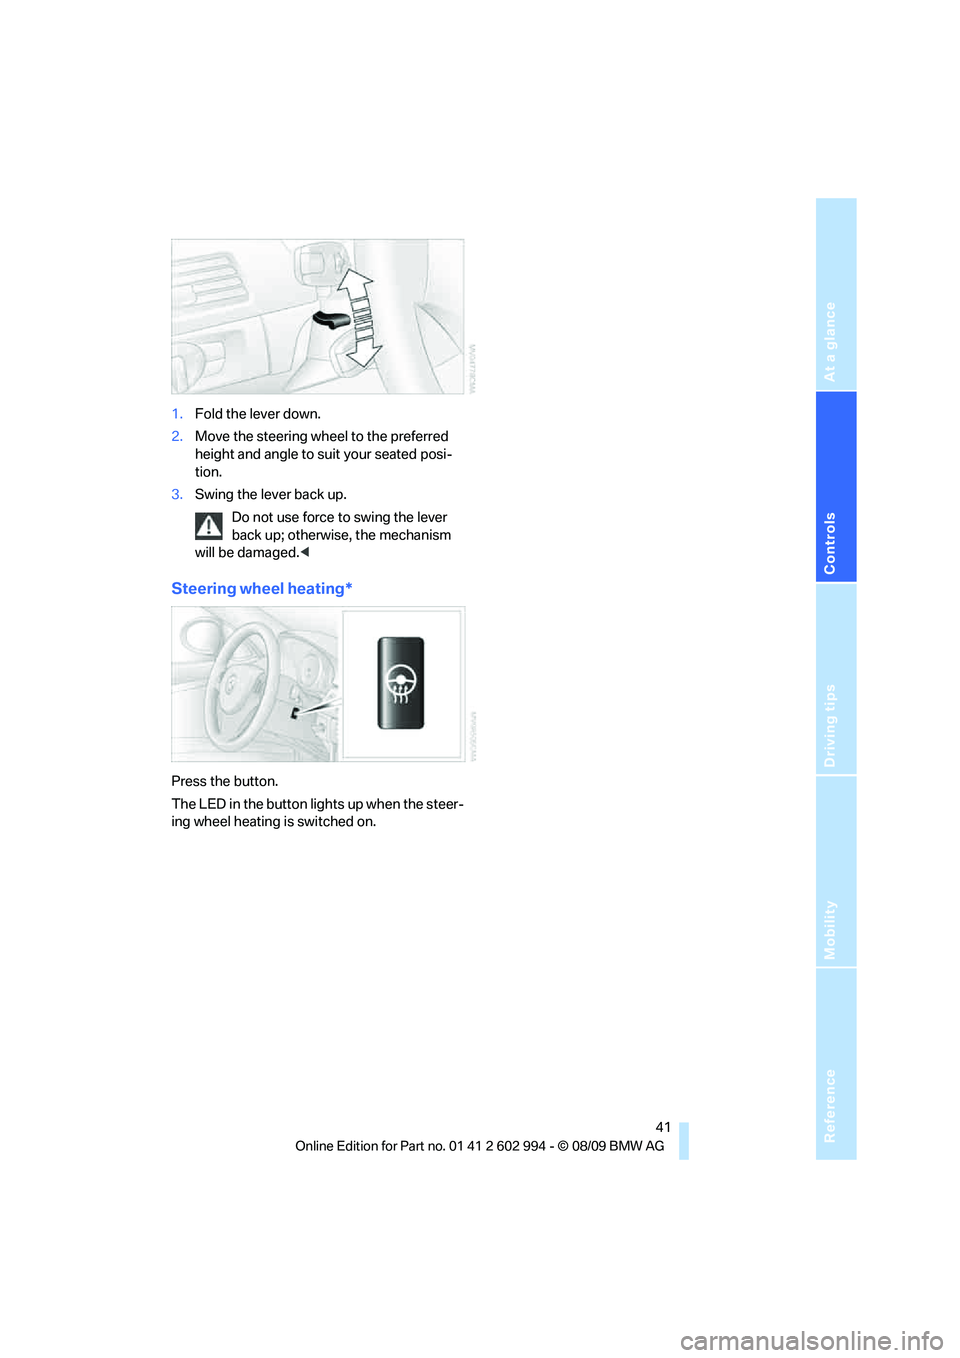
1.Fold the lever down.
2.Move the steering wheel to the preferred
height and angle to suit your seated posi-
tion.
3.Swing the lever back up.
Do not use force to swing the lever
back up; otherwise, the mechanism
will be damaged.<
Steering wheel heating*
Press the button.
The LED in the button lights up when the steer-
ing wheel heating is switched on.
Page 61 of 196
Reference
At a glance
Controls
Driving tips
Mobility
59
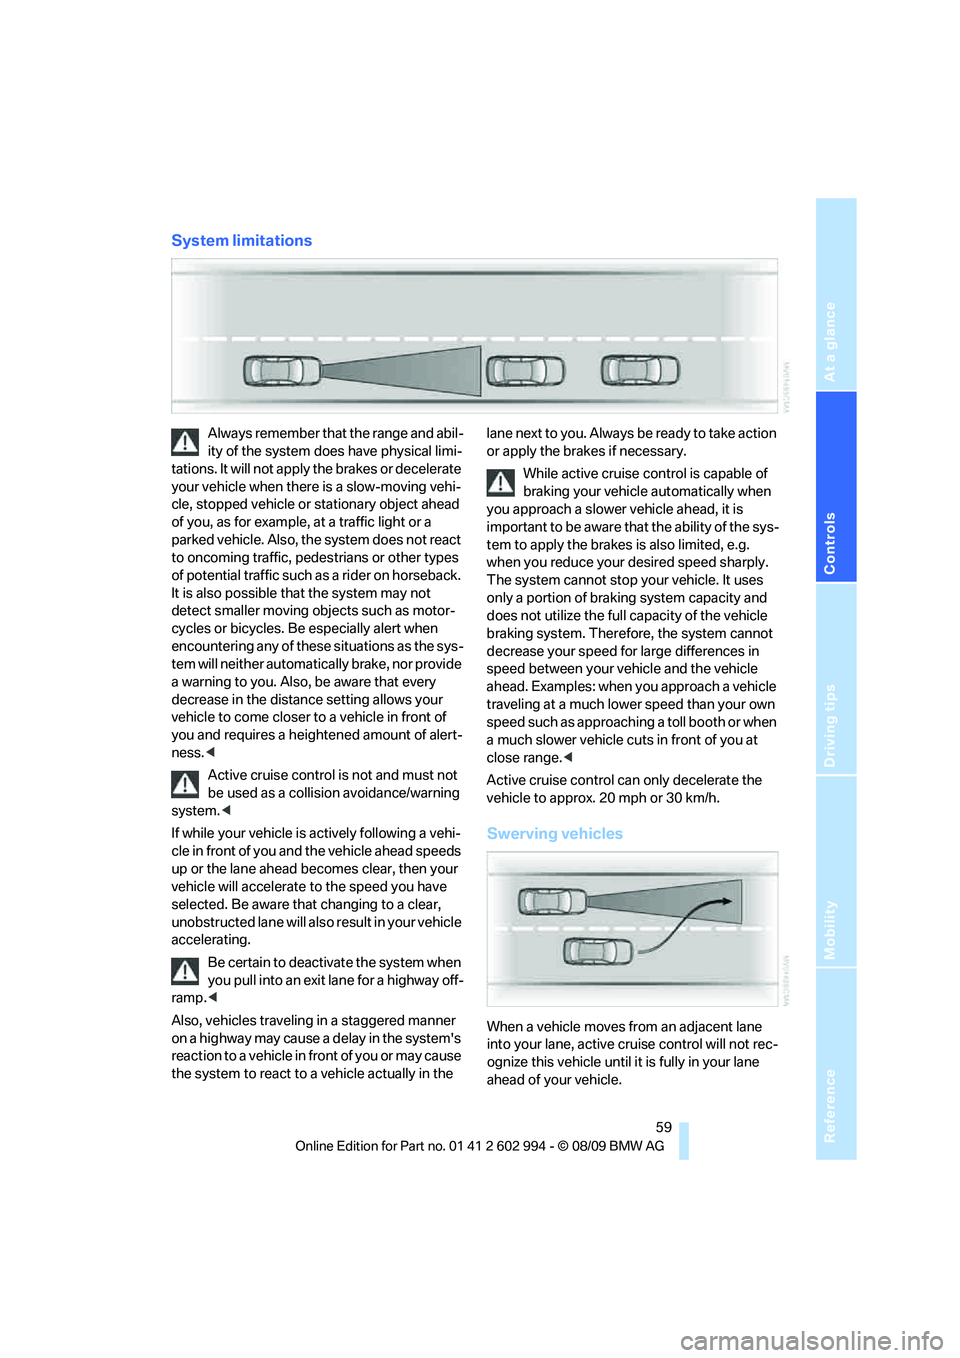
System limitations
Always remember that the range and abil-
ity of the system does have physical limi-
tations. It will not apply the brakes or decelerate
your vehicle when there is a slow-moving vehi-
cle, stopped vehicle or stationary object ahead
of you, as for example, at a traffic light or a
parked vehicle. Also, the system does not react
to oncoming traffic, pedestrians or other types
of potential traffic such as a rider on horseback.
It is also possible that the system may not
detect smaller moving objects such as motor-
cycles or bicycles. Be especially alert when
encountering any of these situations as the sys-
tem will neither automatically brake, nor provide
a warning to you. Also, be aware that every
decrease in the distance setting allows your
vehicle to come closer to a vehicle in front of
you and requires a heightened amount of alert-
ness.<
Active cruise control is not and must not
be used as a collision avoidance/warning
system.<
If while your vehicle is actively following a vehi-
cle in front of you and the vehicle ahead speeds
up or the lane ahead becomes clear, then your
vehicle will accelerate to the speed you have
selected. Be aware that changing to a clear,
unobstructed lane will also result in your vehicle
accelerating.
Be certain to deactivate the system when
you pull into an exit lane for a highway off-
ramp.<
Also, vehicles traveling in a staggered manner
on a highway may cause a delay in the system's
reaction to a vehicle in front of you or may cause
the system to react to a vehicle actually in the lane next to you. Always be ready to take action
or apply the brakes if necessary.
While active cruise control is capable of
braking your vehicle automatically when
you approach a slower vehicle ahead, it is
important to be aware that the ability of the sys-
tem to apply the brakes is also limited, e.g.
when you reduce your desired speed sharply.
The system cannot stop your vehicle. It uses
only a portion of braking system capacity and
does not utilize the full capacity of the vehicle
braking system. Therefore, the system cannot
decrease your speed for large differences in
speed between your vehicle and the vehicle
ahead. Examples: when you approach a vehicle
traveling at a much lower speed than your own
speed such as approaching a toll booth or when
a much slower vehicle cuts in front of you at
close range.<
Active cruise control can only decelerate the
vehicle to approx. 20 mph or 30 km/h.
Swerving vehicles
When a vehicle moves from an adjacent lane
into your lane, active cruise control will not rec-
ognize this vehicle until it is fully in your lane
ahead of your vehicle.
Page 138 of 196
Under the hood
136
Under the hood
Do not work on the car unless you pos-
sess the necessary technical knowledge.
If you are unfamiliar with the statutory guide-
lines, have any work on the vehicle performed
only by a BMW center or by a workshop that
work according to BMW repair procedures with
correspondingly trained personnel. If this work
is not carried out properly, there is a danger of
subsequent damage and related safety haz-
ards.<
Hood
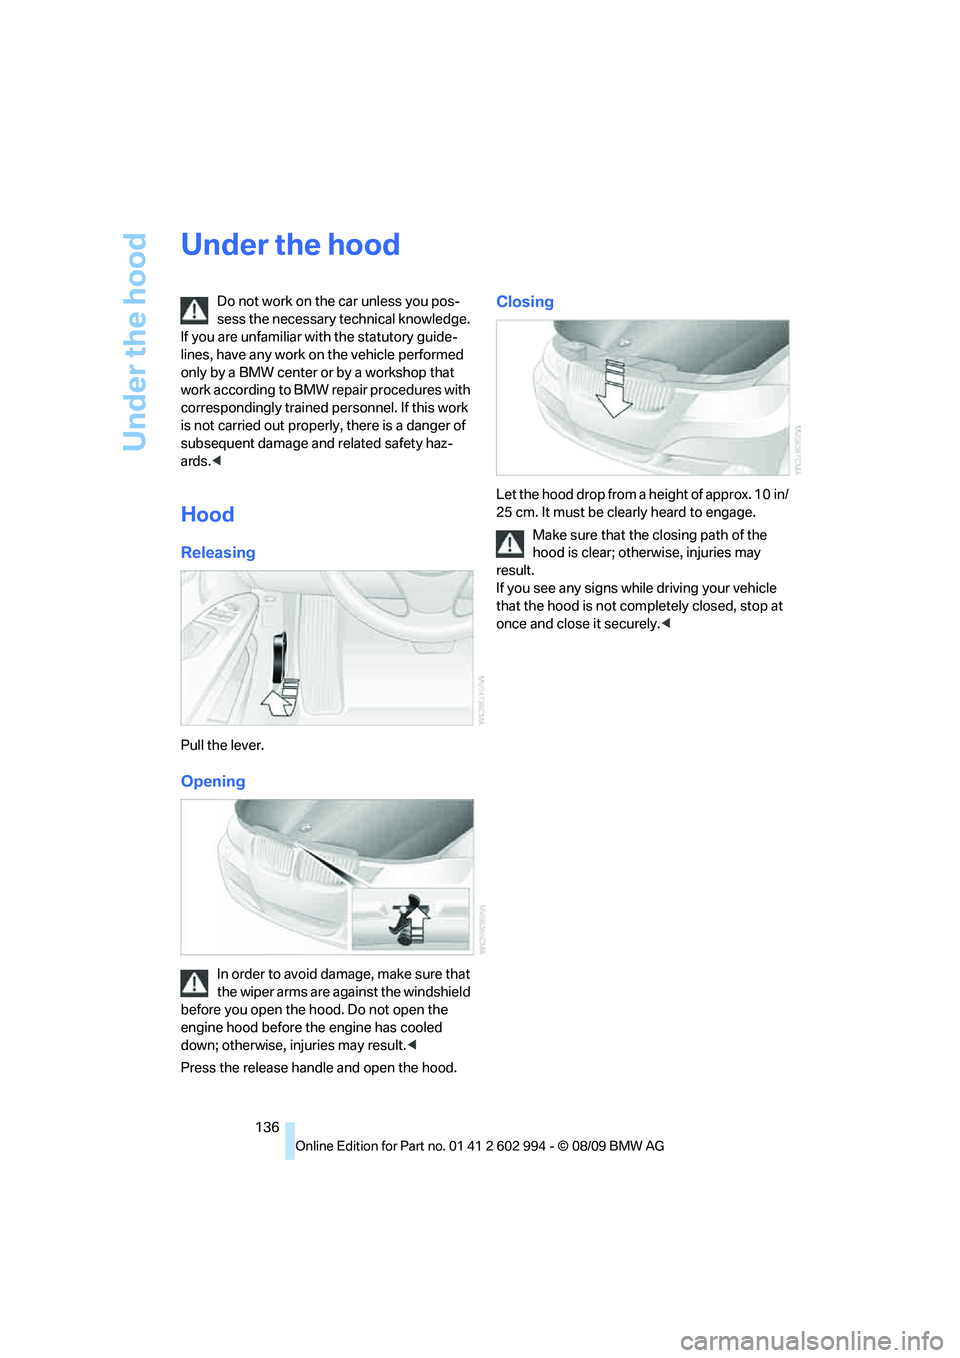
Releasing
Pull the lever.
Opening
In order to avoid damage, make sure that
the wiper arms are against the windshield
before you open the hood. Do not open the
engine hood before the engine has cooled
down; otherwise, injuries may result.<
Press the release handle and open the hood.
Closing
Let the hood drop from a height of approx. 10 in/
25 cm. It must be clearly heard to engage.
Make sure that the closing path of the
hood is clear; otherwise, injuries may
result.
If you see any signs while driving your vehicle
that the hood is not completely closed, stop at
once and close it securely.<
Page 145 of 196
Reference
At a glance
Controls
Driving tips
Mobility
143
Care
Care products
Regular cleaning and care contributes signifi-
cantly to the value retention of your BMW.
BMW recommends cleaning and caring for your
vehicle with products that are approved by
BMW for this purpose.
Your BMW center will be happy to advise you on
the products and services available for cleaning
and caring for your BMW.
Original BMW Care Products have been
material tested, laboratory checked and
proven in the field, and offer optimal care and
protection for your vehicle.<
Do not use cleaners that contain alcohol
or solvents as these may result in dam-
age.<
Cleaning agents can contain substances
that are dangerous or hazardous to your
health. Therefore, follow the warning and safety
instructions on the packaging. When cleaning
inside the vehicle, always open the doors or
windows of the vehicle. In enclosed areas, pro-
vide for sufficient ventilation. Only use products
designed for cleaning vehicles.<
Exterior care
Washing the vehicle
Especially during the winter months,
ensure that the vehicle is washed more
frequently. Heavy soiling and road salt can lead
to vehicle damage.<
After washing the vehicle, apply the
brakes briefly to dry them; otherwise,
water can reduce braking efficiency over the
short term and the brake discs can corrode.<
Automatic car washes
Preference should be given to cloth car washes.
Before driving into a car wash, ensure that it is
suitable for your BMW. Check the following:>Dimensions of your vehicle, refer to
page175.
>If necessary: fold in the exterior mirrors,
refer to page39.
>Maximum permissible tire width.
Avoid car washes with guide rail heights
over 4 in/10 cm; otherwise, there is the
danger of damaging chassis parts.<
Preparations before driving into an automatic
car wash:
>Unscrew the rod antenna
*.
>Deactivate the rain sensor
* to prevent unin-
tentional wiping.
>Sports Wagon: deactivate the rear window
wiper and protect it against damage. If nec-
essary, ask the operator of the car wash
about protective measures you should take.
>Remove additional add-on parts, e.g. spoil-
ers or phone antennas, if they could be
damaged.
Automatic transmission
Before driving into an automatic car wash, per-
form the following steps to ensure that the vehi-
cle can roll:
1.Insert the remote control into the ignition
lock, even with Comfort Access.
2.Move the selector lever to position N.
3.Release the parking brake.
4.Switch off the engine.
5.Leave the remote control in the ignition lock
so that the vehicle can roll.
Steam jets/high-pressure washers
When using steam jets or high-pressure
washers, ensure that you maintain suffi-
cient clearance to the vehicle and do not exceed
a temperature of 1407/606.
Insufficient clearance or excessive pressure or
temperature can lead to component damage or
Page 187 of 196

Reference
At a glance
Controls
Driving tips
Mobility
185
Glass roof, electric29
– closing after electrical
malfunction30
– Convenient operation20,22
– initializing30
– opening, closing29
– pinch protection system30
– power failure30
– raising29
– remote control20
Glove compartment94
Grills, refer to Air vents84
Gross vehicle weight, refer to
Weights177
H
Halogen lamps
– replacing bulbs149
Handbrake, refer to Parking
brake48
Hands-free system14
Hazard warning flashers14
HDC Hill Descent Control71
Head airbags77
Headlamp control,
automatic79
Headlamp cover149
Headlamp flasher50
– indicator lamp11,14,160
Headlamps
– replacing bulbs149
Head restraints35
– rear, removing36
– sitting safely33
Heated
– mirrors40
– rear window86,89
– seats37
– steering wheel41
Heating84
– mirrors40
– rear window86,89
– seats37
– steering wheel41
Heating and ventilation, refer
to Climate84
Heavy loads, refer to Stowing
cargo109Height, refer to
Dimensions175
Height adjustment
– seats34
– steering wheel40
High-beam assistant81
High beams81
– headlamp flasher81
– indicator lamp160
– replacing bulbs149
High beams and low beams,
automatic, refer to High-
beam assistant81
High-pressure
washer143,144
High water, refer to Driving
through water108
Hill Descent Control HDC71
Hills108
Holders for cups95
Homepage BMW4
Hood136
Hooks for shopping bags100
Horn10,11
Hotel function, refer to
Locking or unlocking
separately24
Hot exhaust system107
Hydraulic brake assist, refer to
Dynamic Brake Control
DBC70
Hydroplaning108
I
Ice warning, refer to Outside
temperature
warning61
Identification marks
– run-flat tires134
– tire coding132
Ignition46
– switched off47
– switched on46
Ignition key, refer to Remote
control with integrated
key18
Ignition key position 1, refer to
Radio readiness46Ignition key position 2, refer to
Ignition on46
Ignition lock46
Imprint2
Indicator and warning
lamps13
– Tire Pressure Monitor
TPM74
Indicator and warning lamps,
overview160
Individual air distribution85
Inflation pressure, refer to Tire
inflation pressure119
Inflation pressure monitoring,
refer to Tire Pressure
Monitor TPM73
Initializing
– after power failure153
– compass, refer to
Calibrating93
– Flat Tire Monitor FTM72
– glass roof30
– panorama glass roof32
Installation location
– telephone95
Instrument cluster12
Instrument lighting82
Instrument panel, refer to
Cockpit10
Integrated key18
Integrated universal remote
control91
Interior lamps83
– remote control20
Interior motion sensor26
Interior rearview mirror40
– automatic dimming
feature40
– compass93
Interlock, refer to Disengaging
the remote control48
Intermittent mode of the
wipers51
J
Jacking points153
Jumpering, refer to Jump-
starting156