Page 14 of 196
Cockpit
12
Instrument cluster
1Speedometer
2Indicator lamps for turn signals
3Indicator and warning lamps13
4Displays for active cruise control
*55
5Tachometer61
6Engine oil temperature
*62
Energy Control
*62
7Display for
>Clock61
>Outside temperature61
>Indicator and warning lamps678Display for
>Position of automatic transmission
*48
>Computer63
>Date of next scheduled service, and
remaining distance to be driven65
>Odometer and trip odometer61
>High-beam assistant
*81
>Initializing the Flat Tire Monitor
*72
>Resetting the Tire Pressure
Monitor
*74
>Checking engine oil level
*137
>Settings and information64
>There is a Check Control
message67
9Fuel gauge62
10Resetting the trip odometer61
Page 66 of 196

Controls overview
64
Settings and information
Operating principle
Certain settings and information can only be
called up when the ignition is switched on. A
number of settings cannot be made while driv-
ing.
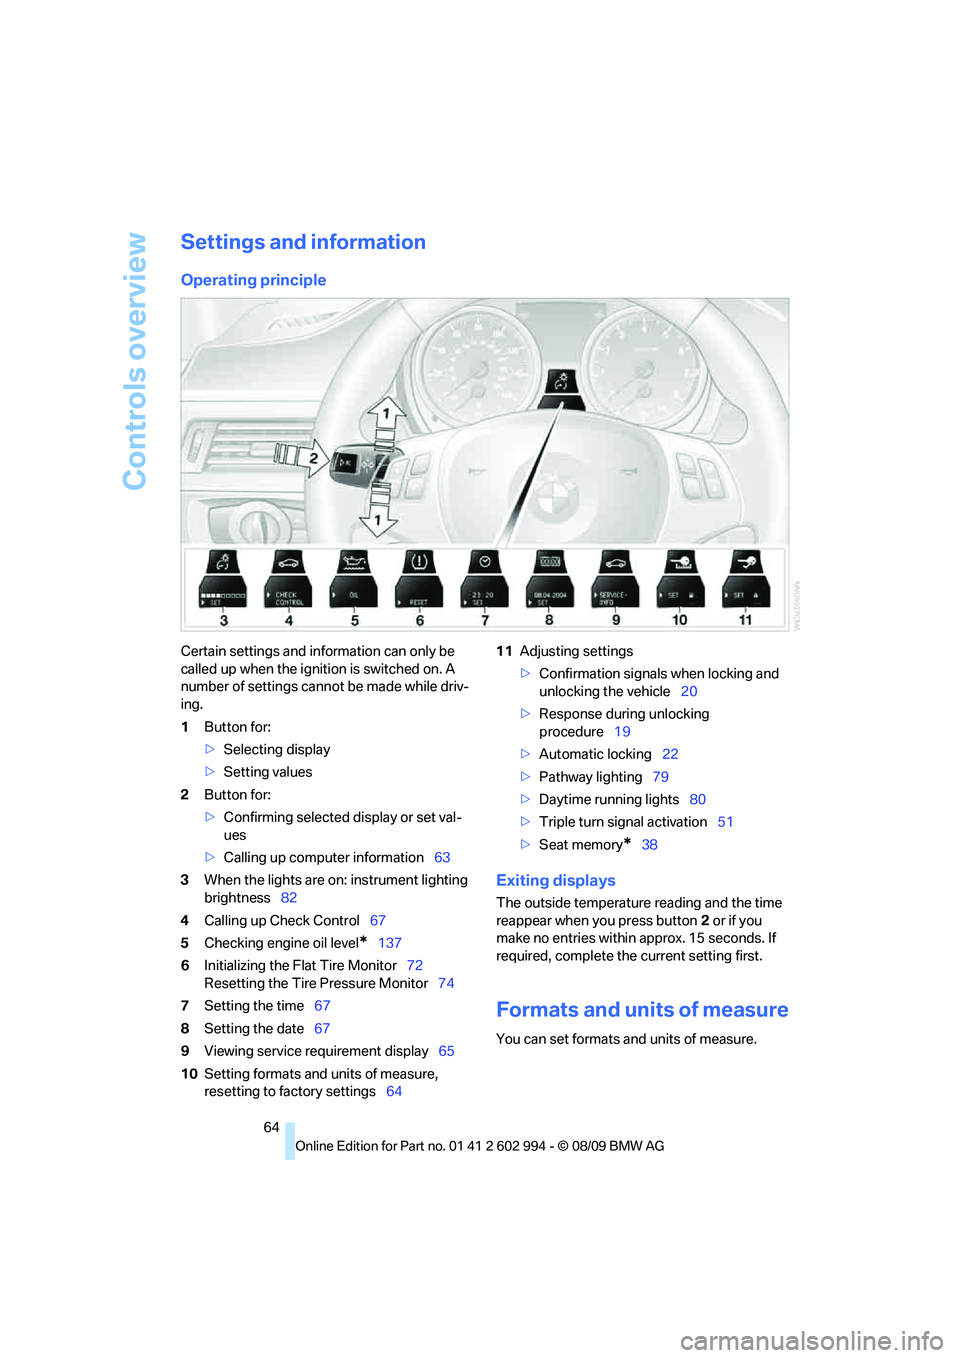
1Button for:
>Selecting display
>Setting values
2Button for:
>Confirming selected display or set val-
ues
>Calling up computer information63
3When the lights are on: instrument lighting
brightness82
4Calling up Check Control67
5Checking engine oil level
*137
6Initializing the Flat Tire Monitor72
Resetting the Tire Pressure Monitor74
7Setting the time67
8Setting the date67
9Viewing service requirement display65
10Setting formats and units of measure,
resetting to factory settings6411Adjusting settings
>Confirmation signals when locking and
unlocking the vehicle20
>Response during unlocking
procedure19
>Automatic locking22
>Pathway lighting79
>Daytime running lights80
>Triple turn signal activation51
>Seat memory
*38
Exiting displays
The outside temperature reading and the time
reappear when you press button2 or if you
make no entries within approx. 15 seconds. If
required, complete the current setting first.
Formats and units of measure
You can set formats and units of measure.
Page 139 of 196

Reference
At a glance
Controls
Driving tips
Mobility
137
Important parts of the engine compartment
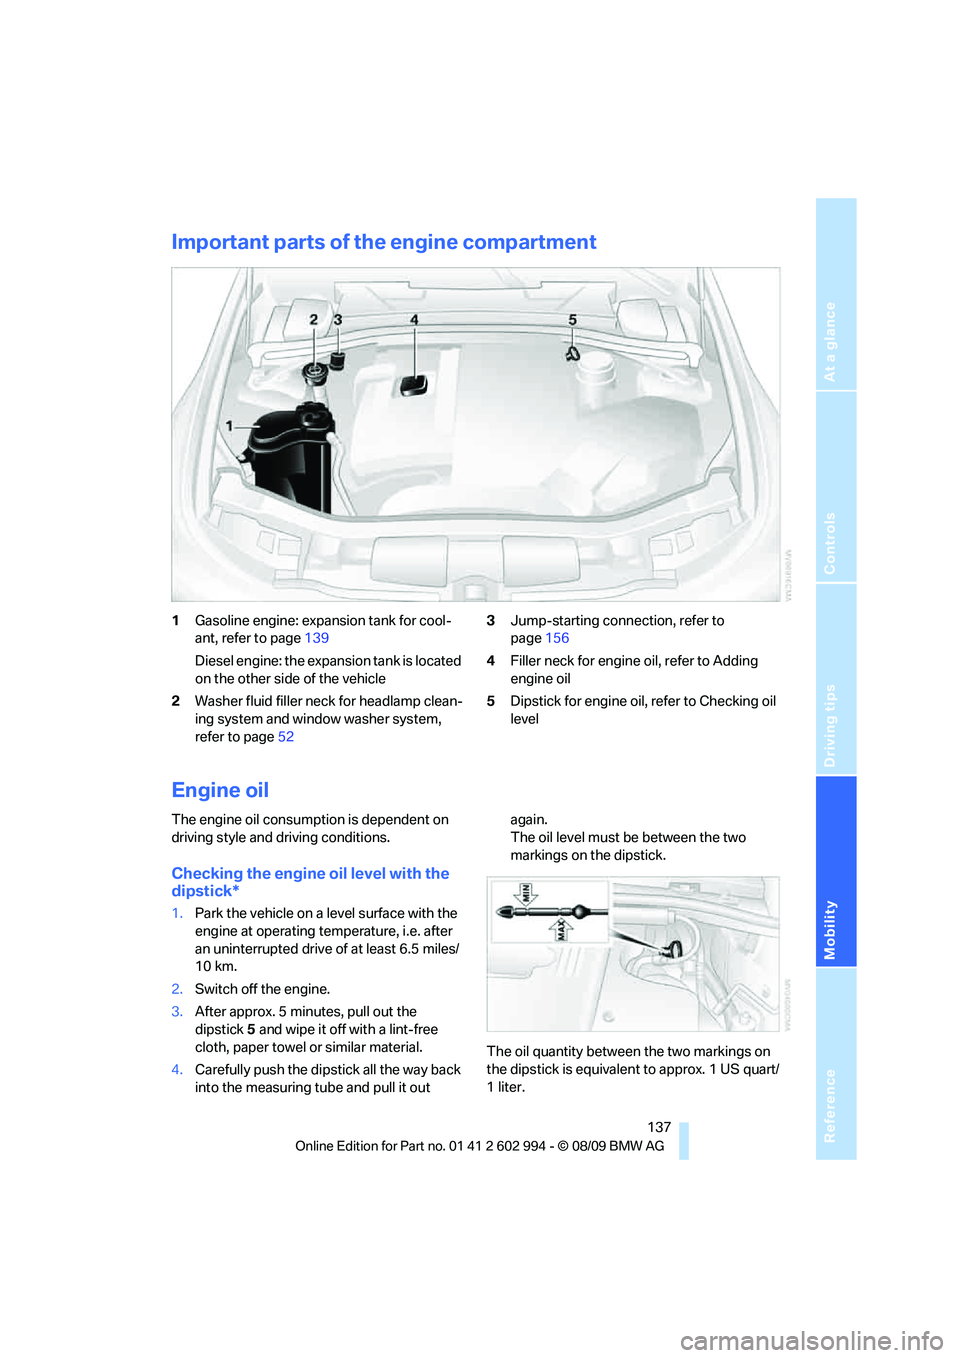
1Gasoline engine: expansion tank for cool-
ant, refer to page139
Diesel engine: the expansion tank is located
on the other side of the vehicle
2Washer fluid filler neck for headlamp clean-
ing system and window washer system,
refer to page523Jump-starting connection, refer to
page156
4Filler neck for engine oil, refer to Adding
engine oil
5Dipstick for engine oil, refer to Checking oil
level
Engine oil
The engine oil consumption is dependent on
driving style and driving conditions.
Checking the engine oil level with the
dipstick*
1.Park the vehicle on a level surface with the
engine at operating temperature, i.e. after
an uninterrupted drive of at least 6.5 miles/
10 km.
2.Switch off the engine.
3.After approx. 5 minutes, pull out the
dipstick5 and wipe it off with a lint-free
cloth, paper towel or similar material.
4.Carefully push the dipstick all the way back
into the measuring tube and pull it out again.
The oil level must be between the two
markings on the dipstick.
The oil quantity between the two markings on
the dipstick is equivalent to approx. 1 US quart/
1liter.
Page 140 of 196

Under the hood
138 The oil level must not be above the upper
marking of the dipstick. Too much oil will
harm the engine.<
Checking the engine oil level
electronically*
Your car is equipped with an electronic oil-level
monitor.
For a precise measurement and display of the
oil level, it is necessary that the engine be at
operating temperature, i.e. after uninterrupted
driving for at least approx. 6.5 miles/10 km. You
can have the oil level displayed while you are
driving, or while the vehicle is at a standstill on a
level surface and the engine is running.
You can have the oil level reading displayed in
the instrument cluster.
1.Push button 1 in the turn indicator lever up
or down repeatedly until the appropriate
symbol is shown in the display, accompa-
nied by the word "OIL".
2.Press button 2 in the turn indicator lever.
The oil level is checked and the reading dis-
played.
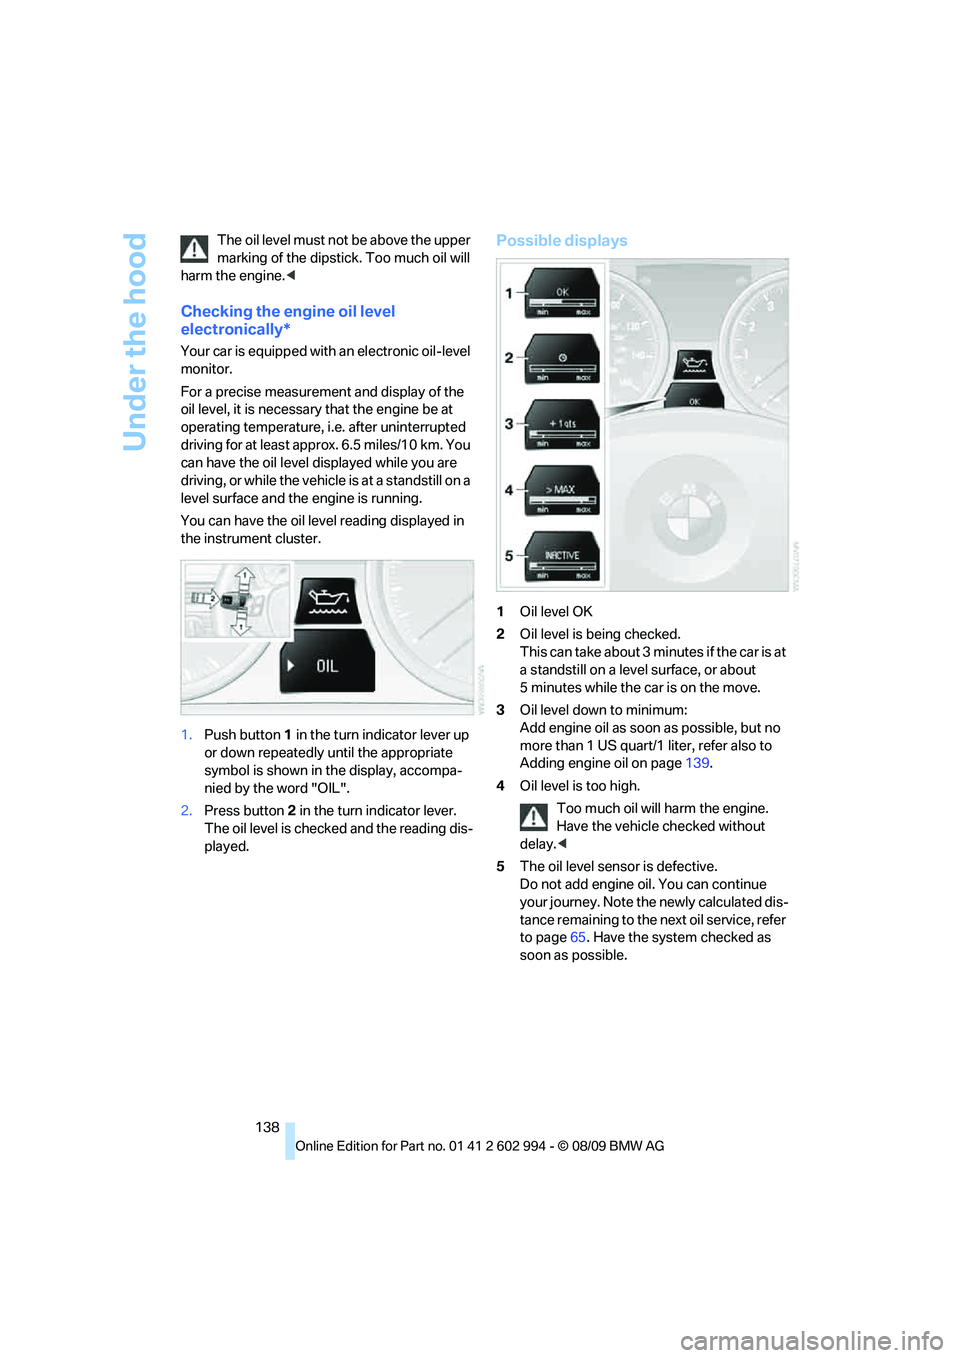
Possible displays
1Oil level OK
2Oil level is being checked.
This can take about 3 minutes if the car is at
a standstill on a level surface, or about
5 minutes while the car is on the move.
3Oil level down to minimum:
Add engine oil as soon as possible, but no
more than 1 US quart/1 liter, refer also to
Adding engine oil on page139.
4Oil level is too high.
Too much oil will harm the engine.
Have the vehicle checked without
delay.<
5The oil level sensor is defective.
Do not add engine oil. You can continue
your journey. Note the newly calculated dis-
tance remaining to the next oil service, refer
to page65. Have the system checked as
soon as possible.
Page 186 of 196

Everything from A to Z
184 Engine oil
– adding139
– alternative oil types139
– BMW Maintenance
System141
– capacity178
– checking level137
– dipstick137
– intervals between changes,
refer to Service
requirements65
Engine output, refer to Engine
data174
Engine speed, refer to Engine
data174
Engine starting, refer to
Starting the engine47
Entry lamps, refer to Interior
lamps83
Environmentally friendly
driving, refer to Energy
Control62
Error messages, refer to
Check Control67
ESP Electronic Stability
Program, refer to Dynamic
Stability Control DSC70
Event data recorders142
Exhaust system, refer to Hot
exhaust system107
Expanding the cargo area99
Exterior mirrors39
– adjusting39
– automatic dimming
feature40
– automatic heating40
– folding in and out39
External audio device95
Eyes
– for tow-starting and towing
away157
– for tying down loads110
F
Failure messages, refer to
Check Control67
Failure of an electrical
consumer154False alarm
– avoiding unintentional
alarm26
– switching off an alarm26
Fastening safety belts, refer to
Safety belts38
Filter
– refer to Microfilter/activated-
charcoal filter for automatic
climate control90
– refer to Microfilter for air
conditioner86
First aid pouch155
Fixture for remote control,
refer to Ignition lock46
Flash when locking/
unlocking20
Flat tire
– run-flat tires134
– Tire Pressure Monitor
TPM73
Flat Tire Monitor FTM72
– indicating a flat tire73
– indicator/warning lamp73
– initializing the system72
– snow chains72,135
– system limits72
Flat tires, refer to Tire
condition133
Fluid reservoir, refer to
Washer fluid reservoir53
Fog lamps82
– indicator lamp82,160
Folding rear seat backrest99
Folding up the floor panel101
Footbrake, refer to Braking
safely108
Footwell lamps, refer to
Interior lamps83
For your own safety5
Four-wheel drive, refer to
xDrive71
Front airbags77
FTM, refer to Flat Tire
Monitor72Fuel115
– additives116
– average consumption63
– gauge62
– high-quality brands115
– quality115
– specifications115
– tank contents, refer to
Capacities178
Fuel clock, refer to Fuel
gauge62
Fuel display, refer to Fuel
gauge62
Fuel-efficient driving, refer to
Energy Control62
Fuel filler flap114
– releasing in the event of
electrical malfunction114
Fuses154
G
Garage door opener, refer to
Integrated universal remote
control91
Gasoline
– refer to Average
consumption63
Gasoline, refer to Required
fuel115
Gasoline display, refer to Fuel
gauge62
Gear indicator, automatic
transmission with
Steptronic48
Gearshift lever
– automatic transmission with
Steptronic49
– manual transmission48
Gearshifts
– automatic transmission with
Steptronic49
– manual transmission48
General driving notes107