2010 BMW M3 sensor
[x] Cancel search: sensorPage 83 of 196

Reference
At a glance
Controls
Driving tips
Mobility
81
Adaptive light control*
The concept
Adaptive light control is a variable headlamp
control system that enables better illumination
of the road surface. Depending on the steering
angle and other parameters, the light from the
headlamp follows the course of the road.
Activating Adaptive Light Control
With the ignition switched on, turn the light
switch to position 3, refer to page79.
Standstill function
*: to avoid blinding oncoming
traffic, the adaptive light control directs light
towards the front passenger side when the
vehicle is at a standstill.
Adaptive light control is not active when revers-
ing.
Malfunction
The LED next to the symbol for automatic head-
lamp control flashes. Adaptive light control is
malfunctioning or has failed. Have the system
checked as soon as possible.
High beams/roadside parking
lamps
1High beams
2Headlamp flasher
3Roadside parking lamps
*
Roadside parking lamps, left or right*
There is an additional option of switching on the
lamps on the side of the car facing the road
when parked.
Switching on
After parking the vehicle, press the lever up or
down beyond the pressure point for a longer
period, arrow 3.
The roadside parking lamps drain the bat-
tery. Therefore, do not leave them on for
unduly long periods of time; otherwise, the bat-
tery might not have enough power to start the
engine.<
Switching off
Press the lever in the opposite direction to the
pressure point, arrow 3.
High-beam assistant*
The concept
This system automatically switches the high
beams on and off. The procedure is controlled
by a sensor on the front of the interior rearview
mirror. The assistant ensures that the high
beams are switched on whenever the traffic sit-
uation allows. It handles this task for you and
gives you the benefit of the best possible view.
You can intervene at any time and switch the
high beams on and off as usual.
Activating the system
1.Turn the light switch to position3, refer to
page79.
2.With the low beams switched on, briefly
push the turn indicator lever in the direction
of the high beam.
The indicator lamp in the instrument
cluster lights up when the high beams
are activated. The system automati-
cally switches from high beams to low beams
and vice versa in response to oncoming traffic,
traffic ahead of you, and adequate ambient
lighting, e.g. on city streets.
Switching the high beams on and off
manually
Whenever you wish, or when the situation
requires, you can intervene:
Page 84 of 196

Lamps
82 >If the high-beam assistant switches on the
high beams, but you would like to drive with
the low beams, simply switch off the high
beams using the turn indicator lever. This
deactivates the high-beam assistant.
To reactivate the system, briefly push the
turn indicator lever toward the high beams
again.
>If the high-beam assistant switches on the
low beams, but you would like to drive with
the high beams, switch on the high beams
as usual. This deactivates the system and
the high beams need to be switched off
manually, if necessary.
To reactivate the system, briefly push the
turn indicator lever toward the high beams
again.
>Use the headlamp flasher as usual with the
low beams switched on.
System limitations
The high-beam assistant cannot serve as
a substitute for the driver's personal judg-
ment of when to use the high beams. Therefore,
manually switch off the high beams in situations
where this is required to avoid a safety risk.<
The system is not fully functional in situations
such as the following, and driver intervention
may be necessary:
>In very unfavorable weather conditions,
such as fog or heavy precipitation
>In detecting poorly-lit road users, such as
pedestrians, cyclists, horseback riders and
wagons; when driving close to train or ship
traffic; and at animal crossings
>In tight curves, on hilltops or in depressions,
in cross traffic or half-obscured oncoming
traffic on highways
>In poorly lit towns and cities and in the pres-
ence of highly reflective signs
>At low speeds
>When the windshield in front of the interior
rearview mirror is fogged over, dirty or cov-
ered with stickers, etc.
>If the sensor is dirty. Clean the sensor on
the front of the interior rearview mirror using a cloth moistened with a small amount of
glass cleaner.
Fog lamps
The parking lamps or low beams must
be switched on for the fog lamps to
operate. The green indicator lamp in
the instrument cluster lights up whenever the
fog lamps are on.
The fog lamps are switched off while you acti-
vate the headlamp flasher or switch on the high
beams.
If the automatic headlamp control is acti-
vated, the low beams will come on auto-
matically when you switch on the fog lamps.<
Instrument lighting
You can adjust the brightness of the instrument
lighting only when the parking lamps or the low
beams are switched on.
1.Push button 1 up or down repeatedly until
the appropriate symbol appears in the dis-
play, accompanied by the brightness set-
ting and scale the word "SET".
2.Press button 2.
Page 89 of 196

Reference
At a glance
Controls
Driving tips
Mobility
87
Automatic climate control*
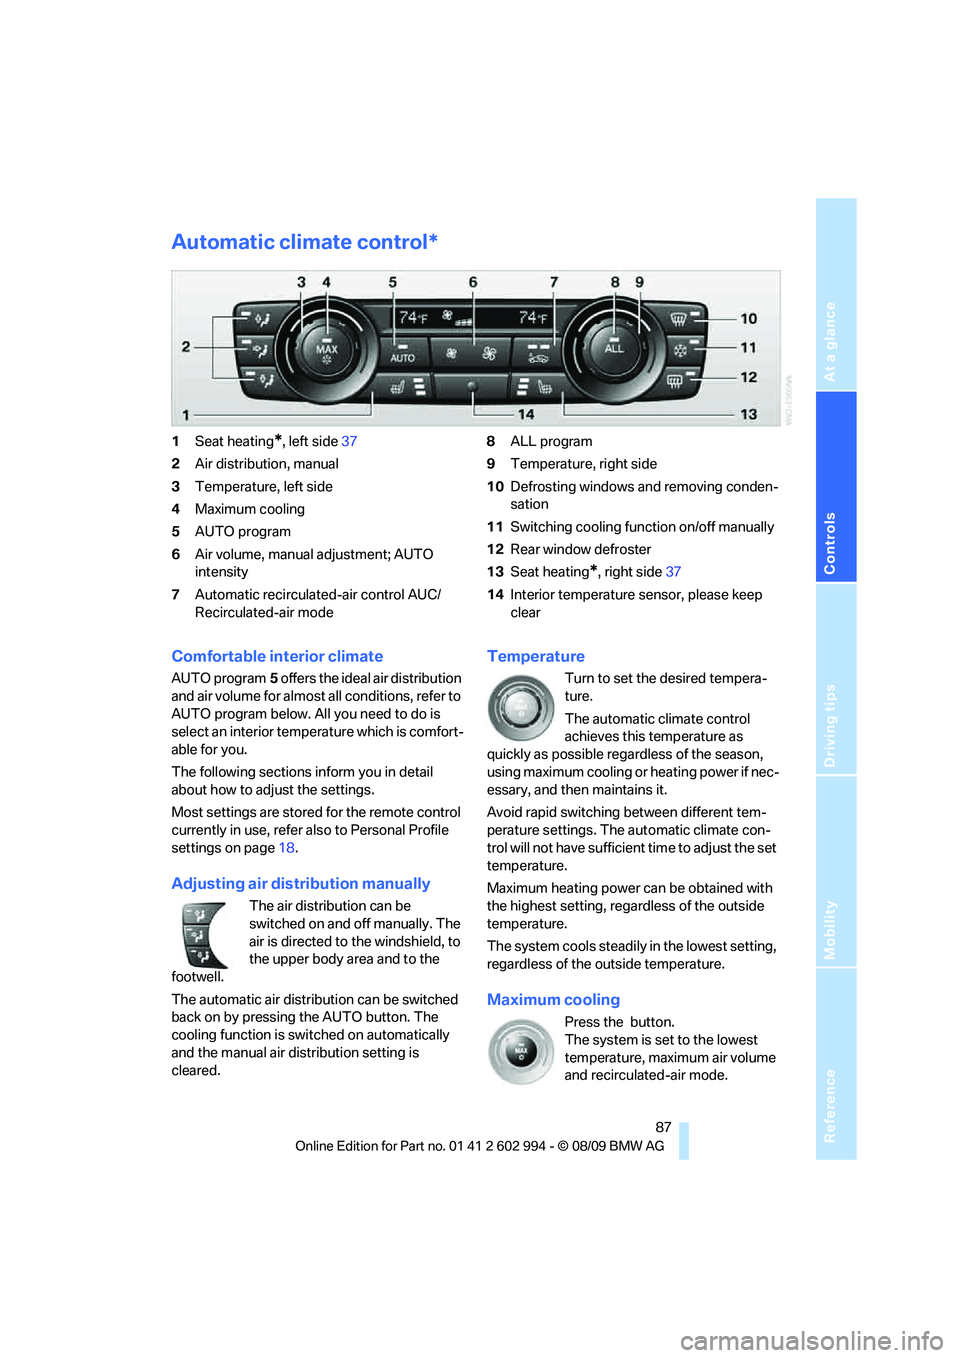
1Seat heating*, left side37
2Air distribution, manual
3Temperature, left side
4Maximum cooling
5AUTO program
6Air volume, manual adjustment; AUTO
intensity
7Automatic recirculated-air control AUC/
Recirculated-air mode8ALL program
9Temperature, right side
10Defrosting windows and removing conden-
sation
11Switching cooling function on/off manually
12Rear window defroster
13Seat heating
*, right side37
14Interior temperature sensor, please keep
clear
Comfortable interior climate
AUTO program5 offers the ideal air distribution
and air volume for almost all conditions, refer to
AUTO program below. All you need to do is
select an interior temperature which is comfort-
able for you.
The following sections inform you in detail
about how to adjust the settings.
Most settings are stored for the remote control
currently in use, refer also to Personal Profile
settings on page18.
Adjusting air distribution manually
The air distribution can be
switched on and off manually. The
air is directed to the windshield, to
the upper body area and to the
footwell.
The automatic air distribution can be switched
back on by pressing the AUTO button. The
cooling function is switched on automatically
and the manual air distribution setting is
cleared.
Temperature
Turn to set the desired tempera-
ture.
The automatic climate control
achieves this temperature as
quickly as possible regardless of the season,
using maximum cooling or heating power if nec-
essary, and then maintains it.
Avoid rapid switching between different tem-
perature settings. The automatic climate con-
trol will not have sufficient time to adjust the set
temperature.
Maximum heating power can be obtained with
the highest setting, regardless of the outside
temperature.
The system cools steadily in the lowest setting,
regardless of the outside temperature.
Maximum cooling
Press the button.
The system is set to the lowest
temperature, maximum air volume
and recirculated-air mode.
Page 90 of 196

Climate
88 Air flows out of the vent outlets for the upper
body region. Open them for this purpose.
Air is cooled as quickly as possible:
>Above an outside temperature of approx.
327/06
>When the engine is running
AUTO program
Press the button.
Air volume, air distribution and
temperature are controlled auto-
matically.
Depending on the selected temperature, AUTO
intensity and outside influences, the air is
directed toward the windshield, the side win-
dows, the upper body and the footwell.
Pressing the AUTO button automatically
switches on the cooling function.
At the same time, a condensation sensor con-
trols the program so as to prevent window con-
densation as much as possible.
The program is switched off when the air distri-
bution is set manually or the button is pressed
again.
Intensity of the AUTO program
With the AUTO program switched on, auto-
matic control of the air volume and air distribu-
tion can be adjusted:
Press the left side of the button to
reduce the intensity. Press the
right side of the button to increase
it.
The selected intensity is shown on the display
of the automatic climate control.
Adjusting air volume manually
To be able to manually adjust the air volume,
switch off the AUTO program first.
Press the left side of the button to
reduce the air volume. Press the
right side of the button to increase
it.The air volume may be reduced or the blower
may be switched off entirely to save on battery
power. The display remains the same.
Automatic recirculated-air control
AUC/Recirculated-air mode
You can respond to unpleasant odors or pollut-
ants in the immediate environment by tempo-
rarily suspending the supply of outside air. The
system then recirculates the air currently within
the vehicle.
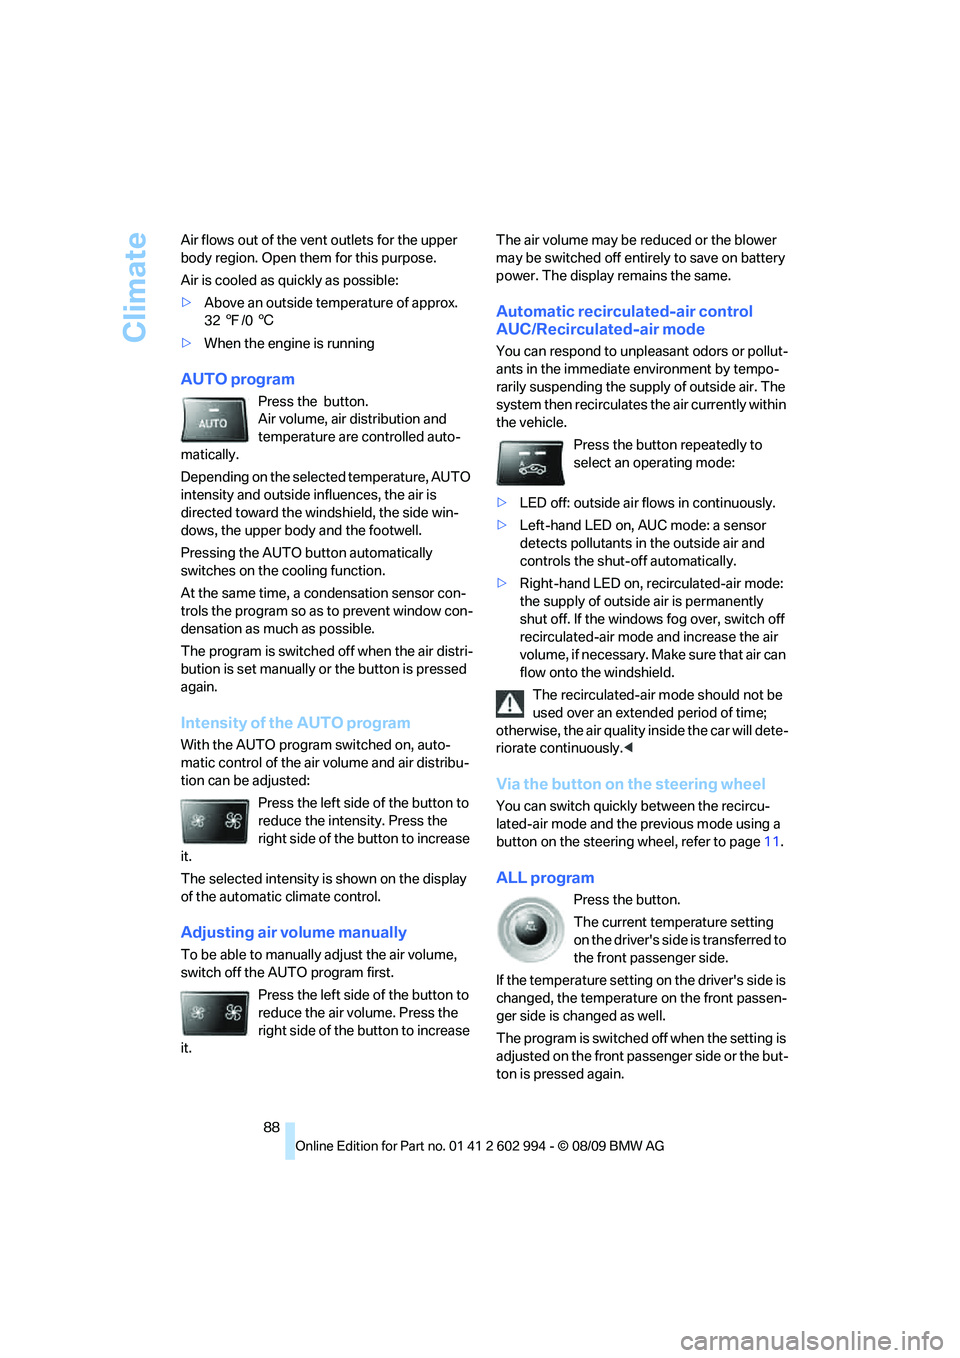
Press the button repeatedly to
select an operating mode:
>LED off: outside air flows in continuously.
>Left-hand LED on, AUC mode: a sensor
detects pollutants in the outside air and
controls the shut-off automatically.
>Right-hand LED on, recirculated-air mode:
the supply of outside air is permanently
shut off. If the windows fog over, switch off
recirculated-air mode and increase the air
volume, if necessary. Make sure that air can
flow onto the windshield.
The recirculated-air mode should not be
used over an extended period of time;
otherwise, the air quality inside the car will dete-
riorate continuously.<
Via the button on the steering wheel
You can switch quickly between the recircu-
lated-air mode and the previous mode using a
button
on the steering wheel, refer to page11.
ALL program
Press the button.
The current temperature setting
on the driver's side is transferred to
the front passenger side.
If the temperature setting on the driver's side is
changed, the temperature on the front passen-
ger side is changed as well.
The program is switched off when the setting is
adjusted on the front passenger side or the but-
ton is pressed again.
Page 140 of 196

Under the hood
138 The oil level must not be above the upper
marking of the dipstick. Too much oil will
harm the engine.<
Checking the engine oil level
electronically*
Your car is equipped with an electronic oil-level
monitor.
For a precise measurement and display of the
oil level, it is necessary that the engine be at
operating temperature, i.e. after uninterrupted
driving for at least approx. 6.5 miles/10 km. You
can have the oil level displayed while you are
driving, or while the vehicle is at a standstill on a
level surface and the engine is running.
You can have the oil level reading displayed in
the instrument cluster.
1.Push button 1 in the turn indicator lever up
or down repeatedly until the appropriate
symbol is shown in the display, accompa-
nied by the word "OIL".
2.Press button 2 in the turn indicator lever.
The oil level is checked and the reading dis-
played.
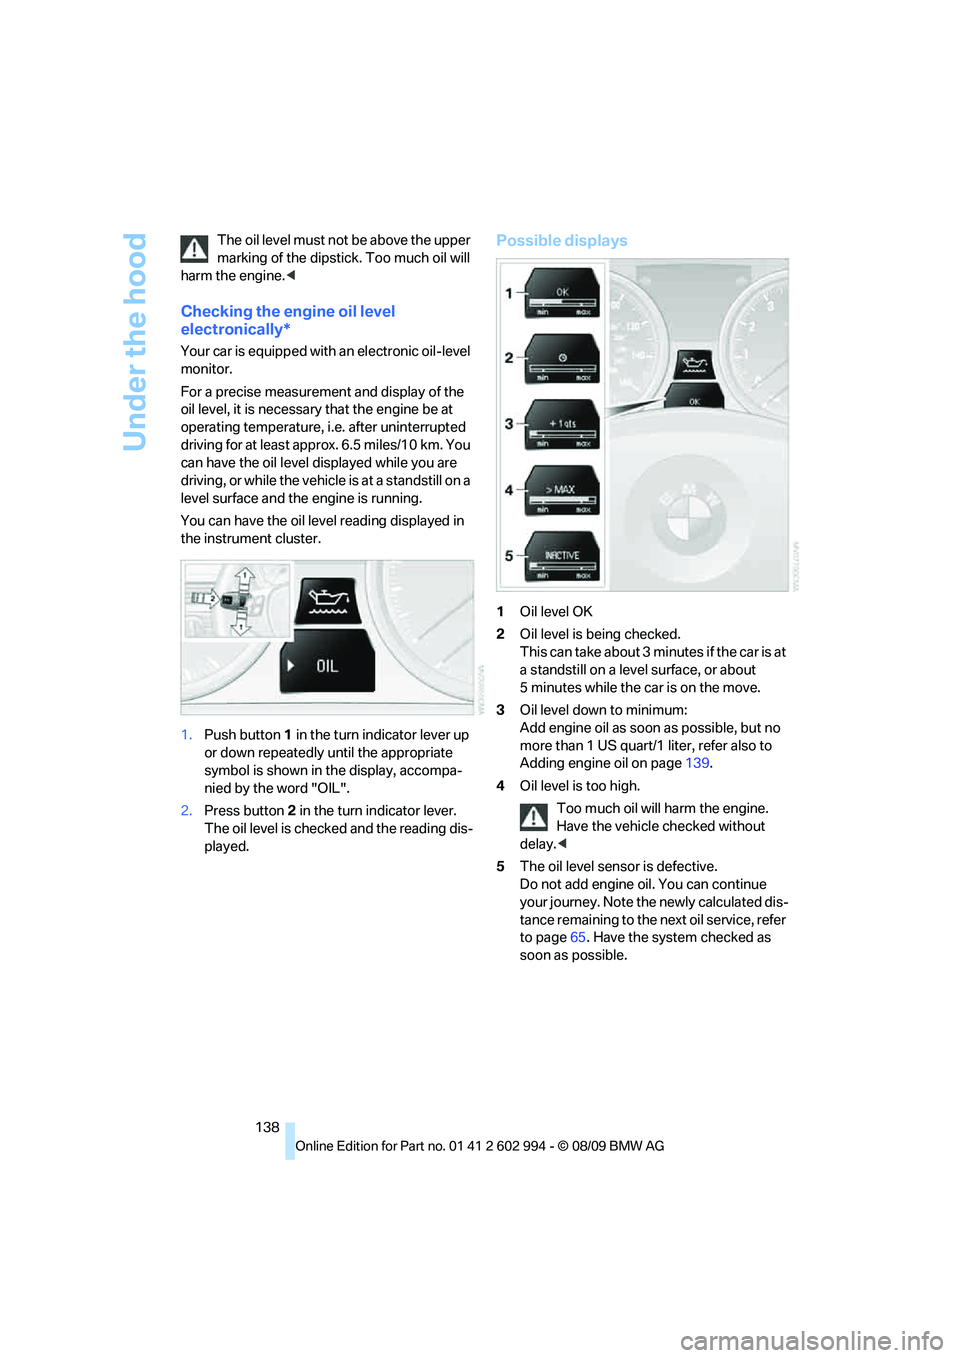
Possible displays
1Oil level OK
2Oil level is being checked.
This can take about 3 minutes if the car is at
a standstill on a level surface, or about
5 minutes while the car is on the move.
3Oil level down to minimum:
Add engine oil as soon as possible, but no
more than 1 US quart/1 liter, refer also to
Adding engine oil on page139.
4Oil level is too high.
Too much oil will harm the engine.
Have the vehicle checked without
delay.<
5The oil level sensor is defective.
Do not add engine oil. You can continue
your journey. Note the newly calculated dis-
tance remaining to the next oil service, refer
to page65. Have the system checked as
soon as possible.
Page 143 of 196

Reference
At a glance
Controls
Driving tips
Mobility
141
Maintenance
BMW Maintenance System
The BMW Maintenance System supports the
preservation of the traffic and operating safety
of your BMW. The objective is to optimize
efforts with respect to minimal vehicle mainte-
nance costs.
If and when you come to sell your BMW, a com-
prehensive record of servicing will prove a sig-
nificant benefit.
Condition Based Service CBS
Sensors and special algorithms take the differ-
ent driving conditions of your BMW into
account. Condition Based Service uses this to
determine the current and future service
requirements. By letting you define a service
and maintenance regimen that reflects your
own individual requirements, the system builds
the basis for trouble-free driving.
In the instrument cluster, you can have the
remaining times or distances for selected main-
tenance tasks and any legally prescribed dates
displayed, refer to page65:
>Engine oil
>Brake pads: separately for front and rear
>Brake fluid
>Vehicle check
>Legally mandated inspections depending
on local regulations
>Diesel particulate filter
*
Service data in the remote control
Your vehicle continuously stores service-
requirement information in the remote control
while you are driving. Your BMW Service Advi-
sor can read out this data from the remote con-
trol unit, and propose an optimized mainte-
nance approach. Whenever you take your car in
for servicing you should therefore hand your
BMW Service Advisor the remote control unit
that you last used.
Make sure that the date in the instrument
cluster is always set correctly, refer to
page67; otherwise, the effectiveness of Condi-
tion Based Service CBS is not assured.<
Service and Warranty Information
Booklet for US models and Warranty
and Service Guide Booklet for
Canadian models
Please consult your Service and Warranty Infor-
mation Booklet for US models and Warranty
and Service Guide Booklet for Canadian models
for additional information on service require-
ments.
BMW recommends that you have service
and repair operations performed at your
BMW center.
Take the time to ensure that these service pro-
cedures are confirmed by entries in your vehi-
cle's Service and Warranty Information Booklet
for US models and Warranty and Service Guide
Booklet for Canadian models. These entries
verify that your vehicle has received the speci-
fied regular maintenance.<
Page 145 of 196

Reference
At a glance
Controls
Driving tips
Mobility
143
Care
Care products
Regular cleaning and care contributes signifi-
cantly to the value retention of your BMW.
BMW recommends cleaning and caring for your
vehicle with products that are approved by
BMW for this purpose.
Your BMW center will be happy to advise you on
the products and services available for cleaning
and caring for your BMW.
Original BMW Care Products have been
material tested, laboratory checked and
proven in the field, and offer optimal care and
protection for your vehicle.<
Do not use cleaners that contain alcohol
or solvents as these may result in dam-
age.<
Cleaning agents can contain substances
that are dangerous or hazardous to your
health. Therefore, follow the warning and safety
instructions on the packaging. When cleaning
inside the vehicle, always open the doors or
windows of the vehicle. In enclosed areas, pro-
vide for sufficient ventilation. Only use products
designed for cleaning vehicles.<
Exterior care
Washing the vehicle
Especially during the winter months,
ensure that the vehicle is washed more
frequently. Heavy soiling and road salt can lead
to vehicle damage.<
After washing the vehicle, apply the
brakes briefly to dry them; otherwise,
water can reduce braking efficiency over the
short term and the brake discs can corrode.<
Automatic car washes
Preference should be given to cloth car washes.
Before driving into a car wash, ensure that it is
suitable for your BMW. Check the following:>Dimensions of your vehicle, refer to
page175.
>If necessary: fold in the exterior mirrors,
refer to page39.
>Maximum permissible tire width.
Avoid car washes with guide rail heights
over 4 in/10 cm; otherwise, there is the
danger of damaging chassis parts.<
Preparations before driving into an automatic
car wash:
>Unscrew the rod antenna
*.
>Deactivate the rain sensor
* to prevent unin-
tentional wiping.
>Sports Wagon: deactivate the rear window
wiper and protect it against damage. If nec-
essary, ask the operator of the car wash
about protective measures you should take.
>Remove additional add-on parts, e.g. spoil-
ers or phone antennas, if they could be
damaged.
Automatic transmission
Before driving into an automatic car wash, per-
form the following steps to ensure that the vehi-
cle can roll:
1.Insert the remote control into the ignition
lock, even with Comfort Access.
2.Move the selector lever to position N.
3.Release the parking brake.
4.Switch off the engine.
5.Leave the remote control in the ignition lock
so that the vehicle can roll.
Steam jets/high-pressure washers
When using steam jets or high-pressure
washers, ensure that you maintain suffi-
cient clearance to the vehicle and do not exceed
a temperature of 1407/606.
Insufficient clearance or excessive pressure or
temperature can lead to component damage or
Page 146 of 196

Care
144 water penetration. Follow the operating instruc-
tions of the high-pressure washer.<
When using high-pressure washers, do
not spray against the sensors and cam-
eras, e.g. of the Park Distance Control or Rear
View Camera, for an extended period and main-
tain a distance of at least 1 ft/30 cm.<
Manual car wash
When washing the vehicle by hand, use large
quantities of water and car shampoo if neces-
sary. Clean the vehicle with a sponge or wash-
ing brush, applying light pressure only.
Before cleaning the windshield, deacti-
vate the rain sensor or switch off the igni-
tion to prevent unintentional activation of the
wipers.<
Observe local regulations pertaining to
washing vehicles by hand.<
Headlamps
Do not rub them dry and do not use abrasive or
corrosive cleaning agents.
Loosen dirt, e.g. insects, with shampoo or
insect remover and wash away with copious
quantities of water.
Thaw ice with a windshield deicer and do not
use an ice scraper.
Windows
Clean the inside and outside surfaces of the
windows and the mirrors with window cleaner.
Do not clean the mirrors with cleaners
containing quartz.<
Paintwork care
Regular care contributes to value retention and
protects the paintwork against the long-term
effects of damaging substances.
Region-specific environmental influences can
damage the vehicle paintwork. Therefore, it is
important to adapt the frequency and scope of
car care accordingly.
Immediately remove aggressive materials such
as spilled fuel, oil, grease, brake fluid, tree sap or bird droppings to prevent damage to the paint-
work.
Repairing paintwork damage
Immediately repair scratches or similar
damage, such as that caused by stones
hitting the vehicle, where necessary to prevent
rusting.<
BMW recommends having paintwork damage
repaired by a professional paint repair work-
shop according to BMW specifications using
original BMW paint materials.
Preservation
A preservation treatment is necessary when
water no longer beads off the clean paintwork
surface. Only use products for paintwork pres-
ervation that contain carnauba or synthetic
waxes.
Rubber seals
Treat only with water or rubber care products.
Do not use silicon-containing care prod-
ucts on rubber seals; otherwise, noise
and damage could occur.<
Chrome parts
Carefully clean vehicle parts such as the radia-
tor grill, door handles or window frames with
copious quantities of water and a shampoo
additive, especially when roads are treated with
deicing salt. For additional treatment, use a
chrome polish.
Light-alloy wheels
For technical reasons, dust is generated during
braking that is deposited on the light-alloy
wheels. Remove the dust regularly using acid-
free rim cleaner.
Do not use aggressive, acidic, strongly
alkaline and abrasive cleaning agents or
steam jets over 1407/606; otherwise, dam-
age may occur.<