2010 AUDI S6 ignition
[x] Cancel search: ignitionPage 150 of 368
ffl..__A_ u_ t_ o_ m_ a_ t _ ic_ t_r_a _ n_ s_m _ i_ s _s_ i_ o _ n _____________________________________________ _
R -Rev e rse
T he transmission will automatically select the lowe st gea r ratio when
you sh ift into reverse .
Select
R only when the vehicle is at a full stop and the engine is
running at id le speed=>
& in "Driving the a utomatic tra nsmiss ion"
on
page 146 .
Before yo u move the selector lever to R, press both the button in the
handle of the selector lever
and the brake pedal at the same time.
When the ignition is on, the backup lights illum inate when the
selector lever is moved into
R .
N -Neutral
The tra nsmission is in neutra l in t his position . Shift to this posit ion
for standing wit h the brakes applied~
page 148.
When the vehicle is s tationary or a t speeds be low 3 mph (5 km/h),
you must always apply the footbrake before and while mov ing the
lever ou t of
N .
D -Normal position for dri ving forward
Posit ion Dis fo r normal city and highway driv ing. I t ranges from ze ro
to top speed and all gears shift automatically, depending on eng ine
load, d riving speed and au tomatically selected s hift p rograms.
When the vehicle is stat ionary or at speeds below 3 mph (5 km/h),
you must always apply the foot brake before and while moving the
lever to
D out of N .
In certa in circumstances it may be advantageous to temporarily
switch to the m anu al sh ift prog ram to man ua lly se lect gea r ratios to
match specific driving conditions~
page 150.
S -Sport position
Select this position for sportier performance. In this position, the
t ransm iss ion will not upshif t as soon, allowing the vehicle to use the
increased power available at higher engine speeds to achieve livelier
a cceler ation. When the vehicle
is stationary or at speeds below 3 mph (5 km/h),
you must always app ly the foot bra ke before and w hile movi ng the
lever to
S out of N.
& WARNING
Read and follow all WARNINGS=> & in "Driving the automatic
transmi ssion " on
page 146 .
0 Note
Coast ing downh ill with the transmission in N and t he e ng ine not
running will result in damage to the automatic t ransmiss ion and
possibly the catalytic converter .•
Ap plies to veh icles: w it h 6-speed automatic t ransmissio n
Automatic Shift Lock (ASL)
The Automati c Shift Lo ck s afegu ards you ag ainst acci
dentally shifting i nto a for ward or the reverse gear and
causing the vehicle to m ove unintentionally .
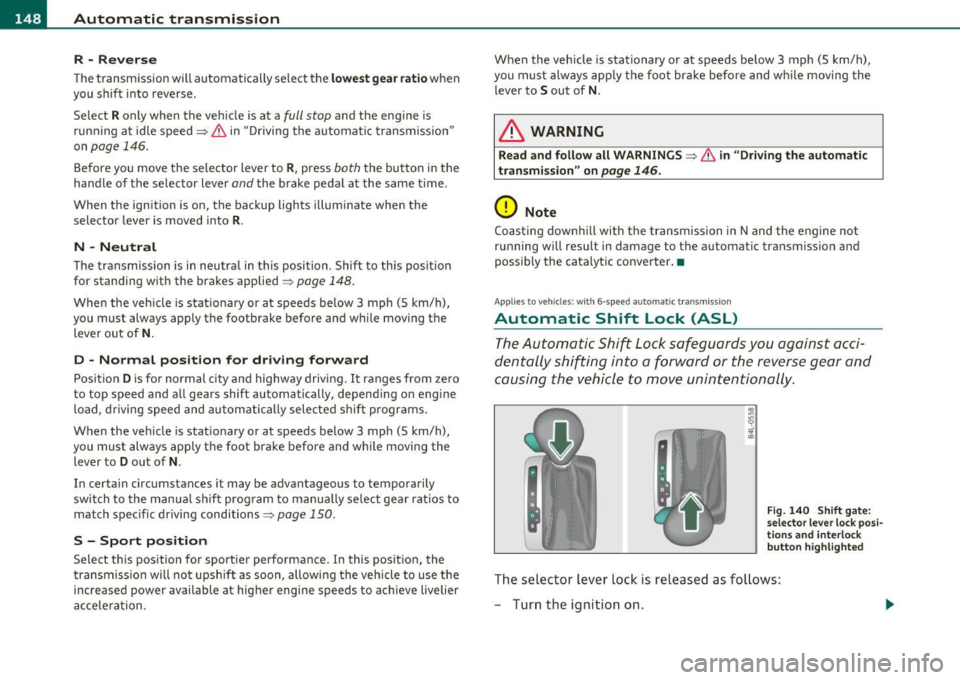
Fig. 140 Shift gat e:
s e lect or le ve r lo ck posi
t io ns a nd interl ock
butt on h ighlighted
The sele ct or lever lock is released as fo llows:
- Turn the ignition on.
Page 151 of 368
______________________________________________ A_ u_ t_ o _ m_ a_ t_ ic_ t_r_a _ n_ s_m_ i_ s _s_ i_ o _ n __ _
-Step on the brake pedal. At the same time press and hold
the interlock button on the side of the gear selector knob
=:> fig. 140 with your thumb until you have moved the
selector lever to the desired position.
Automatic selector lever lock
The selector lever is locked in the P and N positions when the ignition
is turned on. To move the lever from these positions the driver must
depress the brake pedal. As a reminder to the driver, the following
warning appears in the instrument cluster display when the se lector
is in
P and N:
When stationary apply footbrake while selecting gear
A time delay element prevents the selector lever from locking when
it is moved through the
N position (going from R to D). The locking
element will lock the selector lever if the lever is left in N (Neutra l) for
more than approximately 1 second, without the brake pedal being
pressed.
A t speeds above about 3 mph (5 km/h) the Automatic Shift Lock is
automatically deactivated in the
N position .
Interlock button
The lock button on the selector lever prevents the lever from being
accidentally shifted into certain posi tions . Pressing this button deac
tivates the selector lever lock. Depending on the direction of the
shift, the selector lever locks at different positions. The positions are
highlighted in the illustration=>
page 148, fig. 140.
Ignition key safety interlock
The key cannot be removed from the ignition unless the selector lever
is in the
P pa rk position. When the ignition key is removed, the
selector lever will be locked in the
P position. •
Controls and equip
ment Safety first
A
pp lies to vehicles : w ith 6-s p eed a utomati c transm ission
Kick-down
The kick-down feature allows the vehicle to generate
maximum acceleration .
When you press the accelerator pedal beyond the resistance point
that is reached at full throttle, the transmission will select a lower
gear ratio based on vehicle speed and engine RPM. The engine RPM
will be controlled to produce maximum vehicle acceleration as long
as you continue to press the accelerator pedal beyond this resistance
point .
& WARNING
Be careful when using the kick-down feature on slippery roads.
Rapid acceleration may cause the vehicle to skid. •
Applies to v ehicles: with 6 -speed auto mat ic trans miss ion
Dynamic shift program (DSP)
The automatic transmission is electronically controlled.
The transmission is self adapting and will automatically select the
best sh ift p rogram suited to the driv in g conditions and driving style.
The transmission will select one of the
economy programs when you
drive at a steady speed or a gradually changing speed without heavy
acceleration . This ach ieves optimum fuel efficiency, with early
upshifting and de layed downshifting.
Th e transmission will automatically select the
sporty shift programs
when you dr ive at higher speeds, or w ith heavy acceleration and
frequently changing speeds . Upshifts are delayed to make full use of
engine power . Downsh ifting takes place at higher engine speeds than
in the economy programs . _.,
Vehicle care Technical data
Page 154 of 368
-Automatic transmission .n,..__ ______________ _
Appli es to veh icles : wi th 6-spe ed a utomatic t ransm iss ion
Emergency release for selector Lever
If the vehicle's power supply fails, the selector lever can
be released in an emergency.
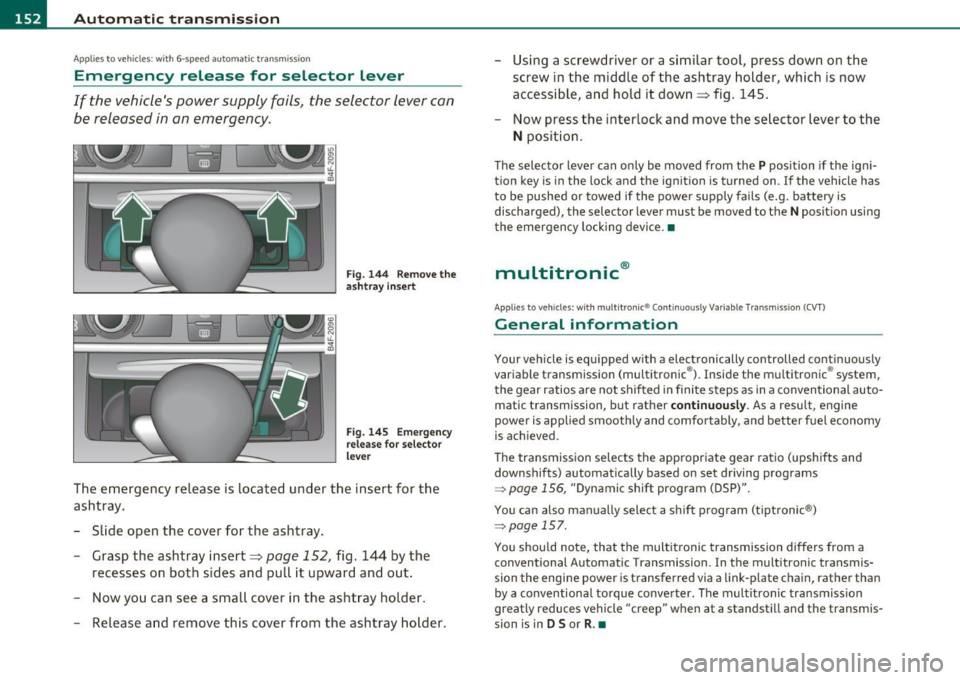
Fig. 144 Remove the
ashtray insert
Fig. 145 Emergency
release for selector
lever
The emergency release is located under the insert for the
ashtray.
- Slide open the cover for the ashtray.
- Grasp the ashtray insert=>
page 152, fig. 144 by the
recesses on both sides and pull it upward and out.
- Now you can see a small cover in the ashtray holder.
- Release and remove this cover from the ashtray holder. -
Using a screwdriver or a similar tool, press down on the
screw in the middle of the ashtray holder, which is now
accessible, and hold it down=> fig. 145.
- Now press the interlock and move the selector lever to the
N position.
The selector lever can only be moved from the P position if the igni
tion key is in the lock and the ignition is turned on . If the vehicle has
to be pushed or towed if the power supply fails (e.g. battery is
discharged), the selector lever must be
moved to the N position using
the emergency locking device.•
multitronic ®
Appli es to vehi cles: w ith mul tit ron ic® Co ntin uous ly Var ia ble Tra nsm iss ion ( CVT)
General information
Your vehicle is equipped with a electronically controlled continuously
variable transmiss ion (multitronic ®). Inside the multitronic ® system,
the gear ratios are not shifted in finite steps as in a conventional auto
matic transmission, but rath er
continuously. As a result, engine
power is applied smoothly and comfortably, and better fuel economy
is achieved .
The transm ission selects the appropriate gear ratio (upshifts and
downshifts) automatically based on set driving programs
~ page 156, "Dynamic shift program (DSP)".
You can also manually select a shift program (tiptronic ®)
~ page 157.
You should note, that the multitronic transmission differs from a
conventional Autom ati c Transmission . In the multitronic transmis
sion the engine power is transferred via a link-plate chain, rather than
by a conventional torque converter. The multitronic transmission
greatly reduces vehicle "creep" when at a standstill and the transmis
sion is in
D Sor R . •
Page 157 of 368
Automatic transmission Ill
----------------
Before you move the selector lever to R, press both, the button in the
hand le of the se lector lever
and the brake pedal at the same time.
When the ignition is on, the backup lights illuminate when the
selector lever is moved into
R.
N -Neutral
Shift to this position for standing with brakes applied=> page 155.
When the vehicle is stat ionary o r at speeds below 3 mph (5 km/h),
you must always apply the footbrake before and wh ile moving the
lever out of
N.
Do not use N for coasting downhill.
D -Normal driving position for forward
Depending on the load on the engine, vehicle speed and the dynamic
control program, the transmission will se lect the
optimal gear ratio.
In certa in circumstances it may be advantageous to temporarily
switch to the manual shift program to manually select gear ratios to
match specific driving conditions=>
page 157.
When the vehicle is stationary or at speeds below 3 mph (5 km/h),
you must always apply the footbrake before and while moving the
lever to
D out of N .
S -Sport position
Select this position for sportier performance. In this position, the
transmission will not upshift as soon, allowing the veh icle to use the
increased power available at higher engine speeds to achieve livelier
acceleration.
When the vehicle is stat ionary or at speeds below 3 mph (5 km/h),
you must always app ly the foot brake before and whi le moving the
lever to
S out of N.
& WARNING
Read and follow all WARNINGS=> & in "Driving the multi
tronic ®" on
page 153.
Controls and equip
ment Safety first
0 Note
Coasting downhill
with the transmission in N and the engine not
operating will result in damage to the automatic transmission and
poss ibly the catalytic converter.•
Applies to veh icles: w ith mult itronic ® Continuously Va riable T ransmiss ion (C VT)
Automatic Shift Lock (ASL)
The Automatic Shift Lock safeguards you against acci
dentally shifting into a forward or the reverse gear and
causing the vehicle to move unintentionally.
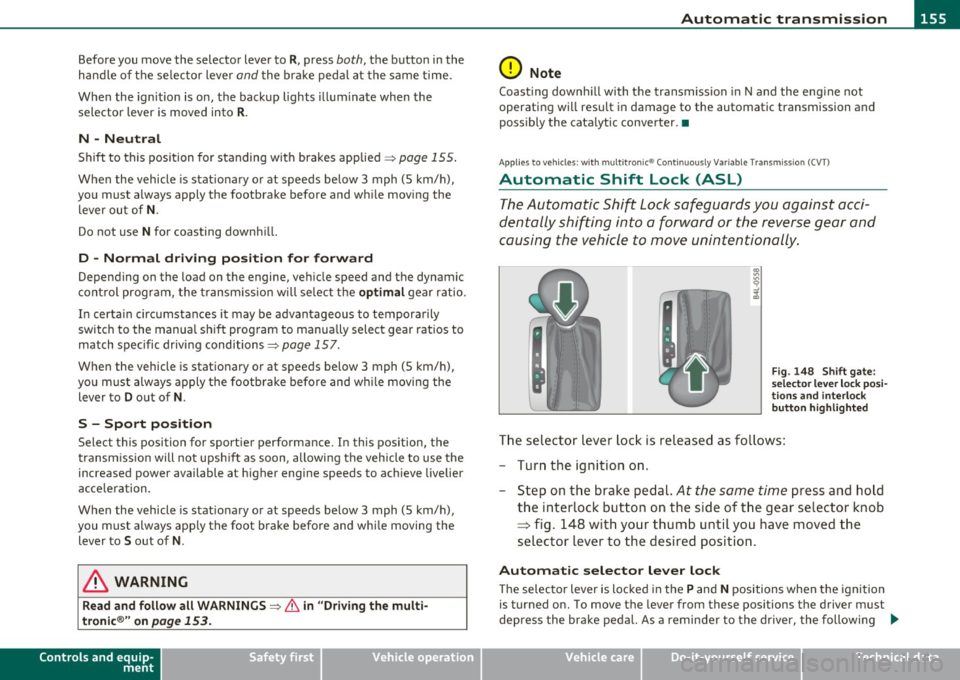
Fig. 148 Shift gate:
selector lever lock posi
tions and inter lock
button highlighted
The selector lever lock is released as follows:
- Turn the ignition on.
- Step on the brake pedal.
At the some time press and hold
the interlock button on the side of the gear se lector knob
=> fig. 148 with your thumb until you have moved the
selector lever to the desired position .
Automatic selector lever lock
The selecto r lever is locked in th e P and N positions when the ignition
is turned on. To move the lever from these pos itions the driver must
depress the brake pedal. As a reminder to the driver, the following .,_
Vehicle care Technical data
Page 158 of 368
1111....__A_ u_ t_o _m_ a_ t_ic _ t_ r_ a_ n_s _m_ i _s_ s_ i_ o_ n ____________________________________________ _
warning appears in the instrument cluster display when the selector
is in
P and N:
When stationary apply footbrake while selecting gear
A time delay element prevents the selector lever from locking when
it is moved through the
N position (going from R to D). The locking
element will lock the selector lever if the lever is left in N (Neutral) for
more than approximately 1 second, without the brake pedal be ing
pressed .
At speeds above about 3 mph (5 km/h) the Automatic Shift Lock is
automatically deactivated in the
N position.
Interlock button
The lock button on the selector lever prevents the lever from being
accidentally shifted into certain positions. Pressing this button deac
tivates the selector lever lock. Depending on the direction of the
shift, the selector lever locks at different positions. The positions are
high light ed in the illustrat ion~
page 155 , fig. 148.
Ignition key safety interlock
The key cannot be removed from the ignition unless the selector lever
is in the
P park position. When the ignition key is removed, the
selector lever w ill be locked in the
P pos it ion .•
Ap plies to v ehicles : w ith mult itronic ® Contin uously Var iable Transm issio n (C VT)
Kick-down
The kick-down feature allows the vehicle to generate
maximum acceleration.
When you press the accelerator pedal beyond the resistance point
that is reached at full throttle, the transmission will select a lower
gear ratio based on vehicle speed and engine RPM . The engine RPM
w ill be contro lled to produce maximum vehicle acceleration as long
as you continue to press the accelerato r pedal beyond th is resistance
point .
& WARNING
Be careful when using the kick-down feature on slippery roads.
Rapid acceleration may cause the vehicle to skid. •
Applies to veh icl es: w it h mul tit ro nic® Con tin uous ly Va ria bl e Tran smis s io n ( CVT)
Dynamic shift program (DSP)
The multitronic ® transmission is electronically
controlled .
The transmission selects the appropriate gear ratio (upshifts and
downshifts) automatically based on preset d riving programs.
The transmission will select one of the
economy programs when you
drive at a steady speed or a gradua lly changing speeds without heavy
acceleration . Th is gives best fuel eff iciency, with early upshifting and
delayed downshifting.
Th e transmission will automatically select the
sporty shift programs
when you dr ive at higher speeds, or w ith heavy acceleration and
frequently changing speeds. Upshifts are delayed to make full use of
engine power . Downshifting takes place at higher engine speeds than
in the economy programs.
Th e selection of the most suitab le shift program is a continuous,
automatic process. The driver can a lso make the transmission switch
to a sporty program by
quickly pressing down the gas pedal.
This causes the transmiss ion to shift down into a lower gear ratio and
makes quick acceleration possible (to pass another vehicle) You do
not need to press the gas pedal into the kickdown range. After the
transmission has upshifted, the original program is selected
according to your driving style.
An additional shift prog ram allows the automatic t ransmission to
select the proper gear for uph ill and downh ill grad ients.
This prevents the transmiss ion from shifting up and down unneces
sari ly on hills. The transmission will shift down to a lower gear ratio _,,,
Page 161 of 368
____________________________________________ A_ u_ t_ o_ m_ a_ t_ i_ c _ t_ra _ n_s_ m __ is_s_ i_ o _ n _ __._
App lies to vehicles : wi th mul titro nic® Continu ous ly Va riable Trans missi on (CV T)
Emergency release for selector lever
If the vehicle's power supply fails, the selector lever can
be released in an emergency.
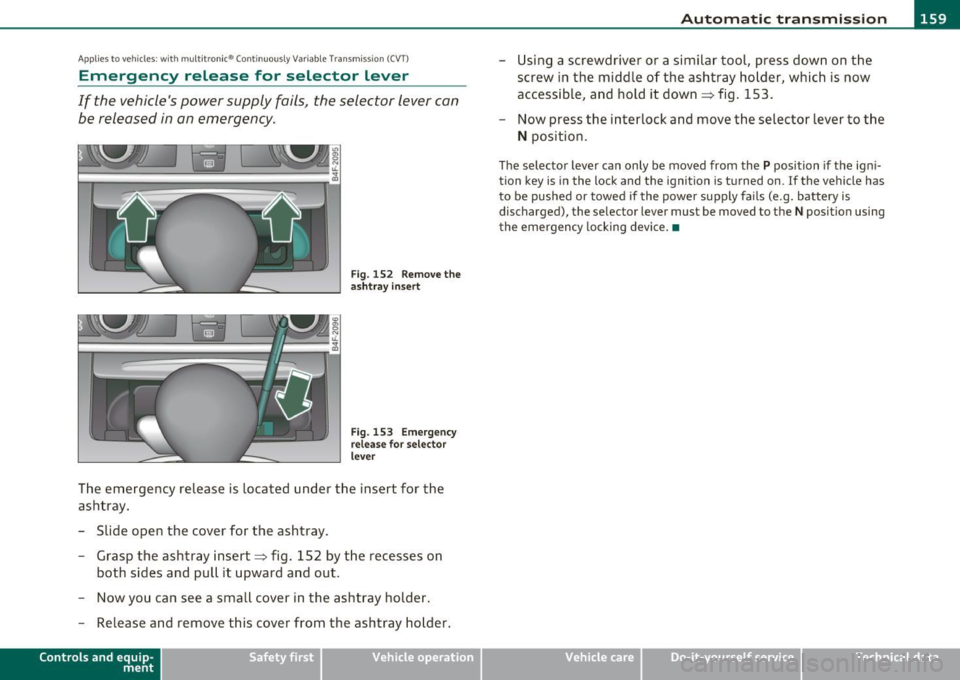
Fig. 152 Remove the
asht ray insert
F ig . 153 E mergen cy
release for se lector
l ever
The emergency release is located under the insert for the
ashtray.
- Slide open the cover for the ashtray .
- Grasp the ashtray insert~ fig. 152 by the recesses on
both sides and pull it upward and out.
- Now you can see a small cover in the ashtray holder.
- Release and remove this cover from the ashtray holder.
Con tro ls a nd e quip
m en t Vehicle
OP-eration
-Using a screwdriver or a similar tool, press down on the
screw in the middle of the ashtray holder , which is now
accessible, and hold it down~ fig. 153 .
- Now press the interlock and move the selector lever to the
N position.
The selector lever can only be moved from the P position if the igni
tion key is in the lock and the ignition is turned on. If the vehicle has
to be pushed or towed if the power supply fails (e.g. battery is
discharged), the selector lever must be moved to the
N position using
the emergency locking device. •
Vehicle care Do-it-yourselt service iTechnical data
Page 164 of 368

1111...._ __ P_a _ r_ k_ a_ s_ s_is _ t ____________________________________________________ _
continue to be signaled. Objects such as barrier chains, trailer draw
bars, thin painted vertical poles or fences may not be detected by the
system, posing risk of damage .
• Never use warm or hot water to remove snow or ice from the rear
view camera lens - danger of crack formation on the lens!
• When cleaning the lens, never use products that are abrasive. •
Applies to veh icles: with park ing syste m (rear, with rear view camera)
Switching on/off
The rear view camera switches on automatically together
with the acoustic park assist* when you put the vehicle in
reverse .
Switching on
-Before parking with the rear view camera, the Adaptive Air
Suspension* comfort or automatic mode must be
switched on=>
page 16.
-Put the vehicle in reverse gear, the acoustic parking
system* with rear view camera is activated automatically.
Activation of the acoustic parking system is confirmed by a brief acknowledgement sound.*
Switching off
- Drive faster than 6 mph (10 km/h), or
- take the vehicle out of reverse gear. The acoustic parking
system* is immediately deactivated, and the rear view
camera picture is deactivated automatically after a period
of about 15 seconds, or
- switch off the ignition.
The delay in deactivating the camera prov ides an uninterrupted view
behind the vehicle especially when maneuvering in tight parking spaces and prevents the picture
from turning off the every time you
shift out of reverse.
If the warning message appears in the display but not the rear view
camera picture, read and confirm the warning message. The acoustic
distance signal is always active.*
If you press a function but ton on the MMI control console, the rear
view camera picture disappears. The rear view camera picture reap
pears the next time you park.
Further information on the warning message and the MMI control
console can be found in the MMI instruction booklet.
[I) Tips
• The rear view camera picture is available as soon as the MMI
Display or the MMI is switched on, or the start-up phase is completed.
• Keep the sensors in the rear bumper and the rear view came ra lens
clean and free of snow and ice, so that the parking system can work
properly . Please follow the additional notes on~
page 165. •
Applies to veh icles: with park ing syste m (rear, w ith rear vie w came ra)
Reverse Parking
Parking mode 1 can be used when parking in a garage or
parking space.
Fig. 158 MMI Display:
aiming at a parking
spot
~
Page 167 of 368

Park assist IIJII _________________________________ _____;.....:;_;_.:..:,____;;_ ____ _
0 Note
In the MMI display, the d irect ion of t ravel of the vehicle rear is rep re
sented depend ing on the steering wheel angle. The vehicle front
swi ngs ou t mo re t han t he ve hicle re ar. M ain tain ple nty of dist ance
from an obstacle so t hat your outs ide mirror or a corner of your
vehicle d oes no t collide with any o bstacles - dange r of accide nt!
[ i ) Tips
Th e left or right or ientat ion lines and s urfaces will be displ aye d,
depending on the tu rn signal being used. •
App lies to veh icles : with park ing syst em (rear, wit h rea r view cam era)
Adjusting the display and warning tones
Th e display and warning tones can be adjusted in the
MM I.
-Select: Funct ion button !CA R]> Systems *> Parking
system .
Display
• Off -when the parking system is switche d off, only audible sig na ls
are given.
• On -when t he pa rking system is swi tched on, the pic ture from the
rear view camera is displayed.
Warning tones (Canada models)
• Rear volume -rear sensor vo lume
• Rear frequency -rear sensor frequency
• In-car entertainment fader -w hen the p ark in g sys tem is switche d
on, t he volume of the active audio source is lowered.
Th e newly adj uste d value is briefly hear d from the signal generator .
Th e set tings are automat ically stored and assigned to the master key
with remote control.
Controls and equip
ment Safety first
& WARNING
•
Canada models: always make sure that the volume and
frequency of the chimes is adjusted so that you can easily hear the
acoustic distance signal even if the radio is playing, the air-condi
tioner blower is on High or there is a high level of outside noise.
• Check the settings whenever someone else has driven the
vehicle before you.
[I] Tips
• Cana da mo dels: the warning tones can a lso be adjusted directly
from t he rear -view came ra image* . Simply press the
!Settings)
control button.
• Cha nged settings are activated w hen parking assist is switched on
again. •
Appli es to ve hicle s: wit h pa rk ing system (rea r, wi th r ear vie w c amer a)
Error messages
If a wa rni ng tone* is aud ible for abo ut five seconds w he n you t urn on
the ignition , the re is a ma lfunction in the system. Have the prob lem
co rrected by yo ur aut ho rized Audi dea ler.
Keep the sensors in the rear b umper clean and free from ice so that
t he a cousti c p ark assis t* sys tem c an fun ction pro perly .•
Vehicle care Technical data