2010 AUDI S6 engine
[x] Cancel search: enginePage 333 of 368

Emergency situations --------------=----EWI
Emergency situations
General
This chapter is intended for trained emergency crew s and working
personnel who ha ve the necessar y tools and equipment to perform
the se operations . •
Starting by pushing or towing
(D Note
Your vehicle is equipped with an a utomat ic transmission. Conse
que ntly, the eng ine can not be started by pushing or towing. •
Starting with jumper cables
If necess ary, the engine can be started by connecting it to
the battery of an other vehicle .
If the engine shou ld fai l to start because of a discharged or weak
battery, the battery can be co nnecte d to the battery of
another
vehicle, using a pair of jumper cable s to start the engine .
Jumper cables
Use only jumper cables of suffic ient ly large cross section to carry the
sta rter cur ren t safely . Refe r to the manufacture r's specifications.
Use on ly j umper cab les with
insulated te rm ina l clamps w hich are
distinct ly marked :
plus(+) cable in most cases colo red red
minus (-) cable i n most cases colored black.
Safety first
& WARNING
Batterie s contain electricity, acid, and gas . Any of these can cause
very serious or fatal injury . Follow the inst ructions below for safe
handling of your vehicle 's battery .
• Always shield your eyes and avoid leaning over the battery
whenever possible.
• A discharged battery can freeze at temperatures just below
32 °F (0 °C). Before connecting a jumper cable, you must thaw the
frozen battery completely , otherwise it could explode.
• Do not allow battery acid to contact eyes or skin . Flush any
contacted area with water immediately .
• Improper use of a booster battery to start a vehicle may cause
an explosion.
• Vehicle batteries generate e xplos ive gases. Keep spa rks, flame
and lighted cigarettes away from batteries.
• Do not try to jump start any vehicle with a low acid level in the
battery.
• The voltage of the booster battery must also h ave a 12 -Volt
rating. The capacity (Ah) of the booster battery should not be
lower than that of the discharged battery. Use of batter ies of
different voltage or sub stantially different "Ah " rating may cau se
an explosion and personal injury.
• Never charge a frozen battery . Ga s trapped in the ice may cause
an e xplosion.
• Never charge or use a battery that has been frozen. The battery
case may have be weakened.
• Use of batteries of different voltage or substantially different
capacity (Ah ) rating may cause an explosion and injury . The
capacity (Ah ) of the booster battery should not be lower than that
of the discharged battery. _..
Vehicle care Do-it-yourself service Technical data
Page 334 of 368

-Emergency situations PW..._-=----='----------------
& WARN ING (con tin ue d)
• Before you che ck anything in the engine compartment, always
read and heed all WARNINGS~
page 269, "Engine compart
ment ".
0 Note
• App lying a higher vo ltage booster battery will cause expens ive
damage t o sens it ive e lec tron ic compone nts, such as contro l units,
re lays, rad io, etc.
• The re must be no elect rical contact between the veh icles as othe r
w ise current could already start to flow as soon as the pos it ive( +)
t erminals a re connected.
[ i ] Tips
• T he discha rged ba ttery mus t be p roper ly connec ted to the
vehicle's electrical system. Whe n jump starting or charging the
b att ery, never connec t the negat ive g round cable to the batte ry nega
tive post because the battery manager system must be ab le to detect
the ba ttery's state of charge . Always connect the negative gro und
cable to the negative ground post of the batte ry manager contro l
unit. •
Use of jumper cables
fvfake sure t o con nect the j umpe r ca ble clamps i n ex a ctly
the order describ ed belo w!
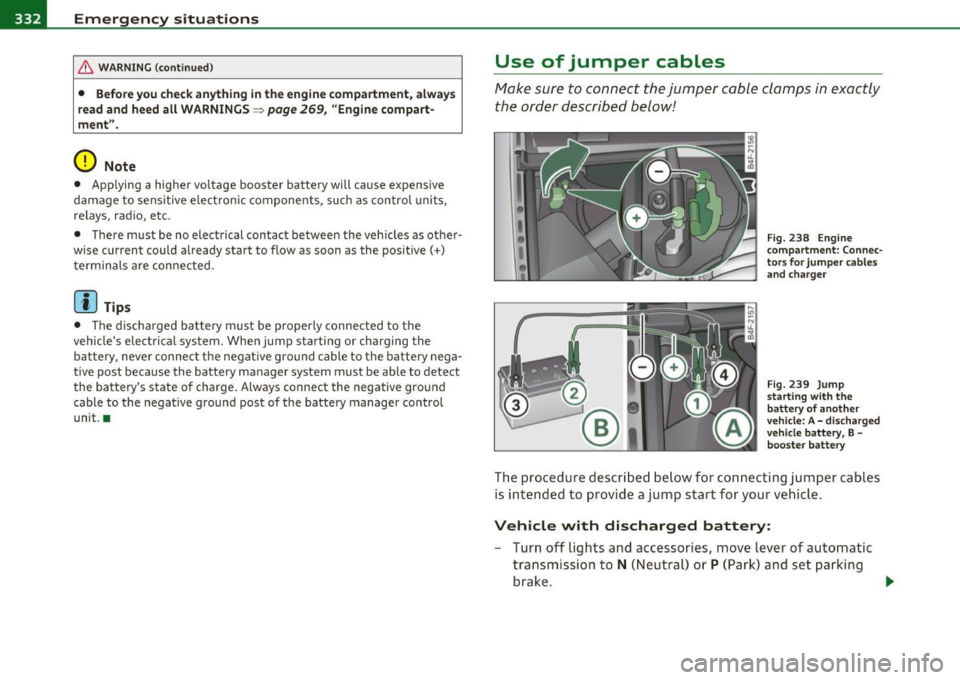
Fig. 2 38 Engine
c omp artment : Co nnec
t o rs f or jump er cab les
a nd c harger
Fig. 239 Jump
st art in g wi th the
b att ery of ano th er
v eh icle : A -disch arged
v ehicle batt ery, B -
boo ste r battery
Th e p ra ced u re descri bed belo w for c onn ect ing jump er ca ble s
is int ende d to prov ide a jump star t for your veh icle.
Vehicle with d ischarged battery:
- Tur n off lights and accesso ries, move leve r of automatic
tra nsm ission to
N ( N eutral) o r P (P ark) and set pa rking
b rake.
~
Page 335 of 368

Emergency situations --------------=----Efffll
Connect POSITIVE (+) to POSITIVE (+) (red)
- Open the red cover on the posi tive po le ~ page 332,
fig . 238.
1. Connect one e nd of the pos itive cable (red) on the
jump
start bolt~
page 332, fig. 239 © (Bolts under red cover
= "positive") of the vehicle to be started @.
2 . Connect the other end to the pos itive terminal @ of the
booster battery ®·
Connect NEGATIVE(-) to NEGATIVE(-)
(black)
3 . Connec t one end to the negative te rmi nal @ of the
booster battery ®·
4. Conn ect t he other end o f the n ega tive cabl e (black) to t he
jump start bolt© (Bolts w it h hex head = "n egat ive") of
the vehic le to be s tarte d
@.
Starting the engine
- Start the engine of t he vehicle w ith the booster battery.
Run the engi ne at a moderate speed.
- Start e ng ine w it h discharged ve hicle battery in the usu al
ma nner .
- If the engine fai ls to star t: do no t ke ep the s tar ter
crank ing for lo nger than 10 secon ds. W ait for abou t
30 seco nds and then t ry again .
- Wi th engine running, remove jum per cable s from bot h
v eh icle s in t he exact
re vers e order.
- C lose the re d cove r on the positive pole.
Safety first
T he battery is vented to the outside to prevent gases from entering
t he ve hicl e inter ior. Make su re t hat t he ju mper clamps are we ll
connected with the ir
metal parts in full contact with the battery
terminals .
& WARNING
To avoid serious per sonal injury and damage to the vehicle, heed
all warnings and instructions of the jumper cable manufacturer . If
in doubt, call for road service .
• Jumper cables must be long enough so that the vehicles do not
tou ch.
• When connecting jumper cables , make sure that they cannot
get caught in any moving part s in the engine compartment .
• Before you che ck anything in the engine compartment , always
read and heed all WARNINGS~
page 269, "Engine compart
ment ".
0 Note
Improper hook-up of j umper cab les can ruin the generator.
• Always co nnect POSITIVE(+) to POSI TIVE(+), and NEGATIV E(- )
to NEGA TIVE( -) ground post of the battery manager cont rol unit.
• Check that all screw p lugs on the battery ce lls are sc rewed in
firmly. If not, tighten p lugs prior to connecting clamp on negative
battery terminal.
• Please note that the proced ure for connecting a jumper cable as
described above applies specifically to t he case of your vehicle being
jump started . When you a re giving a jump start to another vehicle, do
not connect the negative( -) cab le to the nega tive (-) te rm inal on the
discharged battery©~
page 332, fig. 239. Instead, securely
c onne ct the negative (- ) cab le to ei ther a so lid met al componen t th at
is f irm ly bolted to the eng ine b lock or to the eng ine b lock itself. If the
ba ttery tha t is bei ng charged does not ven t to t he ou tside, escap ing
battery gas could ignite and explode! •
Vehicle care Do-it-yourself service Technical data
Page 336 of 368

,..,___E_ m_ e_r -=g :.. e_ n_c -=y '-- s_i_t _u _a _ t_ i_ o _ n_ s ____________________________________________ _
Emergency towing with
commercial tow truck
General hints
Your Audi requires special handling for towing.
The following information is to be used by commercial tow truck
operators who know how to operate their equipment safely.
• Never tow your Audi, towing will cause damage to the engine
and transmission.
• Never wrap the safety chains or winch cables around the brake
lines.
• To prevent unnecessary damage, your Audi must be transported
with a flat bed truck.
• To load the vehicle on to the flat bed, use the towing loop found
in the vehicle tools and attach to the front or rear anchorage
~ page 334 and~ page 335 .
& WARNING
A vehicle being towed is not safe for passengers. Never allow
anyone to ride in a vehicle being towed, for any reason. •
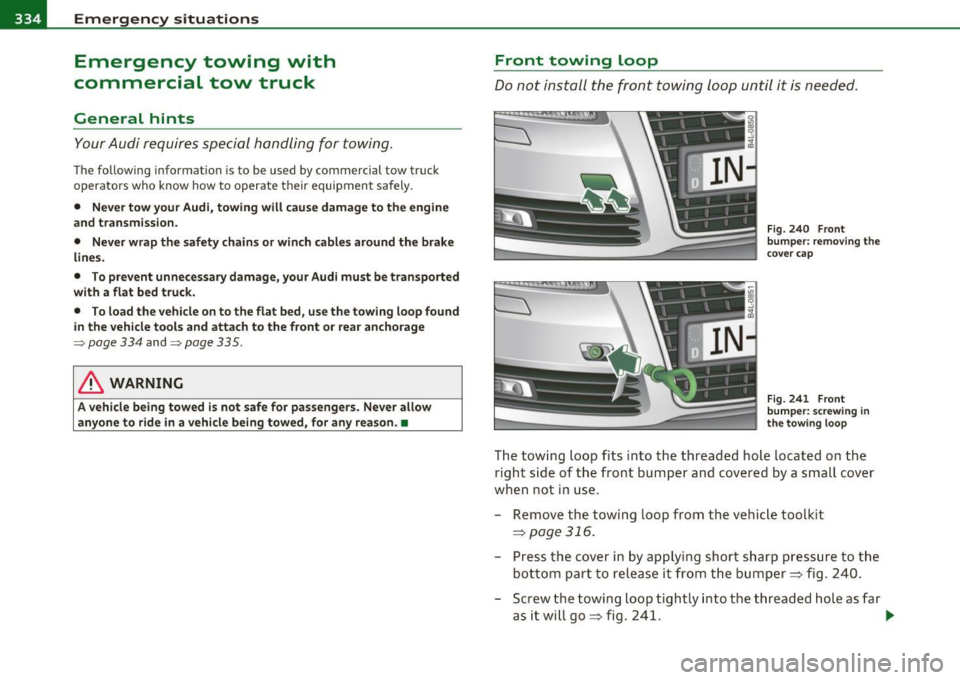
Front towing Loop
Do not install the front towing loop until it is needed.
Fig. 240 Front
bumper: removing the
cover cap
Fig. 241 Front
bumper: screwing in
the towing loop
The towing loop fits into the threaded hole located on the
right side of the front bumper and covered by a small cover
when not in use.
- Remove the towing loop from the vehicle toolkit
=> page 316.
-Press the cover in by applying short sharp pressure to the
bottom part to release it from the bumper=> fig. 240.
- Screw the towing loop tightly into the threaded hole as far
as it will go=> fig. 241 . ..,
Page 339 of 368

_____________________________________________ E_ m_ e_r-= g ::.. e_ n_c-= y'- s_ i_t _u _a_ t_ i_ o _ n_ s __ ffl'II
& WARNING
• To reduce the risk of serious injury and vehicle damage.
-Always lift the vehicle only at the special workshop hoist and
floor jack lift points illustrated=>
page 336, fig. 244 and
=> page 336, fig. 245.
- Failure to lift the vehicle at these points could cause the
vehicle to tilt or fall from a lift if there is a change in vehicle
weight distribution and balance. This might happen, for
example, when heavy components such as the engine block or
transmission are removed .
• When removing heavy components like these, anchor vehicle
to hoist or add corresponding weights to maintain the center of
gravity. Otherwise , the vehicle might tilt or slip off the hoist ,
causing serious personal injury.
0 Note
• B e aw are of the following poi nts b efo re li fting the ve hicl e:
- The vehicle should never be lifted or jacked up from under
neath the engine oil pan, the transmission housing , the front or
rear axle or the body side members . This could lead to serious
damage.
- To avoid damage to the underbody or chassis frame, a rubber
pad must be inserted between the floor jack and the lift points.
- Before driving over a workshop hoist, check that the vehicle
weight does not exceed the permissible lifting capacity of the hoist.
- Before driving over a workshop hoist, ensure that there is
sufficient clearance between the hoist and low parts of the
vehicle. •
Safety first Vehicle care Do-it-yourself service Technical data
Page 340 of 368

___ G_ e_n_ e_r _a _ l_ in_ f_o _r_ m_ a_ t_io _ n _______________________________________________ _
General information
Explanation of technical data
Some of the technical data listed in this manual requires
further explanation.
The technical data for your vehicle is listed in the charts starting on
~ page 341 . This sect ion prov ides genera l information, notes and
restrictions which app ly to this data .•
Veh icle identification
The key data is given on the vehicle identification number
(VIN) plate and the vehicle data sticker.
F ig. 2 46 V ehicle I den
t ifi ca tion Nu mbe r
(V IN ) plate: locat io n
o n d river's s id e d ash
p an el Fi
g. 2 47 The vehi cle
i d enti ficati on l abel -
in side the l ugga ge
co mpa rtme nt
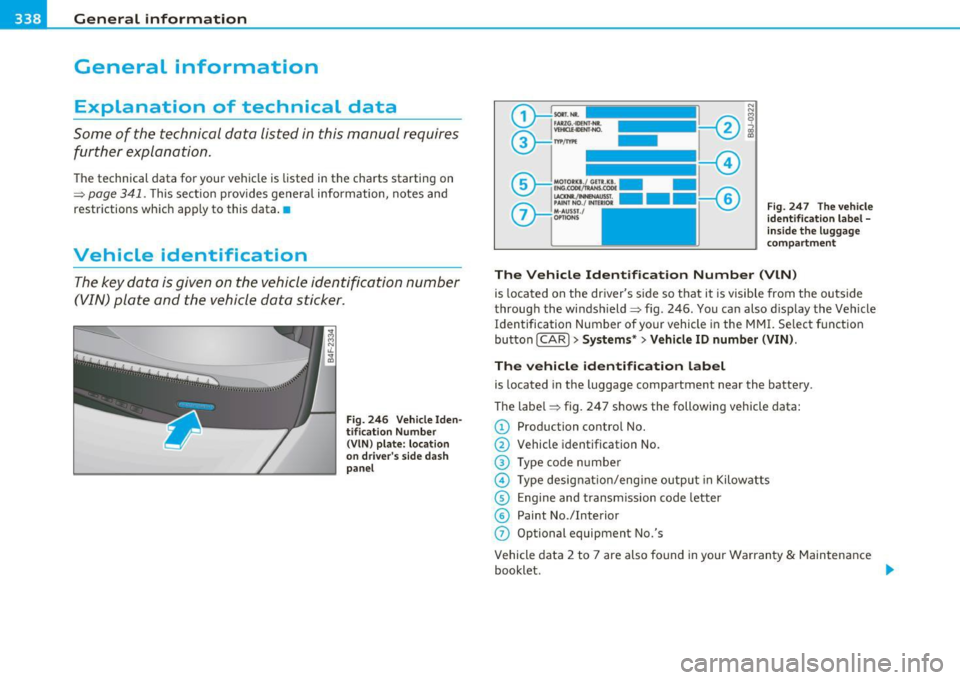
The Vehicle Id ent ifi cat ion Number (VlN )
is located on the driver's s ide so that it is visible from the outside
through the windshield~ fig. 246. You can also d isp lay the Vehicle
Identification Number of your vehicle in the MMI. Se lect funct ion
button [CAR]>
S yst em s*> Vehicle ID number (VIN ).
The vehicle identifica tion lab el
is located in the luggage compartment near the battery .
The label~ fig. 247 shows the following vehicle data:
© Production control No.
@ Vehicle identification No.
® Type code n umber
@ Type designat io n/eng ine output in Kilow atts
© Engine and transmission code letter
© Paint No./Interior
(j) Optional equipment No.'s
Vehicle data 2 to 7 are also found in your Warranty
& Maintenance
booklet . .,,
Page 343 of 368

_______________________________________________________ D_ a_ t_a __ _
Data
Applies to vehicles: with 3 .0 lit er 6-c ylin der engine
300 hp, 3.0 liter, 6-cylinder engine
Engine data
Maximum outpu t SA E net
Maximum torque SAE net
No. of cy linders
Displacement
St roke
Bore
Compression ratio
Fu el
Dimensions (approx. )
Length
W idth
He igh t (u nloaded)
Turning circle diameter (curb to curb)
Capacities (approx .)
Fu el tank
- Tota l capacity
- Rese rve (of to tal cap aci ty)
Windshield and headlight* washer fluid container
Engine oil
with filter c hange
Safety first
hp@rpm
lb-ft@ rpm
C ID (cm
3
)
in (mm)
in (mm) 30
0@ 5100-6800
310@ 2500-5100
6 cylinder 183 (2995)
3.50 (89.0)
3 .33 (84 .5)
10.5 : 1
Premium unleaded (91 AKI) Recomm end ed for maximum engin e perfo rmanc e. Fur
ther details =>
page 271, "Gasoline"
i n (mm)
i n (mm)
i n (mm)
ft (m) 193.5 (4916)
79 .2 (2012)
57. 4 (1459)
39.0 (11.9)
gal (liters)
gal ( liters)
quarts (liters)
quarts ( liters) 21.1 (80.0)
1. 8-2.4 (7-9)
5 .1(4.8)
6.9 (6.5)
•
Do-it,yourself service Technical data
Page 344 of 368

___ D_ a_t _a _____________________________________________________ _
Applies to vehicles : w ith 3.2 lite r 6 -cylin der engine
265 hp, 3.2 Liter, 6-cylinder engine
Engine dat a
Max imum output SAE net
Max imum torque SAE net
No . of cylinders
Displacement
Stroke
Bore
Comp ression ratio
F uel
Dimen sions (appro x.)
Length
Width Height (unloaded)
Turn ing circle diameter (curb to curb)
Capacities (appro x.)
Fuel t ank
- Total capac ity
- Reserve (of total capacity)
Wind shield and headlight* was her flu id c ontainer
Engin e oil
with filter change hp@rpm
lb-
ft@ rpm
CID (cm
3 )
in (mm)
in (mm) 265 @6500
243 @ 3200-5000
6 cylinder
195 1 (3 197)
3 .65 (92 .8)
3 .37 (85.5)
12 .5: 1
Premium un leaded (91 A KI) Recommended fo r maximum engine performance . Fur
ther details =>
page 271, "Gasoline"
in (mm)
in (mm)
in (mm)
ft (m) 193.5 (4916)
79.2 (2012)
57.4 (1459)
39 .0 (11.9)
gal (liters)
gal (liters)
quarts (lite rs)
quarts ( liters) 21.1 (80
.0)
1. 8-2 .4 (7 -9)
5.1 (4 .8)
6.9 (6.5)
•