2010 AUDI S6 engine
[x] Cancel search: enginePage 293 of 368
___________________________________________ C_ h_e _c _k_ i_n ~g_ a_n_ d_ f_ i_ll _i_n _g __ _
- Mak e su re the a rea is w ell ventilated when you charge the
battery .
- Open the hood
~ page 2 76 .
- Open the red cover on the positive pole~ fig. 214.
- Connect the charger connectors according to the instruc- tions to the
jump start bolts . (Bolts under the red cover =
"positive", Bolts wit h hex head = "negative").
- Only now p lug the ma ins lead for the charging equipment
into the wall outlet and turn it on
~ &,. .
- Make sure the charging rate is not over 30 amps /14.8
Volt.
- When the batte ry is fully charged : Turn the charging
equipment off and remov e the ma ins lead from the wall
ou tlet.
- Now remove the clamps for the charging equipment .
- Close the red cover on the posit ive pole .
- Clos e the hood ~
page 277.
A discharged battery can freeze at tempe rat ures of only O 0C. Allow a
frozen battery to thaw completely before attemp ting to charge it
~ ,&. . However, we recommend not using a thawed battery again
because the battery casing can be cracked due to ice formation and
can leak battery acid.
B atter y charging (Ma ximum charging rate of 30
amps /14.8 Volt )
When charging at low voltages (e.g. w ith a trickle charger ), the
ba ttery cab les do not have to be disconnec ted first. The battery caps
should
not be opened when charging a battery .
It is not necessary to remove the battery from the luggage compart
ment.
Safety first
Fa st charging the b atter y (charging rat e above 14 .8
Volts)
For technical reasons do not use a batte ry c ha rger that uses voltage
greater t han 14.8 Volts to charge your veh icle's battery .
& WARNING
Charging a batter y can be dange rou s.
• Always follow the ope rating instruct ions p ro vi ded by the
batt ery c harger manufa cturer when charging your battery .
• Never cha rge a frozen battery. It ma y explode be cause of gas
trapped in the i ce. Allow a frozen battery to thaw out first.
• Do not reu se batter ies which were frozen. The battery housing
may have cracked and weakened when the batt ery froze.
• Charge the battery in a well ventilated are a. Keep a way from
open flame or el ectr ica l spark. Do not sm oke. Hydrogen gas gener
ated by the battery i s ex plosive.
• To r educ e th e danger of e xplosion , nev er conn ect or dis conne ct
c harger cable s while the charger i s operating.
• Batt ery acid that may spill during charging should b e washed
off with a solution of warm water and bakin g soda to neutralize
the acid .
0 Note
Never use a fast charger as a booster to start the engine . This will seri
ous ly damage sensitive electronic components , such as control units,
re lays, rad io, etc., as well as the battery charger. •
Vehicle care Technical data
Page 294 of 368
___ C_h_ e_c _k _i_n -=g :a,__ a_n_ d_ f_ i_ l _li _n _,g;._ __________________________________________ _
Battery replacement
The new battery must have the same specifications and
dimensions as the original equipment battery.
Inte lligent energy management in your veh icle is responsible for
dis trib uti ng the elect ric al ene rgy throughout yo ur vehi cle
::} page 247 . The intelligent energy management system will keep
t he e ngine battery charged be tter then vehicles withou t this system.
To make sure the additional e lectrical energy is available once again
after you have changed the ba tte ry, we recom mend that you in sta ll
batter ies of the same type and manufacture only (the same as those
installed at the t ime your vehicle was delivered). Specifications are
listed on the battery hous ing. Your author ized Audi dealer will then
code the battery management control unit .
If it is no t poss ible to use a ba tte ry of this type, the new battery m ust
have the same capacity, vo ltage (12 volts), amperage, construction
and plug sea ling.
When install ing the battery, make sure the ign it ion and a ll electrica l
cons umers are turned off .
0 Note
Make sure the venti lation hose on the side of the battery is
connec ted, othe rwise fumes or battery acid ca n leak out .
W For the sake of the environment
Because of the problem of proper disposal of a bat tery, w e recom
mend your authorized Audi dealer change the battery for you.
Batte ries contain sulfu ric acid and lead and mus t alway s be d ispose d
of properly in compliance with all environmental regulat ions.
Di sposing of vehicle b atteries imprope rly is very dange ro us to t he
environme nt.•
Windshield/headlight washer
container
Fi g. 215 En gine
compartm ent: Wind·
s hie ld and head light*
w as her flu id co ntainer
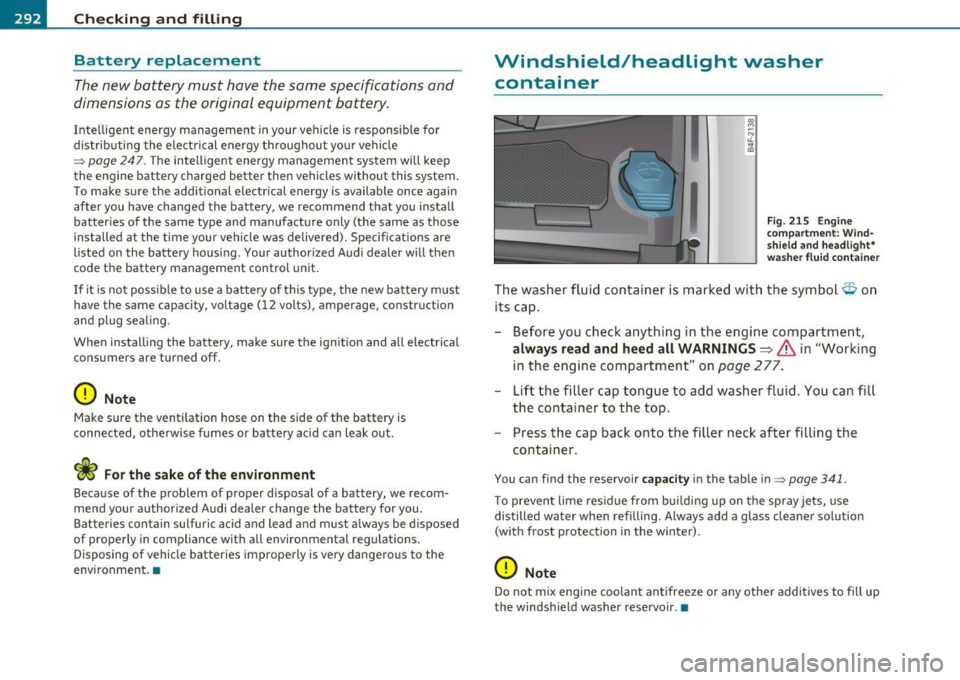
Th e washe r fluid contain er is mark ed with the symbol O on
its cap .
- Bef ore you check anything i n the engin e compartm ent,
always read and heed all WARNINGS~ & in "Working
in th e e ngine com partme nt" on
page 277 .
- Lift t he filler cap tongue to add washe r fluid. You can fill
the conta iner to the top.
- Press the cap bac k onto the filler neck af ter filling the
container .
You can find the reservoir capacity in the table in::} page 341 .
To preven t lime res idue from bui ldi ng up on t he spray jets, use
distilled water when refilling. Always add a glass cleane r so lution
(with frost protection in t he winter).
0 Note
Do not mix engine coo lant antifreeze or any othe r additives to fi ll up
the windsh ield washe r rese rvo ir .•
Page 300 of 368
-~_T_ ir_e_ s_ a_ n_ d_ w_ h_e_ e_ ls _______________________________________________ _
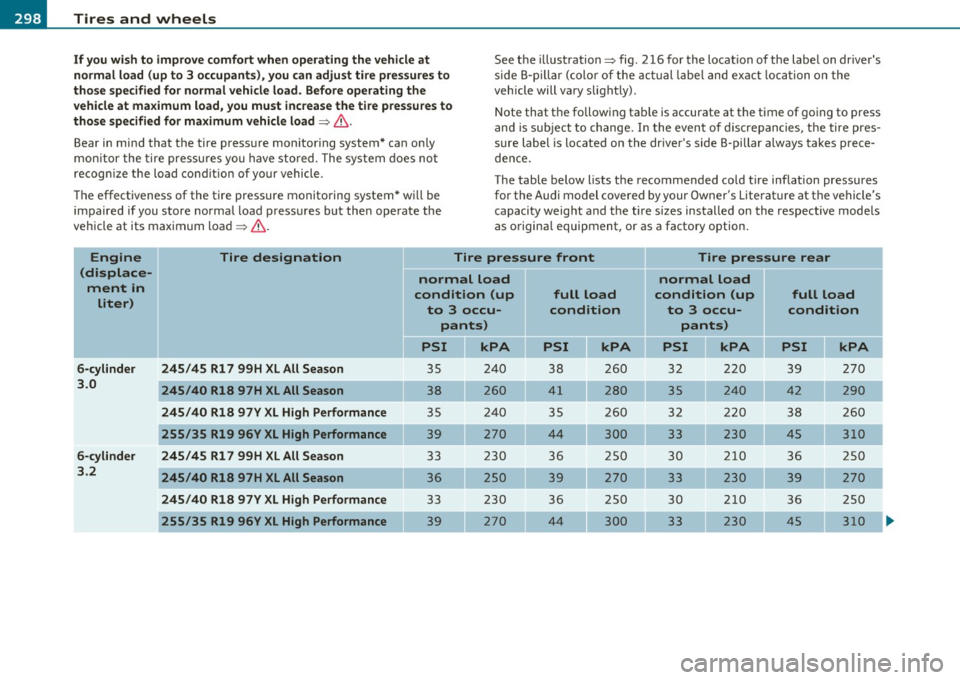
If you wish to improve comfort when operating the vehicle at
normal load (up to 3 o ccupants ), you can adjust tire pre ssures to
those specified for normal vehicle load . Before operating the
vehicle at maximum load, you must inc rease the tire pressures to
those specified for maximum vehicle load
=> & .
Bear in mind that the tire press ure monitoring system* can on ly
m oni tor the tire pressu res you have sto red . The system does no t
recogn ize the load condit ion of your vehicle.
T he effectiveness of the tire pressure monitoring system * w ill be
impaired if you store norma l load p ressu res b ut the n operate th e
vehicle at its maxim um loa d=> & .
Tire designation
See the illustration=> fig. 216 for the locat ion of the labe l on dr iver's
side B-p illar (colo r of the actu al labe l and ex act loc ation o n the
veh icle will vary slight ly) .
N ote that the following tab le is accurate at the time of going to press
and i s su bje ct to change. I n the even t of discrepancie s, t he tire pres
sure label is located on the driver's side B-pillar always takes prece
de nce.
The table below lists the recommended co ld tire inf lation pressures
fo r the Audi mode l covered by your Owner 's Literat ure at the vehicle's
capacity weight and t he tire sizes installed on the respective mode ls
as o rigina l equipment, or as a factory option.
Tire pressure front Tire pressure rear
Engine
(displace
ment in liter) normal load
normal load
6-cylinder
3.0
6-cylinder
3 .2
245 /45 Rl 7 99H XL All Season
245 /40 R18 97H XL All Season
245/40 R18 97Y XL High Performance
255 /35 R19 96Y XL High Performance
245/ 45 Rl 7 99 H XL All Season
245 /40 R18 97H XL All Season
245 /40 R18 97Y XL High Performance
255 /35 R19 96Y XL High Performance
condition (up
to 3 occu- pants)
PSI
35
38
3 5 24 0
39 270
33 230
36
33
39
full load
condition
PSI kPA
38 260
41 280
3 5 260
44 300
36 250
39 270
36 250
44 300
condition (up
full load
to 3 occu- condition
pants)
PSI kPA kPA
32 220 270
35 240 42
290
3 2 220 38 260
33 230 45 310
30 210 36 250
33 230 39 270
30 210 36 250
33 230 45
310
Page 301 of 368
________________________________________________ T_i_re _ s_ a _ n_d_ w_ h_ e_ e_l_s __ _
Engine Tire designation Tire pressure front II Tire pressure rear
(displace- normal load normal load
ment in
liter) condition
(up full load condition (up full load
to 3 occu- condition to 3 occu- condition
pants) pants)
PSI II kPA PSI II kPA II PSI ll kPA PSI II kPA
a-cylinder 245/45 Rl 7 99H X L All Season 36 250 39 270 33 230 39 270
4
.2
245/40 R18 97H XL All Season 39 270 42 29 0 35 2 40 42 290
245 /40 R18 97Y XL High Performance 36 250
39 270
33 230
39 270
255
/35 R19 96Y XL High Performance 39 4 4 300 33 230 45 310
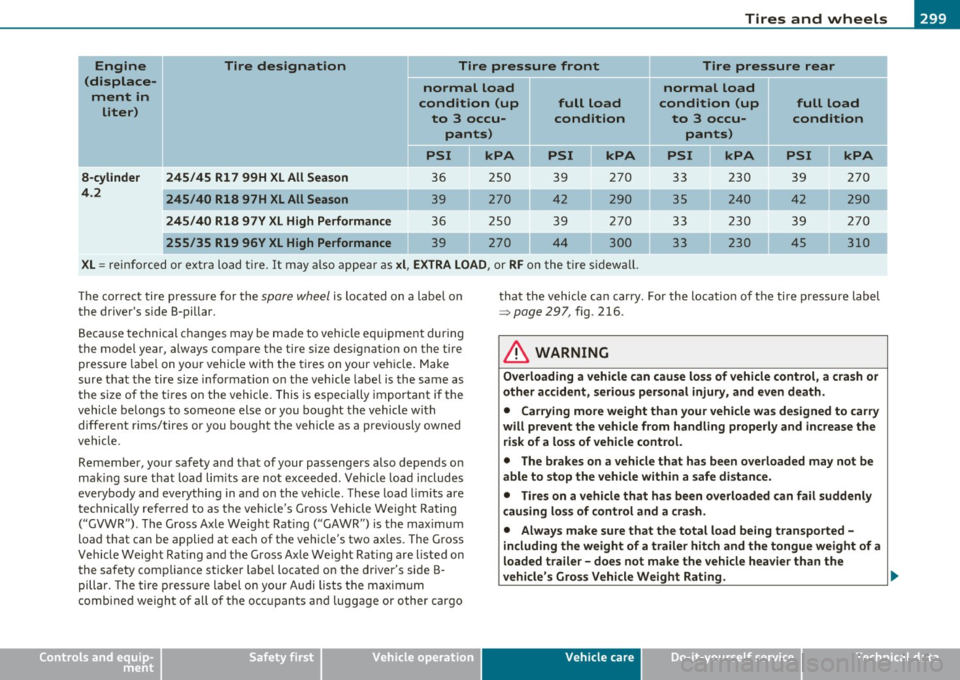
XL = reinf orced or extr a load t ire. It m ay a lso ap pear a s xl, EXTRA LOAD , or RF on the tire sidewa ll.
The correct tir e press ure for th e
spare wh eel is l ocat ed on a labe l on
the driver 's s ide B-pillar.
B eca u se technical c hanges may be ma de to vehicle e quipment dur ing
the model year, always compare the tire s ize des ignation on the tire
pressu re la b el on yo ur vehicle with the t ires on your veh icle. Make
sure that the tire size in forma tion on the vehicle labe l is the same as
the s ize of the t ires on the vehicle. This is especially important i f the
vehicle belongs to someone else or you bought the vehicle with
different r ims/tires or you bought the vehicle as a previously owned
vehicle. that the vehicle can carry.
For the loc atio n of t he ti re p ressure label
~ page 297, fig. 216 .
_& WARNING
Overloading a vehicle can cause loss of vehicle control , a cra sh or
other accident, serious personal injury, and even death .
• Carrying more weight than your vehicle wa s de signed to carr y
will prevent the veh icle from handling properly and increase the
risk of a los s of vehicle control.
• The brakes on a vehicle that has been overloaded may not be
able to stop the vehicle within a safe di stan ce.
• Tires on a vehicle that has been overloaded can fail suddenly
c ausing lo ss of control and a crash .
• Always make sure that the total load being transported -
including the weight of a trailer hitch and the tongue weight of a
loaded trailer -does not make the vehicle heavier than the
I
I
Remember, your safety and that of your passengers also depends on
m aki ng sure th at lo ad lim its are no t ex ceeded. Vehicle lo ad includes
everybody and everything in and on the veh icle. These load limits are
t echnically re fer red to as t he ve hicle's G ross Vehicle Weig ht Ra ting
("GVWR") . The Gross Axle Weight Rat ing ("GA WR") is the max imum
load that can be applied at each of the veh icle's two ax les. The Gross
Vehicle Weight Rat ing and the G ross Ax le We ight Ra ting are listed on
the safety comp liance sticke r label located on the driver's side B
pillar. The tire p re ssur e label on your Audi lists the maxim um
combined weight of a ll of th e occ upants and luggage or other cargo
vehicle 's Gros s Vehicle Weight Rating. ._
Safety first Vehicle care Technical data
Page 319 of 368
What do I do now? I'll ______________________________ ____::..:..:..:..::..::....::..::.....::.....:::...::,_ __ __,J
& WARNING (continued)
• Never start or run the engine while the vehicle is supported by
the jack.
• If you must work under the vehicle, always use safety stands
specifically designed for this purpose.
• Never use the hexagonal socket in the handle of the screw
driver to loosen or tighten the wheel bolts.
• Always make sure the spare tire and even a flat tire are secured
in place and not loose, otherwise they could fly forward, causing
personal injury to passengers in the vehicle in an accident or
sudden maneuver. •
Tools
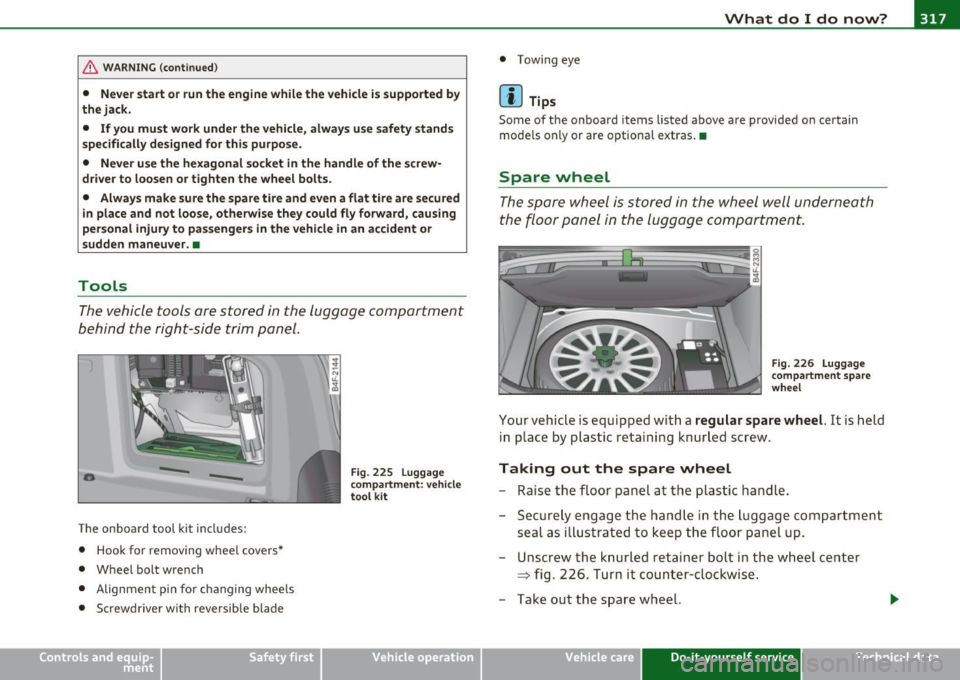
The vehicle tools are stored in the luggage compartment
behind the right-side trim panel.
-
The onboard tool kit includes:
• Hook for removing wheel covers*
• Wheel bolt wrench
• Alignment pin for changing wheels
• Screwdrive r with reve rsible blade
Fig. 225 Luggage
compartment: vehicle
tool kit
Vehicle OP-eration
• Towing eye
[ i] Tips
Some of the onboard items listed above are provided on certain
models only or are optional extras. •
Spare wheel
The spare wheel is stored in the wheel well underneath
the floor panel in the luggage compartment.
Fig. 226 Luggage
compartment spare
wheel
Your vehicle is equipped with a regular spare wheel. It is held
in place by plastic retaining knurled screw .
Taking out the spare wheel
- Raise the floor panel at the plastic handle.
- Securely engage the handle in the luggage compartment
seal as illustrated to keep the floor panel up.
Unscrew the knurled retainer bolt in the wheel center
=> fig. 226. Turn it counter-clockwise.
- Take out the spare wheel.
Vehicle care Do-it-yourself service iTechnical data
Page 320 of 368

,.,___W_ h _a_t _ d _ o_ I_ d_ o_ n_o _w_ ? ____________________________________________ _
- Disengage and lower the floor panel before you close the
luggage compartment lid again.
Storing the replaced wheel
-Place the replaced wheel inside the spare wheel well in the
luggage compartment.
Tighten the knurled retaining screw clockwise to secure
the wheel in place.
- Disengage and lower the floor panel before you close the
luggage compartment lid again.
& WARNING
Loose items in the passenger compartment can cause serious
personal injury during hard braking or in an accident.
• Never store the spare wheel or jack and tools in the passenger
compartment.
• Always store all jacking equipment, tools, and the spare wheel
in the luggage compartment.
• Tighten the knurled retaining screw for the spare wheel
securely.
[ i] Tips
Check the inflation pressure of the spare tire periodically to keep the
tire ready for use.•
Changing a wheel
Before changing a wheel
Observe the following precautions for your own and your
passenger's safety when changing a wheel.
- After you experience a tire failure, pull the car well away
from moving traffic and try to reach
level ground before
you stop :::> & .
- All passengers should
leave the car and move to a safe
location (for instance, behind the guardrail) :::>& .
- Engage the
parking brake to prevent your vehicle from
rolling unintentionally:::> &.
- Move
selector lever to position P :::> & .
- If you are towing a trailer: unhitch the trailer from your
vehicle.
- Take the
jack and the spare tire out of the luggage
compartment:::>
page 316.
& WARNING
You or your passengers could be injured while changing a wheel if
you do not follow these safety precautions:
• If you have a flat tire, move a safe distance off the road. Turn
off the engine, turn the emergency flashers on and use other
warning devices to alert other motorists.
• Make sure that passengers wait in a safe place away from the
vehicle and well away from the road and traffic.
• To help prevent the vehicle from moving suddenly and possibly
slipping off the jack, always fully set the parking brake and block
the wheel diagonally opposite the wheel being changed. When
one front wheel is lifted off the ground, placing the Automatic
~
Page 329 of 368

______________________________________________ F _u_s _e_ s_ a_ n_ d _ b _u_l_b _ s _ ___.9I
No. Equipment
29 Not used
30 Not used
31 Back-up
light switch, transmission, engine com-
ponents
Intelligent power module driver (footwell light
32 and front headlights, horn, wiper system, elec-
trically adjustable steering wheel)
-
33 Intelligent power module dr
iver
(lights left-side)
34 Intelligent power module driver
(lights right-side)
35 Not used
36 Headlight
washer system
37 Electronic Stabilization Program (ESP)
38 Wiper system
39 Door control module
left-side
Horn
41 Heater fan
42 Control module electronic ignition lock/electri-
cally adjustable steering wheel
43 Rear
windshie ld wiper (Avant)
44 Power window opener (left-side)
Amps
15
30
25
25
30
25
30 15
25
40
30
15
-
-
35 •
Vehicle OP-eration
Fuse Location, Instrument Panel right
Fig. 236 Fuse panel
l ayou t
Some of the equipment items listed are optional or only available on
certain model configurations.
Note that the following table is accurate at the time of going to
press and is subject to change. In the event of discrepancies, the
label on the inside of the cover always takes precedence.
The power seats are protected by circuit breakers , which automati
cally reset afte r a few seconds after the overload has been remedied.
No. Equipment Amps
Fuse holder (black)
1 Control module Convenience
key
15
2 Cigarette lighter front 20
3 Tire pressure monitoring system
5
4 Electrical outlet front (center console)
20
-
5 Intelligent power module passenger
15
(glove box lock)
6 Door control module right-s ide
15
Sunroof 20
A/C controls 10
Vehicle care Do-it-yourself service iTechnical data
Page 332 of 368
![AUDI S6 2010 Owners Manual lffl!I.___F_ u_ s_e _s_ a_n_ d_ b_u _ l_ b_ s _______________________________________________ _
(I] Tips
• If you must rep lace the light bulbs yourself, a lways remember
that the eng AUDI S6 2010 Owners Manual lffl!I.___F_ u_ s_e _s_ a_n_ d_ b_u _ l_ b_ s _______________________________________________ _
(I] Tips
• If you must rep lace the light bulbs yourself, a lways remember
that the eng](/manual-img/6/57594/w960_57594-331.png)
lffl!I.___F_ u_ s_e _s_ a_n_ d_ b_u _ l_ b_ s _______________________________________________ _
(I] Tips
• If you must rep lace the light bulbs yourself, a lways remember
that the engine compartment of any vehicle is a hazardous area to
work in. Always read and heed all WARNINGS~
page 269, "Engine
compartment"~
& -
• It is best to ask your author ized Audi dea le r w henever you need to
change a bulb. •