2010 AUDI S6 headlight bulb
[x] Cancel search: headlight bulbPage 5 of 368

Table of contents
Monitoring the Advanced Airbag Vehicle care .............. 258 Emergency towing with
System ...................... 206 commercial tow truck ........ .
Side airbags ... ......... ...... 211
Cleaning and protection ...... 258 Lift
ing vehicle ............... . 334
336
Side curtain airbags . . . . . . . . . . . . 214
Child Safety .. .. .......... ..... 217
Important things to know . . . . . . 217
Child safety seats . . . . . . . . . . . . . 222
Installing a child safety seat .. .. 227
LATCH Lower anchorages and
tethers for children . . . . . . . . . . . . 230
Additional Information 237
Vehicle operation ...... 240
Intelligent technology ........ 240
Notice abou t data recorded by
vehicle control modules . . . . . . . . 240
E lectronic Stabilization Program
(ESP) ........................ 240
Braking ...................... 243
Servo tronic® -advanced power
steering system . . . . . . . . . . . . . . . 245
Driving with your quattro® . . . . . . 246
Energy management ........... 247
Driving and environment ...... 249
The first 1,000 miles (1,500 km)
and afterwards . . . . . . . . . . . . . . . 249
Avoid damaging the veh icle . . . . . 250
Driving through water on roads . 250
Catalytic converter . . . . . . . . . . . . 250
Operate your vehicle economically
and minimize pollution ......... 251
Trailer towing ................. 254
Driving with a trailer . . . . . . . . . . . 254
T railer towing tips . . . . . . . . . . . . . 256
Controls and equip
ment Safety first
General informa
tion . . . . . . . . . . . 258
Care of exterior . . . . . . . . . . . . . . . 258
Care of interior . . . . . . . . . . . . . . . 265
Fuel supply and filling your fuel
tank ..........................
271
Gasoline . . . . . . . . . . . . . . . . . . . . . 271
Fuel tank . . . . . . . . . . . . . . . . . . . . . 272
Checking and filling . . . . . . . . . . . 276
Technical data
General information
Explanation of technical data .. .
Vehicle ident ification ......... .
Weights ................... . .
Dimensions ............... .. . 338
338
338
338
339
339
Engine hood . . . . . . . . . . . . . . . . . . 276
Data . . . . . . . . . . . . . . . . . . . . . . . . . . 341
Engine oil . . . . . . . . . . . . . . . . . . . . 279 300 hp, 3.0 liter, 6-cylinder
Engine cooling system . . . . . . . . . 284
Brake fluid . . . . . . . . . . . . . . . . . . . 287
Ba ttery . . . . . . . . . . . . . . . . . . . . . . 288
Windshield/headlight washer container . . . . . . . . . . . . . . . . . . . . 292
Tires and wheels . . . . . . . . . . . . . . 293 engine ......................
.
265 hp, 3.2 liter , 6-cylinder
engine ......... ..... ........ .
350 hp, a-cylinder engine ..... .
Consumer Information ...... .
Warranty coverages .......... . 341
342
343
344
344
T ires ........................ 293 Operating your vehicle outside the
T ire pressure monitoring system 312
Do-it-yourself service . 316
What do I do now? ........... 316
Trunk escape handle ........... 316
Jack, tools and spare wheel ..... 316
Changing a wheel . . . . . . . . . . . . . 318
Fuses and bulbs . . . . . . . . . . . . . . 325
F u ses ........... ............. 325 U.S.A
. or Canada ............. .
Audi Service Repair Manuals and
Literature ................... .
Maintenance ................ .
Additional accessories, modifications and parts replacement ............... . .
Declaration of Compliance,
T elecommunications and
Electronic Systems .......... . .
Bulbs ........................ 329
Alphabetical index ....
Emergency situations ......... 331
General . . . . . . . . . . . . . . . . . . . . . . 331
Starting by pushing or towing 331
Starting with jumper cables .... 331
Use of jumper cables . . . . . . . . . . 332
Vehicle operation Vehicle care Do-it-yourself service
344
344
344
346
347
350
Technical data
Page 23 of 368

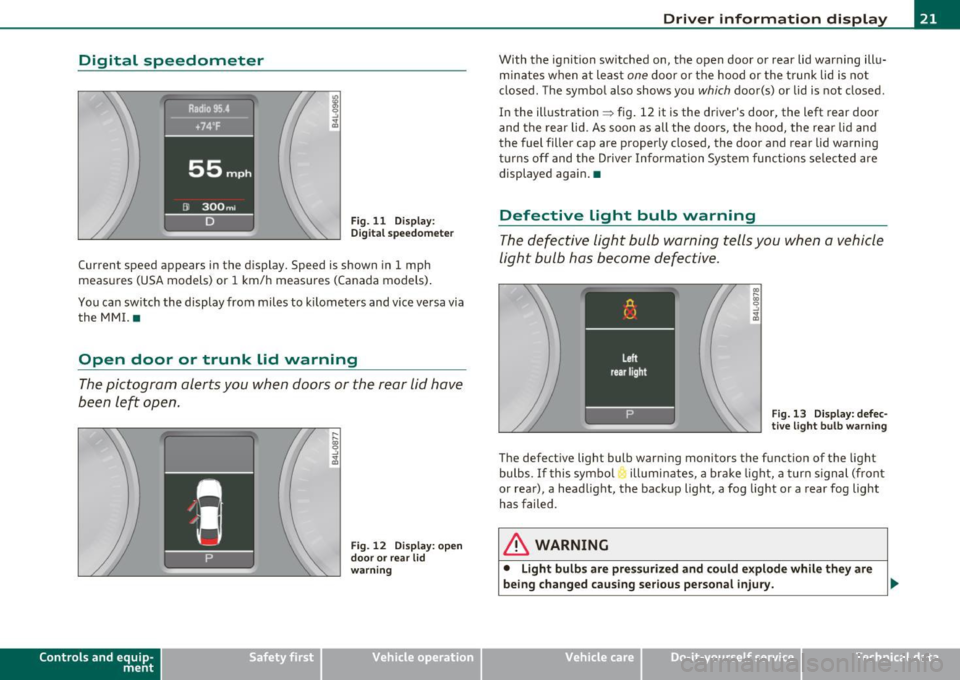
Digital speedometer
Fig. 11 Display:
Digital speedomete r
Current speed appears in the display. Speed is shown in 1 mph
measures (USA models) or 1 km/h measures (Canada models) .
You can switch the display from miles to kilometers and vice versa via
the MMI. •
Open door or trunk lid warning
The pictogram alerts you when doors or the rear lid have
been left open.
Con tro ls a nd e quip
m en t
Fig . 12 Display: open
door or rear lid
warning
Vehicle OP-eration
Driver information display
With the ignition switched on, the open door or rear lid warning illu
minates when at least
one door or the hood or the trunk lid is not
closed . The symbol also shows you
which door(s) or lid is not closed.
In the illustration ~ fig. 12 it is the driver's door, the left rear door
and the rear lid. As soon as all the doors, the hood, the rear lid and
the fuel filler cap are properly closed, the door and rear lid warning
turns off and the Driver Information System functions selected are
displayed again. •
Defective Light bulb warning
The defective light bulb warning tells you when a vehicle
light bulb has become defective.
Fig. 13 Display: defec
tive light bulb warning
The defective light bulb warning monitors the function of the light
bulbs.
If this symbol illuminates, a brake light, a turn signal (front
or rear), a headlight, the backup light, a fog light or a rear fog light
has failed .
& WARNING
• Light bulbs are pressurized and could explode while they are
being changed causing serious personal injury. .._
Vehicle care Do-it-yourselt service iTechnical data
Page 31 of 368

Ignition Lock malfunction ~
A malfunction in the ignition lock must be repaired immediately .
If the .Pe symbol in the display blinks, there is a malfunction
in the electronic ignition lock. An additional driver message
can also be displayed by pressing the
[CHECK ] button:
Ignition lock defecti ve . Contact wor kshop!
- Do not turn the engine off.
- Drive immediately to an authorized Audi dealer to have
the malfunct ion correc ted.
If the re is a malfunction in the e lectronic ignition lock, the ignit ion
cannot be turned
off . Drive immediately to an authori zed Audi dealer
to have the cause of the mal function corrected.
On vehicles with Convenience key* , the eng ine should not be switched
off using the [STOP] button because the engine cannot be started
again afte r the ign ition is switched off .•
Yellow symbols
Ayellow symbol means WARNING.
Controls and equip
ment Safety first
Fig.
18 Disp la y : lo w
f u el l evel warning
(p rio ri ty 2)
Dri ver information display
Yellow symbols ind icate a prior ity 2 malfunct ion - Warning!
When a yellow warning symbo l appears,
one warning tone sounds. A
dr iver message appears as well to expla in the malfunction in more
detail. The driver warning goes out after about 5 seconds, but it can
be brought up again a t any time by pressing the
I CHECK] button .
Check the displayed function as soon as possible . If
more than one
pr iori ty 2 malfunction is detected, all symbo ls will appear one after
the other for about 2 seconds.
Yellow symbols mean:
Convenience key*
=> page 112
Key not in vehicle
-
USA models : => page 21
Defective brake light
Canada models : => page 21
Defective brake light
Defective light bulb
=> page 21
L ig ht/rai n sensor defective :::>page 30
Windshield washer fluid =:>page 30
level low
Low fue l level
=:> page30
II Battery voltage => page 31
-
Worn brake pads => page 31
II Dynamic headlight range => page 31
control defective
-
Check engine oil leve l => page 31
=> page 281
..,
Vehicle care Technical data
Page 63 of 368

Applies to veh icles : w ith Adaptive Light
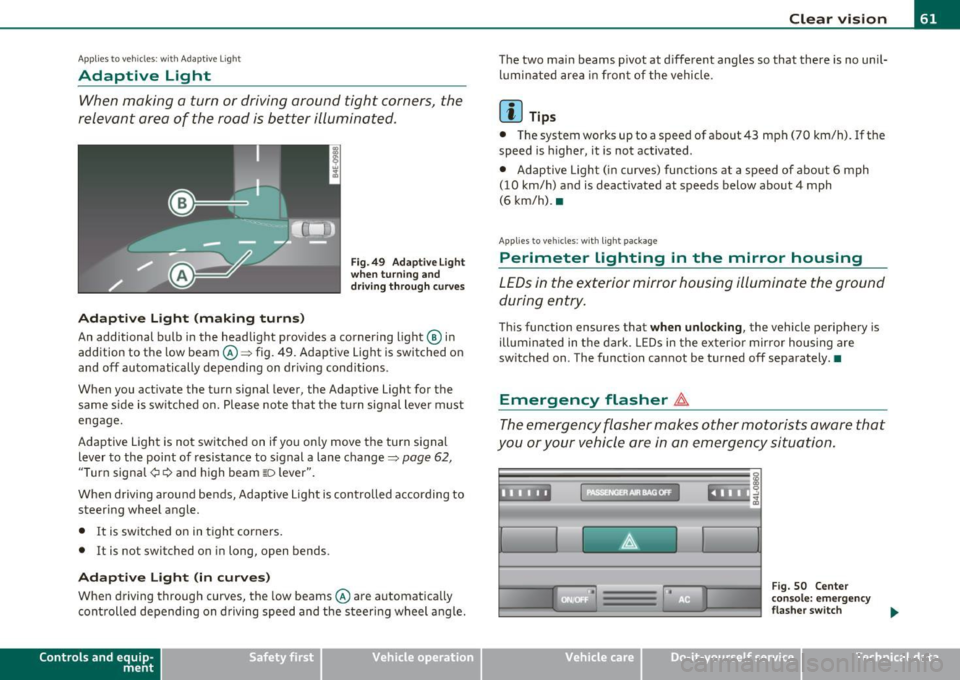
Adaptive Light
When making a turn or driving around tight corners, the
relevant area of the rood is better illuminated .
Adaptive Light (making turns)
Fig. 49 Adaptive Light
when turning and
driving through curves
An additional bulb in the headlight provides a cornering light@ in
addition to the low beam ©~ fig. 49. Adaptive Light is switched on
and off automatically depending on driving conditions.
When you activate the turn signal lever, the Adaptive Light for the
same side is switched on. Please note that the turn signal lever must
engage.
Adaptive Light is not switched on if you only move the turn signal
lever to the point of resistance to signal a lane change~
page 62,
"Turn signal
¢i c:> and high beam ~o lever".
When driving around bends, Adaptive Light is controlled according to steering wheel angle.
• It is switched on in tight corners.
• It is not switched on in long, open bends .
Adaptive Light (in curves)
When driving through curves, the low beams © are automatica lly
controlled depending on driving speed and the steering wheel angle.
Con tro ls a nd e quip
m en t Vehicle
OP-eration
Clear vision
The two main beams pivot at different angles so that there is no unil
luminated area in front of the vehicle .
[ i] Tips
• The system works up to a speed of about 43 mph (70 km/h). If the
speed is higher, it is not activated .
• Adaptive Light (in curves) functions at a speed of about 6 mph
(10 km/h) and is deactivated at speeds below about 4 mph
(6 km/h). •
Applies to vehicles : w ith ligh t package
Perimeter lighting in the mirror housing
LEDs in the exterior mirror housing illuminate the ground
during entry.
This function ensures that when unlocking, the vehicle periphery is
ill uminated in the dark. LEDs in the exterior mirror housing are
switched on . The function cannot be turned off separately. •
Emergency flasher A
The emergency flasher makes other motorists aware that
you or your vehicle are in an emergency situation.
Vehicle care
Fig. 50 Center
console: emergency
flasher switch .,
Do-it-yourselt service iTechnical data
Page 331 of 368

_______________________________________________ F_u _s_ e_ s_ a_ n_ d_ b_u _ l_ b _ s __ _
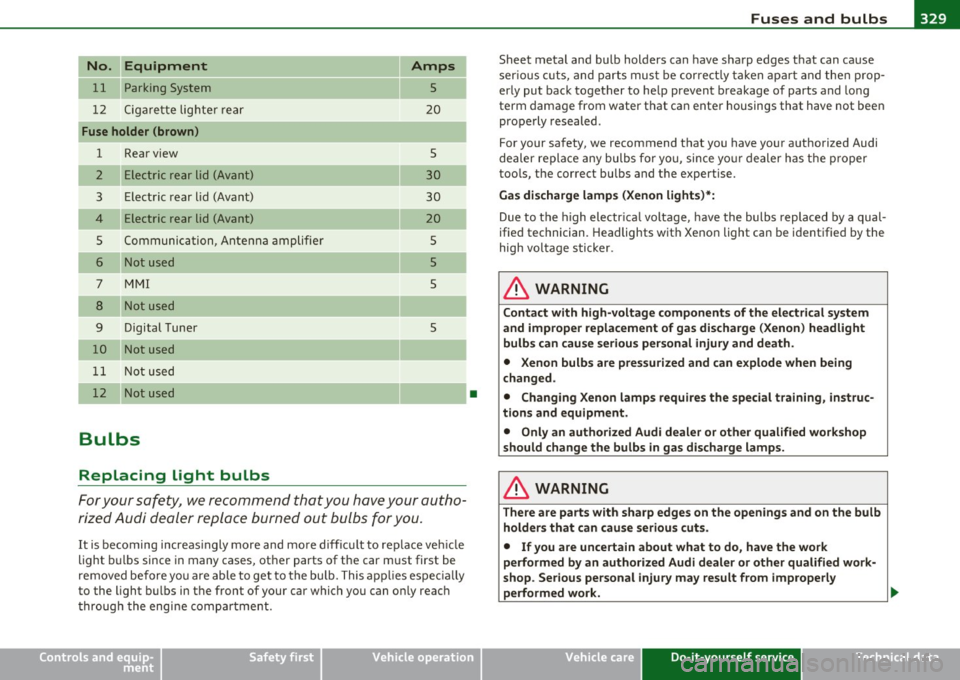
No. Equipment
11 Pa rk in g System
12 Cigare tt e lig ht er r ea r
Fuse holder (brown)
1 Rear view
2 El ectr ic re ar lid (A va nt)
3 Electric rear lid (Avant)
4 Electric rear lid (Avant)
5 Co mmuni cation, An te n na amplifie r
6 Not used
7 M MI
8 Not used
9 Digital Tuner
10 Not used
11 Not used
12 No t used
Bulbs
Replacing Light bulbs
Amps
5
20
5
30
30
20
5
5
5
5
For your safety, we recommend that you have your autho
rized Audi dealer replace burned out bulbs for you.
It is becoming increas ingly more and mo re difficu lt to replace veh icle
light b ulbs since in many cases, other parts of t he car must first be
removed before yo u are able to get to the bu lb. This ap plies espe cially
to the light bu lbs in the front of your car which you can on ly reach
through the engi ne compa rtment.
Safety first
•
Sheet metal and bulb holders can have sharp edges that can cause
ser io us c uts, and parts mus t be cor re ct ly ta ken apar t and the n prop
erly put back together to he lp prevent breakage of parts and long
term damage from water t hat ca n enter housings that have not been
properly resealed .
For your safety, we recommend that you have your a uthorized Audi
dealer replace any bulbs fo r yo u, since yo ur dealer has t he pr oper
too ls, the correct bu lbs and t he expertise.
Gas discharge lamp s (Xenon lights) *:
Due to the high electr ica l voltage, have the bulbs replaced by a qual
ified technician. Headlights with Xenon light can be identified by the
high vol tage s ticker.
& WARNING
Contact with high-voltage components of the electrical system
and improper repla cement of g as discharge (Xenon ) headlight
bulb s can cause serious personal injury and dea th .
• Xenon bulbs are pres surized and can e xplode when being
c hanged.
• Changing Xenon lamp s requires the special training , instruc
tions and equipm ent .
• Only an authorized Audi dealer
or oth er qualified work shop
should change the bulbs in gas discharge lamps .
& WARNING
There are parts with sharp edge s on the opening s and on the bulb
holder s that can cau se serious cuts.
• If you are unce rtain about what to do, have the work
performed by an authorized Audi dealer or other qualified work
shop . Se rious personal injury m ay result from improperly
performed work. ..
Vehicle care Do-it-yourself service Technical data