Page 7 of 551
�Î
�Î
�Î
�Î
�Î
�ΠCanadian models only RL models
2:
3:
Your Vehicle at a Glance
4
POWER DOOR
LOCK MASTER
SWITCH
POWER WINDOW
SWITCHES
DRIVING POSITION
MEMORY SYSTEM
(P.11, 26)PASSENGER’S FRONT AIRBAG
AUTOMATIC
TRANSMISSION INTERFACE DIAL
COMPASS SYSTEM
AUDIO SYSTEM
CLIMATE CONTROL
SYSTEM
MIRROR CONTROL
AUTO BUTTON
DRIVER’S FRONT
AIRBAG INSTRUMENT PANEL
INDICATORS
(P.62)
(P.11, 26) CEILING
CONSOLE
ACCESSORY
POWER SOCKETS
AUXILIARY INPUT
JACK
HOOD RELEASE LEVER
1:
HOMELINK
BUTTONS
MOONROOF SWITCH
POWER REAR
SUNSHADE BUTTON
REAR HEAD RESTRAINT
TILT BUTTON TRUNK RELEASE BUTTON
FUEL FILL DOOR
RELEASE BUTTON
(P.163)
(P.153)
(P.185)
(P.154)
(P.334)
(P.188)
(P.198)
(P.158) REAR SEAT HEATER
SWITCHES (P.184)USB ADAPTER CABLE
(P.259)
(P.277 )
(P.197) (P.281) (P.205,
213,282)
(P.213) (P.204)
(P.161)
(P.379) (P.381) (P.399)
2
1
3
�����—�����—�����y�
�������������y���
�(�����������y���������y
2010 RL
Page 8 of 551

�Î
�Î
�Î
�Î
�Î�Î �Î
�Î
�Î
�Î
�Î
�Î
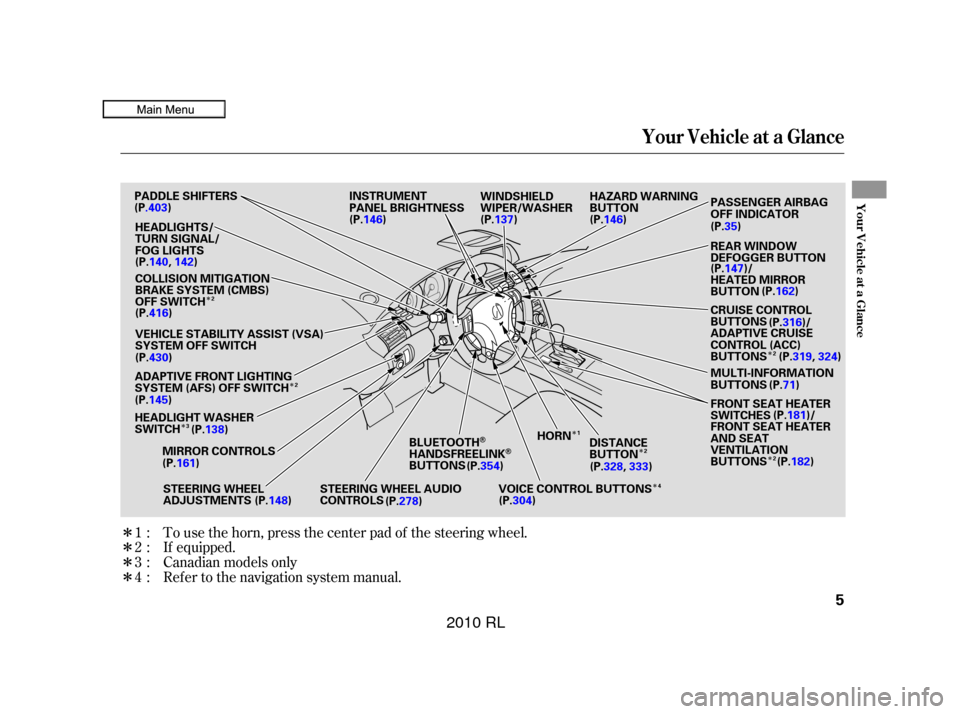
To use the horn, press the center pad of the steering wheel.
If equipped.
1:
2:
3:
4: Canadian models only
Ref er to the navigation system manual.
Your Vehicle at a Glance
Your Vehicle at a Glance
5
VEHICLE STABILITY ASSIST (VSA)
SYSTEM OFF SWITCH COLLISION MITIGATION
BRAKE SYSTEM (CMBS)
OFF SWITCH
ADAPTIVE FRONT LIGHTING
SYSTEM (AFS) OFF SWITCH MIRROR CONTROLS
HEADLIGHTS/
TURN SIGNAL/
FOG LIGHTS
(P.140,
142) PASSENGER AIRBAG
OFF INDICATOR
(P.
35)
REAR WINDOW
DEFOGGER BUTTON
HEATED MIRROR
BUTTON
CRUISE CONTROL
BUTTONS
ADAPTIVE CRUISE
CONTROL (ACC)
BUTTONS
MULTI-INFORMATION
BUTTONS (P.71)
INSTRUMENT
PANEL BRIGHTNESS
HAZARD WARNING
BUTTON
PADDLE SHIFTERS
(P.137) WINDSHIELD
WIPER/WASHER
FRONT SEAT HEATER
SWITCHES
FRONT SEAT HEATER
AND SEAT
VENTILATION
BUTTONS
HEADLIGHT WASHER
SWITCH
STEERING WHEEL
ADJUSTMENTS(P.138)
STEERING WHEEL AUDIO
CONTROLSBLUETOOTH
HANDSFREELINKBUTTONS
HORN
DISTANCE
BUTTON
VOICE CONTROL BUTTONS
(P.145)
(P.148) (P.278)(P.
304 ) (P.328,
333) (P.182)
(P.181)/
(P.316)/
(P.
162 )
(P.147)/
(P.146)
(P.146)
(P.161) (P.319,
324)
(P
.403)
(P.416)
(P.430)
(P.354)
2
2 2
2
3
1
2
4
�����—�����—�����y�
�����������
�y���
�(�����������y�����
���y
2010 RL
Page 21 of 551

This could cause
very serious injuries in a crash.
If a seat belt does not seem to work
properly, it may not protect the
occupant in a crash.
Using a seat
belt that is not working properly can
result in serious injury or death.
Have your dealer check the belt as
soon as possible.
See page f or additional
inf ormation about your seat belts
and how to take care of them.
The front seats have adjustable seat
belt anchors. To adjust the height of
an anchor, press and hold the release
buttons, and slide the anchor up or
down as needed (it has f our
positions).
If the seat belt touches or crosses
your neck, or if it crosses your arm
instead of your shoulder, you need to
adjust the seat belt anchor height. This spreads the f orces of a crash
over the strongest bones in your
upper body.
21
Protecting A dults and Teens
Never place t he shoulder port ion of alap/shoulder belt under your arm orbehind your back.
No one should sit in a seat wit h aninoperat ive seat belt .
18
RELEASE
BUTTON
Improperly positioning the seat
belts can cause serious injury
or death in a crash.
Make sure all seat belts are
properly positioned before
driving.
�����—�����—�����y�
�������������y���
�(�����������y���������y
2010 RL
Page 63 of 551
�Î�Î
�Î
�Î
�Î
�ΠCanadian models only
2:
3: RL models
Control L ocations
60
INSTRUMENT PANEL
INDICATORS
GAUGES
HOOD RELEASE LEVER MIRROR CONTROL
AUTO BUTTON
(P.62)
(P.70) CEILING CONSOLE
AUDIO SYSTEM CLIMATE CONTROL
SYSTEM
AUTOMATIC
TRANSMISSION
ACCESSORY POWER
SOCKETS
INTERFACE DIAL
COMPASS SYSTEM
AUXILIARY INPUT
JACK
DRIVING POSITION
MEMORY SYSTEM
1:
HOMELINK
BUTTONS
MOONROOF SWITCH
POWER REAR
SUNSHADE BUTTON POWER DOOR LOCK
MASTER SWITCH
POWER WINDOW
SWITCHES
FUEL FILL DOOR
RELEASE BUTTON TRUNK RELEASE
BUTTON
REAR SEAT HEATER
SWITCHES
(P.163)
(P.153)
(P.185)
(P.154)
(P.334)
(P.188)
(P.198)
REAR HEAD RESTRAINT
TILT BUTTON (P.158) (P.184)USB ADAPTER CABLE
(P.259) (P.277)
(P.197)
(P.
281 )
(P.205,
213,282)
(P.
213 )
(P.
204 )
(P.161)
(P.379) (P.381) (P.399)
1
2
3
�����—�����—�����y�
�������������y���
�(�����������y���������y
2010 RL
Page 74 of 551

�Û�Ý
The multi-inf ormation display in the
instrument panel displays various
inf ormation and messages when the
ignition switch is in the ON (II)
position. Some of the messages help
you operate your vehicle more
comf ortably. Others help to keep
you aware of the periodic
maintenance your vehicle needs f or
continued trouble-f ree driving.You can change the display and
customize your vehicle control
settings by pressing the SEL/RESET
or INFO buttons on the right side of
the steering wheel.With the ignition switch in the ON
(II) position, the lower part of the
multi-inf ormation display changes as
shown in the illustration, each time
you press the SEL/RESET button.
When you open the driver’s door, a
‘‘Welcome’’ message is shown on the
multi-inf ormation display. When you
turn the ignition switch from the ON
(II) position to the ACCESSORY (I)
position, a ‘‘Goodbye’’ message is
shownonthedisplay.
Multi-Inf ormation Display
Inst rument s and Cont rols
71
U.S.
CANADA
INFO ( / )
BUTTONS
SEL RESET BUTTON
�����—�����—�����y�
���������
���y���
�(�����������y���������y
2010 RL
Page 84 of 551

�Û�Ý�Û�Ý
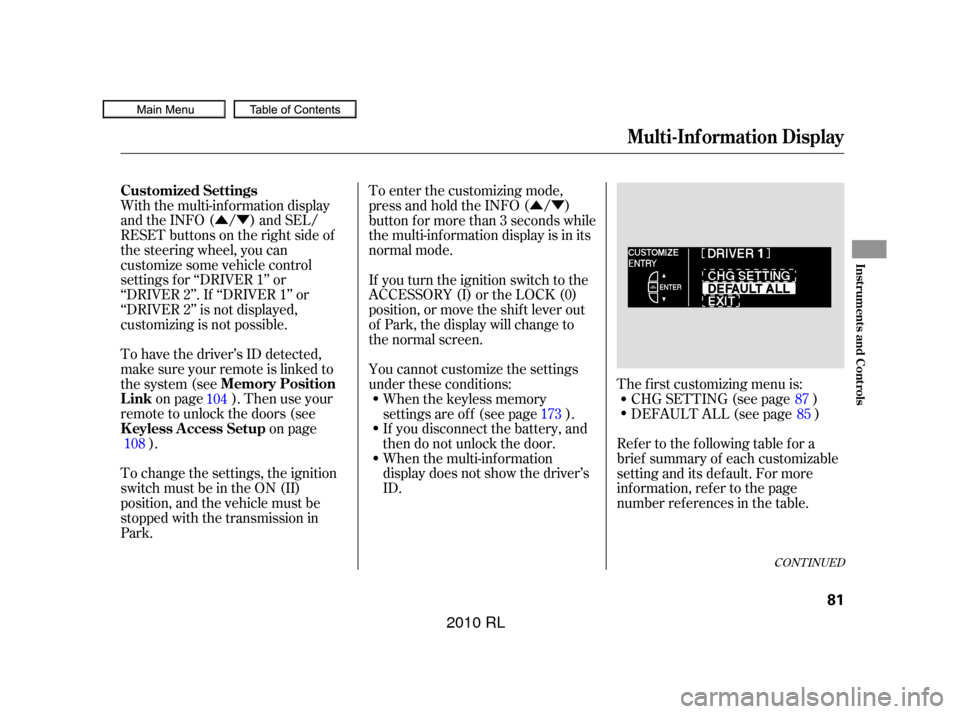
With the multi-information display
and the INFO ( / ) and SEL/
RESET buttons on the right side of
the steering wheel, you can
customize some vehicle control
settings f or ‘‘DRIVER 1’’ or
‘‘DRIVER 2’’. If ‘‘DRIVER 1’’ or
‘‘DRIVER 2’’ is not displayed,
customizing is not possible.
To have the driver’s ID detected,
make sure your remote is linked to
the system (see
on page ). Then use your
remote to unlock the doors (see on page
). To enter the customizing mode,
press and hold the INFO ( / )
button for more than 3 seconds while
the multi-information display is in its
normal mode.
If you turn the ignition switch to the
ACCESSORY (I) or the LOCK (0)
position, or move the shif t lever out
of Park, the display will change to
the normal screen.
When the multi-information
display does not show the driver’s
ID. The f irst customizing menu is:
CHG SETTING (see page )
If you disconnect the battery, and
then do not unlock the door. When the keyless memory
settings are of f (see page ). DEFAULT ALL (see page )
You cannot customize the settings
under these conditions:
To change the settings, the ignition
switch must be in the ON (II)
position, and the vehicle must be
stopped with the transmission in
Park. Ref er to the f ollowing table f or a
brief summary of each customizable
setting and its default. For more
inf ormation, ref er to the page
number ref erences in the table.
104
108 87
85
173
CONT INUED
Customized Settings
Memory Position
Link
K eyless A ccess Setup
Multi-Inf ormation Display
Inst rument s and Cont rols
81
�����—�����—�����y�
�������������y���
�(�����������y���������y
2010 RL
Page 139 of 551

�Î�Î
�Î
�Î�Î �Î
�Î
�Î
�Î
�Î
�Î
�Î
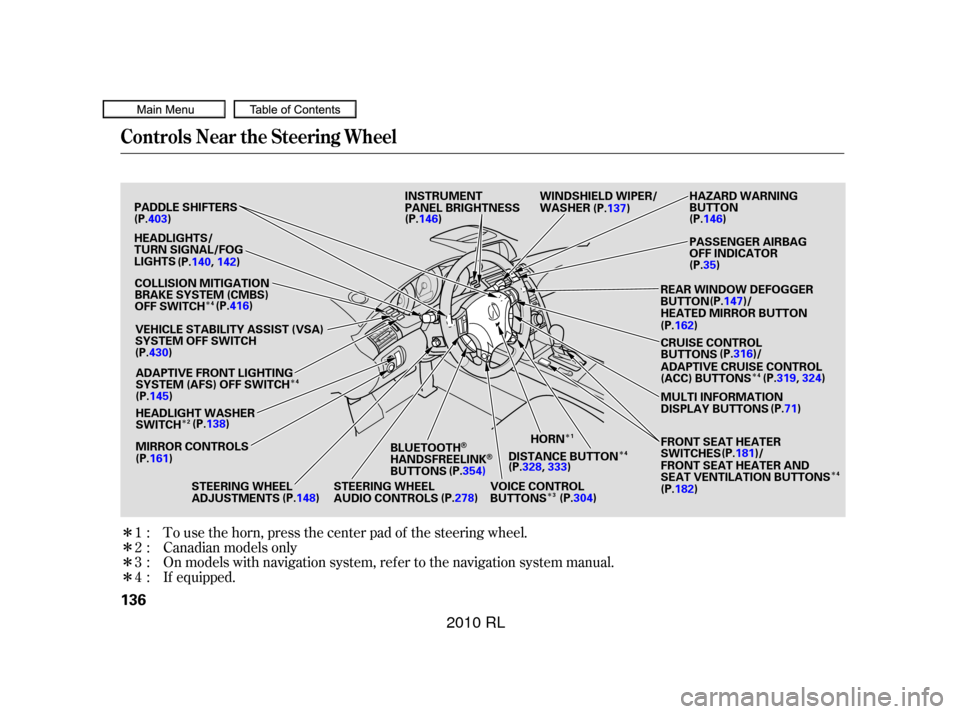
To use the horn, press the center pad of the steering wheel.
On models with navigation system, refer to the navigation system manual.
If equipped. Canadian models only
1:
2:
3:
4:
Controls Near the Steering Wheel
136
MIRROR CONTROLS
VEHICLE STABILITY ASSIST (VSA)
SYSTEM OFF SWITCH
PADDLE SHIFTERS
STEERING WHEEL
AUDIO CONTROLS
STEERING WHEEL
ADJUSTMENTS
HEADLIGHT WASHER
SWITCH
COLLISION MITIGATION
BRAKE SYSTEM (CMBS)
OFF SWITCH
ADAPTIVE FRONT LIGHTING
SYSTEM (AFS) OFF SWITCH
VOICE CONTROL
BUTTONSHORN
(P.138)
HEADLIGHTS/
TURN SIGNAL/FOG
LIGHTS
(P.140,142) INSTRUMENT
PANEL BRIGHTNESS
WINDSHIELD WIPER/
WASHER HAZARD WARNING
BUTTON
PASSENGER AIRBAG
OFF INDICATOR
(P.
35)
(P.137)
BLUETOOTHHANDSFREELINKBUTTONS HEATED MIRROR BUTTON
REAR WINDOW DEFOGGER
BUTTON
CRUISE CONTROL
BUTTONS
ADAPTIVE CRUISE CONTROL
(ACC) BUTTONS
FRONT SEAT HEATER AND
SEAT VENTILATION BUTTONS MULTI INFORMATION
DISPLAY BUTTONS
FRONT SEAT HEATER
SWITCHES (P.71)
(P.145)
(P.148) (P.278)(P.304)(P.182)(P.
181 )/
(P.316)/
(P.162)
(P.147)/
(P.
146 )
(P.146)
(P.328,333) (P.
319 ,324 )
(P.403)
(P.416)
(P.430)
(P.354)DISTANCE BUTTON
(P.161)
2 4
4
31 4
4
4
�����—�����—�����y�
�������������y���
�(�����������y���
���
�y
2010 RL
Page 164 of 551
Keeptheinsideandoutsidemirrors
clean and adjusted f or best visibility.
Be sure to adjust the mirrors bef ore
you start driving.The inside mirror can automatically
darken to reduce glare. To turn on
this feature, press the button on the
bottom of the mirror. The AUTO
indicator comes on as a reminder.
When it is on, the mirror darkens
when it senses the headlights of a
vehicle behind you, then returns to
normal visibility when the lights are
gone. Press the button again to turn
of f this f eature. Move the selector switch to L
(driver’s side) or R (passenger’s
side).
Push the appropriate edge of the
adjustment switch to move the
mirrorright,left,up,ordown.
1.
2.
CONT INUED
Mirrors
A djusting the Power Mirrors
Inst rument s and Cont rols
161
INDICATOR
AUTO BUTTONSENSOR
SELECTOR
SWITCHADJUSTMENT SWITCH
�����—�����—�����y�
�������������y���
�(�����������y���
�����y
2010 RL