2010.5 PEUGEOT 5008 change time
[x] Cancel search: change timePage 39 of 345

40
� � �V�e�h�i�c�l�e� �c�o�n�fi� �g�u�r�a�t�i�o�n� Options
Once the "Options" menu has been se-
lected, you can start diagnostics of the
status of the equipment (active, not active,
faulty).
Languages
Once the "Languages" menu has been
selected, you can change the language
used by the display (Français, Italiano,
Nederlands, Portugues, Portugues-Brasil,
Türkçe, Deutsch, English, Espanol).
Display settings
Once the "Display settings" menu has
been selected, you can gain access to
the following settings:
- year,
- month,
- day,
- hour,
- minutes,
- 12 or 24 hour mode. Units
Once the "Units" menu has been selected,
you can change the units for:
- temperature (°C or °F),
- fuel consumption (l/100 km, mpg or
km/l).
� Once you have selected a setting,
press the "OK" button to change its
value.
� Wait for approximately ten sec-
onds without any action to allow the
changed data to be recorded or press
the "ESC" button to cancel.
The screen then returns to the normal
display.
� �O�n�c�e� �t�h�e� �"�V�e�h�i�c�l�e� �c�o�n�fi� �g�u�r�a�t�i�o�n�"� �m�e�n�u�
has been selected, you can activate or
deactivate the following equipment (ac-
cording to country):
- wiper linked with reverse gear (refer to the "Visibility" section),
- selective unlocking (refer to the "Access" section),
-
"guide-me-home" and welcome lighting
(refer to the "Visibility" section),
- interior mood lighting (refer to the "Visibility" section),
- daytime running lamps (refer to the "Visibility" section),
- directional headlamps (refer to the "Visibility" section),
- automatic or manual parking brake (refer to the "Driving" section),
- ... � � �F�o�r� �s�a�f�e�t�y� �r�e�a�s�o�n�s�,� �c�o�n�fi� �g�u�-
ration of the multifunction
screen by the driver must only
be done when stationary.
Page 40 of 345

41
MONOCHROME SCREEN A (WITH AUDIO EQUIPMENT) Controls
Displays on the screen
This displays the following information:
- time,
- date,
� � �-� � �a�m�b�i�e�n�t� �t�e�m�p�e�r�a�t�u�r�e� �*� � �(�t�h�i�s� �fl� �a�s�h�e�s� �i�f� there is a risk of ice),
-
status of the openings (doors, boot, ...),
- audio sources (radio, CD, ...),
- trip computer (refer to the end of the section).
Warning messages (e.g.: "Emission
control system faulty") or information
messages (e.g.: "Boot open") may ap-
pear temporarily. Some can be cleared
by pressing the "ESC" button.
Main menu
� Press the "MENU" button for access
to the main
menu , then press the
" � " or " � " buttons to scroll through
the various menus:
- radio-CD,
� � �-� � �v�e�h�i�c�l�e� �c�o�n�fi� �g�u�r�a�t�i�o�n�,�
- options,
- display settings,
- languages,
- units.
� Press the "OK" button to select the
menu required.
From the audio equipment control panel,
you can:
� press the "MENU" button to gain
access to the main
menu ,
� press the " � " or " � " buttons to scroll
through the items on the screen,
� press the "MODE" button to change
the permanent application (trip com-
puter, audio source, ...),
� press the " � " or " � " buttons to
change a setting value,
� press the "OK"� � �b�u�t�t�o�n� �t�o� �c�o�n�fi� �r�m�,� �
or
� press the "ESC" button to abandon
the operation in progress. Radio-CD
With the audio equipment switched on,
once the "Radio-CD" menu has been
selected you can activate or deactivate
the functions linked with use of the radio
(RDS, REG), the CD or the CD changer
�(�i�n�t�r�o�s�c�a�n�,� �s�h�u�f�fl� �e�,� �C�D� �r�e�p�e�a�t�)�.�
* With air conditioning only. For more information on the
"Radio-CD" application, refer
to the "Audio and Telematics"
section.
Page 41 of 345

42
� � �F�o�r� �s�a�f�e�t�y� �r�e�a�s�o�n�s�,� �c�o�n�fi� �g�u�-
ration of the multifunction
screen by the driver must only
be done when stationary.
Display settings
Once the "Display settings" menu has
been selected, you can gain access to
the following settings:
- year,
- month,
- day,
- hour,
- minutes,
- 12 or 24 hour mode.
Languages
Once the "Languages" menu has been
selected, you can change the language
used by the display (Français, Italiano,
Nederlands, Portugues, Portugues-Brasil,
Türkçe, Deutsch, English, Espanol).
Units
Once the "Units" menu has been se-
lected, you can change the units of the
following parameters:
- temperature (°C or °F),
- fuel consumption (l/100 km, mpg
or km/l).
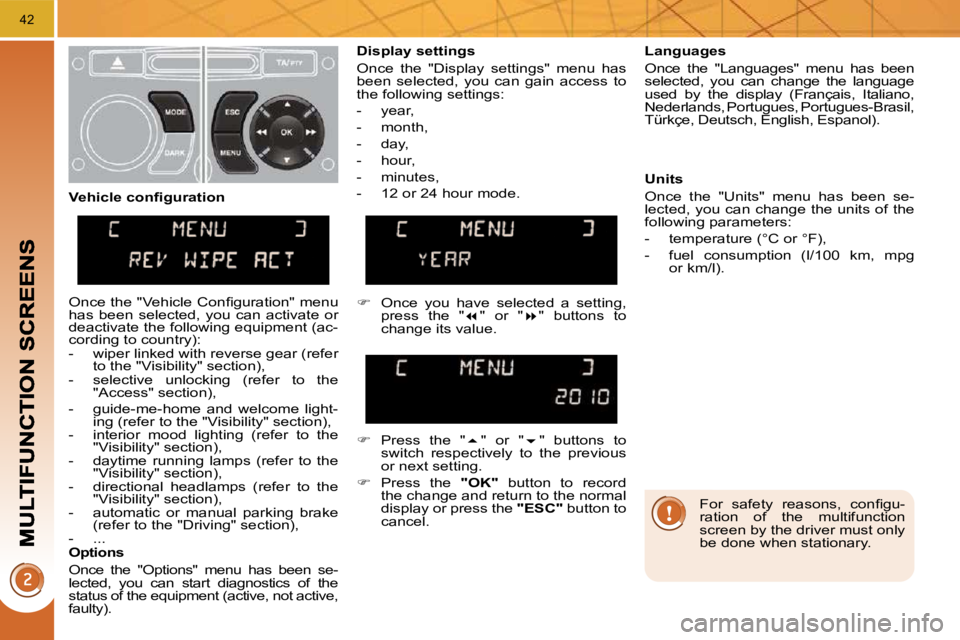
� Once you have selected a setting,
press the " � " or " � " buttons to
change its value.
� Press the " � " or " � " buttons to
switch respectively to the previous
or next setting.
� Press the "OK" button to record
the change and return to the normal
display or press the "ESC" button to
cancel.
� � �V�e�h�i�c�l�e� �c�o�n�fi� �g�u�r�a�t�i�o�n�
� �O�n�c�e� �t�h�e� �"�V�e�h�i�c�l�e� �C�o�n�fi� �g�u�r�a�t�i�o�n�"� �m�e�n�u�
has been selected, you can activate or
deactivate the following equipment (ac-
cording to country):
- wiper linked with reverse gear (refer
to the "Visibility" section),
- selective unlocking (refer to the "Access" section),
- guide-me-home and welcome light- ing (refer to the "Visibility" section),
- interior mood lighting (refer to the "Visibility" section),
- daytime running lamps (refer to the "Visibility" section),
- directional headlamps (refer to the "Visibility" section),
- automatic or manual parking brake (refer to the "Driving" section),
- ...
Options
Once the "Options" menu has been se-
lected, you can start diagnostics of the
status of the equipment (active, not active,
faulty).
Page 42 of 345

43
MONOCHROME SCREEN C (WITH PEUGEOT CONNECT SOUND) Main menu
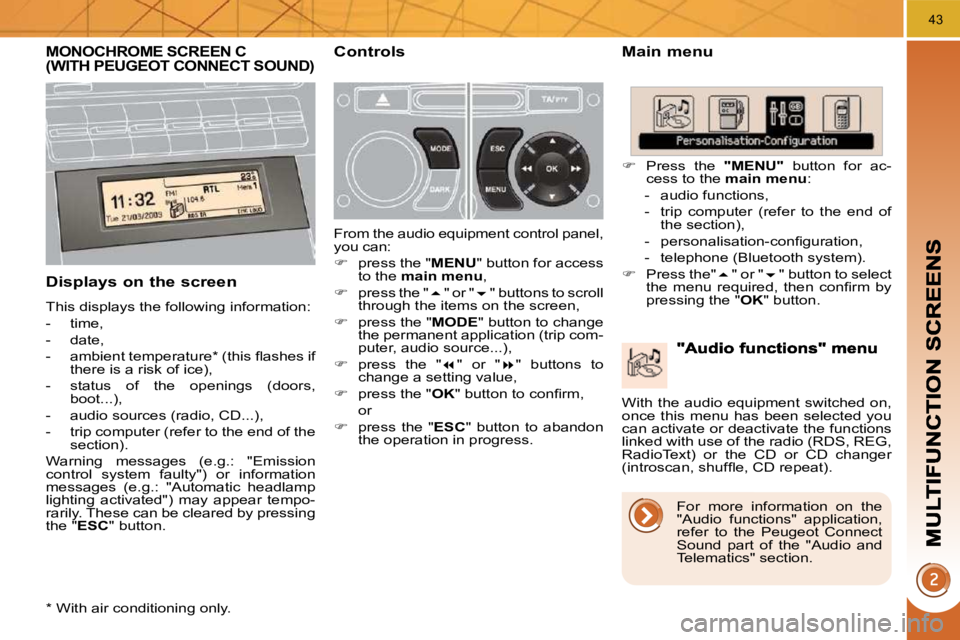
Displays on the screen
This displays the following information:
- time,
- date,
� � �-� � �a�m�b�i�e�n�t� �t�e�m�p�e�r�a�t�u�r�e� �*� � �(�t�h�i�s� �fl� �a�s�h�e�s� �i�f� there is a risk of ice),
- status of the openings (doors, boot...),
- audio sources (radio, CD...),
- trip computer (refer to the end of the section).
Warning messages (e.g.: "Emission
control system faulty") or information
messages (e.g.: "Automatic headlamp
lighting activated") may appear tempo-
rarily. These can be cleared by pressing
the " ESC " button.
Controls
From the audio equipment control panel,
you can:
� press the " MENU " button for access
to the main menu ,
� press the " � " or " � " buttons to scroll
through the items on the screen,
� press the " MODE " button to change
the permanent application (trip com-
puter, audio source...),
� press the " � " or " � " buttons to
change a setting value,
� press the " OK� �"� �b�u�t�t�o�n� �t�o� �c�o�n�fi� �r�m�,� �
or
� press the " ESC " button to abandon
the operation in progress.
� Press the "MENU" button for ac-
cess to the main menu :
- audio functions,
- trip computer (refer to the end of the section),
� � �-� � �p�e�r�s�o�n�a�l�i�s�a�t�i�o�n�-�c�o�n�fi� �g�u�r�a�t�i�o�n�,�
- telephone (Bluetooth system).
� Press the" � " or " � " button to select
�t�h�e� �m�e�n�u� �r�e�q�u�i�r�e�d�,� �t�h�e�n� �c�o�n�fi� �r�m� �b�y�
pressing the " OK " button.
* With air conditioning only. With the audio equipment switched on,
once this menu has been selected you
can activate or deactivate the functions
linked with use of the radio (RDS, REG,
RadioText) or the CD or CD changer
�(�i�n�t�r�o�s�c�a�n�,� �s�h�u�f�fl� �e�,� �C�D� �r�e�p�e�a�t�)�.�
For more information on the
"Audio functions" application,
refer to the Peugeot Connect
Sound part of the "Audio and
Telematics" section.
Page 44 of 345

45
� � �D�i�s�p�l�a�y� �c�o�n�fi� �g�u�r�a�t�i�o�n�
Once this menu has been selected, you
have access to the following settings:
- brightness-video setting,
- date and time setting,
- selection of the units.
Choice of language
Once this menu has been selected,
you can change the screen display
language (Deutsch, English, Espanol,
Français,
Italiano, Nederlands, Portugues,
Portugues-Brasil, Türkçe * ).
Example: setting of the duration of the
guide-me-home lighting.
� Press the " � " or " � " buttons, then
the " OK " button to select the menu
required.
� Press the " � " or " � " buttons, then
the " OK " button to select the "Guide-
me-home headlamps" line.
�
Press the " � " or " � " buttons to set the
value required (15, 30 or 60 seconds),
then press the " OK� �"� �b�u�t�t�o�n� �t�o� �c�o�n�fi� �r�m�.
� Press the " � " or " � " buttons, then
the " OK " button to select the " OK "
�b�o�x� �a�n�d� �c�o�n�fi� �r�m� �o�r� �p�r�e�s�s� �t�h�e� �"� ESC "
button to cancel.
* According to country. "Telephone" menu
� � �F�o�r� �s�a�f�e�t�y� �r�e�a�s�o�n�s�,� �c�o�n�fi� �g�u�-
ration of the multifunction
screen by the driver must only
be done when stationary.
For more information on the
"Telephone" application, re-
fer to the Peugeot Connect
Sound part of the "Audio and
Telematics" section.
With the audio equipment switched on,
once this menu has been selected you
�c�a�n� �c�o�n�fi� �g�u�r�e� �y�o�u�r� �B�l�u�e�t�o�o�t�h� �h�a�n�d�s�-
free kit (pairing), consult the various
telephone directories (calls log, ser-
vices...) and manage your communi-
cations (pick up, hang up, call waiting,
secret mode...).
Page 192 of 345

158
Moving off
� With your foot on the brake, select
position P or N .
� Start the engine.
If this procedure is not followed, an au-
dible signal is heard, accompanied by a
message on the multifunction screen.
� With the engine running, press the
brake pedal.
� Release the parking brake, unless it
is programmed to automatic mode.
� Select position R , D or M .
� Gradually release the brake pedal.
The vehicle moves off immediately.
If position N is engaged inad-
vertently while driving, allow the
engine to return to idle then en-
gage position D to accelerate. The gearbox then operates in auto-
adaptive mode, without any intervention
on the part of the driver. It continuously
selects the most suitable gear accord-
�i�n�g� �t�o� �t�h�e� �s�t�y�l�e� �o�f� �d�r�i�v�i�n�g�,� �t�h�e� �p�r�o�fi� �l�e� �o�f�
the road and the load in the vehicle.
For maximum acceleration without
touching the lever, press the accelera-
tor pedal down fully (kick down). The
gearbox changes down automatically
or maintains the gear selected until the
maximum engine speed is reached.
On braking, the gearbox changes down
�a�u�t�o�m�a�t�i�c�a�l�l�y� �t�o� �p�r�o�v�i�d�e� �e�f�fi� �c�i�e�n�t� �e�n�g�i�n�e�
braking.
If you release the accelerator sharply,
the gearbox will not change to a higher
gear for safety reasons.
� Select position D for automatic
changing of the six gears.
� appears on the instrument
panel.
Snow programme "
� "
� Press button " � ", after starting the
engine.
The gearbox adapts to driving on slip-
pery roads.
This programme improves starting and
drive when traction is poor.
S appears on the instrument
panel.
Sport programme "S"
� Press button "S" , after starting the
engine.
The gearbox automatically favours a
dynamic style of driving.
Never select position N while
the vehicle is moving.
Never select positions P or R
unless the vehicle is completely sta-
tionary.
When the engine is running at
idle, with the brakes released,
if position
R , D or M is select-
ed, the vehicle moves even without
the accelerator being pressed.
When the engine is running, never
leave children in the vehicle without
supervision.
When carrying out maintenance with
the engine running, apply the parking
brake and select position P .
Sport and snow programmes
These two special programmes supple-
ment the automatic operation in very
�s�p�e�c�i�fi� �c� �c�o�n�d�i�t�i�o�n�s� �o�f� �u�s�e�.�
Return to automatic operation
� At any time, press the button selected
again to quit the programme en-
gaged and return to auto-adaptive
mode.
Page 193 of 345

159
Stopping the vehicle
Before switching off the engine, you
can engage position P or N to place the
gearbox in neutral.
In both cases, apply the parking brake
to immobilise the vehicle, unless it is
programmed to automatic mode.
Operating fault
When the ignition is on, the
lighting of this warning lamp,
accompanied by an audible
signal and a message in the
multifunction screen, indicates
a gearbox malfunction.
In this case, the gearbox switches to
back-up mode and is locked in 3rd gear.
You may feel a substantial knock when
changing from P to R and from N to R .
This will not cause any damage to the
gearbox.
Do not exceed 60 mph (100 km/h), local
speed restrictions permitting.
Have it checked by a PEUGEOT dealer.
This warning lamp may also come on if
a door is opened.
You risk damaging the gearbox:
Manual operation
� Select position M for sequential
changing of the six gears.
� Push the lever towards the + sign to
change up a gear.
� Pull the lever towards the - sign to
change down a gear.
D disappears and the gears
engaged appear in succes-
sion in the instrument panel.
If the lever is not in posi-
tion P , when the driver's
door is opened or approxi-
mately 45 seconds after the ignition
is switched off, an audible signal is
heard and a message appears.
� Return the lever to position P ; the
audible signal stops and the mes-
sage disappears.
It is only possible to change from one
gear to another if the vehicle speed and
engine speed permit; otherwise, the
gearbox will operate temporarily in au-
tomatic mode.
Invalid value during manual
operation
This symbol is displayed if a
gear is not engaged correctly
(selector between two posi-
tions).
It is possible to change from position D
(automatic) to position M (manual) at
any time.
When the vehicle is stationary or mov-
ing very slowly, the gearbox selects
gear M1 automatically.
The sport and snow programmes do not
operate in manual mode.
If the engine speed is too low or too
�h�i�g�h�,� �t�h�e� �g�e�a�r� �s�e�l�e�c�t�e�d� �fl� �a�s�h�e�s� �f�o�r� �a� �f�e�w�
seconds, then the actual gear engaged
is displayed.
- if you press the accelerator and
brake pedals at the same time,
- if you force the lever from posi- tion P to another position when
�t�h�e� �b�a�t�t�e�r�y� �i�s� �fl� �a�t�.� �
To reduce fuel consumption when
stationary for long periods with the
�e�n�g�i�n�e� �r�u�n�n�i�n�g� �(�t�r�a�f�fi� �c� �j�a�m�.�.�.�)�,� �p�o�s�i�-
tion the gear lever at N and apply
the parking brake, unless it is pro-
grammed in automatic mode.
Page 219 of 345

PRACTICAL INFORMATION
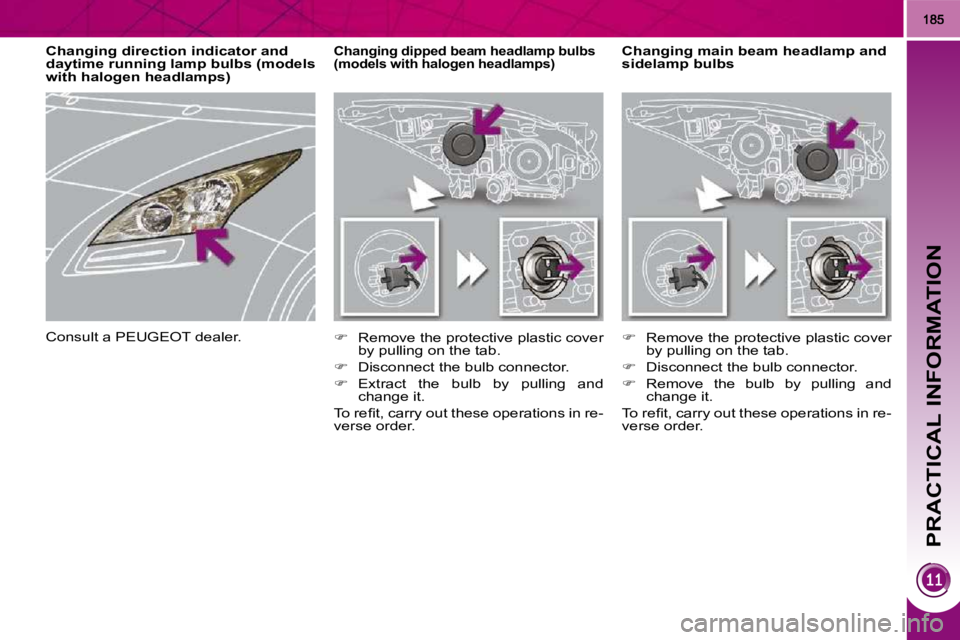
Changing main beam headlamp and
sidelamp bulbs Changing dipped beam headlamp bulbs
(models with halogen headlamps)
� Remove the protective plastic cover
by pulling on the tab.
� Disconnect the bulb connector.
� Extract the bulb by pulling and
change it.
� �T�o� �r�e�fi� �t�,� �c�a�r�r�y� �o�u�t� �t�h�e�s�e� �o�p�e�r�a�t�i�o�n�s� �i�n� �r�e�-
verse order.
� Remove the protective plastic cover
by pulling on the tab.
� Disconnect the bulb connector.
� Remove the bulb by pulling and
change it.
� �T�o� �r�e�fi� �t�,� �c�a�r�r�y� �o�u�t� �t�h�e�s�e� �o�p�e�r�a�t�i�o�n�s� �i�n� �r�e�-
verse order.
Changing direction indicator and
daytime running lamp bulbs (models
with halogen headlamps)
Consult a PEUGEOT dealer.