Page 9 of 96

SAFETY INFORMATION
1-2
1
ed by road and traffic conditions.
�
Always signal before turning or
changing lanes. Make sure that
other motorists can see you.
�
The posture of the operator and
passenger is important for proper
control.
�
The operator should keep both
hands on the handlebar and
both feet on the operator foot-
rests during operation to main-
tain control of the motorcycle.
�
The passenger should always
hold onto the operator, the seat
strap or grab bar, if equipped,
with both hands and keep both
feet on the passenger footrests.
Never carry a passenger unless
he or she can firmly place both
feet on the passenger footrests.
�
Never ride under the influence of
alcohol or other drugs.
Protective apparel
The majority of fatalities from motorcy-
cle accidents are the result of head in-
juries. The use of a safety helmet is the
single most critical factor in the preven-tion or reduction of head injuries.
�
Always wear an approved helmet.
�
Wear a face shield or goggles.
Wind in your unprotected eyes
could contribute to an impairment
of vision that could delay seeing a
hazard.
�
The use of a jacket, heavy boots,
trousers, gloves, etc., is effective in
preventing or reducing abrasions
or lacerations.
�
Never wear loose-fitting clothes,
otherwise they could catch on the
control levers, footrests, or wheels
and cause injury or an accident.
�
Always wear protective clothing
that covers your legs, ankles, and
feet. The engine or exhaust sys-
tem become very hot during or af-
ter operation and can cause burns.
�
A passenger should also observe
the above precautions.
Avoid Carbon Monoxide Poisoning
All engine exhaust contains carbon
monoxide, a deadly gas. Breathing car-
bon monoxide can cause headaches,
dizziness, drowsiness, nausea, confu-sion, and eventually death.
Carbon Monoxide is a colorless, odor-
less, tasteless gas which may be
present even if you do not see or smell
any engine exhaust. Deadly levels of
carbon monoxide can collect rapidly
and you can quickly be overcome and
unable to save yourself. Also, deadly
levels of carbon monoxide can linger
for hours or days in enclosed or poorly
ventilated areas. If you experience any
symptoms of carbon monoxide poison-
ing, leave the area immediately, get
fresh air, and SEEK MEDICAL TREAT-
MENT.
�
Do not run engine indoors. Even if
you try to ventilate engine exhaust
with fans or open windows and
doors, carbon monoxide can rap-
idly reach dangerous levels.
�
Do not run engine in poorly venti-
lated or partially enclosed areas
such as barns, garages, or car-
ports.
�
Do not run engine outdoors where
engine exhaust can be drawn into
a building through openings such
as windows and doors.
Page 10 of 96

SAFETY INFORMATION
1-3
1
Loading
Adding accessories or cargo to your
motorcycle can adversely affect stabili-
ty and handling if the weight distribution
of the motorcycle is changed. To avoid
the possibility of an accident, use ex-
treme caution when adding cargo or
accessories to your motorcycle. Use
extra care when riding a motorcycle
that has added cargo or accessories.
Here, along with the information about
accessories below, are some general
guidelines to follow if loading cargo to
your motorcycle:
The total weight of the operator, pas-
senger, accessories and cargo must
not exceed the maximum load limit.
Operation of an overloaded vehicle
could cause an accident.
When loading within this weight limit,
keep the following in mind:
�
Cargo and accessory weight
should be kept as low and close to
the motorcycle as possible. Se-
curely pack your heaviest items asclose to the center of the vehicle as
possible and make sure to distrib-
ute the weight as evenly as possi-
ble on both sides of the motorcycle
to minimize imbalance or instabili-
ty.
�
Shifting weights can create a sud-
den imbalance. Make sure that ac-
cessories and cargo are securely
attached to the motorcycle before
riding. Check accessory mounts
and cargo restraints frequently.
�
Properly adjust the suspension
for your load, and check the con-
dition and pressure of your tires.
�
Never attach any large or heavy
items to the handlebar, front
fork, or front fender. These
items, including such cargo as
sleeping bags, duffel bags, or
tents, can create unstable han-
dling or a slow steering re-
sponse.
�
This vehicle is not designed to
pull a trailer or to be attached to
a sidecar.Genuine Yamaha Accessories
Choosing accessories for your vehicle
is an important decision. Genuine
Yamaha accessories, which are avail-
able only from a Yamaha dealer, have
been designed, tested, and approved
by Yamaha for use on your vehicle.
Many companies with no connection to
Yamaha manufacture parts and acces-
sories or offer other modifications for
Yamaha vehicles. Yamaha is not in a
position to test the products that these
aftermarket companies produce.
Therefore, Yamaha can neither en-
dorse nor recommend the use of ac-
cessories not sold by Yamaha or
modifications not specifically recom-
mended by Yamaha, even if sold and
installed by a Yamaha dealer.
Aftermarket Parts, Accessories,
and Modifications
While you may find aftermarket prod-
ucts similar in design and quality to
genuine Yamaha accessories, recog-
nize that some aftermarket accessories
or modifications are not suitable be-
cause of potential safety hazards to you
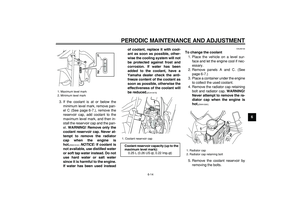
Maximum load:
185 kg (408 lb)
Page 11 of 96

SAFETY INFORMATION
1-4
1
or others. Installing aftermarket prod-
ucts or having other modifications per-
formed to your vehicle that change any
of the vehicle’s design or operation
characteristics can put you and others
at greater risk of serious injury or death.
You are responsible for injuries related
to changes in the vehicle.
Keep the following guidelines in mind,
as well as those provided under “Load-
ing” when mounting accessories.
�
Never install accessories or carry
cargo that would impair the perfor-
mance of your motorcycle. Care-
fully inspect the accessory before
using it to make sure that it does
not in any way reduce ground
clearance or cornering clearance,
limit suspension travel, steering
travel or control operation, or ob-
scure lights or reflectors.
�
Accessories fitted to the handle-
bar or the front fork area can
create instability due to improper
weight distribution or aerody-
namic changes. If accessories
are added to the handlebar or
front fork area, they must be aslightweight as possible and
should be kept to a minimum.
�
Bulky or large accessories may
seriously affect the stability of
the motorcycle due to aerody-
namic effects. Wind may at-
tempt to lift the motorcycle, or
the motorcycle may become un-
stable in cross winds. These ac-
cessories may also cause
instability when passing or being
passed by large vehicles.
�
Certain accessories can dis-
place the operator from his or
her normal riding position. This
improper position limits the free-
dom of movement of the opera-
tor and may limit control ability,
therefore, such accessories are
not recommended.
�
Use caution when adding electri-
cal accessories. If electrical acces-
sories exceed the capacity of the
motorcycle’s electrical system, an
electric failure could result, which
could cause a dangerous loss of
lights or engine power.
Aftermarket Tires and Rims
The tires and rims that came with your
motorcycle were designed to match the
performance capabilities and to provide
the best combination of handling, brak-
ing, and comfort. Other tires, rims, siz-
es, and combinations may not be
appropriate. Refer to page 6-19 for tire
specifications and more information on
replacing your tires.
Page 12 of 96
2-1
1
2
3
4
5
6
7
8
9
DESCRIPTION
EAU10410
Left view
4
5
1
2
3
6
7
8
9
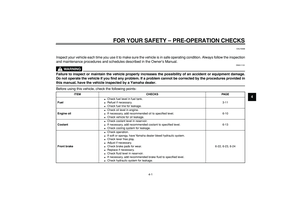
1. Front fork rebound damping force adjusting screw (page 3-14)
2. Fuse box (page 6-32)
3. Coolant reservoir (page 6-13)
4. Shock absorber assembly compression damping force adjusting
screw (page 3-17)
5. Battery (page 6-31)
6. Main fuse (page 6-32)
7. Owner’s tool kit (page 6-1)8. Helmet holder (page 3-14)
9. Front fork compression damping force adjusting screw (page 3-14)
Page 13 of 96
DESCRIPTION
2-2
2
3
4
5
6
7
8
9
EAU10420
Right view
3
1
2
6
5
4
1. Rear brake fluid reservoir (page 6-24)
2. Air filter element (page 6-16)
3. Rear brake light switch (page 6-23)
4. Engine oil filler cap (page 6-10)
5. Engine oil level check window (page 6-10)
6. Shock absorber assembly rebound damping force adjusting dial
(page 3-17)
Page 14 of 96
DESCRIPTION
2-3
1
2
3
4
5
6
7
8
9
EAU10430
Controls and instruments
12 34 5 6
8
7
1. Clutch lever (page 3-9)
2. Left handlebar switches (page 3-8)
3. Main switch/steering lock (page 3-1)
4. Multi-function display (page 3-3)
5. Right handlebar switches (page 3-8)
6. Brake lever (page 3-10)
7. Throttle grip (page 6-18)
8. Fuel tank cap (page 3-11)
Page 15 of 96

3-1
2
34
5
6
7
8
9
INSTRUMENT AND CONTROL FUNCTIONS
EAU10460
Main switch/steering lock
The main switch/steering lock controls
the ignition and lighting systems, and is
used to lock the steering. The various
positions are described below.
EAU38530
ON
All electrical circuits are supplied with
power; the meter lighting, taillight, li-
cense plate light and auxiliary light
come on, and the engine can be start-
ed. The key cannot be removed.
TIP
The headlight comes on automatically
when the engine is started and stays on
until the key is turned to “OFF”, even if
the engine stalls.
EAU10661
OFF
All electrical systems are off. The key
can be removed.
WARNING
EWA10061
Never turn the key to “OFF” or
“LOCK” while the vehicle is moving.
Otherwise the electrical systems will
be switched off, which may result in
loss of control or an accident.
EAU10681
LOCK
The steering is locked, and all electrical
systems are off. The key can be re-
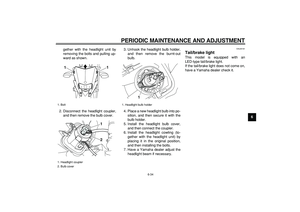
moved.To lock the steering
1. Turn the handlebars all the way to
the left.
2. Push the key in from the “OFF” po-
sition, and then turn it to “LOCK”
while still pushing it.
3. Remove the key.
1. Push.
2. Turn.
1
2
Page 16 of 96

INSTRUMENT AND CONTROL FUNCTIONS
3-2
1
2
3
4
5
6
7
8
9
To unlock the steering
Push the key in, and then turn it to
“OFF” while still pushing it.
EAU11003
Indicator and warning lights
EAU11020
Turn signal indicator light “ ”
This indicator light flashes when the
turn signal switch is pushed to the left or
right.
EAU11060
Neutral indicator light “ ”
This indicator light comes on when the
transmission is in the neutral position.
EAU11080
High beam indicator light “ ”
This indicator light comes on when the
high beam of the headlight is switched
on.
EAU11350
Fuel level warning light “ ”
This warning light comes on when the
fuel level drops below approximately
2.1 L (0.55 US gal, 0.46 Imp.gal). When
this occurs, refuel as soon as possible.
The electrical circuit of the warning light
can be checked by turning the key to
“ON”.
If the warning light does not come on
for a few seconds, then go off, have a
Yamaha dealer check the electrical cir-
cuit.
EAU11442
Coolant temperature warning light
“”
This warning light comes on if the en-
gine overheats. If this occurs, stop the
engine immediately and allow the en-
gine to cool.
The electrical circuit of the warning light
can be checked by turning the key to
1. Push.
2. Turn.
1 2
1. Coolant temperature warning light “ ”
2. Fuel level warning light “ ”
3. Neutral indicator light “ ”
4. Turn signal indicator light “ ”
5. High beam indicator light “ ”
6. Engine trouble warning light “ ”
1234
5 6


2. Fuse box (page 6-32)
3. Coolant reservoir (page 6")

2. Air filter element (page 6-16)
3. Rear brake light switch (page 6-23)
4. Eng")

2. Left handlebar switches (page 3-8)
3. Main switch/steering lock (page 3-1)
4")