Page 24 of 76
Features and functions
17
EJU31021
Operation of controls and other
functions
EJU31053Hood
The hood is secured at the rear by a latch.
Lift the steering pole and support it with the
lock pin before removing the hood.To remove the hood:
(1) Turn the latch knob to the open position,
and then pull up on the hood latch to un-
latch the hood.
(2) Grasp the hood using the handgrips pro-
vided at the front and rear of the hood. Lift
the hood up and to the rear to remove it.
1Steering pole
1Lock pin
1Hood latch knob
2Hood latch
1Handgrip
UF2F71E0.book Page 17 Thursday, April 10, 2008 11:47 AM
Page 34 of 76

Operation
27
EJU32280Pre-operation check points EJU32291Engine compartment
WARNING
EWJ00460
Failure to ventilate the engine compart-
ment could result in a fire or explosion. Do
not start the engine if there is a fuel leak or
a loose electrical connection.
Ventilate the engine compartment before
each use.
To ventilate the engine compartment, lift the
steering pole and support it with the lock pin,
and then remove the hood. (See page 17 for
hood removal and installation procedures.)
Leave the engine compartment open for a few
minutes to allow any fuel vapors to escape.
While the engine compartment is open, check
for loose electrical connections.
EJU32350Hull and deck
Check the hull and deck for cracks and other
damage. If any damage is found, have a
Yamaha dealer repair the watercraft.
EJU32361Fuel system
Make sure that there is sufficient fuel in the
fuel tank before each use.
Also, check the fuel system for leakage,
cracks, and malfunctions. (See page 51 for
check points and correct procedures.)(1) Remove the fuel tank filler cap to release
any pressure that might have built up in
the fuel tank.
(2) Remove the hood. (See page 17 for hood
removal and installation procedures.)
(3) Check the fuel level in the fuel tank and
replenish if necessary. (See page 25 for
filling procedures.)
(4) Install the fuel tank filler cap and the
hood.
EJU32420Water separator
Check the water separator for water. The wa-
ter separator retains any water that may have
entered through the fuel tank breather hose if
the watercraft was capsized. Normally, the
water separator is empty.
If water remains in the water separator, drain
it by removing the drain screw. Place a drain
pan under the water separator to catch the
1Water separator
2Drain screw
UF2F71E0.book Page 27 Thursday, April 10, 2008 11:47 AM
Page 36 of 76

Operation
29
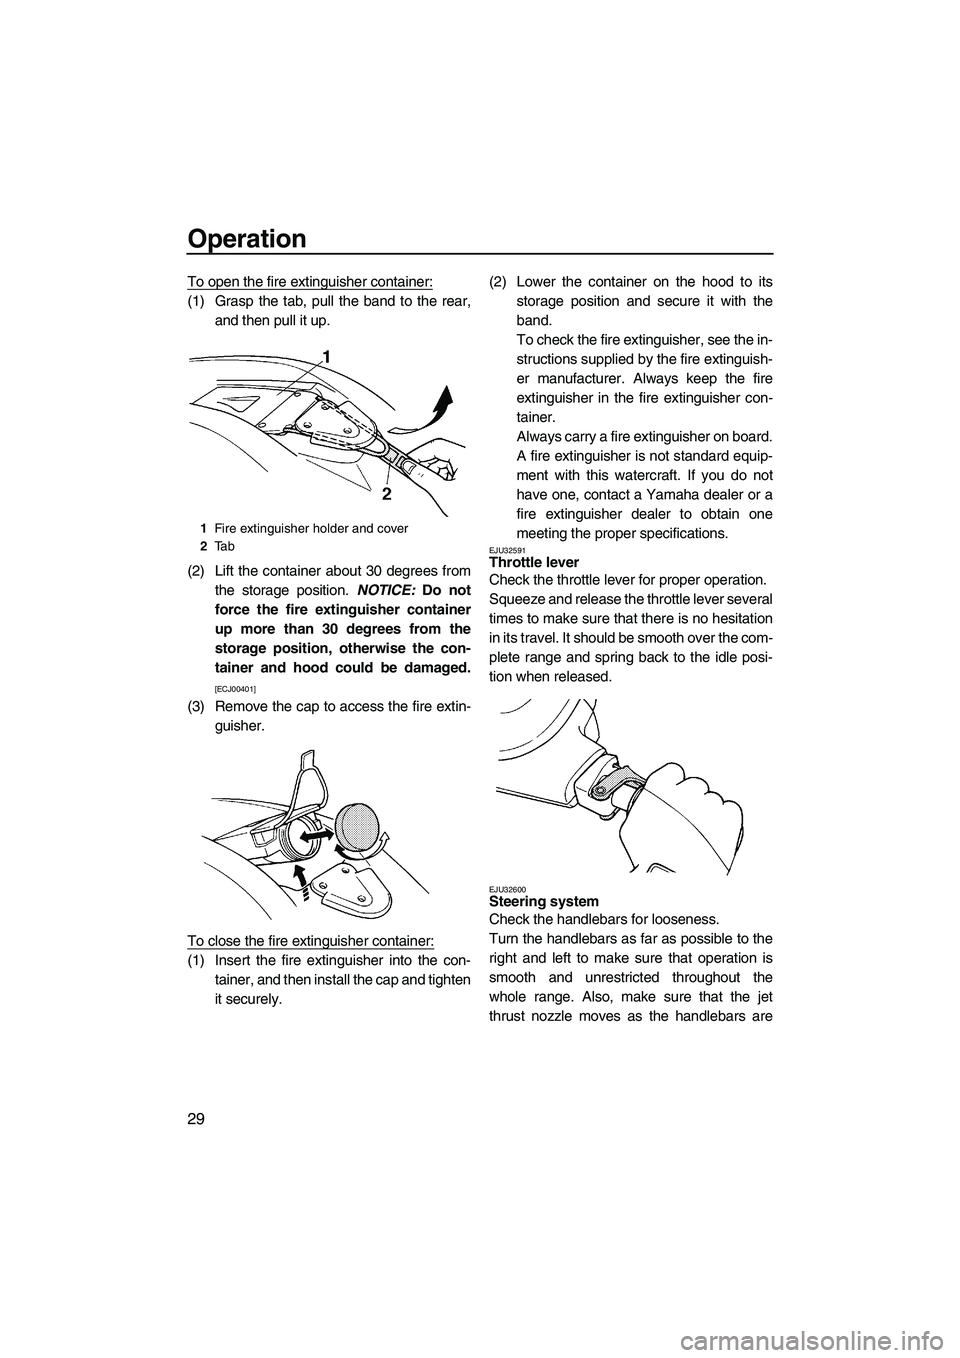
To open the fire extinguisher container:
(1) Grasp the tab, pull the band to the rear,
and then pull it up.
(2) Lift the container about 30 degrees from
the storage position. NOTICE: Do not
force the fire extinguisher container
up more than 30 degrees from the
storage position, otherwise the con-
tainer and hood could be damaged.
[ECJ00401]
(3) Remove the cap to access the fire extin-
guisher.
To close the fire extinguisher container:
(1) Insert the fire extinguisher into the con-
tainer, and then install the cap and tighten
it securely.(2) Lower the container on the hood to its
storage position and secure it with the
band.
To check the fire extinguisher, see the in-
structions supplied by the fire extinguish-
er manufacturer. Always keep the fire
extinguisher in the fire extinguisher con-
tainer.
Always carry a fire extinguisher on board.
A fire extinguisher is not standard equip-
ment with this watercraft. If you do not
have one, contact a Yamaha dealer or a
fire extinguisher dealer to obtain one
meeting the proper specifications.
EJU32591Throttle lever
Check the throttle lever for proper operation.
Squeeze and release the throttle lever several
times to make sure that there is no hesitation
in its travel. It should be smooth over the com-
plete range and spring back to the idle posi-
tion when released.
EJU32600Steering system
Check the handlebars for looseness.
Turn the handlebars as far as possible to the
right and left to make sure that operation is
smooth and unrestricted throughout the
whole range. Also, make sure that the jet
thrust nozzle moves as the handlebars are
1Fire extinguisher holder and cover
2Ta b
UF2F71E0.book Page 29 Thursday, April 10, 2008 11:47 AM