Page 55 of 76
Maintenance and care
48
convenience, a storage pouch is provided on
the watercraft for the manual and tool kit.
To protect these materials from water dam-
age, it would be a good idea to put them in a
waterproof bag.
The service information included in this man-
ual is intended to provide you, the owner, with
the necessary information for completing your
own preventive maintenance and minor re-
pairs. The tools provided in the tool kit are suf-
ficient for this purpose, except that a torque
wrench may also be necessary to tighten nuts
and bolts.
1Storage pouch
1Tool bag
2Screwdriver
314/21 mm box wrench
4Pliers
5Open-end wrench
610/12 mm box wrench
7Garden hose adapter
8Spark plug (one included for each cylinder)
UF2F71E0.book Page 48 Thursday, April 10, 2008 11:47 AM
Page 60 of 76

Maintenance and care
53
(4) Loosen the locknut.
(5) Tighten or loosen the adjusting nut until
the desired amount of friction is obtained.
(6) Hold the adjusting nut with one wrench
while tightening the locknut with another
wrench.
(7) Install the handlebar cover and the four
screws.
EJU31285Adjusting the jet thrust nozzle angle
The angle of the jet thrust nozzle can be ad-
justed to suit operator preference according to
the following procedure.
To change the steering cable pivot bolt posi-
tion:
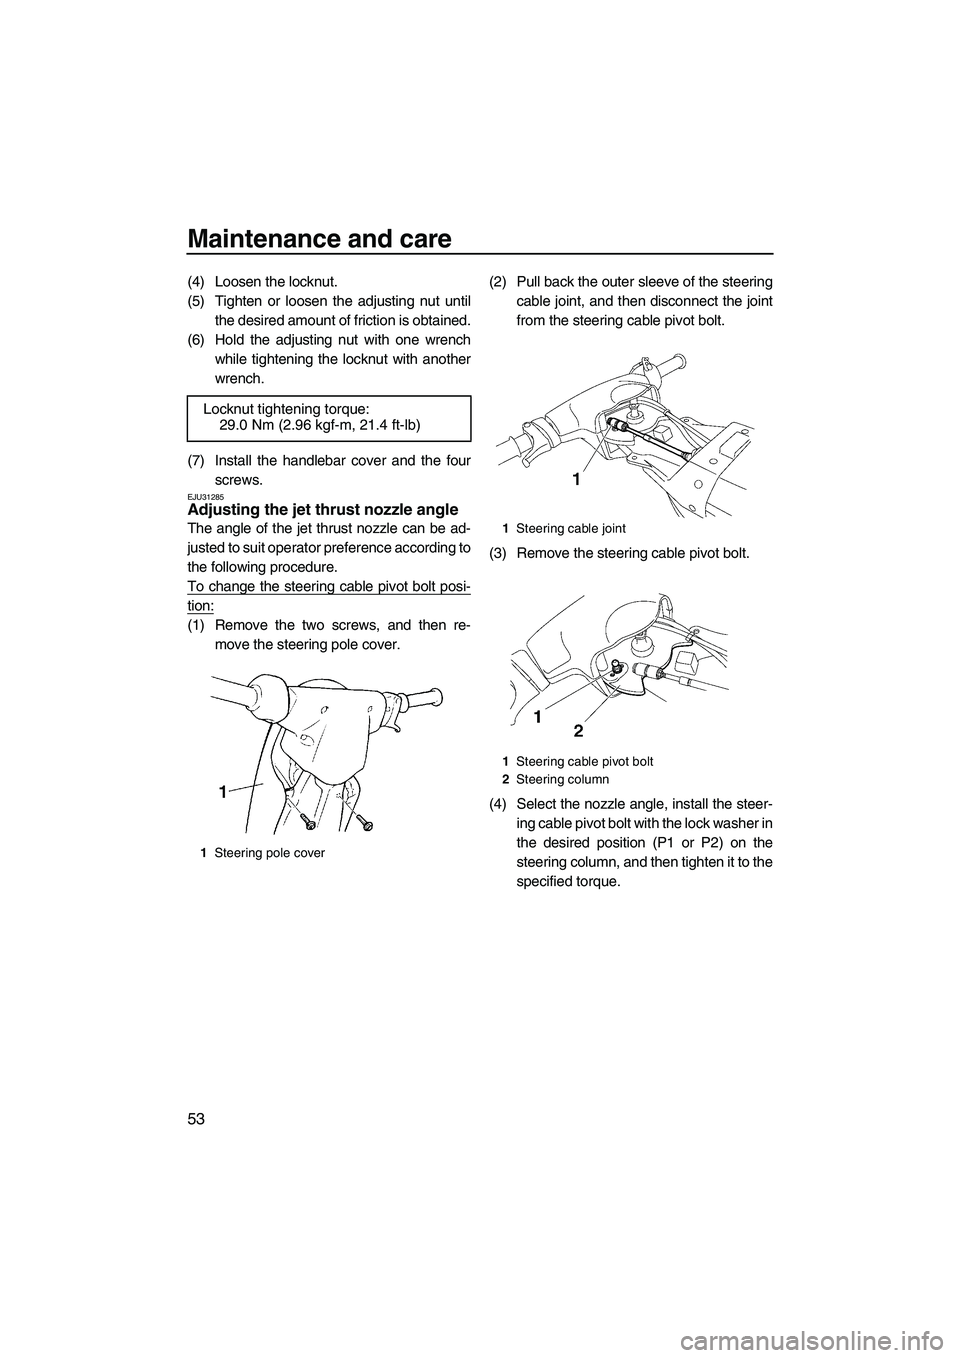
(1) Remove the two screws, and then re-
move the steering pole cover.(2) Pull back the outer sleeve of the steering
cable joint, and then disconnect the joint
from the steering cable pivot bolt.
(3) Remove the steering cable pivot bolt.
(4) Select the nozzle angle, install the steer-
ing cable pivot bolt with the lock washer in
the desired position (P1 or P2) on the
steering column, and then tighten it to the
specified torque. Locknut tightening torque:
29.0 Nm (2.96 kgf-m, 21.4 ft-lb)
1Steering pole cover
1Steering cable joint
1Steering cable pivot bolt
2Steering column
UF2F71E0.book Page 53 Thursday, April 10, 2008 11:47 AM
Page 61 of 76

Maintenance and care
54
TIP:
The outermost hole in the steering column
cannot be used.
(5) Connect the steering cable joint to the
steering cable pivot bolt.
(6) Install the steering pole cover, and then
install the two screws.
EJU34361Checking and adjusting the throttle
cable
Check that the throttle cable moves back to
the set position smoothly and that the throttle
lever free play is within specification.
Squeeze and release the throttle lever. If the
throttle lever does not return smoothly, have a
Yamaha dealer service it.
If the specified throttle lever free play cannot
be obtained as described below, have a
Yamaha dealer make the adjustment.
(1) Remove the four screws, and then re-
move the handlebar cover.
(2) Loosen the locknut.
(3) Adjust the free play by turning the adjust-
er.
1Nozzle angles
1Nozzle angles
2Steering cable pivot bolt positions
Standard steering cable pivot bolt posi-
tion:
P2
Tightening torque:
Steering cable pivot bolt:
5.4 Nm (0.55 kgf-m, 4.0 ft-lb)
1Locknut
2Adjuster
3Throttle lever free play
UF2F71E0.book Page 54 Thursday, April 10, 2008 11:47 AM
Page 62 of 76

Maintenance and care
55
(4) Hold the adjuster with one wrench while
tightening the locknut with another
wrench.
(5) Install the handlebar cover and the four
screws.
EJU34374Cleaning and adjusting the spark
plugs
WARNING
EWJ00350
Be careful not to damage the insulator
when removing or installing a spark plug.
A damaged insulator could allow sparks to
escape, which could result in a fire or ex-
plosion.
The spark plug is an important engine compo-
nent and is easy to inspect. The condition of
the spark plug can indicate something about
the condition of the engine. For example, if the
center electrode porcelain is very white, this
could indicate an intake air leak or carburetion
problem in that cylinder. Do not attempt to di-
agnose any problems yourself. Have a
Yamaha dealer service the watercraft.
Remove and inspect the spark plugs periodi-
cally; heat and deposits will cause the spark
plugs to slowly break down and erode. If elec-
trode erosion becomes excessive, or if carbon
and other deposits are excessive, replace the
spark plug with the specified plug.
To remove a spark plug:
(1) Remove the hood. (See page 17 for hood
removal and installation procedures.)
(2) Remove the spark plug cap.(3) Remove the spark plug.
Measure the spark plug gap with a wire
thickness gauge. Replace the spark
plugs or adjust the gap to specification if
necessary.
To install a spark plug:
(1) Clean the gasket surface.
(2) Wipe any dirt from the threads of the
spark plug.
(3) Install the spark plug, and then tighten it
to the specified torque.
(4) Wipe off any water on the spark plug or
inside the spark plug cap, and then install
the cap. Push the spark plug cap down
until it is securely installed.
TIP:
If a torque wrench is not available when you
are installing a spark plug, a good estimate of
the correct torque is 1/4 turn to 1/2 turn past
finger tight using the spark plug wrench in-
cluded in the tool kit. Have the spark plug ad-
justed to the correct torque with a torque
wrench as soon as possible.
(5) Install the hood. Throttle lever free play:
7.0–10.0 mm (0.28–0.39 in)
Specified spark plug:
BR7HS
1Spark plug gap
Spark plug gap:
0.6–0.7 mm (0.024–0.028 in)
Spark plug tightening torque:
25.0 Nm (2.55 kgf-m, 18.4 ft-lb)
UF2F71E0.book Page 55 Thursday, April 10, 2008 11:47 AM