Page 155 of 672
155
1-7. Safety information
1
Before driving
Fully extend the shoulder belt
and then allow it to retract
slightly in order to activate the
ALR lock mode.
Lock mode allows the seat belt to
retract only.
While pushing the child seat into
the seat, allow the shoulder belt
to retract until the child seat is
securely in place.
After the shoulder belt has
retracted to a point where there is
no slack in the belt, pull the belt to
check that it cannot be extended.
Regular Cab and Double Cab models: If the child restraint has
a top tether strap, the top tether strap should be latched onto
the top tether strap anchor.
(
P. 156, 158)
■ Booster seat
Place the booster seat on the
seat facing the front of the vehi-
cle.
Page 162 of 672
162 1-7. Safety information
Child restraint systems with a top tether strap (CrewMax models)Remove the head restraint.
Installing position:Outside passenger seat
Center passenger seat
Outside passenger seat Swing the seatback forward
slightly. (P. 63)
Open the anchor bracket
cover.
Latch the hook onto the
anchor bracket.
Return the seatback to its orig-
inal position.
Make sure the seatback is
securely locked by pushing for-
ward and rearward on the top of
the seatback.
Page 163 of 672
163
1-7. Safety information
1
Before driving
Center passenger seat
Swing the seatback forward
slightly. (P. 63)
Open the anchor bracket
cover.
Latch the hook onto the
anchor bracket.
Return the seatback to its orig-
inal position.
Make sure the seatback is
securely locked by pushing for-
ward and rearward on the top of
the seatback.
Secure the child restraint using LATCH anchors ( P. 151) or
a seat belt ( P. 154), and tighten the top tether strap.
Make sure the top tether strap is securely latched.
Replace the head restraint.
Installing position:
Outside passenger seat
Center passenger seat
■Laws and regulations pertaining to anchorages
The LATCH system conforms to FMVSS225 or CMVSS210.2.
Child restraint systems conforming to FMVSS213 or CMVSS213 specifica-
tions can be used.
This vehicle is designed to conform to the SAE J1819.
Page 164 of 672

164 1-7. Safety information
CAUTION
■When installing a booster seat
Do not fully extend the shoulder belt to prevent the belt from going to ALR
lock mode. ( P. 79)
● ALR mode causes the belt to tighten only which could cause injury or dis-
comfort to the child.
■ When installing a child restraint system
Follow the directions given in the child restraint system installation manual
and fix the child restraint system securely in place.
If the child restraint system is not correctly fixed in place, the child or other
passengers may be seriously injured or even killed in the event of sudden
braking or an accident.
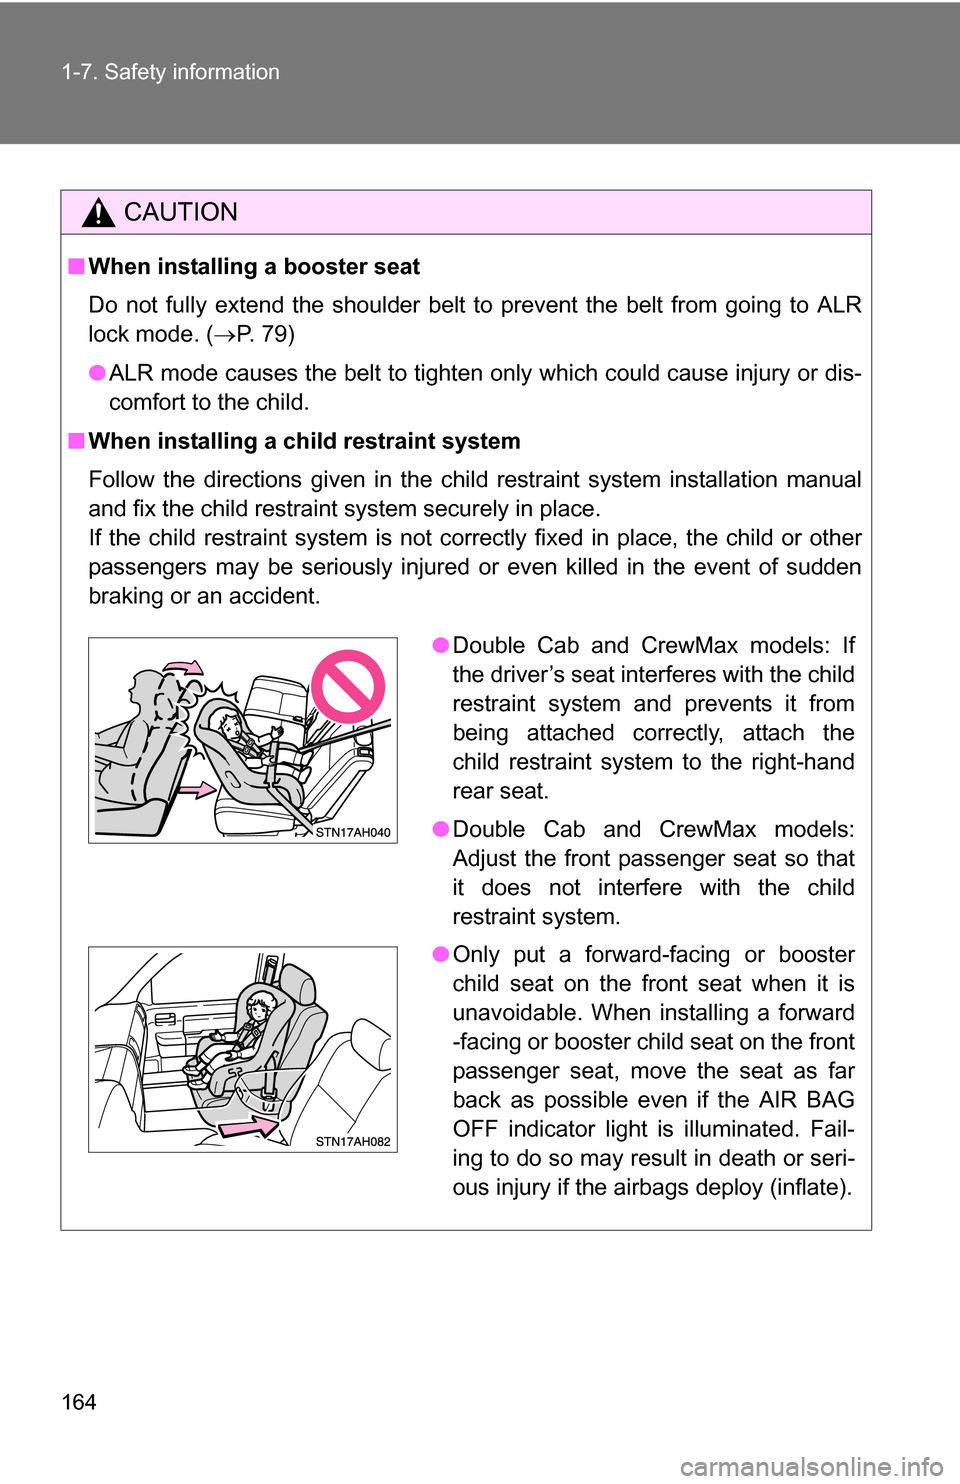
●Double Cab and CrewMax models: If
the driver’s seat interferes with the child
restraint system and prevents it from
being attached correctly, attach the
child restraint system to the right-hand
rear seat.
● Double Cab and CrewMax models:
Adjust the front passenger seat so that
it does not interfere with the child
restraint system.
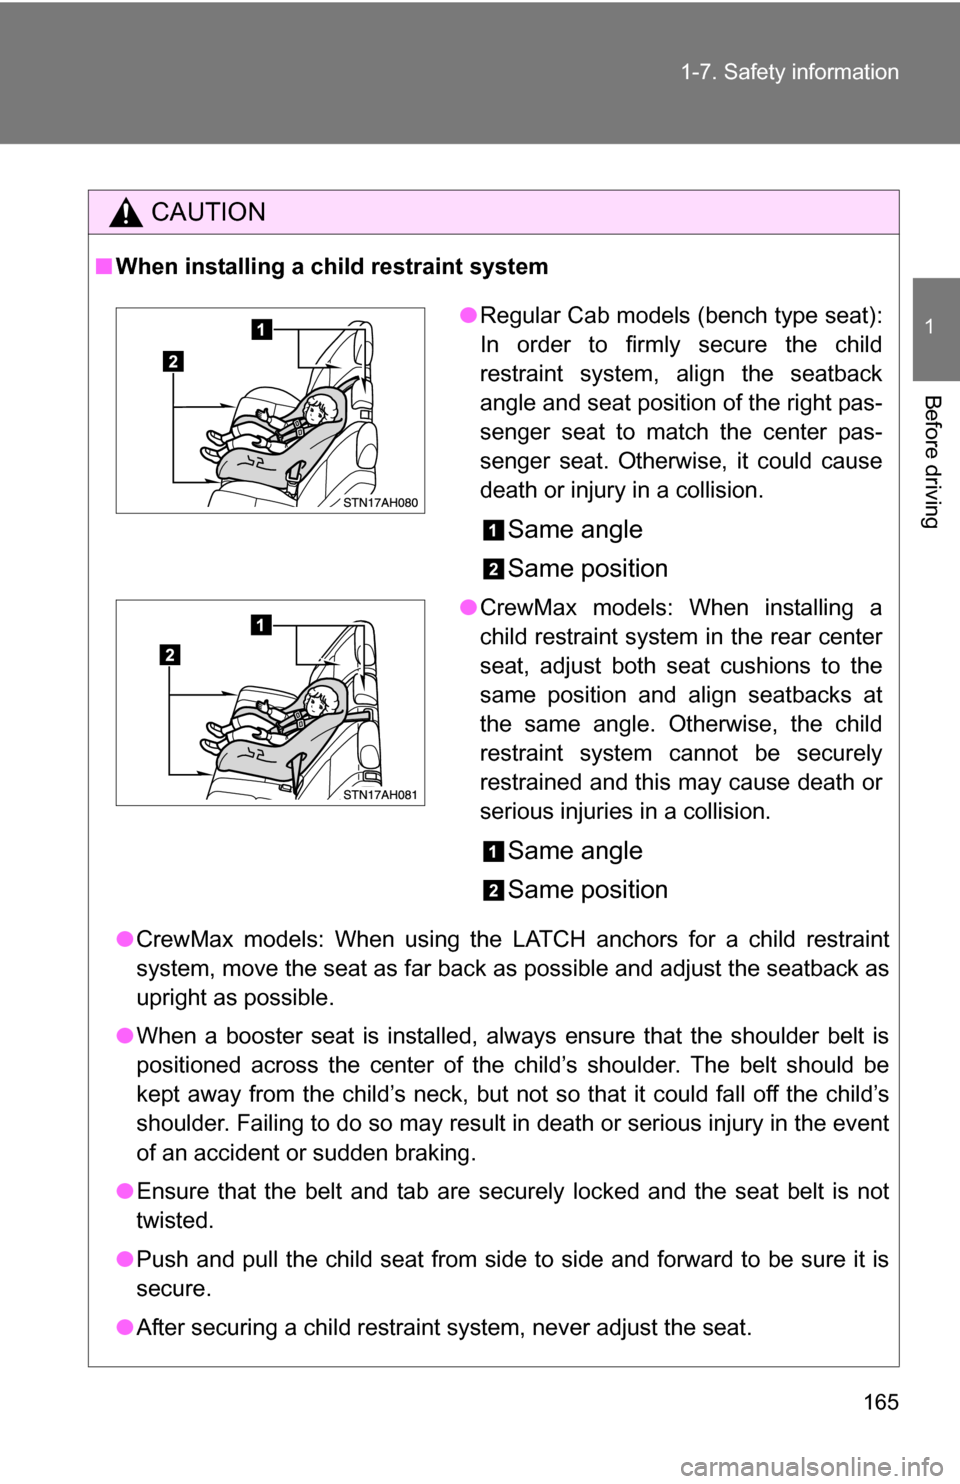
● Only put a forward-facing or booster
child seat on the front seat when it is
unavoidable. When installing a forward
-facing or booster child seat on the front
passenger seat, move the seat as far
back as possible even if the AIR BAG
OFF indicator light is illuminated. Fail-
ing to do so may result in death or seri-
ous injury if the airbags deploy (inflate).
Page 165 of 672

165
1-7. Safety information
1
Before driving
CAUTION
■
When installing a child restraint system
●CrewMax models: When using the LATCH anchors for a child restraint
system, move the seat as far back as possible and adjust the seatback as
upright as possible.
● When a booster seat is installed, always ensure that the shoulder belt is
positioned across the center of the child’s shoulder. The belt should be
kept away from the child’s neck, but not so that it could fall off the child’s
shoulder. Failing to do so may result in death or serious injury in the event
of an accident or sudden braking.
● Ensure that the belt and tab are securely locked and the seat belt is not
twisted.
● Push and pull the child seat from side to side and forward to be sure it is
secure.
● After securing a child restraint system, never adjust the seat.
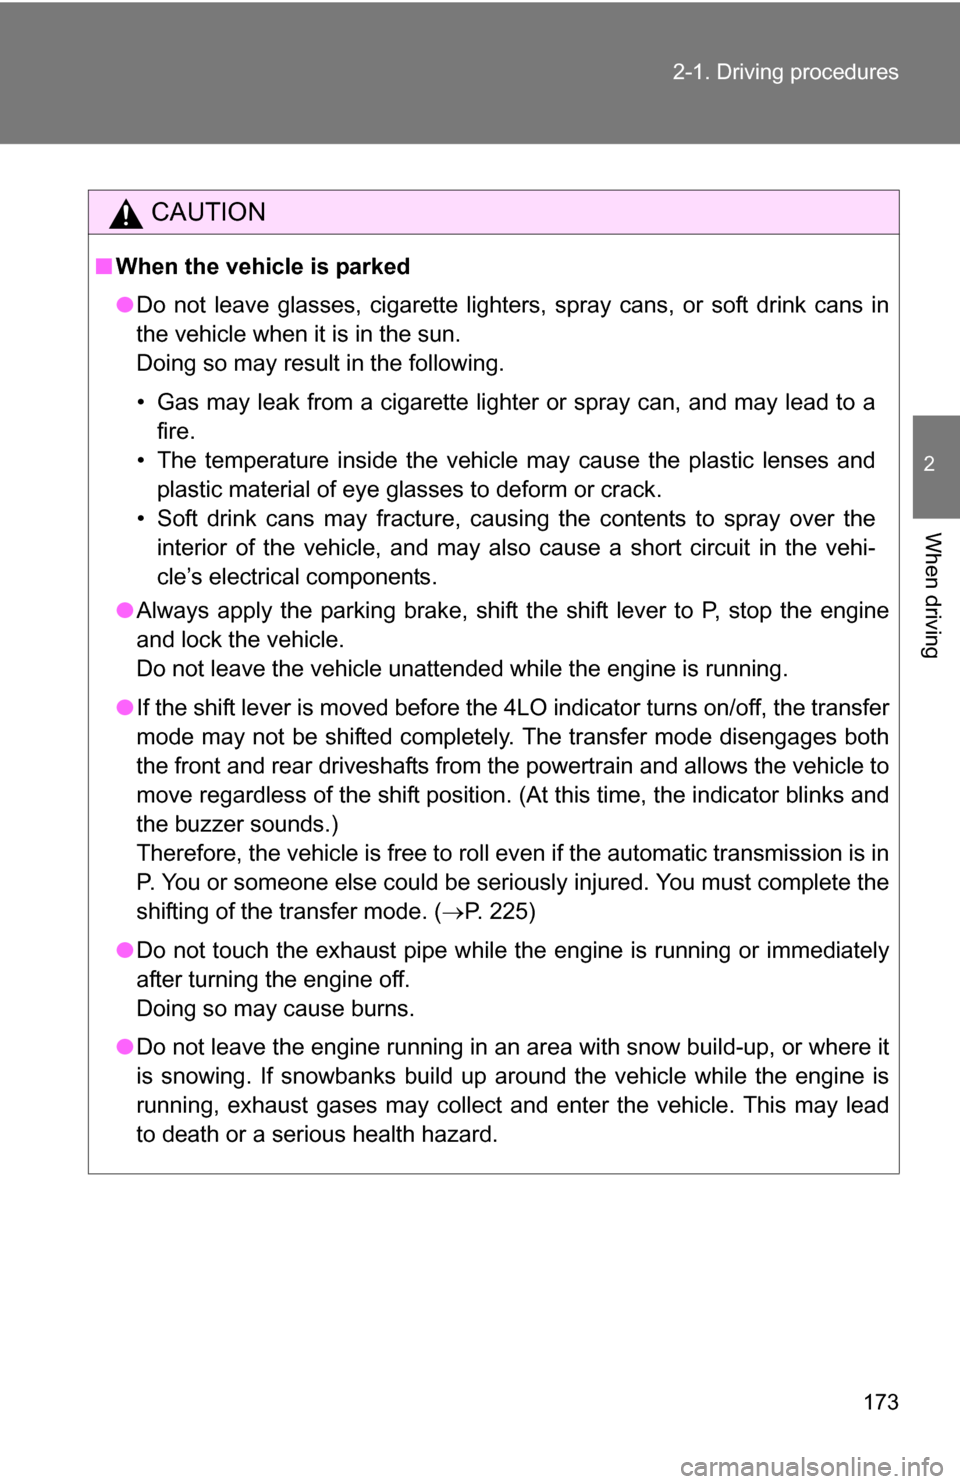
●Regular Cab models (bench type seat):
In order to firmly secure the child
restraint system, align the seatback
angle and seat position of the right pas-
senger seat to match the center pas-
senger seat. Otherwise, it could cause
death or injury in a collision.
Same angle
Same position
●CrewMax models: When installing a
child restraint system in the rear center
seat, adjust both seat cushions to the
same position and align seatbacks at
the same angle. Otherwise, the child
restraint system cannot be securely
restrained and this may cause death or
serious injuries in a collision.
Same angle
Same position
Page 168 of 672
168
2-1. Driving procedures
Driving the vehicle
The following procedures should be observed to ensure safe driv-
ing.
■ Starting the engine ( P. 177)
■ Driving
With the brake pedal depressed, shift the shift lever to D. ( P. 180)
Release the parking brake. ( P. 186)
Gradually release the brake pedal and gently depress the
accelerator pedal to accelerate the vehicle.
■ Stopping
With the shift lever in D, depress the brake pedal.
If necessary, set the parking brake.
When the vehicle is stopped for an extended period of time, shift
the shift lever to P or N. ( P. 180)
■Parking the vehicle
With the shift lever in D, depress the brake pedal.
Set the parking brake. ( P. 186)
Shift the shift lever to P. ( P. 180)
When parking on a hill, if necessary, block the wheels.
Turn the engine switch off to stop the engine.
Lock the door, making sure that you have the key on your
person.
Page 173 of 672

173
2-1. Driving procedures
2
When driving
CAUTION
■
When the vehicle is parked
●Do not leave glasses, cigarette lighters, spray cans, or soft drink cans in
the vehicle when it is in the sun.
Doing so may result in the following.
• Gas may leak from a cigarette lighter or spray can, and may lead to a
fire.
• The temperature inside the vehicle may cause the plastic lenses and plastic material of eye glasses to deform or crack.
• Soft drink cans may fracture, causing the contents to spray over the interior of the vehicle, and may also cause a short circuit in the vehi-
cle’s electrical components.
● Always apply the parking brake, shift the shift lever to P, stop the engine
and lock the vehicle.
Do not leave the vehicle unattended while the engine is running.
● If the shift lever is moved before the 4LO indicator turns on/off, the transfer
mode may not be shifted completely. The transfer mode disengages both
the front and rear driveshafts from the powertrain and allows the vehicle to
move regardless of the shift position. (At this time, the indicator blinks and
the buzzer sounds.)
Therefore, the vehicle is free to roll even if the automatic transmission is in
P. You or someone else could be seriously injured. You must complete the
shifting of the transfer mode. ( P. 225)
● Do not touch the exhaust pipe while the engine is running or immediately
after turning the engine off.
Doing so may cause burns.
● Do not leave the engine running in an area with snow build-up, or where it
is snowing. If snowbanks build up around the vehicle while the engine is
running, exhaust gases may collect and enter the vehicle. This may lead
to death or a serious health hazard.
Page 177 of 672
177
2-1. Driving procedures
2
When driving
Engine (ignition) switch
■Engine switch
LOCK
The steering wheel is locked
and the key can be removed.
ACC
Some electrical components
such as the audio system can
be used.
ON
All electrical components can
be used.
START
For starting the engine.
■Starting the engine
Check that the parking brake is set.
Check that the shift lever is set in P.
Sit in the driver’s seat and firmly depress the brake pedal.
Turn the engine switch to the START position and start the
engine.
The engine will crank until it starts or for up to 25 seconds, which-
ever is less. If you turn the engine switch, the engine will keep
cranking for about 30 seconds maximum.
Continue depressing the brake pedal until the engine is com-
pletely started.