2009 SUBARU FORESTER brake fluid
[x] Cancel search: brake fluidPage 255 of 384

8-8Driving tips
Winter driving
&Operation during cold weather
Carry some emergency equipment, such
as tire chains, a window scraper, a bag of
sand, flares, a small shovel, and jumpercables.
Check the battery and cables. Cold
temperatures reduce battery capacity.
The battery must be in good condition to
provide enough power for cold winterstarts.
Use an engine oil of proper grade and
viscosity for cold weather. Heavy summer
oil will cause harder starting.
Keep the door locks from freezing by squirting them with deicer or glycerin.
Forcing a frozen door open may damage
or separate the rubber weather strips
around the door. If the door is frozen,
use hot water to melt the ice, and after-
wards thoroughly wipe the water away.
Use a windshield washer fluid that con-
tains an antifreeze solution. Do not use
engine antifreeze or other substitutes
because they may damage the paint of
the vehicle.
SUBARU Windshield Washer Fluid con-
tains 58.5% methyl alcohol and 41.5%
surfactant, by volume. Its freezing tem-
perature varies according to how much it
is diluted, as indicated in the followingtable.
Washer Fluid Con- centration Freezing Temperature
30% 10.4 8F( �12 8C)
50% �48F( �20 8C)
100% �
49 8F( �45 8C)
In order to prevent freezing of washer
fluid, check the freezing temperatures in
the table above when adjusting the fluid
concentration to the outside temperature.
If you fill the reservoir tank with a fluid with
a different concentration from the one used previously, purge the old fluid from
the piping between the reservoir tank and
washer nozzles by operating the washer
for a certain period of time. Otherwise, if
the concentration of the fluid remaining in
the piping is too low for the outside
temperature, it may freeze and block thenozzles.
CAUTION
Adjust the washer fluid concentra-
tion appropriately for the outside
temperature. If the concentration is
inappropriate, sprayed washer fluid
may freeze on the windshield and
obstruct your view, and the fluid
may freeze in the reservoir tank.
! Before driving your vehicle
Before entering the vehicle, remove any
snow or ice from your shoes because that
could make the pedals slippery anddangerous.
While warming up the vehicle before
driving, check that the accelerator pedal,
brake pedal, and all other controls operate
smoothly.
Clear away ice and snow that has
accumulated under the fenders to avoid
making steering difficult. During severe
Page 270 of 384

!Driving on grades
. Before going down a steep hill, slow
down and shift into lower gear (if neces-
sary, use 1st gear) in order to utilize the
engine braking effect and prevent over-
heating of your vehicle ’s brakes. Do not
make sudden downshifts. . When driving uphill in hot weather, the
air conditioner may turn off automatically
to protect the engine from overheating. . When driving uphill in hot weather, pay
attention to the coolant temperature high
warning light (for all vehicles) and AT OIL
TEMP warning light (for AT vehicles) since
the engine and transmission are relatively
prone to overheating under these condi-
tions. If the coolant temperature high
warning light or the AT OIL TEMP warning
light illuminates, immediately switch off the
air conditioner and stop the vehicle at the
nearest safe place. Refer to the “Engine
overheating ”section in chapter 9, and
“ Warning and indicator lights ”section in
chapter 3. . If your vehicle has an automatic trans-
mission, avoid using the accelerator pedal
to stay stationary on an uphill slope
instead of using the parking brake or foot
brake. That may cause the transmission
fluid to overheat. . If your vehicle has an automatic trans-
mission, place the selector lever as follows:
Uphill slopes:
“D ”position
Downhill slopes: A low-speed gear posi-
tion to use engine braking ! Parking on a grade
Always block the wheels under both
vehicle and trailer when parking. Apply
the parking brake firmly. You should not
park on a hill or slope. But if parking on a
hill or slope cannot be avoided, you
should take the following steps:
1. Apply the brakes and hold the pedal down.
2. Have someone place wheel blocks
under both the vehicle and trailer wheels.
3. When the wheel blocks are in place,
release the regular brakes slowly until the
blocks absorb the load.
4. Apply the regular brakes and then
apply the parking brake; slowly release
the regular brakes.
5. Shift into 1st or reverse gear (manual
transmission) or “P ” (automatic transmis-
sion) and shut off the engine. Driving tips
8-23
Page 291 of 384

10-2Appearance care
Exterior care &Washing
CAUTION
. When washing the vehicle, the
brakes may get wet. As a result,
the brake stopping distance will
be longer. To dry the brakes,
drive the vehicle at a safe speed
while lightly pressing the brake
pedal to heat up the brakes.
. Do not wash the engine compart-
ment and area adjacent to it. If
water enters the engine air in-
take, electrical parts or the power
steering fluid reservoir, it will
cause engine trouble or faulty
power steering respectively.
. Since your vehicle is equipped
with a rear wiper, automatic car-
wash brushes could become
tangled around it, damaging the
wiper arm and other compo-
nents. Ask the automatic car-
wash operator not to let the
brushes touch the wiper arm or
to fix the wiper arm on the rear
window glass with adhesive tape
before operating the machine. NOTE
When having your vehicle washed in
an automatic car wash, make sure
beforehand that the car wash is of
suitable type.
The best way to preserve your vehicle
’s
beauty is frequent washing. Wash the
vehicle at least once a month to avoid
contamination by road grime.
Wash dirt off with a wet sponge and plenty
of lukewarm or cold water. Do not wash
the vehicle with hot water and in direct sunlight.
Salt, chemicals, insects, tar, soot, tree
sap, and bird droppings should be washed
off by using a light detergent, as required.
If you use a light detergent, make certain
that it is a neutral detergent. Do not use
strong soap or chemical detergents. All
cleaning agents should be promptly
flushed from the surface and not allowed
to dry there. Rinse the vehicle thoroughly
with plenty of lukewarm water. Wipe the
remaining water off with a chamois or softcloth. ! Washing the underbody
Chemicals, salts and gravel used for
deicing road surfaces are extremely cor-
rosive, accelerating the corrosion of un-
derbody components, such as the exhaust system, fuel and brake lines, brake
cables, floor pan and fenders, and sus-pension.
Thoroughly flush the underbody and in-
side of the fenders with lukewarm or cold
water at frequent intervals to reduce the
harmful effects of such agents.
Mud and sand adhering to the underbody
components may accelerate their corro-sion.
After driving off-road or on muddy or
sandy roads, wash the mud and sand off
the underbody. Carefully flush the suspen-
sion and axle parts, as they are particu-
larly prone to mud and sand buildup. Do
not use a sharp-edged tool to remove
caked mud. NOTE
Be careful not to damage brake hoses,
sensor harnesses, and other parts
when washing suspension compo-nents. !
Using a warm water washer
. Keep a good distance of 12 in (30 cm)
or more between the washer nozzle and
the vehicle. . Do not wash the same area continu-
ously.. If a stain will not come out easily, wash
Page 296 of 384

Maintenance schedule....................................... 11-3
Maintenance precautions ................................... 11-3
Before checking or servicing in the engine compartment .................................................... 11-4
When you do checking or servicing in the engine compartment while the engine is running .......... 11-4
Engine hood ....................................................... 11-5
Engine compartment overview .......................... 11-6
Non-turbo models .............................................. 11-6
Turbo models ..................................................... 11-7
Engine oil ............................................................ 11-8
Checking the oil level ......................................... 11-8
Changing the oil and oil filter .............................. 11-9
Recommended grade and viscosity .................. 11-11
Recommended grade and viscosity under severe driving conditions .......................................... 11-12
Synthetic oil ..................................................... 11-12
Cooling system ................................................ 11-12
Cooling fan, hose and connections ................... 11-12
Engine coolant ................................................. 11-13
Air cleaner element .......................................... 11-15
Replacing the air cleaner element ..................... 11-16
Spark plugs ...................................................... 11-18
Recommended spark plugs .............................. 11-18
Drive belts ........................................................ 11-18
Manual transmission oil .................................. 11-19
Checking the oil level ....................................... 11-19
Recommended grade and viscosity .................. 11-20
Automatic transmission fluid .......................... 11-20
Checking the fluid level .................................... 11-20 Recommended fluid
......................................... 11-21
Front differential gear oil (AT vehicles) .......... 11-21
Checking the oil level ...................................... 11-21
Recommended grade and viscosity .................. 11-22
Rear differential gear oil .................................. 11-22
Checking the gear oil level ............................... 11-22
Recommended grade and viscosity .................. 11-23
Power steering fluid ........................................ 11-24
Checking the fluid level .................................... 11-24
Recommended fluid ......................................... 11-25
Brake fluid ........................................................ 11-25
Checking the fluid level .................................... 11-25
Recommended brake fluid ............................... 11-26
Clutch fluid (MT vehicles) ............................... 11-26
Checking the fluid level .................................... 11-26
Recommended clutch fluid ............................... 11-27
Brake booster .................................................. 11-27
Brake pedal ...................................................... 11-28
Checking the brake pedal free play .................. 11-28
Checking the brake pedal reserve distance....... 11-28
Clutch pedal (MT vehicles) .............................. 11-28
Checking the clutch function ............................ 11-28
Checking the clutch pedal free play .................. 11-29
Hill start assist system (MT vehicles) ............ 11-29
Replacement of brake pad and lining ............ 11-29
Breaking-in of new brake pads and linings ....... 11-30
Parking brake stroke ....................................... 11-30
Tires and wheels .............................................. 11-31
Types of tires ................................................... 11-31
Maintenance and service
11
Page 299 of 384

11-4Maintenance and service
guard against getting oil or fluids
in your eyes. If something does
get in your eyes, thoroughly
wash them out with clean water.
. Do not tamper with the wiring of
the SRS airbag system or seat-
belt pretensioner system, or at-
tempt to take its connectors
apart, as that may activate the
system or it can render it inop-
erative. The wiring and connec-
tors of these systems are yellow
for easy identification. NEVER
use a circuit tester for this wiring.
If your SRS airbag or seatbelt
pretensioner needs service, con-
sult your nearest SUBARU deal-
er. &
Before checking or servicing
in the engine compartment
WARNING
. Always stop the engine and set
the parking brake firmly to pre-
vent the vehicle from moving.
. Always let the engine cool down.
Engine parts become very hot
when the engine is running and
remain hot for some time after
the engine is stopped.
. Do not spill engine oil, engine
coolant, brake fluid or any other
fluid on hot engine components.
This may cause a fire.
. Always remove the key from the
ignition switch. When the ignition
switch is in the “ON ”position,
thecoolingfanmayoperate
suddenly even when the engine
is stopped.
. Before performing any servicing
on a vehicle equipped with a
remote engine start system (a
dealer option) temporarily place
that system in the service mode
to prevent it from unexpectedly
starting the engine. &
When you do checking or
servicing in the engine com-
partment while the engine is running
WARNING
A running engine can be dangerous.
Keep your fingers, hands, clothing,
hair and tools away from the cooling
fan, belts and any other moving
engine parts. Removing rings,
watches and ties is advisable.
Page 301 of 384

11-6Maintenance and service
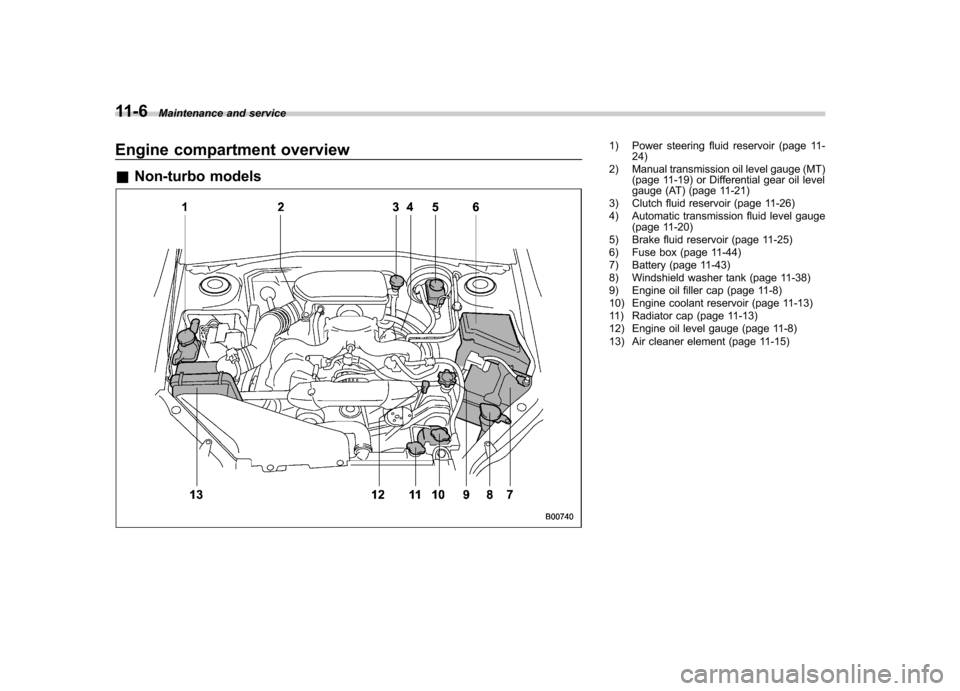
Engine compartment overview &Non-turbo models1) Power steering fluid reservoir (page 11-
24)
2) Manual transmission oil level gauge (MT) (page 11-19) or Differential gear oil level
gauge (AT) (page 11-21)
3) Clutch fluid reservoir (page 11-26)
4) Automatic transmission fluid level gauge (page 11-20)
5) Brake fluid reservoir (page 11-25)
6) Fuse box (page 11-44)
7) Battery (page 11-43)
8) Windshield washer tank (page 11-38)
9) Engine oil filler cap (page 11-8)
10) Engine coolant reservoir (page 11-13)
11) Radiator cap (page 11-13)
12) Engine oil level gauge (page 11-8)
13) Air cleaner element (page 11-15)
Page 302 of 384

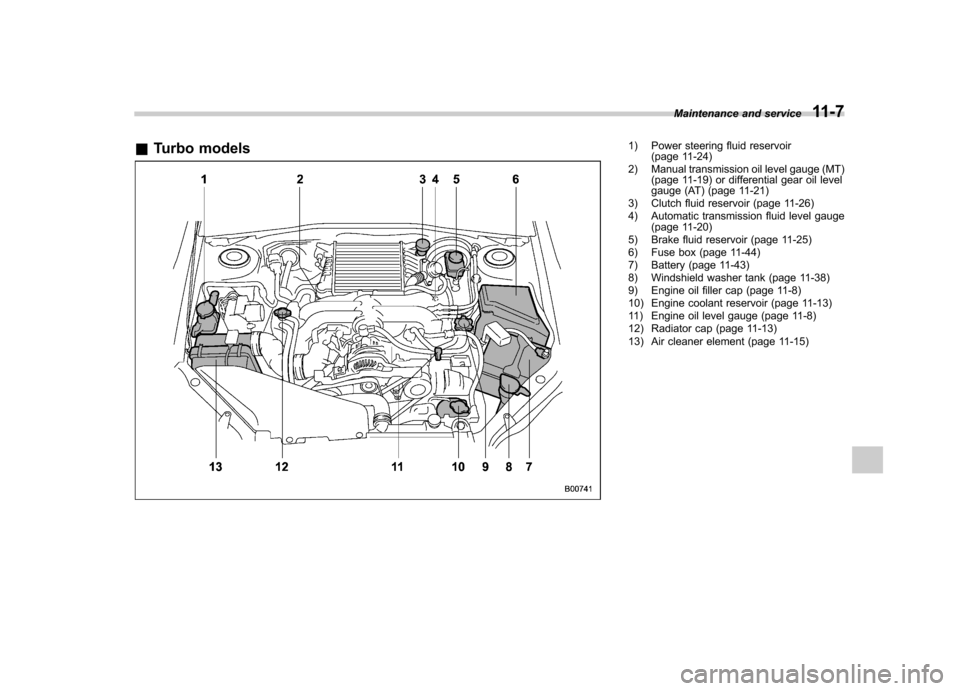
&Turbo models1) Power steering fluid reservoir
(page 11-24)
2) Manual transmission oil level gauge (MT) (page 11-19) or differential gear oil level
gauge (AT) (page 11-21)
3) Clutch fluid reservoir (page 11-26)
4) Automatic transmission fluid level gauge (page 11-20)
5) Brake fluid reservoir (page 11-25)
6) Fuse box (page 11-44)
7) Battery (page 11-43)
8) Windshield washer tank (page 11-38)
9) Engine oil filler cap (page 11-8)
10) Engine coolant reservoir (page 11-13)
11) Engine oil level gauge (page 11-8)
12) Radiator cap (page 11-13)
13) Air cleaner element (page 11-15) Maintenance and service
11-7
Page 315 of 384

11-20Maintenance and service
&Recommended grade and viscosity
Each oil manufacturer has its own base
oils and additives. Never use different
brands together.
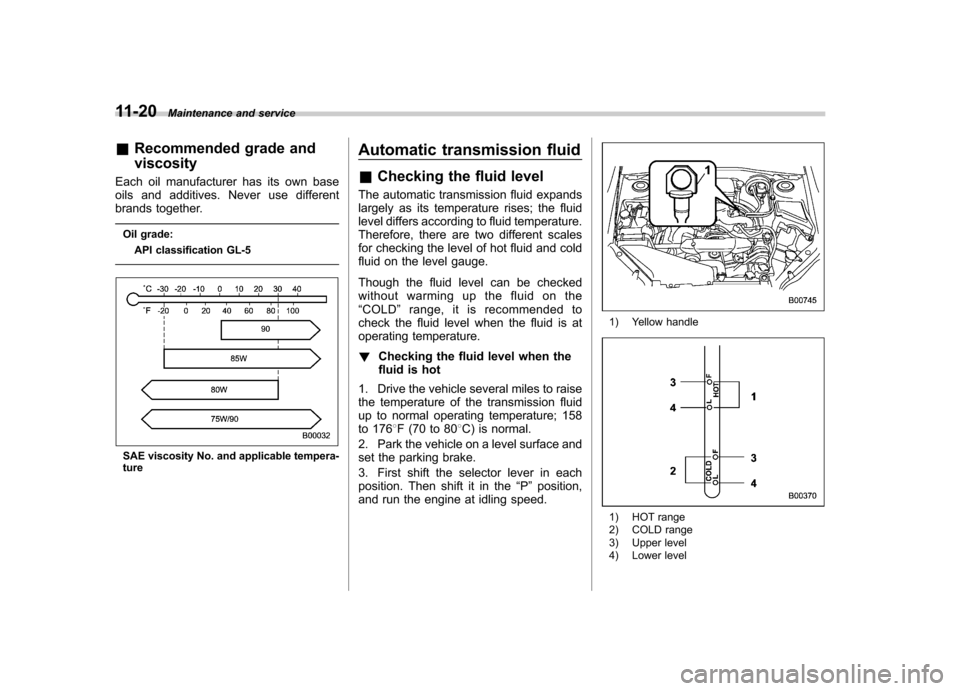
Oil grade: API classification GL-5
SAE viscosity No. and applicable tempera- ture Automatic transmission fluid &
Checking the fluid level
The automatic transmission fluid expands
largely as its temperature rises; the fluid
level differs according to fluid temperature.
Therefore, there are two different scales
for checking the level of hot fluid and cold
fluid on the level gauge.
Though the fluid level can be checked
without warming up the fluid on the“ COLD ”range, it is recommended to
check the fluid level when the fluid is at
operating temperature. ! Checking the fluid level when the
fluid is hot
1. Drive the vehicle several miles to raise
the temperature of the transmission fluid
up to normal operating temperature; 158
to 176 8F (70 to 80 8C) is normal.
2. Park the vehicle on a level surface and
set the parking brake.
3. First shift the selector lever in each
position. Then shift it in the “P ” position,
and run the engine at idling speed.
1) Yellow handle
1) HOT range
2) COLD range
3) Upper level
4) Lower level