2009 SUBARU FORESTER ECO mode
[x] Cancel search: ECO modePage 36 of 384

According to accident statistics,
children are safer when properly
restrained in the rear seating
positions than in the front seat-
ing positions. For instructions
and precautions concerning the
child restraint system, refer tothe“Child restraint systems ”
section in this chapter.
Your vehicle is equipped with a crash
sensing and diagnostic module, which will
record the use of the seatbelt by the front
passenger when any of the SRS frontal
and side airbags deploy. ! Infants or small children
Use a child restraint system that is
suitable for your vehicle. Refer to the“ Child restraint systems ”section in this
chapter. ! Children
If a child is too big for a child restraint
system, the child should sit in the rear seat
and be restrained using the seatbelts.
According to accident statistics, children
are safer when properly restrained in the
rear seating positions than in the front
seating positions. Never allow a child to
stand up or kneel on the seat.
If the shoulder portion of the belt crosses the face or neck, adjust the shoulder belt
anchor height (window-side seating posi-
tions only) and then if necessary move the
child closer to the belt buckle to help
provide a good shoulder belt fit. Care must
be taken to securely place the lap belt as
low as possible on the hips and not on thechild
’s waist. If the shoulder portion of the
belt cannot be properly positioned, a child
restraint system should be used. Never
place the shoulder belt under the child ’s
arm or behind the child ’s back.
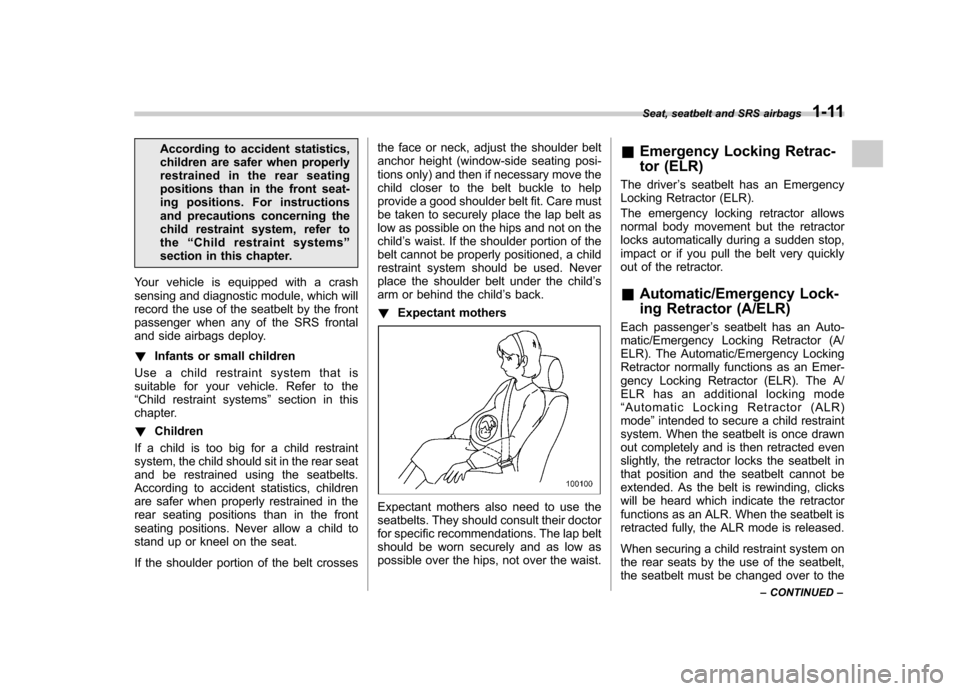
! Expectant mothers
Expectant mothers also need to use the
seatbelts. They should consult their doctor
for specific recommendations. The lap belt
should be worn securely and as low as
possible over the hips, not over the waist. &
Emergency Locking Retrac-
tor (ELR)
The driver ’s seatbelt has an Emergency
Locking Retractor (ELR).
The emergency locking retractor allows
normal body movement but the retractor
locks automatically during a sudden stop,
impact or if you pull the belt very quickly
out of the retractor. & Automatic/Emergency Lock-
ing Retractor (A/ELR)
Each passenger ’s seatbelt has an Auto-
matic/Emergency Locking Retractor (A/
ELR). The Automatic/Emergency Locking
Retractor normally functions as an Emer-
gency Locking Retractor (ELR). The A/
ELR has an additional locking mode“ Automatic Locking Retractor (ALR)
mode ”intended to secure a child restraint
system. When the seatbelt is once drawn
out completely and is then retracted even
slightly, the retractor locks the seatbelt in
that position and the seatbelt cannot be
extended. As the belt is rewinding, clicks
will be heard which indicate the retractor
functions as an ALR. When the seatbelt is
retracted fully, the ALR mode is released.
When securing a child restraint system on
the rear seats by the use of the seatbelt,
the seatbelt must be changed over to the Seat, seatbelt and SRS airbags
1-11
– CONTINUED –
Page 37 of 384

1-12Seat, seatbelt and SRS airbags
Automatic Locking Retractor (ALR) mode.
When the child restraint system is re-
moved, make sure that the seatbelt
retracts fully and the retractor returned to
the Emergency Locking Retractor (ELR) mode.
For instructions on how to convert the
retractor to the ALR mode and restore it to
the ELR mode, refer to the “Child restraint
systems ”section in this chapter.
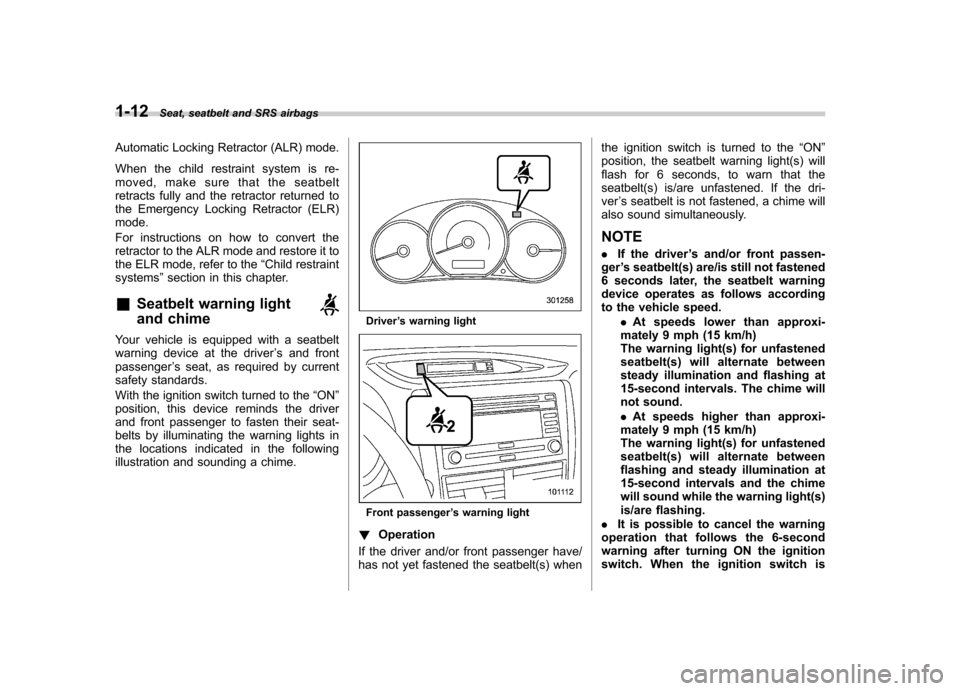
& Seatbelt warning light
and chime
Your vehicle is equipped with a seatbelt
warning device at the driver ’s and front
passenger ’s seat, as required by current
safety standards.
With the ignition switch turned to the “ON ”
position, this device reminds the driver
and front passenger to fasten their seat-
belts by illuminating the warning lights in
the locations indicated in the following
illustration and sounding a chime.
Driver ’s warning light
Front passenger ’s warning light
! Operation
If the driver and/or front passenger have/
has not yet fastened the seatbelt(s) when the ignition switch is turned to the
“ON ”
position, the seatbelt warning light(s) will
flash for 6 seconds, to warn that the
seatbelt(s) is/are unfastened. If the dri-ver ’s seatbelt is not fastened, a chime will
also sound simultaneously. NOTE . If the driver ’s and/or front passen-
ger ’s seatbelt(s) are/is still not fastened
6 seconds later, the seatbelt warning
device operates as follows according
to the vehicle speed.
.At speeds lower than approxi-
mately 9 mph (15 km/h)
The warning light(s) for unfastened
seatbelt(s) will alternate between
steady illumination and flashing at
15-second intervals. The chime will
not sound. . At speeds higher than approxi-
mately 9 mph (15 km/h)
The warning light(s) for unfastened
seatbelt(s) will alternate between
flashing and steady illumination at
15-second intervals and the chime
will sound while the warning light(s)
is/are flashing.
. It is possible to cancel the warning
operation that follows the 6-second
warning after turning ON the ignition
switch. When the ignition switch is
Page 53 of 384

1-28Seat, seatbelt and SRS airbags
8. If the child restraint system requires a
top tether, latch the hook onto the top
tether anchorage and tighten the top
tether. Refer to “Top tether anchorages ”
in this section for additional instructions.
9. To remove the child restraint system,
press the release button on the seatbelt
buckle and allow the belt to retract
completely. The belt will return to the
ELR mode. NOTE
When the child restraint system is no
longer in use, remove it and restore the
ELR function of the retractor. That
function is restored by allowing the
seatbelt to retract fully. & Installing a booster seat
WARNING
. Child restraint systems and seat-
belts can become hot in a vehicle
that has been closed up in sunny
weather; they could burn a small
child. Check the child restraint
system before you place a child
in it.
. Do not leave an unsecured child
restraint system in your vehicle.
Unsecured child restraint sys-
tems can be thrown around in-
side of the vehicle in a sudden
stop, turn or accident; they can
strike and injure vehicle occu-
pants as well as result in serious injuries or death to the child.
CAUTION
When you install a child restraint
system, follow the manufacturer ’s
instructions supplied with it. After
installing the child restraint system,
check to ensure that it is held
securely in position. If it is not held
tight and secure, the danger of your
child suffering personal injury in the
event of an accident may be in-creased.
1. Place the booster seat in the rear
seating position and sit the child on it. The
child should sit well back on the booster
Page 74 of 384

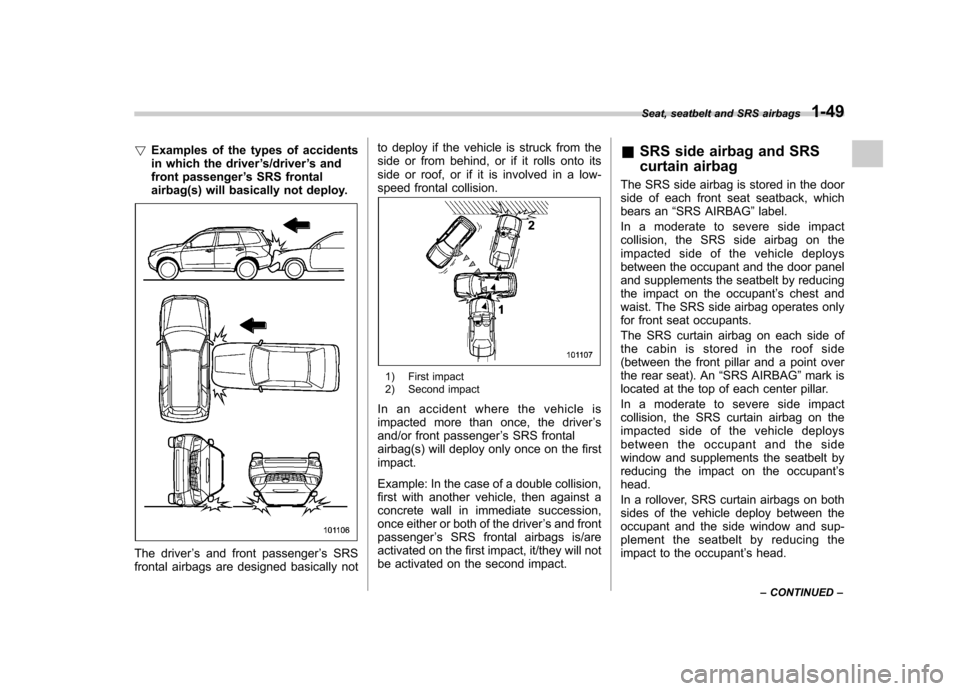
!Examples of the types of accidents
in which the driver ’s/driver ’s and
front passenger ’s SRS frontal
airbag(s) will basically not deploy.
The driver ’s and front passenger ’s SRS
frontal airbags are designed basically not to deploy if the vehicle is struck from the
side or from behind, or if it rolls onto its
side or roof, or if it is involved in a low-
speed frontal collision.
1) First impact
2) Second impact
In an accident where the vehicle is
impacted more than once, the driver ’s
and/or front passenger ’s SRS frontal
airbag(s) will deploy only once on the firstimpact.
Example: In the case of a double collision,
first with another vehicle, then against a
concrete wall in immediate succession,
once either or both of the driver ’s and front
passenger ’s SRS frontal airbags is/are
activated on the first impact, it/they will not
be activated on the second impact. &
SRS side airbag and SRS
curtain airbag
The SRS side airbag is stored in the door
side of each front seat seatback, which
bears an “SRS AIRBAG ”label.
Inamoderatetoseveresideimpact
collision, the SRS side airbag on the
impacted side of the vehicle deploys
between the occupant and the door panel
and supplements the seatbelt by reducing
the impact on the occupant ’s chest and
waist. The SRS side airbag operates only
for front seat occupants.
The SRS curtain airbag on each side of
the cabin is stored in the roof side
(between the front pillar and a point over
the rear seat). An “SRS AIRBAG ”mark is
located at the top of each center pillar.
Inamoderatetoseveresideimpact
collision, the SRS curtain airbag on the
impacted side of the vehicle deploys
between the occupant and the side
window and supplements the seatbelt by
reducing the impact on the occupant ’s
head.
In a rollover, SRS curtain airbags on both
sides of the vehicle deploy between the
occupant and the side window and sup-
plement the seatbelt by reducing the
impact to the occupant ’s head.
Seat, seatbelt and SRS airbags
1-49
– CONTINUED –
Page 103 of 384

2-16Keys and doors
flashing rapidly. After rapid flashing for 30
seconds (standby time), the indicator
lights will then flash slowly (twice approxi-
mately every 2 seconds), indicating that
the system has been armed for surveil-lance. NOTE . The system can be armed even if the
engine hood, the windows and/or
moonroof (if equipped) are open. Al-
ways make sure that they are fully
closed before arming the system.. The 30-second standby time can be
eliminated if you prefer. Have it per-
formed by your SUBARU dealer.. The system is in the standby mode
for a 30-second period after locking the
doors with the remote transmitter. The
security indicator light will flash at
short intervals during this period.. If any of the following actions are
done during the standby period, the
system will not switch to the surveil-
lance state.
–Doors are unlocked using the
remote transmitter. – Any door (including the rear
gate) is opened.– Ignition switch is turned to the
“ ON ”position. &
Disarming the system
Briefly press the “
”button (for less than
2 seconds) on the remote transmitter. The driver ’s door will unlock, an electronic
chirp will sound twice, the turn signal
lights will flash twice. The flashing of the
security indicator light will then change
slowly (once approximately every 3 sec-
onds from twice approximately every 2
seconds), indicating that the alarm system
has been disarmed. NOTE
After disarming the alarm system,
briefly press the “
”button a second
time within 5 seconds to unlock all
other doors and the rear gate. ! Emergency disarming
If you cannot disarm the system using the
transmitter (i.e. the transmitter is lost,
broken or the transmitter battery is too
weak), you can disarm the system without
using the transmitter.
The system can be disarmed as follows. . Turn the ignition switch from the
“ LOCK ”to the “ON ”position with a
registered key.
& Valet mode
When you choose the valet mode, the
alarm system does not operate. In valet mode, the remote transmitter is used only
for locking and unlocking the doors and
rear gate and panic activation.
To enter the valet mode, change the
setting of your vehicle
’s alarm system for
deactivation mode. Refer to “Activating
and deactivating the alarm system ”in this
section. The security indicator light will
continue to flash once every 3 seconds
indicating that the system is in the valetmode.
To exit valet mode, change the setting of
your vehicle ’s alarm system for activation
mode. Refer to “Activating and deactivat-
ing the alarm system ”in this section.
& Passive arming
When passive arming mode has been
programmed by the dealer, arming of the
system is automatically accomplished
without using the remote transmitter. Note
that in this mode, DOORS MUST BE
MANUALLY LOCKED. ! To enter the passive mode
If you wish to program the passive arming
mode, have it done by your SUBARU
dealer.
Page 104 of 384

!Arming the system
CAUTION
In passive mode, the system will
automatically activate the alarm but
WILL NOT automatically lock the
doors. In order to lock the doors
you must either lock them as in-
dicated in step 4 below or with the
key once they have been closed.
Failure to lock the doors manually
will result in a higher security risk.
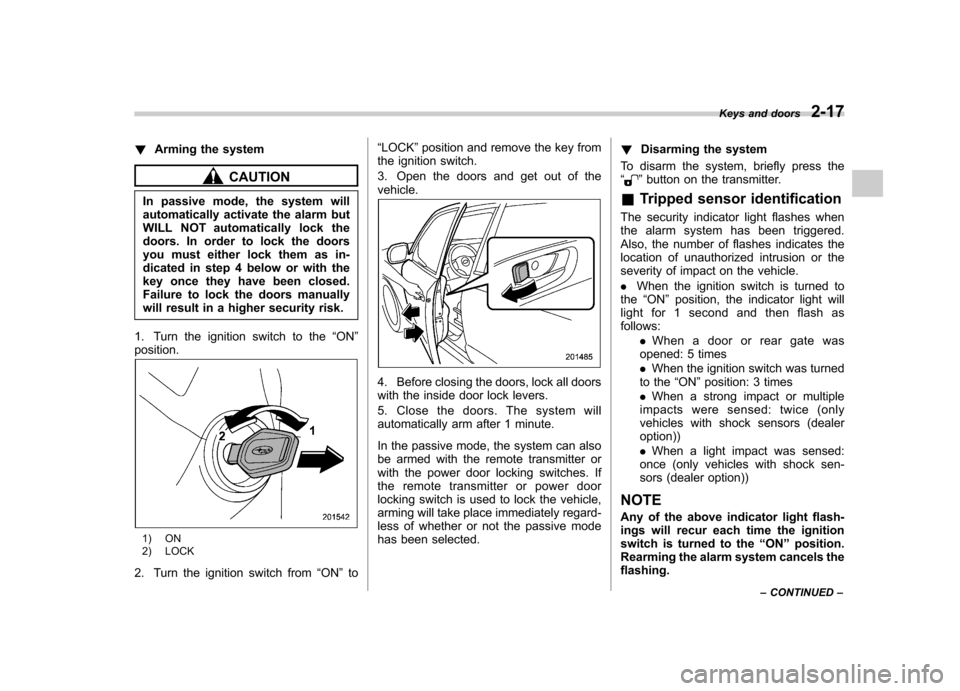
1. Turn the ignition switch to the “ON ”
position.
1) ON
2) LOCK
2. Turn the ignition switch from “ON ”to “
LOCK ”position and remove the key from
the ignition switch.
3. Open the doors and get out of the vehicle.
4. Before closing the doors, lock all doors
with the inside door lock levers.
5. Close the doors. The system will
automatically arm after 1 minute.
In the passive mode, the system can also
be armed with the remote transmitter or
with the power door locking switches. If
the remote transmitter or power door
locking switch is used to lock the vehicle,
arming will take place immediately regard-
less of whether or not the passive mode
has been selected. !
Disarming the system
To disarm the system, briefly press the “
” button on the transmitter.
& Tripped sensor identification
The security indicator light flashes when
the alarm system has been triggered.
Also, the number of flashes indicates the
location of unauthorized intrusion or the
severity of impact on the vehicle. . When the ignition switch is turned to
the “ON ”position, the indicator light will
light for 1 second and then flash as follows:
.When a door or rear gate was
opened: 5 times . When the ignition switch was turned
to the “ON ”position: 3 times
. When a strong impact or multiple
impacts were sensed: twice (only
vehicles with shock sensors (dealeroption)) . When a light impact was sensed:
once (only vehicles with shock sen-
sors (dealer option))
NOTE
Any of the above indicator light flash-
ings will recur each time the ignition
switch is turned to the “ON ”position.
Rearming the alarm system cancels theflashing. Keys and doors
2-17
– CONTINUED –
Page 125 of 384

3-14Instruments and controls
CAUTION
Do not operate the engine with the
oil pressure warning light on. This
may cause serious engine damage.
& AT OIL TEMP warning
light (AT vehicles)
The AT oil temperature warning light “AT
OIL TEMP ”illuminates when the ignition
switch is turned to the “ON ”position and
turns off after the engine has started.
If this light illuminates when the engine is
running, it may indicate that the automatic
transmission fluid temperature is too hot.
If the light illuminates while driving, im-
mediately stop the vehicle in a safe place
and let the engine idle until the warning
light turns off. ! Automatic transmission control
system warning
If the light flashes after the engine starts, it
may indicate that the automatic transmis-
sion control system is not working prop-
erly. Contact your nearest SUBARU deal-
er for service immediately. &
Low tire pressure
warning light (U.S.-spec.models)
When the ignition switch is turned to the “ON ”position, the low tire pressure warn-
ing light will illuminate for approximately 2
seconds to check that the tire pressure
monitoring system (TPMS) is functioning
properly. If there is no problem and all tires
are properly inflated, the light will turn off.
Each tire, including the spare (if provided),
should be checked monthly when cold
and inflated to the inflation pressure
recommended by the vehicle manufac-
turer on the vehicle placard or tire inflation
pressure label. (If your vehicle has tires of
a different size than the size indicated on
the vehicle placard or tire inflation pres-
sure label, you should determine the
proper inflation pressure for those tires.)
As an added safety feature, your vehicle
has been equipped with a tire pressure
monitoring system (TPMS) that illuminates
a low tire pressure telltale when one or
more of your tires is significantly under-
inflated. Accordingly, when the low tire
pressure telltale illuminates, you should
stop and check your tires as soon as
possible, and inflate them to the proper
pressure. Driving on a significantly under-
inflated tire causes the tire to overheat and can lead to tire failure. Under-inflation also
reduces fuel efficiency and tire tread life,
and may affect the vehicle
’s handling and
stopping ability.
Please note that the TPMS is not a
substitute for proper tire maintenance,
and it is the driver ’s responsibility to
maintain correct tire pressure, even if
under-inflation has not reached the level
to trigger illumination of the TPMS low tire
pressure telltale.
Your vehicle has also been equipped with
a TPMS malfunction indicator to indicate
when the system is not operating properly.
The TPMS malfunction indicator is com-
bined with the low tire pressure telltale.
When the system detects a malfunction,
the telltale will flash for approximately one
minute and then remain continuously
illuminated. This sequence will continue
upon subsequent vehicle start-ups as long
as the malfunction exists. When the
malfunction indicator is illuminated, the
system may not be able to detect or signal
low tire pressure as intended. TPMS
malfunctions may occur for a variety of
reasons, including the installation of re-
placement or alternate tires or wheels on
the vehicle that prevent the TPMS from
functioning properly. Always check the
TPMS malfunction telltale after replacing
one or more tires or wheels on your
Page 131 of 384

3-20Instruments and controls
NOTE
Even if the security indicator light
flashes irregularly or its fuse blows
(the light does not flash if its fuse is
blown), the immobilizer system will
function normally. & SPORT mode indicator
light (AT vehicles)
This light illuminates when the ignition
switch is turned to the “ON ”position and
turns off after the engine has started.
When the selector lever is moved to the
manual gate, the SPORT mode is se-
lected and the indicator light illuminates.
Refer to the “SPORT mode ”section in
chapter 7. &
Selector lever and gear posi-
tion indicator (AT vehicles)
This indicator shows the position of the
selector lever.
When the manual mode is selected, the
gear position indicator (which shows the
current gear selection) and the upshift/
downshift indicator light up. Refer to the“Automatic transmission ”section in chap-
ter 7. & Turn signal indicator lights
These lights show the operation of the turn
signal or lane change signal.
If the indicator lights do not blink or blink
rapidly, the turn signal bulb may be burned
out. Replace the bulb as soon as possible. Refer to the
“Replacing bulbs ”section in
chapter 11.
& High beam indicator light
This light shows that the headlights are in
the high beam mode.
This indicator light also illuminates when
the headlight flasher is operated. &Cruise control indica-
tor light
The cruise control indicator light illumi-
nates when the ignition switch is turned tothe “ON ”position and turns off after
approximately 3 seconds.
This light illuminates when the “CRUISE ”
main switch is pressed.
If you press the main switch button while
turning the ignition switch “ON ”, the cruise
control function is deactivated and the“ CRUISE ”indicator light flashes. To re-
activate the cruise control function, turn
the ignition switch back to the “Acc ”or
“ LOCK ”position, and then turn it again to
the “ON ”position.