2009 SUBARU FORESTER differential
[x] Cancel search: differentialPage 263 of 384
8-16Driving tips
watercraft. &When you do not tow a trailer
. Remove the ball mount from the hitch
receiver tube and insert the receiver cover
onto the hitch receiver tube. . Place the dust cap over the four-pin
connector of the hitch wire harness to
protect against possible damage. . Occasionally lubricate terminals of the
four-pin connector using terminal grease. Trailer towing
Your vehicle is designed and intended to
be used primarily as a passenger-carrying
vehicle. Towing a trailer puts additional
loads on your vehicle
’s engine, drivetrain,
brakes, tires and suspension and has an
adverse effect on fuel economy.
If you do decide to tow a trailer, your safety
and satisfaction depend upon proper use
of correct equipment and cautious opera-
tion of your vehicle. Seek the advice of
your SUBARU dealer to assist you in
purchasing a hitch and other necessary
towing equipment appropriate for your
vehicle. In addition, be sure to follow the
instructions on correct installation and use
provided by the trailer and other towing
equipment manufacturers.
SUBARU assumes no responsibility for
injuries or vehicle damage that result from
trailer towing equipment, or from any
errors or omissions in the instructions
accompanying such equipment or for your
failure to follow the proper instructions.
& Warranties and maintenance
SUBARU warranties do not apply to
vehicle damage or malfunction caused
by trailer towing. If you use your vehicle to
tow a trailer, more frequent maintenance
will be required due to the additional load. (Refer to
“Maintenance schedule under
severe driving conditions ”in the “Warranty
and Maintenance Booklet ”.)
Under no circumstances should a trailer
be towed with a new vehicle or a vehicle
with any new powertrain component (en-
gine, transmission, differential, wheel
bearings, etc.) for the first 1,000 miles
(1,600 km) of driving.
& Maximum load limits
WARNING
Never exceed the maximum load
limits explained in the following.
Exceeding the maximum load limits
could cause personal injury and/or
vehicle damage.
CAUTION
. Adequate size trailer brakes are
required when the trailer and its
cargo exceed 1,000 lbs (453 kg)
total weight.
. Before towing a trailer, check the
trailer total weight, GVW, GAWs
and tongue load. Make sure the
load and its distribution in your
vehicle and trailer are accepta-
Page 283 of 384
9-12In case of emergency
Towing
If towing is necessary, it is best done by
your SUBARU dealer or a commercial
towing service. Observe the following
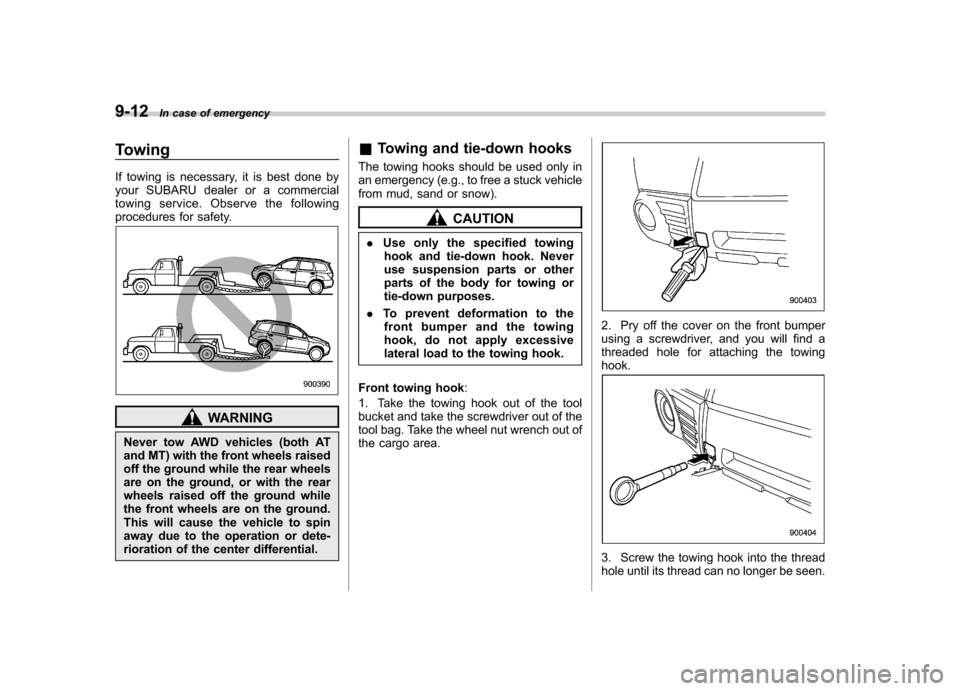
procedures for safety.
WARNING
Never tow AWD vehicles (both AT
and MT) with the front wheels raised
off the ground while the rear wheels
are on the ground, or with the rear
wheels raised off the ground while
the front wheels are on the ground.
This will cause the vehicle to spin
away due to the operation or dete-
rioration of the center differential. &
Towing and tie-down hooks
The towing hooks should be used only in
an emergency (e.g., to free a stuck vehicle
from mud, sand or snow).
CAUTION
. Use only the specified towing
hook and tie-down hook. Never
use suspension parts or other
parts of the body for towing or
tie-down purposes.
. To prevent deformation to the
front bumper and the towing
hook, do not apply excessive
lateral load to the towing hook.
Front towing hook :
1. Take the towing hook out of the tool
bucket and take the screwdriver out of the
tool bag. Take the wheel nut wrench out of
the cargo area.
2. Pry off the cover on the front bumper
using a screwdriver, and you will find a
threaded hole for attaching the towinghook.
3. Screw the towing hook into the thread
hole until its thread can no longer be seen.
Page 296 of 384
Maintenance schedule....................................... 11-3
Maintenance precautions ................................... 11-3
Before checking or servicing in the engine compartment .................................................... 11-4
When you do checking or servicing in the engine compartment while the engine is running .......... 11-4
Engine hood ....................................................... 11-5
Engine compartment overview .......................... 11-6
Non-turbo models .............................................. 11-6
Turbo models ..................................................... 11-7
Engine oil ............................................................ 11-8
Checking the oil level ......................................... 11-8
Changing the oil and oil filter .............................. 11-9
Recommended grade and viscosity .................. 11-11
Recommended grade and viscosity under severe driving conditions .......................................... 11-12
Synthetic oil ..................................................... 11-12
Cooling system ................................................ 11-12
Cooling fan, hose and connections ................... 11-12
Engine coolant ................................................. 11-13
Air cleaner element .......................................... 11-15
Replacing the air cleaner element ..................... 11-16
Spark plugs ...................................................... 11-18
Recommended spark plugs .............................. 11-18
Drive belts ........................................................ 11-18
Manual transmission oil .................................. 11-19
Checking the oil level ....................................... 11-19
Recommended grade and viscosity .................. 11-20
Automatic transmission fluid .......................... 11-20
Checking the fluid level .................................... 11-20 Recommended fluid
......................................... 11-21
Front differential gear oil (AT vehicles) .......... 11-21
Checking the oil level ...................................... 11-21
Recommended grade and viscosity .................. 11-22
Rear differential gear oil .................................. 11-22
Checking the gear oil level ............................... 11-22
Recommended grade and viscosity .................. 11-23
Power steering fluid ........................................ 11-24
Checking the fluid level .................................... 11-24
Recommended fluid ......................................... 11-25
Brake fluid ........................................................ 11-25
Checking the fluid level .................................... 11-25
Recommended brake fluid ............................... 11-26
Clutch fluid (MT vehicles) ............................... 11-26
Checking the fluid level .................................... 11-26
Recommended clutch fluid ............................... 11-27
Brake booster .................................................. 11-27
Brake pedal ...................................................... 11-28
Checking the brake pedal free play .................. 11-28
Checking the brake pedal reserve distance....... 11-28
Clutch pedal (MT vehicles) .............................. 11-28
Checking the clutch function ............................ 11-28
Checking the clutch pedal free play .................. 11-29
Hill start assist system (MT vehicles) ............ 11-29
Replacement of brake pad and lining ............ 11-29
Breaking-in of new brake pads and linings ....... 11-30
Parking brake stroke ....................................... 11-30
Tires and wheels .............................................. 11-31
Types of tires ................................................... 11-31
Maintenance and service
11
Page 301 of 384
11-6Maintenance and service
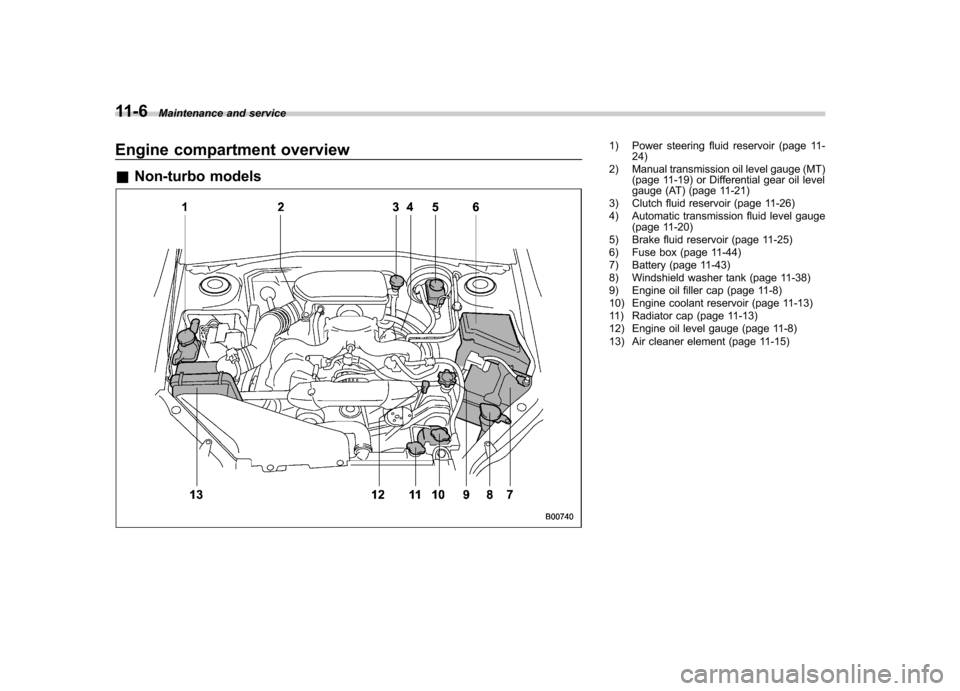
Engine compartment overview &Non-turbo models1) Power steering fluid reservoir (page 11-
24)
2) Manual transmission oil level gauge (MT) (page 11-19) or Differential gear oil level
gauge (AT) (page 11-21)
3) Clutch fluid reservoir (page 11-26)
4) Automatic transmission fluid level gauge (page 11-20)
5) Brake fluid reservoir (page 11-25)
6) Fuse box (page 11-44)
7) Battery (page 11-43)
8) Windshield washer tank (page 11-38)
9) Engine oil filler cap (page 11-8)
10) Engine coolant reservoir (page 11-13)
11) Radiator cap (page 11-13)
12) Engine oil level gauge (page 11-8)
13) Air cleaner element (page 11-15)
Page 302 of 384
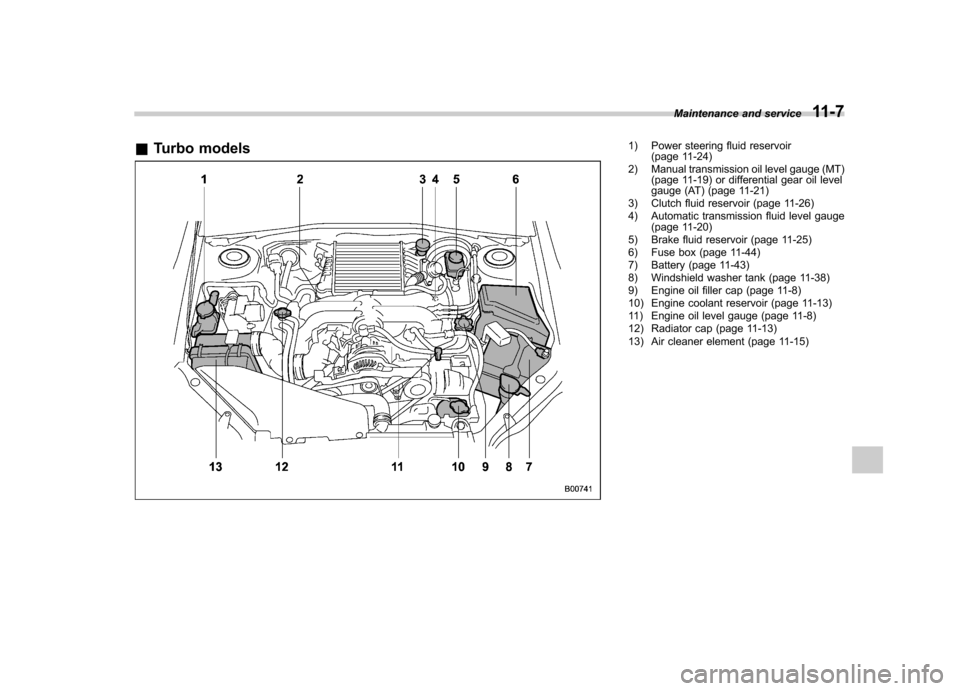
&Turbo models1) Power steering fluid reservoir
(page 11-24)
2) Manual transmission oil level gauge (MT) (page 11-19) or differential gear oil level
gauge (AT) (page 11-21)
3) Clutch fluid reservoir (page 11-26)
4) Automatic transmission fluid level gauge (page 11-20)
5) Brake fluid reservoir (page 11-25)
6) Fuse box (page 11-44)
7) Battery (page 11-43)
8) Windshield washer tank (page 11-38)
9) Engine oil filler cap (page 11-8)
10) Engine coolant reservoir (page 11-13)
11) Engine oil level gauge (page 11-8)
12) Radiator cap (page 11-13)
13) Air cleaner element (page 11-15) Maintenance and service
11-7
Page 316 of 384
4. Pull out the level gauge and check the
fluid level on the gauge. If it is below the
lower level on the“HOT ”range, add the
recommended automatic transmission
fluid up to the upper level. ! Checking the fluid level when the
fluid is cold
When the fluid level has to be checked
without time to warm up the automatic
transmission, check to see that the fluid
level is between the lower level and upper
level on the “COLD ”range. If it is below
that range, add fluid up to the upper level.
Be careful not to overfill.
CAUTION
Be careful not to spill automatic
transmission fluid when adding it.
If automatic transmission fluid
touches the exhaust pipe, it may
cause a bad smell, smoke, and/or a
fire. If automatic transmission fluid
gets on the exhaust pipe, be sure to
wipe it off. &
Recommended fluid
Use one of the following types of auto-
matic transmission fluid. SUBARU ATF Type-HP
IDEMITSU ATF HP
NOTE
Using any non-specified type of auto-
matic transmission fluid could result in
damage inside the transmission. When
replacing the automatic transmission
fluid, be sure to use the kind specified. Front differential gear oil (AT
vehicles) &
Checking the oil level
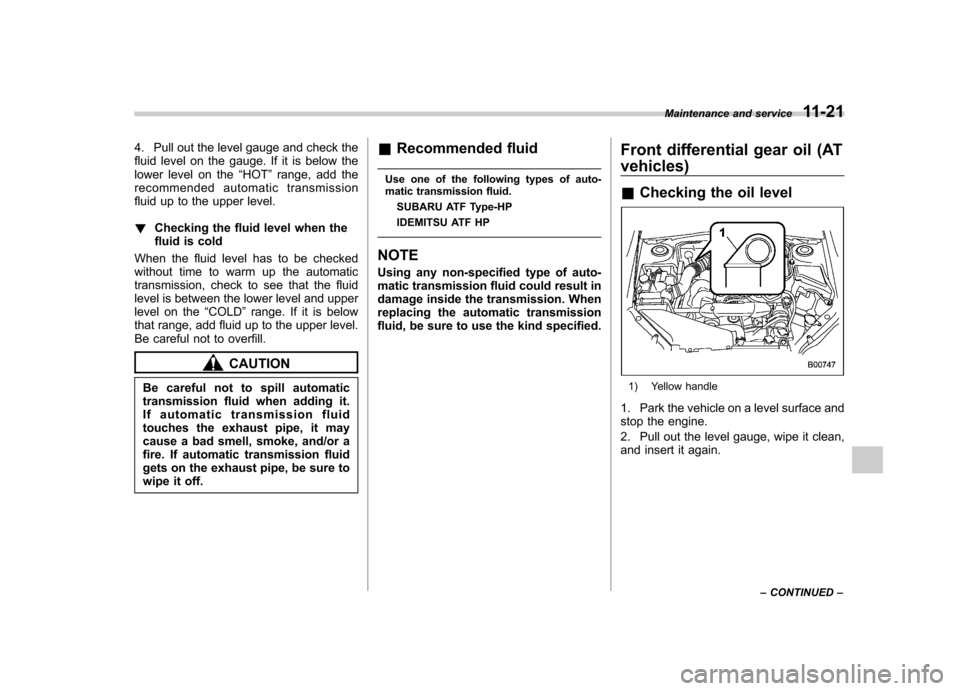
1) Yellow handle
1. Park the vehicle on a level surface and
stop the engine.
2. Pull out the level gauge, wipe it clean,
and insert it again. Maintenance and service
11-21
– CONTINUED –
Page 317 of 384
11-22Maintenance and service
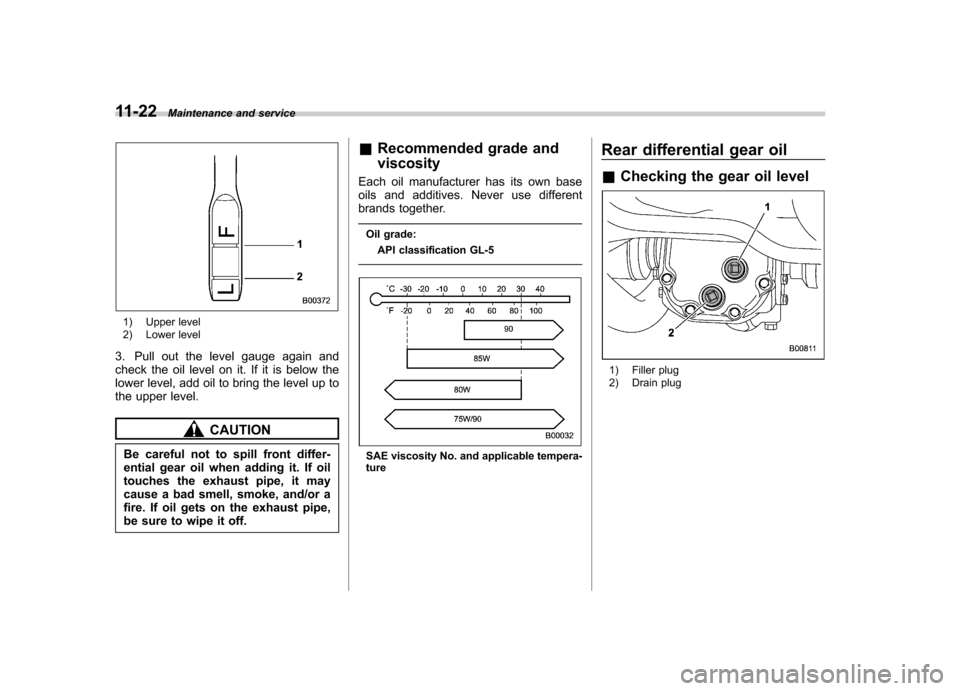
1) Upper level
2) Lower level
3. Pull out the level gauge again and
check the oil level on it. If it is below the
lower level, add oil to bring the level up to
the upper level.
CAUTION
Be careful not to spill front differ-
ential gear oil when adding it. If oil
touches the exhaust pipe, it may
cause a bad smell, smoke, and/or a
fire. If oil gets on the exhaust pipe,
be sure to wipe it off. &
Recommended grade and viscosity
Each oil manufacturer has its own base
oils and additives. Never use different
brands together.
Oil grade: API classification GL-5
SAE viscosity No. and applicable tempera- ture Rear differential gear oil &
Checking the gear oil level
1) Filler plug
2) Drain plug
Page 318 of 384
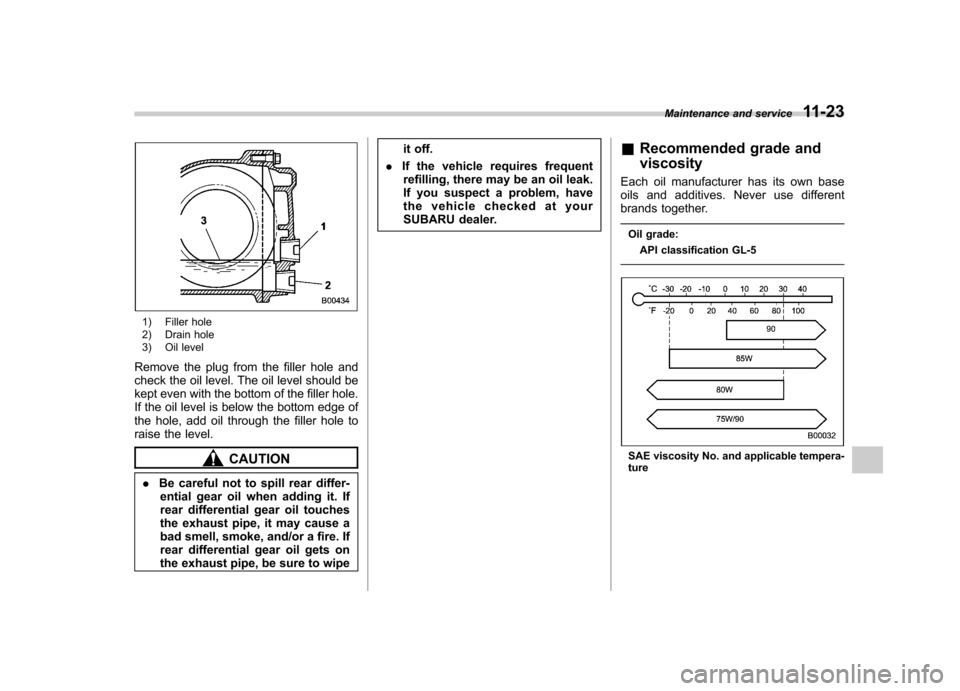
1) Filler hole
2) Drain hole
3) Oil level
Remove the plug from the filler hole and
check the oil level. The oil level should be
kept even with the bottom of the filler hole.
If the oil level is below the bottom edge of
the hole, add oil through the filler hole to
raise the level.
CAUTION
. Be careful not to spill rear differ-
ential gear oil when adding it. If
rear differential gear oil touches
the exhaust pipe, it may cause a
bad smell, smoke, and/or a fire. If
rear differential gear oil gets on
the exhaust pipe, be sure to wipe it off.
. If the vehicle requires frequent
refilling, there may be an oil leak.
If you suspect a problem, have
the vehicle checked at your
SUBARU dealer. &
Recommended grade and viscosity
Each oil manufacturer has its own base
oils and additives. Never use different
brands together.
Oil grade: API classification GL-5SAE viscosity No. and applicable tempera- ture Maintenance and service
11-23