2009 SKODA OCTAVIA TOUR radio
[x] Cancel search: radioPage 43 of 224

Unlocking and locking
42
Unlocking and locking carUnlocking the vehicle
– Press button for about 1 second. Locking the vehicle
– Press button for about 1 second.Deactivating safe securing system – Press button twice in 2 seconds. Further information
⇒
page 38.
Folding out of the key – Press button . Folding up of the key – Press button and collapse the key bit in the housing.The turn signal lights flash twice as
confirmation that the vehicle has been
unlocked. The vehicle will lock again auto
matically if you unlock the vehicle using
button but do not open a door or the
boot lid within the next 30 seconds. This
function is intended to prevent the car being unlocked unintentionally.
The safe securing system along with the anti-theft alarm system are, however, deactivated during these 30 seconds. In addition, when the car is unlocked, the el
ectrically adjustable seats and exterior
mirrors* move into the position assigned to this key. The stored setting of driver seat and exterior mirrors is retrieved. The turn signal lights flash once to co
nfirm that the vehicle has been correctly
locked. If the turn signal lights do not fl
ash, check the doors, bonnet and boot lid
again to ensure that they are closed. If th
e doors, the bonnet or the boot lid remain
open when the anti-theft alarm system is activated, the turn signal lights do not flash until after they have been closed. When the vehicle is unlocked or locked, the
interior lights in the door contact are
automatically switched on or off.
WARNING
If the vehicle is locked from the outsid
e and the safe securing system is acti-
vated, there must not be any person in the vehicle as it is then not possible to open either a door or a window from the inside. The locked doors make it more difficult for rescuers to get into
the vehicle in an emergency - hazard!
Note
•
Operate the radio remote control only when the doors and boot lid are closed
and you have visual co
ntact with the vehicle.
•
Once in the car, you must
not press the lock button
of the radio remote
control before inserting the key into the ignition lock in order to avoid the car being inadvertently locked and the alarm syst
em* being switched on. Should this
happen, press the unlock button
of the radio remote control.
Synchonisation of the remote controlIf the vehicle cannot be unlocked by actuatin
g the remote control system then it is
possible that the code in the key and the
control unit in the vehicle are no longer
synchronised. This can occur when the buttons on the radio-operated key are actu-
Fig. 40 Folding key with radio remote control
A1A2A2A3A3
A1
s2g8.b.book Page 42 Tuesday, April 7, 2009 8:53 AM
Page 44 of 224

Unlocking and locking
43
Using the system
Safety
Driving Tips
General Maintenance
Breakdown assistance
Technical Data
ated a number of times outside of the operative range of the equipment or the battery on the remote control was replaced. This means it is necessary to synchronise the code as follows:•
Press any button on the remote control.
•
pressing of the button means that the door will unlock with the key within 1
minute.Anti-theft alarm system*DescriptionThe anti-theft alarm system increases the le
vel of protection against people seeking
to break into the vehicle. The system tri
ggers audible and visual warning signals if
an attempt is made to break into the vehicle. Optical and acoustic signals alert if an al
arm has been triggered (the turn signal
lights flash and the signal horn honks). How is the alarm system activated? The anti-theft alarm system is activated
automatically when th
e vehicle is locked
with the key on the closed driver's door or
by using the radio remote control. It is
activated 30 seconds after locking the door. How is the alarm system deactivated? The anti-theft alarm system is deactivated
if the vehicle is unlocked by only using
the radio remote control. The vehicle is au
tomatically locked agai
n if the vehicle is
not opened within 30 seconds after reac
tivating the anti-theft alarm system.
Once you unlock the vehicle by inserting the key into the driver door you then have to insert the key into the ignition lock an
d switch the ignition on within 15 seconds
after unlocking the door in order to deac
tivate the anti-theft alarm system. The
alarm will be triggered
if you do
not switch on
the ignition within 15 seconds.
When is the alarm triggered? The following security areas of the locked vehicle are monitored:•
Bonnet,
•
Boot lid,
•
Doors,
•
Ignition lock,
•
Vehicle interior
4),
•
A drop in voltage of the on-board power supply.
An alarm is immediately triggered if either of the two battery terminals is discon- nected while the anti-theft
alarm system is activated.
Deactivation of interior monitor The process of switching off and switching on the interior monitoring system is the same as for switching off and switching on the safe securing system
⇒page 38.
This function makes it possible for example to leave animals in the vehicle. How is the alarm switched off? You switch the alarm off if you unlock the
vehicle with the radio remote control or
if you switch the ignition on.
Note
•
The working life of the alarm siren is 5 years. More detailed information is avail-
able by a specialist garage.•
Before leaving the car, check that all the doors, windows and the electric
sliding/tilting roof* are properly closed in order to ensure that the anti-theft alarm system is fully operational.•
Coding of the radio remote control and
the receiver unit precludes the use of
the radio remote control from other vehicles.4)The alarm will be triggered through movement of
occupants within the interior of the vehicle
or an attempt to steal the radio. The rear part of the interior of the vehicle is not fully moni-tored under certain circumstances.
s2g8.b.book Page 43 Tuesday, April 7, 2009 8:53 AM
Page 64 of 224

Seats and Storage
63
Using the system
Safety
Driving Tips
General Maintenance
Breakdown assistance
Technical Data
Assigning radio remote control* to the memory buttonsAfter storing the settings of the seat
and exterior mirrors, you have 10
seconds in order to assign the radio remote control to the appropriate memory button. – Withdraw the ignition key. – Press the release button
⇒
page 42 and hold it pressed for 1 second
until an audible signal confirms that the setting has been stored. The setting is stored with the memory button which you have selected.
If you wish to be able to retrieve the settings which are stored in the memory by also using the radio remote control, you have
to assign the radio remote control to a
memory button in each case. If you wish, you can obtain an additional re
mote control key from a specialist garage
and then assign the remote control key to another memory button.
Note
•
If the radio remote control had previous
ly been assigned to another memory
button, this setting is then erased by the new assignment.•
If you assign the radio remote control
to a memory button which has already
been assigned to a radio remote control,
the old assignment is also replaced by a
new assignment in this case.•
The assignment of the radio remote control to a memory button is retained,
however, after reassigning the seats and exterior mirrors.Retrieving seat and exterior mirror settings for driving forward You can retrieve the stored settings
either with the memory button
or also with the radio remote control*.
Retrieving the settings of the seat and mirrors can only be carried out when the ignition is switched off
for safety reasons. Retrieving the
settings can be carried out in two different ways:
Retrieving settings with memory buttons –
By pressing briefly:
with the door open, operate the desired memory
button
⇒
page 62, fig. 61
with one-touch. The seat and the exte-
rior mirrors now move automatically into the stored position.
–
By pressing for a long period of time:
with the driver door open or
closed, press and hold the desired memory button until the seat and the exterior mirrors have moved into the stored position.
Retrieving settings with remote control* – If the driver door is closed and the ignition is switched off, briefly press
the unlock button of the radio remote control
⇒
page 42 and then
open the driver door.
– The seat and exterior mirrors now
move automatically into the stored
positions.
Retrieving setting of exterior mirror for reversing* – Turn the rotary knob for the exterior mirror setting into the position
⇒
page 58 before engaging the reverse gear.
Emergency Off – Press any button on the driver seat.
Note
If the memory button is pressed once again
during the automatic setting of the seat
and the exterior mirrors, the setting operation is interrupted. After repeated pressing of the same button, the setting operation is continued to the end. If one of the two remaining memory buttons is pressed, the stored setting of this button is retrieved.
AD
AD
AD
s2g8.b.book Page 63 Tuesday, April 7, 2009 8:53 AM
Page 103 of 224

Communication
102
Mobile phones and two-way radio systemsThe installation of a mobile phone and two-way radio system in a vehicle should be carried out by a specialist garage. Škoda Auto permits the operation of mobile phones and two-way radio systems with a professionally installed external aerial and a maximum transmission power of up to 10 watts. It is essential that you inform a specialist garage about the possibilites to assemble and operate mobile phones and two-way radio sets which have a power output of more than 10 W. They will inform you which technical possibilities exist for retrofit- ting mobile telephones and radio transmitters. Operation of mobile phones or two-way radio systems may interfere with func- tioning of the electronic systems of your vehicle. The reasons for this may be:•
no external aerial,
•
external aerial incorrectly installed,
•
transmission power gr
eater than 10 watts.
You should therefore
not operate a mobile phone or two-way radio system
inside the vehicle
without the use of an external aerial, or with an external aerial
which has been incorrectly installed. You should also be aware of
the fact that only an
external
aerial makes it possible
to achieve the optimal range of such equipment.
WARNING
•
If a mobile phone or two-way radio sy
stem is operated inside the vehicle
without using an external aerial, or with an external aerial which has been incorrectly installed, the result can
be excessive electromagnetic fields
which may cause harm to your health.•
Please concentrate fully at all times on your driving.
•
You must not install two-way radio systems, mobile phones or mounts
on the covers of the airbags or within the immediate deployment range of airbags. This might result in injuries to the occupants in the event of an acci- dent.
Note
Please also refer to the operating instru
ctions of the mobile phones and two-way
radio systems.
s2g8.b.book Page 102 Tuesday, April 7, 2009 8:53 AM
Page 149 of 224

Taking care of your vehicle and cleaning the vehicle
148
Automatic vehicle wash systemsThe paintwork of the vehicle is sufficiently resistant that the vehicle can be washed normally in automatic vehicle wash plants without any problem. The actual stress to which the paintwork is subjected, however, depends greatly on the design of the vehicle wash system, the filtering of the water and the type of washing and care products used. If the paintwork of your
vehicle appears mat after being washed or
even has scratches, point this out to the operator of the vehicle wash plant. Use a different vehicle wash plant, if necessary. There are no particular points to note be
fore washing your vehicle in such a plant
other than the usual precautionary measur
es (closing windows and sliding/tilting
roof, moving any factory-fitted aerials down flat against the bodywork, etc.). If you have any particular atta
ch e d p a r t s f i t te d t o y o u r c a r - s u ch a s s p o i l e r, ro o f ra ck
system, two-way radio aerial - it is best to
first of all consult the operator of the car
wash plant. It is important to degrease the lips of
the windscreen wiper rubbers after passing
through the automatic vehicle wash system.
Caution
Do not screw the swivelling down roof aeri
al tight before washing the vehicle in an
automatic vehicle wash sy
stem - risk of damage!
Washing vehicle by handIt is important to first soften the dirt with
plenty of water and
rinse it off as thor-
oughly as possible before wa
shing your vehi
cle by hand.
One should then clean the vehicle using a soft
washing sponge
, washing glove
or
a washing brush
and only slight pressure. Work
from the top to the bottom -
beginning with the roof. Only place slight
pressure on the vehicle paintwork during
cleaning Only use a
car shampoo
for stubborn dirt.
Wash out the sponge or washing glove thoroughly at short intervals.Clean wheels, door sills and similar parts
last. Use a second sponge for such areas.
Rinse off the vehicle well after giving it a
wash and dry it off using a chamois leather.
WARNING
•
The ignition should always be switched off when you wash your vehicle -
risk of accident!•
Protect your hands and arms from sharp-edged metal parts when you
are cleaning the underfloor, the inside
of the wheel housings or the wheel
trims - risk of cuts.
Caution
•
Do not wash your vehicle in bright
sunlight - risk of paint damage.
•
Ensure that the jet of water is not aimed di
rectly at the locking cylinders or at the
door and panel joints if you spray your vehicle in winter down with a hose - risk of freezing.•
Do not use any insect sponges, rough ki
tchen sponges or simi
lar cleaning prod-
ucts - risk of damage to the surface of paintwork.
For the sake of the environment
Only wash your vehicle at washing bays specifically reserved for this purpose. This ensures that no water which may be cont
aminated by oil flow
s into the sewage
system. It is not even permitted to wash your vehicle in certain areas except at such specific washing bays.Washing with a high-pressure cleanerWhen you wash your vehicle with a high-pre
ssure cleaner, it is
essential to comply
with the instructions for use of the cleaning equipment. This applies in particular to the
pressure
used and to the
spraying distance
. Maintain a sufficiently large
distance to soft materials such as
rubber hoses or insulation material.
On no account use
circular spray nozzles
or so-called
dirt cutters
!
s2g8.b.book Page 148 Tuesday, April 7, 2009 8:53 AM
Page 172 of 224

Inspecting and replenishing
171
Using the system
Safety
Driving Tips
General Maintenance
Breakdown assistance
Technical Data
– Only for “quick-charging”: Disconnect
both battery cables (first of all
“negative”, then “positive”).
– Carefully attach the terminal clam
ps of the charger to the battery
terminals (red = “positive”, black = “negative”).
– You can now plug the mains cable of the charger into the power socket
and switch on the charger.
– When charging is completed: switch the charger off and unplug the
mains cable from the power socket.
– Only then should you disconnect the terminal clamps of the charger. – Reconnect the cables to the battery
(first of all “positive”, then “nega-
tive”).
It is not normally necessary
to disconnect the cables of the battery if you recharge
the battery using low ampera
ges (as for example from a
mini-charger
). Please also
refer to the instructions from the charger manufacturer. A charging current of 0.1 of the total batter
y capacity (or lower) is that which should
be used until full charging is achieved. It is, however, necessary to disconnect both
cables before charging the battery with
high amperages, so-called “
quick-charging
”.
“Quick-charging” a battery is
dangerous
⇒
in “Working on the battery” on
page 168. It requires a special charger and appropriate knowledge. We therefore recommend that you have your battery qu
ick-charged only by your specialist
garage. A discharged battery may already
freeze
at temperatures just below 0°C
⇒
. We
recommend that you no longer use a ba
ttery which has thawed out because the
casing of the battery may be cracked through the formation of ice and this would allow battery electrolyte to flow out. The vent plugs of the battery should not be opened for charging.
WARNING
Never charge a frozen or thawed battery - risk of explosion and caustic burns. Replace a frozen battery.Disconnecting and reconnecting the batteryOn disconnecting and reconnecting the battery the following functions are initially deactivated or are no longer able to operate fault-free. We recommend having the vehicle checked by
a specialist garage to ensure full
functionality of all electrical systems.Replacing the batteryYou should only replace a battery with a
new battery of the same capacity, voltage
(12 V), amperage and of the same size. Specialist garages have a range of suitable batteries available. We recommend that you only have an old ba
ttery disposed of by a specialist garage
since it does require special disposal.
For the sake of the environment
Batteries contain pois
onous substances such as sulphu
ric acid and lead. They must
be disposed of in accordance with loca
l environmental protection regulations and
on no account as domestic waste.Operation
Operating measure
Electrical power window
(operational faults)
⇒page 46
Enter radio code number
see Radio Operating Instructions
Set hours
⇒page 19
Data in the multi-functional indicator* are deleted.
⇒ page 19
s2g8.b.book Page 171 Tuesday, April 7, 2009 8:53 AM
Page 180 of 224

Accessories, changes and
replacement of parts
179
Using the system
Safety
Driving Tips
General Maintenance
Breakdown assistance
Technical Data
Accessories, changes and replacement of partsAccessories and replacement partsŠkoda vehicles have been bu
ilt according to the latest discoveries in safety engi-
neering. Thus one should no
t change the condition in which the vehicle was deliv-
ered from the manufacturer without some thought. The following guidelines should be observed when a vehicle is to be retrofitted with accessories, have technical ch
anges made to it or a par t has to be replaced at some
time in the future.•
Advise should always be obtained from a specialist garage
before
buying any
accessories and
before
making any technical changes
⇒
.
•
This is particularly the case when acce
ssories are bought in a foreign country.
•
Škoda Genuine Accessories which have b
een released for use and Skoda orig-
inal parts can be bought from specialist
garages that professionally undertake the
assembly of parts which were purchased there.•
All Škoda original accessories which are listed in the catalogue of original acces-
sories such as sliding/tilting roofs, sp
oilers, wheel rims et
c. are homologized.
•
Radios, aerials and other electrical acce
ssories should only be installed by a
specialist garage.•
The guidelines issued by Škoda Auto must be observed when making technical
changes.•
This is to ensure that no technical damage
occurs to the vehicle, that travelling
and operating safety are maintained and that the chnages are permissible. The specialist garages also undertake this work professionally or refer it to another specialist garage in special cases. Any damage which is done caused by technical changes made without consulting a Skoda dealer is
excluded from the guarantee.
WARNING
•
We advise you, in your own interest, to only use Škoda Genuine Accesso-
ries and Škoda original parts which have
been expressly approved for use on
your Škoda. Reliability, safety and su
itabiliity have been established for
these Škoda original parts.•
We cannot guarantee suitability of installation into your vehicle of other
products despite keeping a constant ey
e on market developments (also not
in the case where there is an attestation or permission can be produced).Technical changesInterference on the electronic components and their software can lead to opera-tional faults. This interference can also impair not directly affected systems because of the networking of the electronic co
mponents. This means that the operating
safety of your vehicle can
be considerably jeopardized,
a greater wear of vehicle
parts can occur and finally the vehi
cle registration documents expire.
We trust that you will understand that
Škoda Auto cannot be liable for damage
resulting from unprofessional work. We therefore recommend that you have all work carried out with Škoda original parts at specialist garages.
WARNING
Work or modifications on your vehicle, which have been carried out unpro-fessionally, can cause operational faults - risk of accident!Vehicles of the group N1The vehicle of the group N1 is a box car wh
ich is designed and manufactured for the
transportation of goods.
WARNING (continued)
s2g8.b.book Page 179 Tuesday, April 7, 2009 8:53 AM
Page 196 of 224
Fuses and light bulbs
195
Using the system
Safety
Driving Tips
General Maintenance
Breakdown assistance
Technical Data
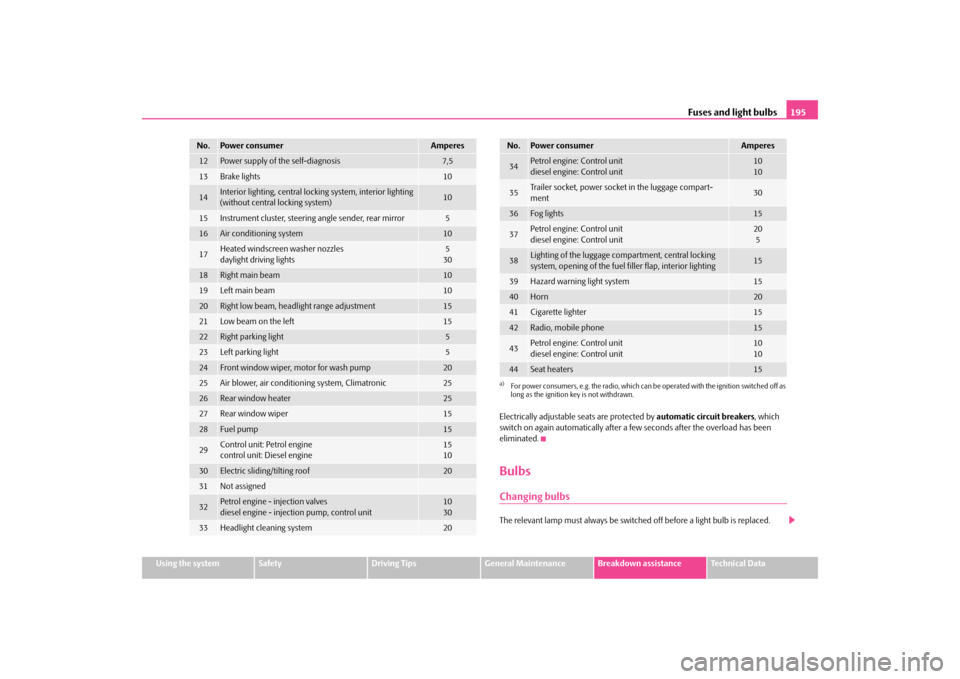
Electrically adjustable
seats are protected by
automatic circuit breakers
, which
switch on again automatically after a fe
w seconds after the overload has been
eliminated.BulbsChanging bulbsThe relevant lamp must always be switch
ed off before a light bulb is replaced.
12
Power supply of the self-diagnosis
7,5
13
Brake lights
10
14
Interior lighting, central lockin
g system, interior lighting
(without central locking system)
10
15
Instrument cluster,
steering angle sender, rear mirror
5
16
Air conditioning system
10
17
Heated windscreen washer nozzles daylight driving lights
530
18
Right main beam
10
19
Left main beam
10
20
Right low beam, headlight range adjustment
15
21
Low beam on the left
15
22
Right parking light
5
23
Left parking light
5
24
Front window wiper, motor for wash pump
20
25
Air blower, air conditioning system, Climatronic
25
26
Rear window heater
25
27
Rear window wiper
15
28
Fuel pump
15
29
Control unit: Petrol engine control unit: Diesel engine
1510
30
Electric sliding/tilting roof
20
31
Not assigned
32
Petrol engine - injection valvesdiesel engine - injection pump, control unit
1030
33
Headlight cleaning system
20
No.
Power consumer
Amperes
34
Petrol engine: Control unitdiesel engine: Control unit
1010
35
Trailer socket, power socket in the luggage compart- ment
30
36
Fog lights
15
37
Petrol engine: Control unit diesel engine: Control unit
205
38
Lighting of the luggage compartment, central locking system, opening of the fuel filler flap, interior lighting
15
39
Hazard warning light system
15
40
Horn
20
41
Cigarette lighter
15
42
Radio, mobile phone
15
43
Petrol engine: Control unit diesel engine: Control unit
1010
44
Seat heaters
15
a)For power consumers, e.g. the radio, which can be
operated with the ignition switched off as
long as the ignition key is not withdrawn.No.
Power consumer
Amperes
s2g8.b.book Page 195 Tuesday, April 7, 2009 8:53 AM