2009 Seat Ibiza ST brake light
[x] Cancel search: brake lightPage 192 of 250

Checking and refilling levels191
Safety First
Operating instructions
Practical tips
Technical Data
Brake fluidChecking the brake fluid level
The brake fluid is checked at the intervals given in the service
schedule.– Read off the fluid level at the transparent brake fluid reservoir. It
should always be between the “MIN” and “MAX” marks.The position of the brake fluid reservoir is shown in the corresponding engine
compartment illustration ⇒page 234. The brake fluid reservoir has a black
and yellow cap.
The brake fluid level drops slightly when the vehicle is being used as the
brake pads are automatically adjusted as they wear. However, if the level goes down noticeably in a short time, or drops below the
“MIN” mark, there may be a leak in the brake system. A display on the instru-
ment panel will warn you if the brake fluid level is too low
⇒page 56.
WARNING
Before opening the bonnet to check the brake fluid level, read and observe
the warnings ⇒page 179.Changing the brake fluid
The Maintenance Programme indicates the brake fluid
change intervals.We recommend that you have the brake fluid changed by an Authorised
Service Centre.
Before opening the bonnet, please read and follow the warnings ⇒ in
“Safety instructions on working in the engine compartment” on page 179 in
section “Safety notes for working in the engine compartment”.
Brake fluid absorbs moisture. In the course of time, it will absorb water from
the ambient air. If the water content in the brake fluid is too high, the brake
system could corrode. This also considerably reduces the boiling point of the
brake fluid. Heavy use of the brakes may then cause a vapour lock which
could impair the braking effect.
It is important that you use only brake fluid compliant with US standard
FMVSS 116 DOT 4. We recommend the use of Genuine SEAT brake fluid.
WARNING
Brake fluid is poisonous. Old brake fluid impairs the braking effect.
Fig. 128 In the engine
compartment: Brake fluid
reservoir cover
Ibiza ST_EN.book Seite 191 Dienstag, 12. Januar 2010 4:03 16
Page 193 of 250
Checking and refilling levels
192•Before opening the bonnet to check the brake fluid level, read and
observe the warnings ⇒page 179.•Brake fluid should be stored in the closed original container in a safe
place out of reach of children. There is a toxic risk.•Complete the brake fluid change according to the Maintenance
Programme. Heavy use of the brakes may cause a vapour lock if the brake
fluid is left in the system for too long. This would seriously affect the effi-
ciency of the brakes and the safety of the vehicle. This may cause an acci-
dent.Caution
Brake fluid could damage the paintwork. Wipe off any brake fluid from the
paintwork immediately.
For the sake of the environment
Brake fluid must be drained and disposed of in the proper manner observing
environmental regulations.
Vehicle batteryWarnings on handling the battery
WARNING
Always be aware of the danger of injury and chemical burns as well as the
risk of accident or fire when working on the battery and the electrical
system:•Wear eye protection. Protect your eyes, skin and clothing from acid and
particles containing lead.•Battery acid is very corrosive and caustic. Wear protective gloves and
eye protection. Do not tilt the batteries. This could spill acid through the
vents. Rinse battery acid from eyes immediately for several minutes with
clear water. Then seek medical care immediately. Neutralise any acid
splashes on the skin or clothing with a soapy solution, and rinse off with
plenty of water. If acid is swallowed by mistake, consult a doctor immedi-
ately.•Fires, sparks, naked lights and smoking are prohibited. When handling
cables and electrical equipment, av oid causing sparks and electrostatic
WARNING (continued)
Wear eye protection
Battery acid is very corrosive and caustic. Wear protective gloves
and eye protection!
Fires, sparks, naked lights and smoking are prohibited!
A highly explosive mixture of gases is released when the battery is
under charge.
Keep children away from acid and batteries!
Ibiza ST_EN.book Seite 192 Dienstag, 12. Januar 2010 4:03 16
Page 203 of 250
If and when
202Snow chains
For technical reasons, snow chains must not be used on the compact tempo-
rary spare wheel.
If you have a puncture on one of the front wheels when using snow chains, fit
the compact temporary spare in place of one of the rear wheels. You can then
attach the snow chains to the wheel taken from the rear and use this wheel to
replace the punctured front wheel.
WARNING
•The tyre pressures must be checked and corrected as soon as possible.•Do not drive faster than 80 km/h. Higher speeds can cause an accident.•Avoid heavy acceleration, hard braking and fast cornering. Risk of acci-
dent.•Never use two or more compact spare tyres at the same time, risk of
accident.•No other type of tyre (normal summer or winter tyre) may be fitted on
the compact temporary spare wheel rim.
Tyre repair kit*
The tyre repair kit (for vehicles not including a spare wheel) is
stored under the floor panel in the luggage compartment.Your vehicle is equipped with the Tyre Mobility System “Tyre repair kit”.
The tyre repair kit consists of a container with sealing compound to repair the
puncture and a compressor to generate the required tyre pressure. The kit will
reliably seal punctures up to a size of about 4 mm caused by the penetration
of a foreign body into the tyre.
Note
•Seek professional assistance if the repair of a tyre puncture is not
possible with the sealing compound.Wheel changePreparation work
What you must do before changing a wheel.– If you have a flat tyre or puncture, park the vehicle as far away from the flow of traffic as possible. Choose a location that is as
level as possible.
– All passengers should leave the vehicle. They should wait in a safe area (for instance behind the roadside crash barrier).
– Switch the engine off. Switch the hazard warning lights on and place the warning triangles in position.
–Apply the handbrake firmly.
– Engage the first gear, or put the gear lever to position P for those
vehicles with an automatic gearbox.
– If you are towing a trailer, unhitch it from your vehicle.
–Take the vehicle tools and the spare wheel out of the luggage
compartment.
Ibiza ST_EN.book Seite 202 Dienstag, 12. Januar 2010 4:03 16
Page 209 of 250
If and when
208It also contains the instructions for using the compressor.
WARNING
•Do not attempt to repair a puncture with the sealing compound if the
tyre has been damaged by driving the car after the tyre has lost its air.•Always observe warnings and follow safety instructions concerning
compressor and sealing compound carefully.•Do not drive faster than 80 km/h, avoid heavy acceleration, hard
braking and fast cornering.•Tyres which have been repaired with sealing compound are only suit-
able for temporary use over a short period. Therefore, please drive carefully
to the next available qualified workshop.For the sake of the environment
•Used sealing compound containers should be disposed of at a proper
facility.•The bottle containing sealing compound must be recycled in its correct
container.Note
•If sealant should leak out, leave it to dry. When it has dried, you can pull
it off like a piece of foil.•Observe the expiry date stated on the sealing compound can. Have the
sealing compound exchanged by a qualified workshop.•Seek professional assistance if the repair of a tyre puncture is not
possible with the sealing compound.
What to do first
Certain steps must be taken before repairing a tyre.– If you have a flat tyre or puncture, park the vehicle as far away from the flow of traffic as possible.
–Apply the handbrake firmly.
–Engage first gear, or put the selector lever to position P.
– All passengers should leave the vehicle. They should wait in a
safe area (for instance behind the roadside crash barrier).
– Check whether a repair is possible using the Tyre Mobility System “General information and safety notes.”
– Unscrew inflation cap from the affected wheel.
–Take the tyre repair kit out of the luggage compartment.
WARNING
Switch on the hazard warning lights and place the warning triangles in
position. This is for your own safety and also warns other road users.
Caution
Take special care if you have to repair a tyre on a slope.
Note
•Please observe legal requirements when doing so.•Remember to replace the sealing compound as soon as possible.
Ibiza ST_EN.book Seite 208 Dienstag, 12. Januar 2010 4:03 16
Page 211 of 250

If and when
210The individual electrical circuits are protected by fuses. The fuses are located
behind a cover at the left-hand end of the dash panel. When the steering
wheel is on the right, the fuses are on the right-hand side of the dash panel,
behind a cover.
The electric windows are protected by circuit breakers . These reset automat-
ically after a few seconds when the overload (caused for example by frozen
windows) has been corrected.
Fuses colour code
WARNING
Never “repair” damaged fuses and never replace them with fuses with a
higher rating. Failure to comply could result in fire. This could also cause
damage to other parts of the electrical system.
Note
•If a newly replaced fuse blows again after a short time, the electrical
system must be checked by a qualified workshop as soon as possible.•If you replace a fuse with higher-rating fuse, you could cause damage to
another location in the electrical system.
•Always keep some spare fuses in the vehicle. These are available from
SEAT dealers.Fuses on left side of dash panelFuses
Colour
Amps
Beige
5
Brown
7,5
Red
10
Blue
15
Ye ll ow
20
Natural (white)
25
Green
30
Number
Consumer
Amps
1
Power steering/Engine operation
7,5
2
Diagnostics/Heater/Autoclimate/Cli-
matronic/Electric anti-dazzle mirror/Naviga-
tor/Air conditioning pressure switch/ Climate
fan/ Kisi/ AFS Control unit/Coming home
relay/Soundaktor
10
3
Petrol engine control unit/Flow meter/Diesel
engine control unit/Relay coils/Engine opera-
tion/Bi-turbo fuel control unit
5
4
ABS/ESP switch (turning sensor)/Light lever
10
5
Reverse light/Heating nozzles
10
6
Instrument panel
5
7
Rear fog light
5
8
Vaca n t
9
Headlight lever
10
10
Headlight lever/Clutch (Petrol)/Brakes (all)
5
11
Airbag control unit
5
12
Automatic gearbox/ Headlight lever
10
13
Exterior mirror control
5
Ibiza ST_EN.book Seite 210 Dienstag, 12. Januar 2010 4:03 16
Page 219 of 250
If and when
218
– Remove the bulb holder ⇒page 217, fig. 148 outwards.
– Replace the bulb by pulling it out and inserting the replacement.
– Installation is done in the reverse order.Turn signal bulb– Raise the bonnet.
– Rotate the bulb holder ⇒fig. 149 to the left and pull.
– Remove the bulb by pressing on the bulb holder and rotating at the same time to the left.
– Installation is done in the reverse order.
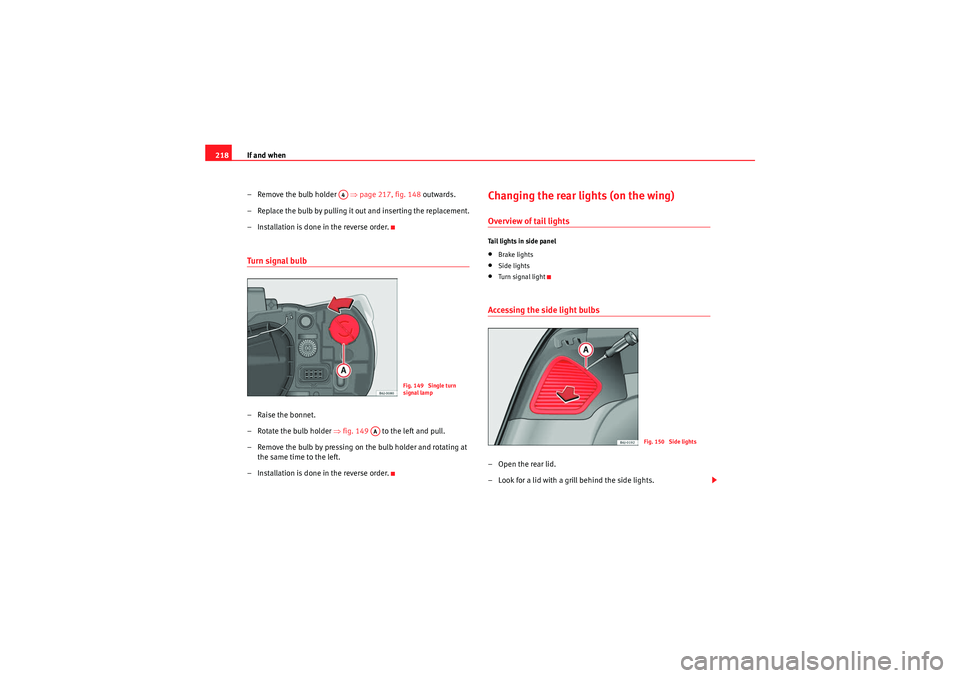
Changing the rear lights (on the wing)Overview of tail lightsTail lights in side panel•Brake lights•Side lights•Turn signal lightAccessing the side light bulbs–Open the rear lid.
– Look for a lid with a grill behind the side lights.
A4
Fig. 149 Single turn
signal lamp
AA
Fig. 150 Side lights
Ibiza ST_EN.book Seite 218 Dienstag, 12. Januar 2010 4:03 16
Page 223 of 250
If and when
222
– First fit the glass with the fastening tabs over the frame of the switch. Next press the front part until the two long tabs click on
the support.Additional brake lights*Given the difficulty involved in the replacement of this light it should be done
by the Technical Service.Luggage compartment light
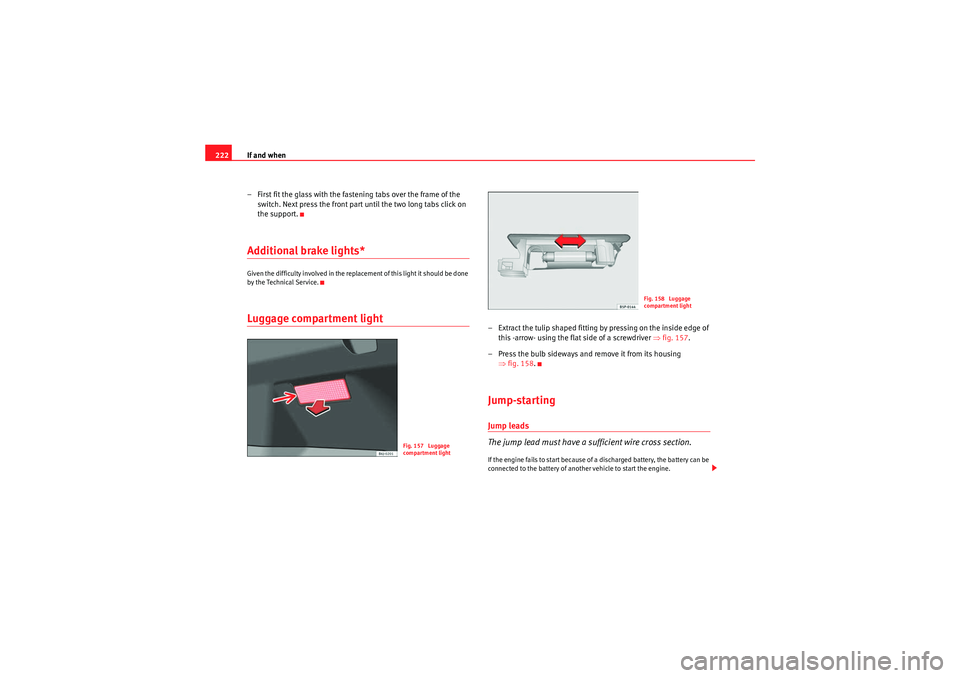
– Extract the tulip shaped fitting by pressing on the inside edge of this -arrow- using the flat side of a screwdriver ⇒fig. 157 .
– Press the bulb sideways and remove it from its housing ⇒fig. 158 .Jump-startingJump leads
The jump lead must have a sufficient wire cross section.If the engine fails to start because of a discharged battery, the battery can be
connected to the battery of another vehicle to start the engine.
Fig. 157 Luggage
compartment light
Fig. 158 Luggage
compartment light
Ibiza ST_EN.book Seite 222 Dienstag, 12. Januar 2010 4:03 16
Page 225 of 250
If and when
224
10. When the engine is running, disconnect the leads in reverse order to the details given above.Connect the battery clamps so they have good metal-to-metal contact with
the battery terminals.
If the engine fails to start, switch off the starter after about 10 seconds and
try again after about half a minute.
WARNING
•Please note the safety warnings referring to working in the engine
compartment ⇒page 179, “Working in the engine compartment”.•The battery providing assistance must have the same voltage as the flat
battery (12V) and approximately the same capacity (see imprint on
battery). Failure to comply could result in an explosion.•Never use jump leads when one of the batteries is frozen. Danger of
explosion! Even after the battery has thawed, battery acid could leak and
cause chemical burns. If a battery freezes, it should be replaced.•Keep sparks, flames and lighted cigarettes away from batteries, danger
of explosion. Failure to comply could result in an explosion.•Observe the instructions provided by the manufacturer of the jump
leads.•Do not connect the negative cable from the other vehicle directly to the
negative terminal of the flat battery. The gas emitted from the battery could
be ignited by sparks. Danger of explosion.•Do not attach the negative cable from the other vehicle to parts of the
fuel system or to the brake line.•The non-insulated parts of the battery clamps must not be allowed to
touch. The jump lead attached to the positive battery terminal must not
touch metal parts of the vehicle, this can cause a short circuit.•Position the leads in such a way that they cannot come into contact
with any moving parts in the engine compartment.
•Do not bend over the batteries. This could result in chemical burns.Note
The vehicles must not touch each other, otherwise electricity could flow as
soon as the positive terminals are connected.
WARNING (continued)
Ibiza ST_EN.book Seite 224 Dienstag, 12. Januar 2010 4:03 16