2009 Seat Ibiza ST turn signal bulb
[x] Cancel search: turn signal bulbPage 5 of 250

Contents
4Accessories, parts replacement and
modifications
. . . . . . . . . . . . . . . . . . . . . . . . . . . .
Accessories and spare parts . . . . . . . . . . . . . . . .
Technical modifications . . . . . . . . . . . . . . . . . . .
Roof aerial* . . . . . . . . . . . . . . . . . . . . . . . . . . . . .
Mobile telephones and two-way radios . . . . . . .
Fitting a towing bracket* . . . . . . . . . . . . . . . . . . .
Checking and refilling levels
. . . . . . . . . . . . . .
Refuelling . . . . . . . . . . . . . . . . . . . . . . . . . . . . . . .
Petrol . . . . . . . . . . . . . . . . . . . . . . . . . . . . . . . . . .
Diesel . . . . . . . . . . . . . . . . . . . . . . . . . . . . . . . . . .
Working in the engine compartment . . . . . . . . .
Engine oil . . . . . . . . . . . . . . . . . . . . . . . . . . . . . . .
Coolant . . . . . . . . . . . . . . . . . . . . . . . . . . . . . . . . .
Washer fluid and windscreen wiper blades . . . .
Brake fluid . . . . . . . . . . . . . . . . . . . . . . . . . . . . . .
Vehicle battery . . . . . . . . . . . . . . . . . . . . . . . . . . .
Wheels . . . . . . . . . . . . . . . . . . . . . . . . . . . . . . . . .
If and when
. . . . . . . . . . . . . . . . . . . . . . . . . . . . . .
Vehicle tools, spare wheel . . . . . . . . . . . . . . . . .
Wheel change . . . . . . . . . . . . . . . . . . . . . . . . . . .
Tyre repair kit (Tyre-Mobility-System)* . . . . . . . .
Fuses . . . . . . . . . . . . . . . . . . . . . . . . . . . . . . . . . .
Bulbs . . . . . . . . . . . . . . . . . . . . . . . . . . . . . . . . . .
Changing bulbs. Double headlights . . . . . . . . .
Changing bulbs. Single headlight . . . . . . . . . . .
Changing the rear lights (on the wing) . . . . . . .
Changing the rear lights (on the rear lid) . . . . .
Side turn signal bulbs . . . . . . . . . . . . . . . . . . . . .
Number plate light . . . . . . . . . . . . . . . . . . . . . . .
Interior light and front reading lights . . . . . . . .
Additional brake lights* . . . . . . . . . . . . . . . . . . .
Luggage compartment light . . . . . . . . . . . . . . . .
Jump-starting . . . . . . . . . . . . . . . . . . . . . . . . . . . .
Towing and tow-starting . . . . . . . . . . . . . . . . . . .
Technical Data
. . . . . . . . . . . . . . . . . . . . . . .
General notes on the technical data
. . . . . . .
Outstanding information . . . . . . . . . . . . . . . . . .
Data on fuel consumption . . . . . . . . . . . . . . . . .
Towing a trailer . . . . . . . . . . . . . . . . . . . . . . . . . .
Wheels . . . . . . . . . . . . . . . . . . . . . . . . . . . . . . . . .
Te chni cal Data
. . . . . . . . . . . . . . . . . . . . . . . . . . . .
Checking fluid levels . . . . . . . . . . . . . . . . . . . . . .
Petrol engine 1.2 51 kW (70 bhp) . . . . . . . . . . .
Petrol engine 1.4 63 kW (85 bhp) . . . . . . . . . . .
Diesel engine 1.6 TDI CR 66 kW (90 bhp) . . . . .
Diesel engine 1.6 TDI CR 77 kW (105 bhp) . . . .
Dimensions and capacities . . . . . . . . . . . . . . . .
Index
. . . . . . . . . . . . . . . . . . . . . . . . . . . . . . . . . .
172
172
172
173
173
174
176
176
177
178
179
182
186
188
191
192
194
201
201
202
207
209
213
214
216
218
219
220
221
221
222
222
222
225 229
229
229
231
232
232
234
234
235
236
237
238
240
241
Ibiza ST_EN.book Seite 4 Dienstag, 12. Januar 2010 4:03 16
Page 58 of 250

Cockpit57
Safety First
Operating instructions
Practical tips
Technical Data
WARNING
•Failure to observe warning lamps and warning messages can result in
serious personal injuries or damage to your vehicle.•The risk of an accident increases if your vehicle breaks down. Use a
warning triangle to draw the attention of other road users in order to
prevent danger to thirds.
Item
Symbol
Meaning of warning and
control lamps
Further
information
Engine fault (petrol engine)
⇒ page 58
Glow plug system for diesel engine
If lit: glow plug system active
If flashing: engine fault
⇒page 58
Pollen accumulation in the diesel
engine particulate filter
⇒page 58
Engine oil pressure
⇒page 59
Bulb defective
⇒page 59
Rear fog light switched on
⇒page 59
Seat belt warning lamp*
⇒page 17
Anti-lock brake system (ABS) *
⇒page 59
If flashing : Electronic Stability Pro-
gramme (ESP) is working
If it remains lit: fault on ESP
⇒ page 60
Handbrake applied,
lack of brake fluid level or
serious fault in the brake system
⇒page 61
Cruise control system switched on
⇒page 61
Tyre pressure
⇒page 61
Automatic gear lever lock (automatic
gearbox)
⇒page 62
A1A1A2A3A4A5A6A7A8A9A10A11A12
Fuel level / reserve
⇒page 62
Doors open
⇒page 62
Rear lid open
⇒page 62
Airbag or belt tensioner system fault
or airbag disabled
⇒page 27
Main beam switched on
⇒page 63
Electro-hydraulic steering
⇒page 63
Fault in the emission control system
⇒page 63
Coolant level / coolant temperature
⇒page 63
Alternator fault
⇒page 64
Turn signals in operation
⇒page 64
SAFE
Electronic immobiliser
⇒page 64
Item
Symbol
Meaning of warning and
control lamps
Further
information
A13A14A15A16A17A18A19A20A21
Ibiza ST_EN.book Seite 57 Dienstag, 12. Januar 2010 4:03 16
Page 60 of 250

Cockpit59
Safety First
Operating instructions
Practical tips
Technical Data
•The diesel engine particulate filter may reach extremely high tempera-
tures; it should not enter into contact with flammable materials under-
neath the vehicle. Failure to comply could result in fire.
Engine oil pressure
This warning lamp indicates that the engine oil pressure is
too low.If this warning symbol starts to flash, and is accompanied by three audible
warnings , switch off the engine and check the oil level. If the oil level is too
low, top up with oil.
If the symbol flashes although the oil level is correct, do not drive on. The
engine must not even run at idle speed. Obtain technical assistance.Bulb defect*
The indicator lights up when a bulb is not functioning.The
warning lamp lights up when there is a fault on the turn signals, head-
lights, side lights and fog lights.
Rear fog light*
This warning lamp lights up when the rear fog light is switched on
. For
further information see ⇒page 87.
Anti-lock brake system (ABS)*
An indicator lamp monitors the ABS.
The indicator lamp
should light up for a few seconds when the ignition is
switched on. It goes out again after the system has run through an automatic
test sequence.
There is a fault in the ABS if:
•The warning lamp
does not light up when the ignition is switched on.
•The warning lamp does not go out again after a few seconds.•The warning lamp lights up when the vehicle is moving.
The vehicle can still be braked in the normal way (except that the ABS control
function will not function). Please take the vehicle to a qualified workshop as
soon as possible. For further information on the ABS see the ⇒page 152.
If there is a fault in the ABS, the ESP* and the tyre pressure warning lamp will
also light up.
Brake system fault
If the ABS warning lamp
lights up together with the brake warning lamp
, this indicates not only a fault in the ABS function, but also a possible fault
in the brake system ⇒.
WARNING
•Before opening the bonnet, read and observe the warnings on
⇒ page 179, “Working in the engine compartment”.•If the brake warning lamp
should light up together with the ABS
warning lamp
, stop the vehicle immediately and check the brake fluid
level in the reservoir ⇒ page 191, “Brake fluid”. If the fluid level has
dropped below the “MIN” mark you must not drive on. Risk of accident.
Obtain technical assistance.
WARNING (continued)
Ibiza ST_EN.book Seite 59 Dienstag, 12. Januar 2010 4:03 16
Page 93 of 250

Lights and visibility
92Turn signal and main beam headlight lever
The turn signal and main beam lever also operates the
parking lights and the headlight flasher.The turn signal and main beam headlight lever has the following
functions:
Switching on the turn signals
– Move the lever all the way up ⇒fig. 55 to indicate right , and
all the way down to indicate left .
Signalling a lane change
– Push the lever up or down to the point where you incur resistance and then release it. The turn signal will flash several
times. The corresponding warning lamp will also flash. Switching main beam on and off
– Turn the light switch to position
.
–Press the lever forward ⇒fig. 55 to switch on the main
beams.
– Pull the lever back towards you to switch the main beam head- lights off again.
Headlight flashers
– Pull the lever towards the steering wheel to operate the flasher.
Switching on parking lights
– Switch the ignition off and remove the key from the lock.
– Move the lever up or down to turn the right or left-hand parking lights on, respectively.
WARNING
The main beam can dazzle other drivers. Risk of accident! Never use the
main beam headlights or the headlight flasher if they could dazzle other
drivers.
Note
• The turn signals only work when the ignition is switched on. The corre-
sponding warning lamp
or flashes in the instrument panel. The warning
lamp
flashes when the turn signals are operated, provided a trailer is
correctly attached and connected to the vehicle. If a turn signal bulb is defec-
tive, the warning lamp flashes at double sp eed. If the trailer turn signal bulbs
are damaged, warning lamp
does not light up. Change the bulb.
Fig. 55 Turn signal and
main beam headlight
lever
A1
A2A1
A2
A4
A3
Ibiza ST_EN.book Seite 92 Dienstag, 12. Januar 2010 4:03 16
Page 214 of 250

If and when213
Safety First
Operating instructions
Practical tips
Technical Data
BulbsGeneral notesBefore changing any bulb, first turn off the failed component.
Do not touch the bulb glass. Fingerprints vaporise in the heat, causing a
reduction in the bulb life and condensation on the mirror surface, thus
reducing efficiency.
A bulb should only be replaced by one of the sam e type. The type is inscribed
on the bulb, either on the glass part or on the base.
It is highly recommended to keep a box of spare bulbs in the vehicle. At the
very least, the following spare bulbs, which are essential for road safety,
should be kept in the vehicle.
Double headlights
Dipped beam - H7 Long Life
Main beam - H7
Position - 2 x W5W Long Life
Turn signal - PY21W
Single headlight
Dipped/Main H4 Long Life
Position W5W Long Life
Turn signal PY 21W
Xenon headlights
12) /adaptive*
Dipped and full beam - D1S
13)
Position W5W Blue Long Life DRL (day light) P21W Super Long Life
Turn signals PY21W
Fog lights
Fog light/cornering - H11
Ta i l l i g h t s
Fog light - P21W
Reverse gear - R10W
Stop/position P21 /5W Long Life
Turn signal - PY21W
Side turn signal
Side turn signal - W5W
Number plate light
Number plate light - W5W Long Life
Note
•Depending on weather conditions (cold or wet), the front lights, the fog
lights, the tail lights and the turn signals may be temporarily misted. This has
no influence on the useful life of the lighting system. By switching on the
lights, the area through which the beam of light is projected will quickly be
demisted. However, the edges may continue to be misted.•Please check at regular intervals that all lighting (especially the exterior
lighting) on your vehicle is functioning pr operly. This is not only in the interest
of your own safety, but also that of all other road users.•D u e t o t h e d i f f i c u l t y i n a cc e s s i n g s o m e o f t h e b u l b s , a n y r e p l a c e m e n t w o r k
should be done by a SEAT dealer. However, there is a description below as to
how to change these bulbs, except for the fog lights.
12)On this type of headlight, the bulb changes must be made by the SEAT dealer, given
that complex elements must be removed from the vehicle and a reset must be made
on the automatic control system incorporated.
13)The Xenon bulbs discharge 2.5 times the light flux and have an average lifespan of 5
times more than that of halogen bulbs, this means that, except due to unusual circum-
stances, there is no need to change the bulbs for the whole life of the vehicle.
Ibiza ST_EN.book Seite 213 Dienstag, 12. Januar 2010 4:03 16
Page 215 of 250

If and when
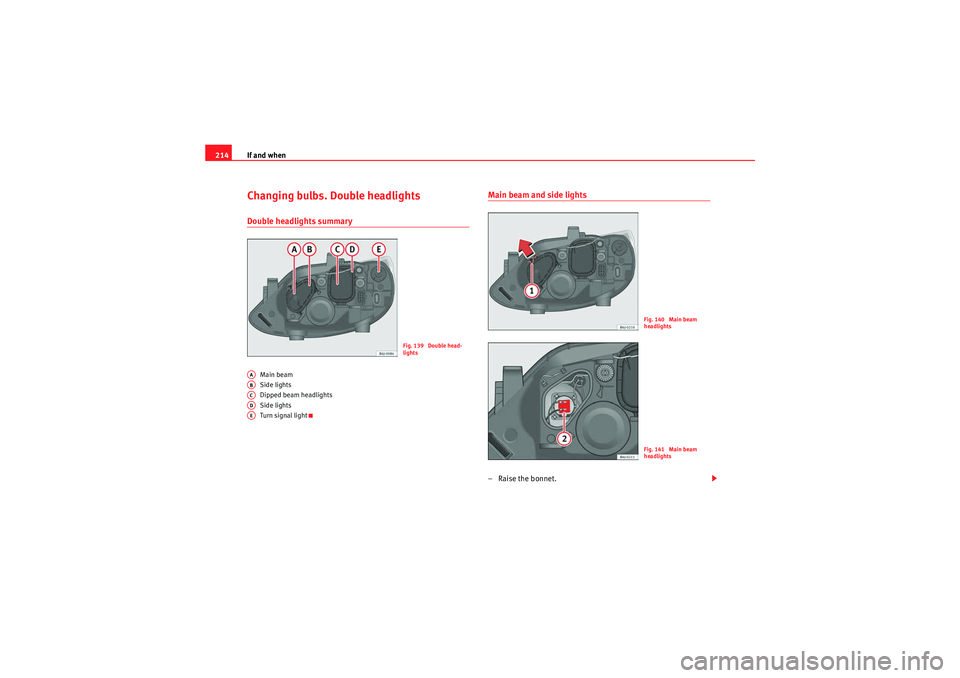
214Changing bulbs. Double headlightsDouble headlights summary
Main beam
Side lights
Dipped beam headlights
Side lights
Turn signal light
Main beam and side lights– Raise the bonnet.
Fig. 139 Double head-
lights
AAABACADAE
Fig. 140 Main beam
headlightsFig. 141 Main beam
headlights
Ibiza ST_EN.book Seite 214 Dienstag, 12. Januar 2010 4:03 16
Page 217 of 250

If and when
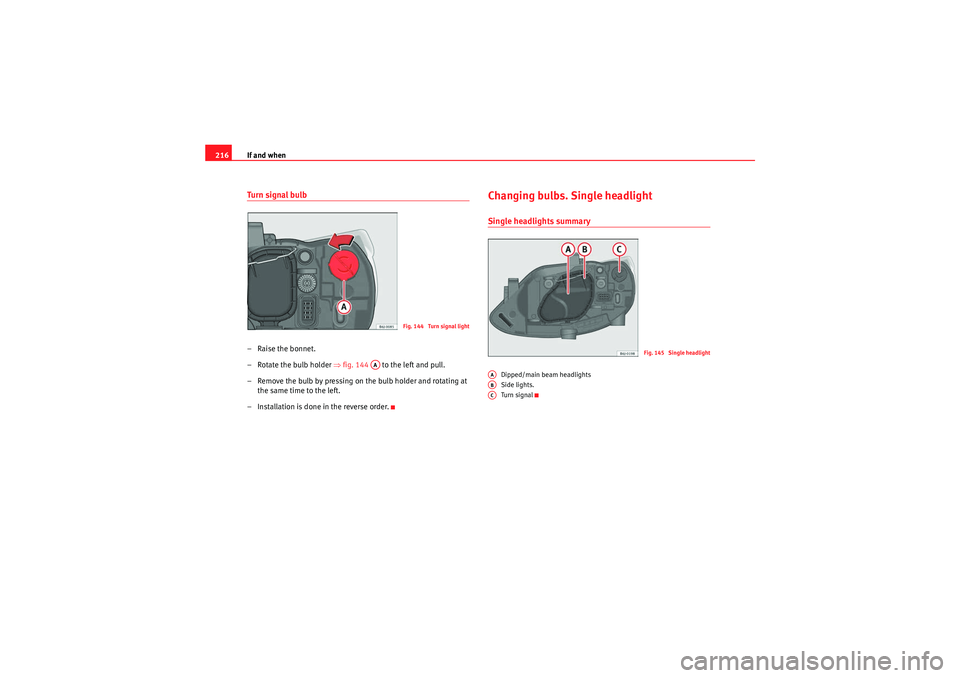
216Turn signal bulb– Raise the bonnet.
– Rotate the bulb holder ⇒fig. 144 to the left and pull.
– Remove the bulb by pressing on the bulb holder and rotating at the same time to the left.
– Installation is done in the reverse order.
Changing bulbs. Single headlightSingle headlights summary
Dipped/main beam headlights
Side lights.
Turn signal
Fig. 144 Turn signal light
AA
Fig. 145 Single headlight
AAABAC
Ibiza ST_EN.book Seite 216 Dienstag, 12. Januar 2010 4:03 16
Page 219 of 250

If and when
218
– Remove the bulb holder ⇒page 217, fig. 148 outwards.
– Replace the bulb by pulling it out and inserting the replacement.
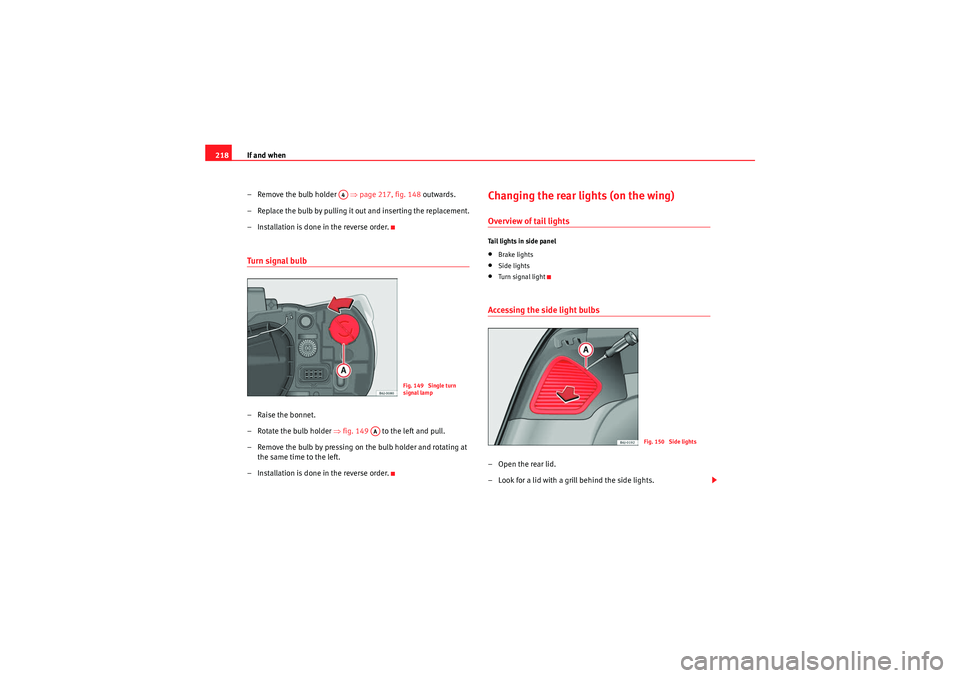
– Installation is done in the reverse order.Turn signal bulb– Raise the bonnet.
– Rotate the bulb holder ⇒fig. 149 to the left and pull.
– Remove the bulb by pressing on the bulb holder and rotating at the same time to the left.
– Installation is done in the reverse order.
Changing the rear lights (on the wing)Overview of tail lightsTail lights in side panel•Brake lights•Side lights•Turn signal lightAccessing the side light bulbs–Open the rear lid.
– Look for a lid with a grill behind the side lights.
A4
Fig. 149 Single turn
signal lamp
AA
Fig. 150 Side lights
Ibiza ST_EN.book Seite 218 Dienstag, 12. Januar 2010 4:03 16