Page 25 of 60

75A-2
FRONT SEAT FRAMES AND MECHANISMS
Front seatback frame: Removal - Refitting
75A
REMOVAL
I - REMOVAL PREPARATION OPERATION
aLock the airbag computer using the Diagnostic tool
(see Fault finding - Replacement of components)
(MR 413, 88C, Airbags and seat belt pretensioners).
aDisconnect the battery (see Battery: Removal - Re-
fitting) (MR 411, 80A, Battery).
aRemove:
-the compete front seat (see 75A, Front seat fra-
mes and mechanisms, Complete front seat: Re-
moval - Refitting, page 75A-8) ,
-the front seatback trim (see 77A, Front seat trim,
Front seatback trim: Removal - Refitting, page
77A-4) ,
-the front seat cushion trim (see 77A, Front seat
trim, Front seat base trim: Removal - Refitting,
page 77A-1) ,
-the front side (chest-level) airbag (depending on
the equipment level) (see Front (chest-level) side
airbag: Removal - Refitting) (MR 411, 88C, Air-
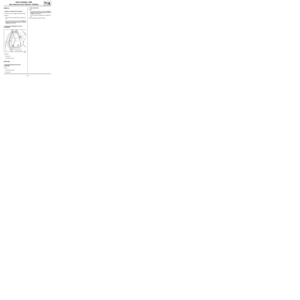
bags and seat belt pretensioners).aRemove:
-the bolts (1) ,
-the lumbar support. Equipment required
Diagnostic tool
Tightening torquesm
front seatback frame
bolts46 Nm
IMPORTANT
To avoid any risk of triggering when working on or
near a pyrotechnic component (airbags or preten-
sioners), lock the airbag computer using the dia-
gnostic tool.
When this function is activated, all the trigger lines
are inhibited and the airbag warning light on the ins-
trument panel lights up contin uously (ignition on).
IMPORTANT
Never handle the pyrotechnic systems (pretensio-
ners or airbags) near to a source of heat or naked
flame - they may be triggered.
121033
Page 26 of 60
75A-3
FRONT SEAT FRAMES AND MECHANISMS
Front seatback frame: Removal - Refitting
75A
aUnclip the various seat back inclination control cable
lower stops (depending on the equipment level).aRemove:
-the seat back inclination control cable upper
stop(s) (depending on the equipment level),
-the seat back inclination control cable(s) (depen-
ding on the equipment level).
aRemove:
-the rivets (2) ,
-the mounting from the control accessing the rear
seats.
120841
121196121192
121035
Page 27 of 60
75A-4
FRONT SEAT FRAMES AND MECHANISMS
Front seatback frame: Removal - Refitting
75A
aRemove:
-the rivets (3) ,
-the casing (4) .aRemove the unlocking cables from the front seat
runners.
120842
120844120843
120845
Page 28 of 60
 ,
-the front seatback f")
75A-5
FRONT SEAT FRAMES AND MECHANISMS
Front seatback frame: Removal - Refitting
75A
II - OPERATION FOR REMOVAL OF PART
CONCERNED
aRemove:
-the front seatback frame bolts (5) ,
-the front seatback frame.
REFITTING
I - REFITTING PREPARATIONS OPERATION
aAlways replace the front seatback frame bolts.
II - REFITTING OPERATION FOR PART
CONCERNED
aRefit:
-the front seatback frame,
-the front seatback frame bolts (5) .
aTorque tighten the front seatback frame bolts (46
Nm).III - FINAL OPERATION.
aRefit:
-the unlocking cables to the front seat runners,
-the casing (4) .
-the rivets (3) ,
-the mounting for the control accessing the rear
seats (depending on the equipment level).
-the rivets (2) ,
-the seat back inclination control cable(s) (depen-
ding on the equipment level).
-the seat back inclination control cable upper
stop(s) (depending on the equipment level),
aClip on the various seat back inclination control ca-
ble lower stops (depending on the equipment level).
aRefit:
-the lumbar support,
-the bolts (1) ,
-the front side (chest-level) airbag (depending on
the equipment level) (see Front (chest-level) side
airbag: Removal - Refitting) (MR 411, 88C, Air-
bags and seat belt pretensioners),
-the front seat cushion trim (see 77A, Front seat
trim, Front seat base trim: Removal - Refitting,
page 77A-1) ,
-the front seatback trim (see 77A, Front seat trim,
Front seatback trim: Removal - Refitting, page
77A-4) ,
-the complete front seat (see 75A, Front seat fra-
mes and mechanisms, Complete front seat: Re-
moval - Refitting, page 75A-8) .
aConnect the battery (see Battery: Removal - Refit-
ting) (MR 411, 80A, Battery).
aUnlock the airbag computer using the Diagnostic
tool (see Fault finding - Replacement of compo-
nents) (MR 413, 88C, Airbags and seat belt preten-
sioners).
120849
Page 29 of 60

75A-6
FRONT SEAT FRAMES AND MECHANISMS
Front seat runner: Removal - Refitting
75A
REMOVAL
I - REMOVAL PREPARATION OPERATION
aLock the airbag computer using the Diagnostic tool
(see Fault finding - Replacement of components)
(88C, Airbags and pretensioners).
aDisconnect the battery (see Battery: Removal - Re-
fitting) (80A, Battery).
aRemove:
-the compete front seat (see 75A, Front seat fra-
mes and mechanisms, Complete front seat: Re-
moval - Refitting, page 75A-8) ,
-the front buckle pretensioner (see Front buckle
pretensioner: Removal - Refitting) (88C, Airbags
and pretensioners).aRemove the unlocking cable from the front seat run-
ners.
II - OPERATION FOR REMOVAL OF PART
CONCERNED
aRemove:
-the nuts (1) from the front seat runner,
-the front seat runners.
REFITTING
I - REFITTING PREPARATION OPERATION
aAlways replace the front seat runner nuts. Equipment required
Diagnostic tool
Tightening torquesm
front seat runner nuts25 Nm
IMPORTANT
To avoid any risk of triggering when working on or
near a pyrotechnic component (airbags or preten-
sioners), lock the airbag computer using the dia-
gnostic tool.
When this function is activated, all the trigger lines
are inhibited and the airbag warning light on the ins-
trument panel lights up contin uously (ignition on).
IMPORTANT
Never handle the pyrotechnic systems (pretensio-
ners or airbags) near to a source of heat or naked
flame - they may be triggered.
120852
120850
Page 30 of 60

75A-7
FRONT SEAT FRAMES AND MECHANISMS
Front seat runner: Removal - Refitting
75A
II - REFITTING OPERATION FOR PART
CONCERNED
aRefit:
-the front seat runners without tightening them,
-the front seat runner control (2) .
aObserve the tightening order:
-the runner on the vehicle interior side (3) ,
-the runner on the vehicle exterior side (4) .
aTighten:
-the runners, holding them towards the interior of
the seat at (5) and (6) ,
-to torque the front seat runner nuts (25 Nm) (1) .
III - FINAL OPERATION.
aRefit:
-the unlocking cable of the front seat runners,
-the front buckle pretensioner (see Front buckle
pretensioner: Removal - Refitting) (88C, Airbags
and pretensioners),
-the entire front seat (see 75A, Front seat frames
and mechanisms, Complete front seat: Remo-
val - Refitting, page 75A-8) .
aConnect the battery (see Battery: Removal - Refit-
ting) (80A, Battery).
aUnlock the airbag computer using the Diagnostic
tool (see Fault finding - Replacement of compo-
nents)(88C, Airbags and pretensioners).
127773
Page 31 of 60
")
75A-8
FRONT SEAT FRAMES AND MECHANISMS
Complete front seat: Removal - Refitting
75A
REMOVAL
I - REMOVAL PREPARATION OPERATION
aPosition the vehicle on a two-post lift (see Vehicle:
Towing and lifting) (MR 411, 02A, Lifting equip-
ment).
aLock the airbag computer using the Diagnostic tool
(see Fault finding - Replacement of components)
(MR 413, 88C, Airbags and seat belt pretensioners).
aDisconnect the battery (see Battery: Removal - Re-
fitting) (MR 411, 80A, Battery).aUnclip the cover (1) located under the front seat.
aDisconnect the connector (2) .
II - OPERATION FOR REMOVAL OF PART
CONCERNED
aRemove:
-the blanking covers (3) ,
-the front seat nuts (3) . Equipment required
Diagnostic tool
Tightening torquesm
front seat nuts35 Nm
IMPORTANT
To avoid any risk of triggering when working on or
near a pyrotechnic component (airbags or preten-
sioners), lock the airbag computer using the dia-
gnostic tool.
When this function is activated, all the trigger lines
are inhibited and the airbag warning light on the ins-
trument panel lights up contin uously (ignition on).
IMPORTANT
Never handle the pyrotechnic systems (pretensio-
ners or airbags) near to a source of heat or naked
flame - they may be triggered.
120814
121326
Page 32 of 60
75A-9
FRONT SEAT FRAMES AND MECHANISMS
Complete front seat: Removal - Refitting
75A
REFITTING
I - REFITTING PREPARATIONS OPERATION
aAlways replace the front seat nuts.
II - REFITTING OPERATION FOR PART
CONCERNED
aRefit the front seat nuts (3) .
aTorque tighten the front seat nuts (35 Nm).
aRefit the blanking covers (3) .
III - FINAL OPERATION.
aConnect the connector (2) .
aClip on the cover (1) located under the front seat.
aConnect the battery (see Battery: Removal - Refit-
ting) (MR 411, 80A, Battery).
aUnlock the airbag computer using the Diagnostic
tool (see Fault finding - Replacement of compo-
nents) (MR 413, 88C, Airbags and seat belt preten-
sioners).


.aRemove:
-th")
 ,
-the casing (4) .aRemove the unlocking cables from the front seat
runners.
120842
120844")
