Page 49 of 122
61A-46
HEATING
Heater matrix: Removal - Refitting
LEFT-HAND DRIVE
61A
aRemove:
-the cross member reinforcement bolts (8) ,
-the cross member reinforcement.
aPut a protective cover on the floor carpet.II - OPERATION FOR REMOVAL OF PART
CONCERNED
aRemove:
-the bolt (9) from the heater matrix pipe bracket on
the distribution unit,
-the heater matrix pipe bracket on the distribution
unit,
-the bolt (10) from the heater matrix pipe bracket.
-the heater matrix pipe bracket,
-the heater matrix bolts (11) .
aPut a container in place to recover the coolant.
aRemove the heater matrix and its pipes.
aUnclip the pipe bracket.
aRemove the heater matrix pipes.
REFITTING
I - REMOVAL PREPARATION OPERATION
aReplace the seals between the pipes and the heater
matrix.
119713
119704
WARNING
To avoid any leaks, check that the pipe surface is
sound before positioning the new seal. The sur-
face must be clean and scratch free.
Page 50 of 122

61A-47
HEATING
Heater matrix: Removal - Refitting
LEFT-HAND DRIVE
61A
II - REFITTING OPERATION FOR PART
CONCERNED
aFit the pipes on the heater matrix with new seals.
aClip on the pipe bracket.
aRefit the heater matrix and its pipes.
aRefit:
-the heater matrix bolts.
-the heater matrix pipe bracket,
-the bolt on the heater matrix pipe bracket,
-the heater matrix pipe bracket on the distribution
unit,
-the heater matrix pipe bracket bolt on the distribu-
tion unit,
III - FINAL OPERATION
aRemove the protective cover on the floor carpet.
aRefit:
-the cross member reinforcement,
-the cross member reinforcement bolts,
aTorque tighten the cross member reinforcement
bolts (21 N.m).
aRefit:
-the dashboard (see Dashboard: Removal - Refit-
ting) (57A, Interior equipment),
-the centre console (see Centre console: Removal
- Refitting) (57A, Interior equipment).
aRefit the storage compartment.
aRefit the radio (see Radio: Removal - Refitting)
(86A, Radio).aRefit the tweeters (see Tweeter: Removal - Refit-
ting) (86A, Radio).
aRefit:
-the control panel (see 61A, Heating, Control pan-
el: Removal - Refitting, page 61A-65) ,
-the instrument panel (see Instrument panel: Re-
moval - Refitting) (83A, Instrument panel),
-the passenger front airbag (see Passenger's fron-
tal airbag: Removal - Refitting) (88C, Airbags
and pretensioners),
-the steering column switch assembly (see Steer-
ing column switch assembly: Removal - Refit-
ting) (84A, Control - Signals),
-the steering wheel (see Centre console: Removal
- Refitting) (36A, Steering assembly),
-the driver's front airbag (see Driver's frontal air-
bag: Removal - Refitting) (88C, Airbags and seat
belt pretensioners).
aRefit the rev counter (see Rev counter: Removal -
Refitting) (83A, Instrument panel).
aRefit the air outlet pipe onto the air filter unit.
aFit the air filter unit air inlet pipe.
aRefit the air filter unit air inlet pipe on the air filter unit
aRefit the heater matrix inlet and outlet hoses.
aFit the heater matrix inlet and outlet hose clips using
the (Mot. 1448) or (Mot. 1202-01) or (Mot. 1202-
02).
aRemove the (Ms. 583) on the heater matrix inlet and
outlet hoses. WITH 2 SPEAKERS, WITHOUT RADIO or VEHI-
CLE WITHOUT RADIO
RADIO NO. 01 or RADIO NO. 03
WITH 2 SPEAKERS, WITHOUT RADIO or RADIO
NO. 01 or RADIO NO. 03
ENGINE REV COUNTER
D7F
Page 51 of 122
61A-48
HEATING
Heater matrix: Removal - Refitting
LEFT-HAND DRIVE
61A
aRefit:
-the scoop under the scuttle panel grille (see Scoop
under the scuttle panel grille: Removal - Refit-
ting) (56A, Exterior equipment),
-the scuttle panel grille (see Scuttle panel grille:
Removal - Refitting) (56A, Exterior equipment),
-the windscreen wiper arms (see Windscreen wip-
er arm: Removal - Refitting) (85A, Wiping -
Washing).
aConnect the battery (see Battery: Removal - Refit-
ting) (80A, Battery).
aUnlock the airbag computer using the Diagnostic
tool (see Fault finding - Replacement of compo-
nents) (88C, Airbags and pretensioners).
aFill up and bleed the cooling system (see Cooling
system: Draining - Refilling) (19A, Cooling).
aCheck the cooling circuit (see Engine cooling sys-
tem: Check) (19A, Cooling).
Page 52 of 122

61A-49
HEATING
Heater matrix: Removal - Refitting
RIGHT-HAND DRIVE
61A
REMOVAL
I - REMOVAL PREPARATION OPERATION
aLock the airbag computer using the Diagnostic tool
(see Fault finding - Replacement of components)
(88C, Airbags and pretensioners).
aDisconnect the battery (see Battery: Removal - Re-
fitting) (80A, Battery).
aRemove:
-the windscreen wiper arms (see Windscreen wip-
er arm: Removal - Refitting) (85A, Wiping -
Washing),
-the scuttle panel grille (see Scuttle panel grille:
Removal - Refitting) (56A, Exterior equipment),
-the scoop under the scuttle panel grille (see Scoop
under the scuttle panel grille: Removal - Refit-
ting) (56A, Exterior equipment).aLoosen the clip (1) of the air outlet pipe on the air fil-
ter unit.
aRemove the air outlet pipe from the air filter unit (2) .
aDisconnect the air filter unit air inlet pipe (3) on the
air filter unit.
aMove aside the air inlet pipe from the air filter unit. Special tooling required
Ms. 583Pipe clamps .
Mot. 1448Remote operation pliers for
hose clips .
Mot. 1202-01Clip pliers for hose clips
(large size).
Mot. 1202-02Clip pliers for hose clips
(small size)
Equipment required
Diagnostic tool
D7F
119715
119716
Page 53 of 122
 (Ms. 583) on the heater matrix inlet and
outlet hoses.
aSeparate the heater matrix inlet and outlet hose clips
(5)")
61A-50
HEATING
Heater matrix: Removal - Refitting
RIGHT-HAND DRIVE
61A
aFit the (4) (Ms. 583) on the heater matrix inlet and
outlet hoses.
aSeparate the heater matrix inlet and outlet hose clips
(5) using the (Mot. 1448) or (Mot. 1202-01) or (Mot.
1202-02).
aDisconnect the heater matrix inlet and outlet hoses.
aRemove the rev counter (see Rev counter: Remov-
al - Refitting) (83A, Instrument panel).
aRemove:
-the driver's front airbag (see Driver's frontal air-
bag: Removal - Refitting) (88C, Airbags and pre-
tensioners),
-the steering wheel (see Steering wheel: Removal
- Refitting) (36A, Steering assembly),
-the steering column switch assembly (see Steer-
ing column switch assembly: Removal - Refit-
ting) (84A, Control - Signals),
-the passenger front airbag (see Passenger's fron-
tal airbag: Removal - Refitting) (88C, Airbags
and pretensioners),
-the instrument panel (see Instrument panel: Re-
moval - Refitting) (83A, Instrument panel),
-the control panel (see 61A, Heating, Control pan-
el: Removal - Refitting, page 61A-65) .aRemove the tweeters (see Tweeter: Removal - Re-
fitting) (86A, Radio).
aRemove the radio (see Radio: Removal - Refitting)
(86A, Radio).
aRemove the storage compartment.
aRemove:
-the central console (see Centre console: Remov-
al - Refitting) (57A, Interior equipment),
-the dashboard (see Dashboard: Removal - Refit-
ting) (57A, Interior equipment).
aPut a protective cover on the floor carpet.
119861
ENGINE REV COUNTER
WITH 2 SPEAKERS, WITHOUT RADIO or RADIO
NO. 01 or RADIO NO. 03
RADIO NO. 01 or RADIO NO. 03
WITH 2 SPEAKERS, WITHOUT RADIO or VEHI-
CLE WITHOUT RADIO
Page 54 of 122
 from the heater matrix pipe bracket on
the distribution uni")
61A-51
HEATING
Heater matrix: Removal - Refitting
RIGHT-HAND DRIVE
61A
II - OPERATION FOR REMOVAL OF PART
CONCERNED
aRemove:
-the bolt (6) from the heater matrix pipe bracket on
the distribution unit,
-the heater matrix pipe bracket on the distribution
unit,
-the bolt (7) from the heater matrix pipe bracket.
-the heater matrix pipe bracket,
-the heater matrix bolts (8) .
aPut a container in place to recover the coolant.
aRemove the heater matrix and its pipes.
aUnclip the pipe bracket.
aRemove the heater matrix pipes.
REFITTING
I - REMOVAL PREPARATION OPERATION
aAlways replace the seals between the pipes and the
heater matrix.II - REFITTING OPERATION FOR PART
CONCERNED
aFit the pipes on the heater matrix with new seals.
aClip on the pipe bracket.
aRefit the heater matrix and its pipes.
aRefit:
-the heater matrix bolts,
-the heater matrix pipe bracket,
-the bolt on the heater matrix pipe bracket,
-the heater matrix pipe bracket on the distribution
unit,
-the heater matrix pipe bracket bolt on the distribu-
tion unit.
III - FINAL OPERATION
aRemove the protective cover on the floor carpet.
aRefit:
-the dashboard (see Dashboard: Removal - Refit-
ting) (57A, Interior equipment),
-the central console (see Centre console: Remov-
al - Refitting) (57A, Interior equipment).
aRefit the storage compartment.
aRefit the radio (see Radio: Removal - Refitting)
(86A, Radio).
aRefit the tweeters (see Tweeter: Removal - Refit-
ting) (86A, Radio).
aRefit:
-the control panel (see 61A, Heating, Control pan-
el: Removal - Refitting, page 61A-65) ,
119704
WARNING
To avoid any leaks, check that the pipe surface is
sound before positioning the new seal. The sur-
face must be clean and scratch free.
WITH 2 SPEAKERS, WITHOUT RADIO or VEHI-
CLE WITHOUT RADIO
RADIO NO. 01 or RADIO NO. 03
WITH 2 SPEAKERS, WITHOUT RADIO or RADIO
NO. 01 or RADIO NO. 03
Page 55 of 122
 (83A, Instrument panel),
-the passenger front airbag (see Pas")
61A-52
HEATING
Heater matrix: Removal - Refitting
RIGHT-HAND DRIVE
61A
-the instrument panel (see Instrument panel: Re-
moval - Refitting) (83A, Instrument panel),
-the passenger front airbag (see Passenger's fron-
tal airbag: Removal - Refitting) (88C, Airbags
and pretensioners),
-the steering column switch assembly (see Steer-
ing column switch assembly: Removal - Refit-
ting) (84A, Control - Signals),
-the steering wheel (see Centre console: Removal
- Refitting) (36A, Steering assembly),
-the driver's front airbag (see Driver's frontal air-
bag: Removal - Refitting) (88C, Airbags and seat
belt pretensioners).
aRefit the rev counter (see Rev counter: Removal -
Refitting) (83A, Instrument panel).
aRefit the air outlet pipe onto the air filter unit.
aFit the air filter unit air inlet pipe.
aConnect the air filter unit air inlet pipe on the air filter
unit.
aConnect the heater matrix inlet and outlet hoses.
aFit the heater matrix inlet and outlet hose clips using
the (Mot. 1448) or (Mot. 1202-01) or (Mot. 1202-
02).
aRemove the (Ms. 583) from the heater matrix inlet
and outlet hoses.
aRefit:
-the scoop under the scuttle panel grille (see Scoop
under the scuttle panel grille: Removal - Refit-
ting) (56A, Exterior equipment),
-the scuttle panel grille (see Scuttle panel grille:
Removal - Refitting) (56A, Exterior equipment),
-the windscreen wiper arms (see Windscreen wip-
er arm: Removal - Refitting) (85A, Wiping -
Washing).
aConnect the battery (see Battery: Removal - Refit-
ting) (80A, Battery).aUnlock the airbag computer using the Diagnostic
tool (see Fault finding - Replacement of compo-
nents) (88C, Airbags and pretensioners).
aFill up and bleed the cooling system (see Cooling
system: Draining - Refilling) (19A, Cooling).
aCheck the cooling circuit (see Engine cooling sys-
tem: Check) (19A, Cooling).
ENGINE REV COUNTER
D7F
Page 56 of 122

61A-53
HEATING
Fan assembly: Removal - Refitting
LEFT-HAND DRIVE
61A
REMOVAL
I - REMOVAL PREPARATION OPERATION
aLock the airbag computer using the Diagnostic tool
(see Fault finding - Replacement of components)
(MR 413 Fault finding, 88C, Airbags and pretension-
ers).
aDisconnect the battery (see Battery: Removal - Re-
fitting) (MR 411, 80A, Battery).
aRemove:
-the passenger's front airbag (see Passenger's
frontal airbag: Removal - Refitting) (MR 411,
88C, Airbags and pretensioners),
-the front right-hand side air distribution duct (see
61A, Heating, Front side air distribution duct:
Removal - Refitting, page 61A-7) .
II - OPERATION FOR REMOVAL OF PART
CONCERNED
aUnpick the blower unit wiring harness (1) .
aUnclip the blower unit connector (2) .
aLift the blower unit connector.
aDisconnect the blower unit connector.aPress on the blower unit tab (3) .
aTurn the blower unit a quarter of a turn clockwise.
aRemove the blower unit (4) .
REFITTING
I - REFITTING OPERATION FOR PART
CONCERNED
aRefit the blower unit.
aPress on the blower unit tab.
aTurn the blower unit a quarter of a turn anti-clock-
wise.
aCheck that the blower unit is in place.
aConnect the blower unit connector. Equipment required
Diagnostic tool
119693
119694
119695
 1
1 2
2 3
3 4
4 5
5 6
6 7
7 8
8 9
9 10
10 11
11 12
12 13
13 14
14 15
15 16
16 17
17 18
18 19
19 20
20 21
21 22
22 23
23 24
24 25
25 26
26 27
27 28
28 29
29 30
30 31
31 32
32 33
33 34
34 35
35 36
36 37
37 38
38 39
39 40
40 41
41 42
42 43
43 44
44 45
45 46
46 47
47 48
48 49
49 50
50 51
51 52
52 53
53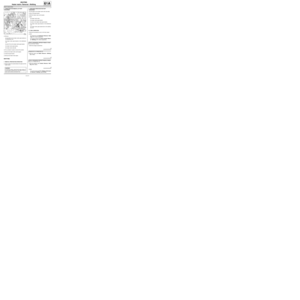 54
54 55
55 56
56 57
57 58
58 59
59 60
60 61
61 62
62 63
63 64
64 65
65 66
66 67
67 68
68 69
69 70
70 71
71 72
72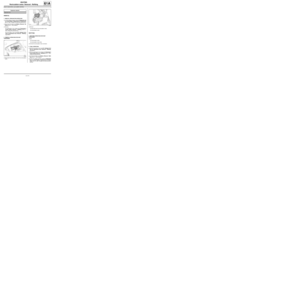 73
73 74
74 75
75 76
76 77
77 78
78 79
79 80
80 81
81 82
82 83
83 84
84 85
85 86
86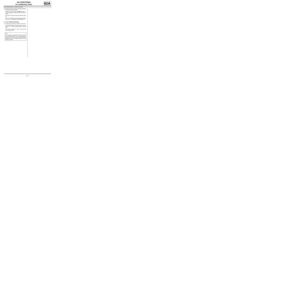 87
87 88
88 89
89 90
90 91
91 92
92 93
93 94
94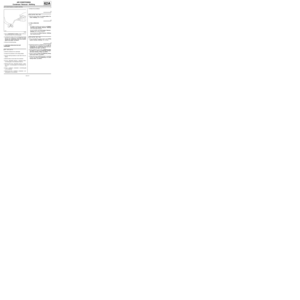 95
95 96
96 97
97 98
98 99
99 100
100 101
101 102
102 103
103 104
104 105
105 106
106 107
107 108
108 109
109 110
110 111
111 112
112 113
113 114
114 115
115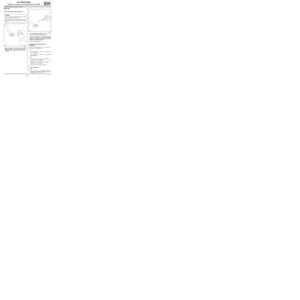 116
116 117
117 118
118 119
119 120
120 121
121 ,
-the cross member reinforcement.
aPut a protective cover on the floor carpet.")
 (56A, Exterior")