Page 97 of 122
62A-16
AIR CONDITIONING
Dehydrator reservoir: Removal - Refitting
AIR CONDITIONING or CLIMATE CONTROL
62A
aRemove:
-the dehydrator reservoir bolts (4) ,
-the dehydrator reservoir.
REFITTING
I - REFITTING PREPARATION OPERATION
aaClean the surface and seal of the pipe using EN-
GINE CLEANER (see Vehicle: Parts and con-
sumables for the repair) (04B, Consumables -
Products).
aUse a compressed air nozzle to blow on the sur-
face and the seal of the connecting pipe.
aLubricate the surface of the connecting pipe and the
seal with air conditioning oil (see 62A, Air condi-
tioning, Air conditioning: Parts and consum-
ables for the repair, page 62A-2) .
aRemove the blanking plugs. D4F, and 780 – K9K
124102
WARNING
Do not remove the blanking plugs from each
component until the last moment.
Also, do not remove the components from their
packaging until they are to be fitted to the vehi-
cle.
143880
143882
Page 98 of 122

62A-17
AIR CONDITIONING
Dehydrator reservoir: Removal - Refitting
AIR CONDITIONING or CLIMATE CONTROL
62A
II - REFITTING OPERATION FOR PART
CONCERNED
aRefit:
-the dehydrator reservoir,
-the dehydrator reservoir bolts on the condenser.
aFit:
-the « condenser - dehydrator reservoir » connect-
ing pipe on the dehydrator reservoir,
-the « expansion valve - dehydrator reservoir » con-
necting pipe on the dehydrator reservoir.
aRefit:
-the bolt on the « condenser - dehydrator
reservoir » connecting pipe,
-the bolt on the « expansion valve - dehydrator
reservoir » connecting pipe.
aPosition the air deflector.
III - FINAL OPERATION
aRefit:
-the front bumper (see Front bumper: Removal -
Refitting) (55A, Exterior protection),
-the front wheel arch liners (see Front wheel arch
liner: Removal - Refitting) (55A, Exterior protec-
tion),
-the front wheels (see Wheel: Removal - Refitting)
(35A, Wheels and tyres).
aConnect the battery (see ) (80A, Battery).
aConsult the refrigerant and oil quantity values before
filling the circuit (see 62A, Air conditioning, Air
conditioning: Parts and consumables for the re-
pair, page 62A-2) .
aFill the refrigerant circuit using a refrigerant charg-
ing station (see 62A, Air conditioning, Refriger-
ant circuit: Draining - Filling, page 62A-8) .
aCheck for leaks (see 62A, Air conditioning, Refrig-
erant circuit: Check, page 62A-7) .
aCheck that the air conditioning system is operating
correctly (see 62A, Air conditioning, Air condi-
tioning: Check, page 62A-4) . Note:
When replacing the dehydrator reservoir, add 15
ml of the recommended oil to the quantity of oil
recovered.
Page 99 of 122

62A-18
AIR CONDITIONING
Compressor: Removal - Refitting
AIR CONDITIONING or CLIMATE CONTROL
62A
REMOVAL
I - REMOVAL PREPARATION OPERATION
aPosition the vehicle on a two-post lift (see Vehicle:
Towing and lifting) (02A, Lifting equipment).aDrain the refrigerant circuit using a refrigerant
charging station (see 62A, Air conditioning, Re-
frigerant circuit: Draining - Filling, page 62A-8) .
aDisconnect the battery (see ) (80A, Battery).
aRemove:
-the front wheels (see Wheel: Removal - Refitting)
(35A, Wheels and tyres),
-the front wheel arch liners (see Front wheel arch
liner: Removal - Refitting) (55A, Exterior protec-
tion),
-the front bumper (see Front bumper: Removal -
Refitting) (55A, Exterior protection),
-the accessories belt (see Accessories belt: Re-
moval - Refitting) (10A, Engine and peripherals).
II - OPERATION FOR REMOVAL OF PART
CONCERNED
aRemove the bolts (1) from the connecting pipes on
the compressor. Equipment required
refrigerant charging station
compressed air nozzle
IMPORTANT
To avoid all risk of damage to the systems, apply
the safety and cleanliness instructions and opera-
tion recommendations before carrying out any
repair:
- (see 62A, Air conditioning, Air conditioning:
Precautions for the repair, page 62A-1) ,
- (see Vehicle: Precautions for the repair) (01D,
Mechanical introduction).
Note:
Use blanking plugs for the fuel circuits with part
numbers 77 01 208 229 or 77 01 476 857 to plug
any openings exposed to the open air. They must
be clean. Do not use any which have already been
used to plug a fuel circuit.
WARNING
To prevent moisture from entering the system,
place plugs on the cold loop components which are
open to the air.
WARNING
In order to avoid any refrigerant leaks, do not dam-
age (deform, twist, etc.) the pipe.
WARNING
Consult the device's operating manual to avoid
incorrect use.
121175
Page 100 of 122
62A-19
AIR CONDITIONING
Compressor: Removal - Refitting
AIR CONDITIONING or CLIMATE CONTROL
62A
aRemove the bolt (2) from the connecting pipe brack-
et on the compressor.
aMove aside the connecting pipes.
aPut blanking plugs in the openings.
aDisconnect the compressor connector (3) .
aRemove:
-the compressor bolts (4) ,
-the compressor.
REFITTING
I - REFITTING PREPARATION OPERATION
a
aClean the surface and seal of the pipe using EN-
GINE CLEANER (see Vehicle: Parts and con-
sumables for the repair) (04B, Consumables -
Products).
121174
121176
WARNING
Do not remove the blanking plugs from each
component until the last moment.
Also, do not remove the components from their
packaging until they are to be fitted to the vehi-
cle.
143880
Page 101 of 122

62A-20
AIR CONDITIONING
Compressor: Removal - Refitting
AIR CONDITIONING or CLIMATE CONTROL
62A
aUse a compressed air nozzle to blow on the sur-
face and the seal of the connecting pipe.
aLubricate the surface of the connecting pipe and the
seal with air conditioning oil (see 62A, Air condi-
tioning, Air conditioning: Parts and consum-
ables for the repair, page 62A-2) .
aRemove the blanking plugs.
II - REFITTING OPERATION FOR PART
CONCERNED
aRefit the compressor.
aConnect the compressor connector.
aPosition the compressor connecting pipes.
aRefit:
-the bolts of the connecting pipes on the compres-
sor,
-the bolt of the connecting pipe bracket on the com-
pressor.
III - FINAL OPERATION
aRefit:
-the accessories belt (see Accessories belt: Re-
moval - Refitting) (10A, Engine and peripherals),
-the front bumper (see Front bumper: Removal -
Refitting) (55A, Exterior protection),
-the front wheel arch liners (see Front wheel arch
liner: Removal - Refitting) (55A, Exterior protec-
tion),-the front wheels (see Wheel: Removal - Refitting)
(35A, Wheels and tyres).
aConnect the battery (see ) (80A, Battery).
aConsult the amount of refrigerant and oil required
before filling the air conditioning circuit (see 62A, Air
conditioning, Air conditioning: Parts and con-
sumables for the repair, page 62A-2) .
aFill the refrigerant circuit using a refrigerant charg-
ing station (see 62A, Air conditioning, Refriger-
ant circuit: Draining - Filling, page 62A-8) .
aIn the event of replacement, apply the after repair
procedure:
-Switch on the ignition,
-Check that the air conditioning is off,
-Switch the ventilation to speed 2,
-Put the temperature setting at minimum,
-Select the air recirculation position,
-Start the engine.
-Run the air conditioning in manual mode (in the
case of climate control do not press auto),
-Run the engine at idle speed for 3 minutes with air
conditioning,
-Switch off the engine.
aCheck for leaks (see 62A, Air conditioning, Refrig-
erant circuit: Check, page 62A-7) .
aCheck that the air conditioning system is operating
correctly (see 62A, Air conditioning, Air condi-
tioning: Check, page 62A-4) .
143882
Page 102 of 122

62A-21
AIR CONDITIONING
Expansion valve: Removal - Refitting
AIR CONDITIONING or CLIMATE CONTROL
62A
REMOVAL
I - REMOVAL PREPARATION OPERATION
a
aDrain the refrigerant circuit using a refrigerant
charging station (see 62A, Air conditioning, Re-
frigerant circuit: Draining - Filling, page 62A-8) .
aDisconnect the battery (see ) (80A, Battery).
aRemove:
-the wiper arms (see Windscreen wiper arm: Re-
moval - Refitting) (85A, Wiping - Washing),
-the scuttle panel grille (see Scuttle panel grille:
Removal - Refitting) (56A, Exterior equipment),
-the scoop under the scuttle panel grille (see Scoop
under the scuttle panel grille: Removal - Refit-
ting) (56A, Exterior equipment).
aRemove:
-the air filter unit (see Air filter unit: Removal - Re-
fitting) (12A, Fuel mixture),
-the upstream oxygen sensor (see Oxygen sen-
sors: Removal - Refitting) (17B, Petrol injection). Equipment requiredrefrigerant charging station
compressed air nozzle
IMPORTANT
To avoid all risk of damage to the systems, apply
the safety and cleanliness instructions and opera-
tion recommendations before carrying out any
repair:
- (see 62A, Air conditioning, Air conditioning:
Precautions for the repair, page 62A-1) ,
- (see Vehicle: Precautions for the repair) (01D,
Mechanical introduction).
Note:
Use blanking plugs for the fuel circuits with part
numbers 77 01 208 229 or 77 01 476 857 to plug
any openings exposed to the open air. They must
be clean. Do not use any which have already been
used to plug a fuel circuit.
WARNING
To prevent moisture from entering the system,
place plugs on the cold loop components which are
open to the air.
WARNING
In order to avoid any refrigerant leaks, do not dam-
age (deform, twist, etc.) the pipe.
WARNING
To prevent the surrounding components from over-
heating, do not damage (tear, pierce, bend, etc.) a
heat shield.
Any damaged heat shields must be replaced.WARNING
Consult the device's operating manual to avoid
incorrect use.
D4F, and 780 – K4M, and 854
Page 103 of 122
62A-22
AIR CONDITIONING
Expansion valve: Removal - Refitting
AIR CONDITIONING or CLIMATE CONTROL
62A
aRemove:
-the bolts (1) from the bulkhead heat-resistant pro-
tectors,
-the bulkhead heat-resistant protectors (2) .II - OPERATION FOR REMOVAL OF PART
CONCERNED
aRemove the bolts (3) from the expansion valve con-
necting pipes.
aMove aside the connecting pipes.
aPut blanking plugs in the openings.
aRemove:
-the bolts (4) from the expansion valve,
-the expansion valve.
123903
123908
121178
121179
Page 104 of 122

62A-23
AIR CONDITIONING
Expansion valve: Removal - Refitting
AIR CONDITIONING or CLIMATE CONTROL
62A
REFITTING
I - REFITTING PREPARATION OPERATION
a
aClean the surface and seal of the pipe using EN-
GINE CLEANER (see Vehicle: Parts and con-
sumables for the repair) (04B, Consumables -
Products).aUse a compressed air nozzle to blow on the sur-
face and the seal of the connecting pipe.
aLubricate the surface of the connecting pipe and the
seal with air conditioning oil (see 62A, Air condi-
tioning, Air conditioning: Parts and consum-
ables for the repair, page 62A-2) .
aRemove the blanking plugs.
II - REFITTING OPERATION FOR PART
CONCERNED
aRefit the expansion valve.
aFit the expansion valve connecting pipes.
aRefit the bolts of the connecting pipes on the expan-
sion valve.
III - FINAL OPERATION
aRefit:
-the bulkhead heat-resistant protectors,
-the upstream oxygen sensor (see Oxygen sen-
sors: Removal - Refitting) (17B, Petrol injection), WARNING
Do not remove the blanking plugs from each
component until the last moment.
Also, do not remove the components from their
packaging until they are to be fitted to the vehi-
cle.
143880
143882
Note:
Gradually tighten the bolts of the expansion valve
so that the expansion valve is positioned evenly
on the distr ibution unit.
D4F, and 780 – K4M, and 854
 1
1 2
2 3
3 4
4 5
5 6
6 7
7 8
8 9
9 10
10 11
11 12
12 13
13 14
14 15
15 16
16 17
17 18
18 19
19 20
20 21
21 22
22 23
23 24
24 25
25 26
26 27
27 28
28 29
29 30
30 31
31 32
32 33
33 34
34 35
35 36
36 37
37 38
38 39
39 40
40 41
41 42
42 43
43 44
44 45
45 46
46 47
47 48
48 49
49 50
50 51
51 52
52 53
53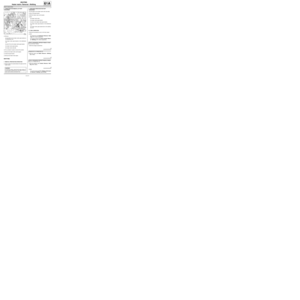 54
54 55
55 56
56 57
57 58
58 59
59 60
60 61
61 62
62 63
63 64
64 65
65 66
66 67
67 68
68 69
69 70
70 71
71 72
72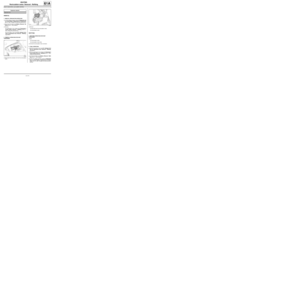 73
73 74
74 75
75 76
76 77
77 78
78 79
79 80
80 81
81 82
82 83
83 84
84 85
85 86
86 87
87 88
88 89
89 90
90 91
91 92
92 93
93 94
94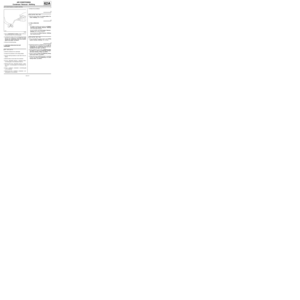 95
95 96
96 97
97 98
98 99
99 100
100 101
101 102
102 103
103 104
104 105
105 106
106 107
107 108
108 109
109 110
110 111
111 112
112 113
113 114
114 115
115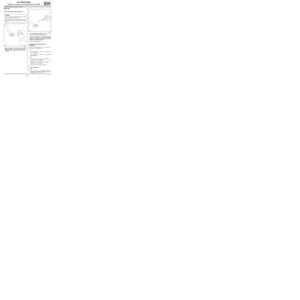 116
116 117
117 118
118 119
119 120
120 121
121 ,
-the dehydrator reservoir.
REFITTING
I - REFITT")
 from the connecting pipe brack-
et on the compressor.
aMove aside the connecting pi")
 from the bulkhead heat-resistant pro-
tectors,
-the bulkhead heat-resistant")