2009 PORSCHE PANAMERA key
[x] Cancel search: keyPage 92 of 343

90
Windows and Slide/Tilt Roof
1. Press lightly on the front tip of the cover over
the left passenger compartment monitoring
sensor.
The opposite end of the cover lifts up.
2. Unclip cover.
f Take the hexagon key out of the tool kit in
the luggage compartment.
For information on the tool kit:
f Please see the chapter “TOOL KIT” on
page 279. 3. Insert the hexagon
key all the way into
the opening.
4. Hold the key in this position and turn.
5. Remove the key. Stow the key in the tool kit.
6. Clip in cover.
f Have the fault corrected.
Please contact a qualified specialist workshop.
We recommend that you have an authorized
Porsche dealer to do this work as they have
trained workshop personnel and the necessary
parts and tools.
Storing end position of the slide/tilt roofThe end position of the slide/ tilt roof are lost if the
vehicle battery is disconnected/reconnected or
flat, the vehicle is started using jump leads, the
electrical fuse for the slide/tilt roof is replaced or
after emergency operation.
Warning!
Risk of injury when closing the slide/tilt roof.
When the end position is stored, the force
limiter is not available and the slide/tilt roof
will close with full force.
f Take care to ensure that nobody can be injured when the slide/tilt roof closes.
The vehicle must be stat ionary to store the end
position of the slide/tilt roof.
1. Switch on ignition.
2. Press the button forwards in closing direction and hold in position.
The process for storing the end position
begins after approximately 10 seconds.
Press and hold the button until the roof has
stopped moving completely.
The process takes a maximum of 20 seconds.
Start the storing process again if the button is
released prematurely.
Page 94 of 343

92
Lights, Turn Signals and Windshield WipersNote on operation
If the ignition key is removed and the door is
opened while the lights are on, an audible signal
(gong) warns of possible battery discharge.
In some countries, differences are possible
due to legal requirements.
Automatic Driving Light Assistant/
Adaptive Light SystemThe automatic driving light assistant is a comfort
function. Your Porsche’s driving light (low beam) is
switched on and off automatically depending on
the ambient brightness.
The automatic driving light assistant also controls
the daytime driving lights, the Automatic Coming
Home lights and the dy
namic cornering light.
The automatic driving light assistant is activated
when the light switch is set to the position .
Despite possible support by the driving light
assistant, it is the responsibility of the driver to
switch on the driving ligh t using the conventional
light switch in accordance with the relevant
national regulations.
Activating the headlights using the driving light
assistant therefore does not absolve the driver
of responsibility for correct operation of the
driving light.
Warning!
Risk of accidents if yo u drive your vehicle
without lights.
f Always carefully monitor the automatic driving light control.
Light SwitchLight is switched off.
The daytime driving lights are switched on
when the ignition is switched on, provided
that they are activated on the multi-
function display in the instrument panel.
For information on activating/deactivating
daytime driving lights:
fPlease see the chapter “ACTIVATING
AND DEACTIVATING AUTOMATIC
DAYTIME DRIVING LIGHTS” on
page 142.
Automatic driving light assistant
Side lights
Side marker lights , licence plate light,
instrument lighting, daytime driving lights
switched off.
Low beam/driving light
Only with ignition on.
Rear fog light
Pull the switch in the low beam position.
Indicator light lights up.
Page 101 of 343

Lights, Turn Signals and Windshield Wipers
99
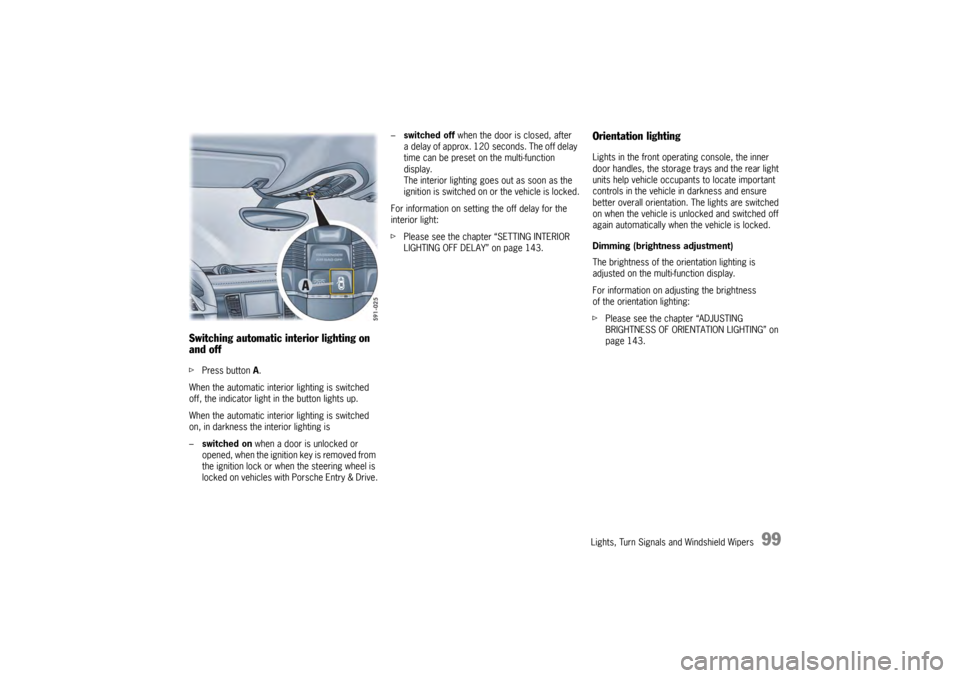
Switching automatic interior lighting on
and off fPress button A.
When the automatic interior lighting is switched
off, the indicator light in the button lights up.
When the automatic interior lighting is switched
on, in darkness the interior lighting is
– switched on when a door is unlocked or
opened, when the ignition key is removed from
the ignition lock or when the steering wheel is
locked on vehicles with Porsche Entry & Drive. –
switched off when the door is closed, after
a delay of approx. 120 seconds. The off delay
time can be preset on the multi-function
display.
The interior lighting goes out as soon as the
ignition is switched on or the vehicle is locked.
For information on setting the off delay for the
interior light:
f Please see the chapter “SETTING INTERIOR
LIGHTING OFF DELAY” on page 143.
Orientation lightingLights in the front operating console, the inner
door handles, the storage trays and the rear light
units help vehicle occupa nts to locate important
controls in the vehicle in darkness and ensure
better overall orientation. The lights are switched
on when the vehicle is unlocked and switched off
again automatically when the vehicle is locked.
Dimming (brightness adjustment)
The brightness of the orientation lighting is
adjusted on the multi-function display.
For information on adjusting the brightness
of the orientation lighting:
f Please see the chapter “ADJUSTING
BRIGHTNESS OF ORIENTATION LIGHTING” on
page 143.
Page 120 of 343

118
Instrument Panel and Multi-Function DisplayVehicle
Audio
Navigation
Map
Phone
Trip
Tire pressure
Sport Chrono
ACC
Info
Oil level
Settings
Limits
Station/track
Destination input
Start/Stop route guidance
Manual zoom
Show destination/position
Auto zoom
3D map
North up
Answer/Reject/End
Phonebook
Previous calls
Received calls
since
consecutive
to destination
Fill info
Tire info
Charge
Comfort press.
Adjust
Start
Stop
Round
IntMessages
Service intervals
Level
Ø Consumption
Display
Light/visibility
Locking
Air conditioning
Date/Time
Units
Language
Volume
Steering wheel op.
Fact. settings
Limit 1/Limit 2
Last destination
Stored destinations
POIs
Res.
Reset
Menu scope
Audio
Vehicle menu
Upper line
PCM display
Lower line
Shift request
Brightness
Exterior lights
Interior lights
Wiper
Revers. opt.
Door unlock
Door lock
Comfort Entry
Climate style
Vent. panel
Center cooler
Automatic air circ.
Time
Date
Summer time
Time Chrono
Speedometer
Temperature
Tire pressure
Boost pressure
Consumption
German/French …
ParkAssist
Warn. tones
Multif. key
Current speed
Setting the speed
Page 128 of 343

126
Instrument Panel and Multi-Function Display
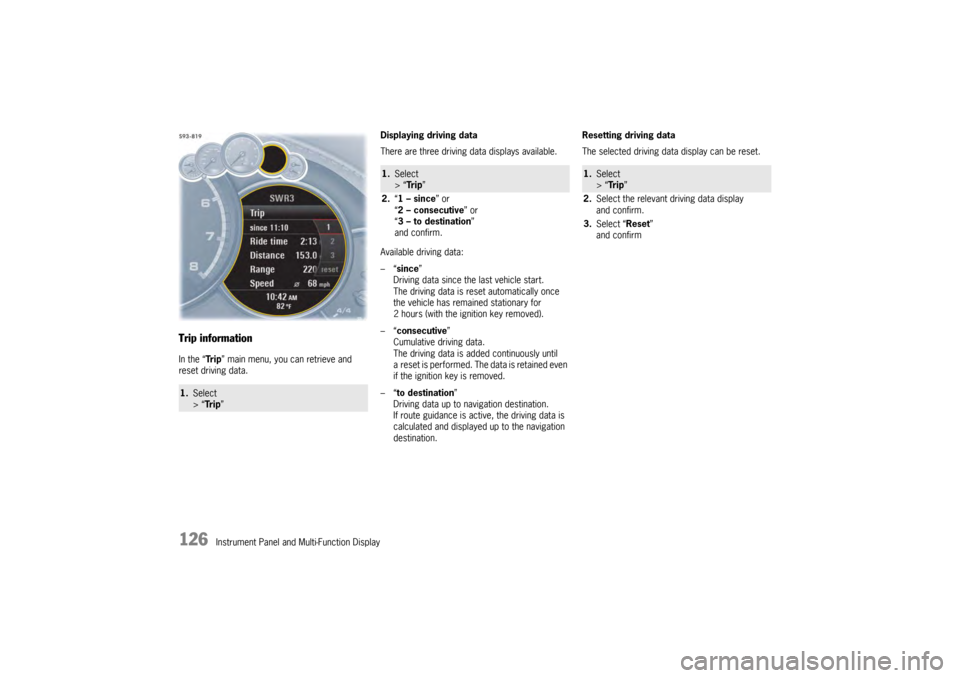
Trip informationIn the “Tr i p” main menu, you can retrieve and
reset driving data. Displaying driving data
There are three driving data displays available.
Available driving data:
–“
since ”
Driving data since the last vehicle start.
The driving data is reset automatically once
the vehicle has remained stationary for
2 hours (with the ignition key removed).
–“ consecutive ”
Cumulative driving data.
The driving data is added continuously until
a reset is performed. The data is retained even
if the ignition key is removed.
–“ to destination ”
Driving data up to navigation destination.
If route guidance is active, the driving data is
calculated and displayed up to the navigation
destination. Resetting driving data
The selected driving data display can be reset.1.
Select
> “Tr i p ”
1.Select
> “Tr i p ”
2. “1 – since ” or
“ 2 – consecutive ” or
“ 3 – to destination ”
and confirm.
1. Select
> “Tr i p ”
2. Select the relevant driving data display
and confirm.
3. Select “Reset ”
and confirm
Page 140 of 343

138
Instrument Panel and Multi-Function Display
Vehicle Settings on the Multi-
Function DisplayDifferent settings can be adjusted in the
multi-function display on the instrument panel
depending on the vehicle equipment.
On vehicles with comfort memory, the settings are
stored on the car key or the person buttons in the
driver’s door.
For information on the comfort memory:
fPlease see the chapter “COMFORT MEMORY”
on page 40.
Selecting settings menu
Setting optionsThe following vehicle functions can be adapted
individually:
–“ Display ”
Adapt the appearance of the multi-function
display, see page 139.
–“ Light/Visibility ”
Adjust the vehicle lighting, wipers and
reversing options, see page 142.
–“ Locking ”
Adjust the locking settings, see page 145.
–“ Air conditioning ”
Adapt the air conditioning, see page 146.
–“ Date/time ”
Set the date and time, see page 147.
–“ Units ”
Set the units of measurement on the
instruments and display, see page 149.
–“ Language”
Set the language of the multi-function display
and the instrument panel, see page 150. –“
Volume ”
Adjust the volume of the warning and
information tones, see page 150.
–“ Steering wheel operation”
Change the MFS button assignment on the
multi-function steering wheel, see page 151.
–“ Reset ”
Reset to factory settings, see page 139.
Selecting setting options or activating
vehicle functionsA symbol positioned in front of a setting option
indicates whether the option is selected or
a vehicle function is activated.
Selecting one of several options
Option is selected.
Option is not selected.
Activating and deactivating functions Function is activated.
Function is deactivated.
1.Select
> “Vehicle ”
> “ Settings ”
and confirm.
Page 153 of 343

Instrument Panel and Multi-Function Display
151
Adjusting volume of warning tones
The volume of the warning tones can be adjusted
individually.
Available setting options:
–“Loud ”
–“ Medium”
–“ Low ”
Changing button assignment on multi-
function steering wheelThe assignment of the MFS button on the multi-
function display can be changed individually.
Functions from the multi-function display or PCM
can be assigned to the MFS button.
Available PCM functions:
–“Source change ”
Change audio source.
–“ Voice control ”
Activate voice control.
–“ Dri. instr. (Rep) “
Repeat voice instruction from the navigation
system.
–“ Station/track < ”
Previous radio station/title.
–“ Station/track > ”
Next radio station/track. –“
Map ”
Display navigation map in PCM.
–“ Menu change ”
Change main menu area.
Available instrument cluster functions:
–“ Start/Stop Chr. ”
Start/stop timing.
–“ Vehicle menu ”
Display vehicle menu.
–“ Tr i p m e n u ”
Display trip menu.
–“ TPM menu ”
Display TPM menu.
–“ Chrono menu”
Display chrono menu.
–“ ACC menu ”
Display ACC menu.
–“ Audio menu ”
Display audio menu.
–“ Phone menu ”
Display telephone menu.
–“ Navi menu ”
Display navigation menu.
–“ Map menu ”
Display navigation map on the multi-function
display.
1. Select
> “Vehicle ”
> “ Settings ”
> “Volume ”
2. “Warn. tones ”.
3. Select desired setting
and confirm.
1.Select
> “Vehicle ”
> “Settings ”
> “ Steering wheel op. ”
2. “Multif. key ”
and confirm.
3. Select “PCM function” or
“ Inst. clus. fun. ”
and confirm.
4. Select desired function assignment
and confirm.
Page 156 of 343

154
Instrument Panel and Multi-Function Display
Battery protection
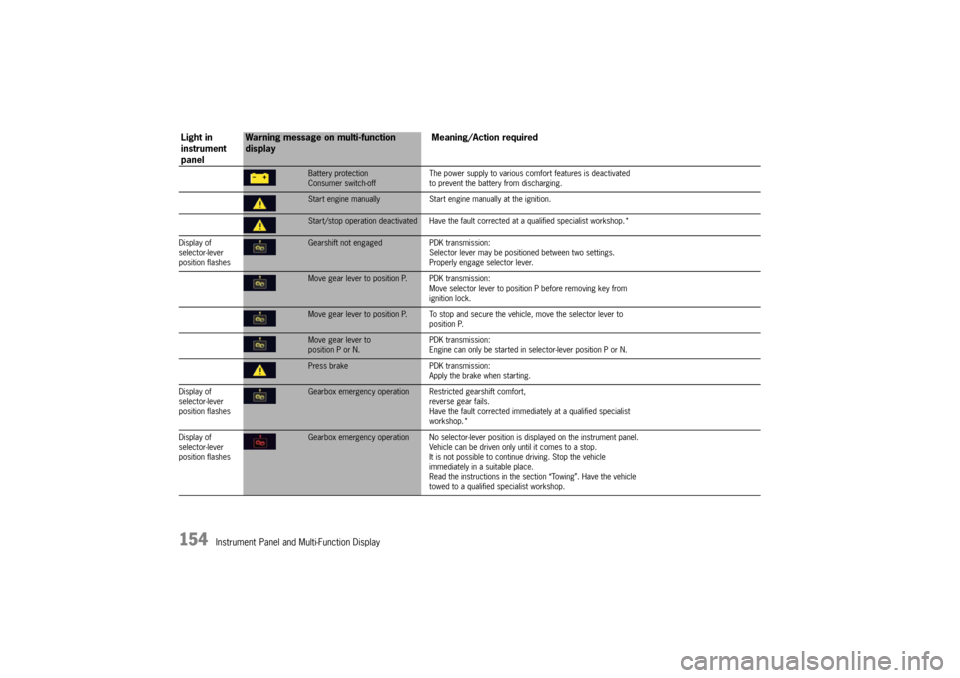
Consumer switch-offThe power supply to various comf
ort features is deactivated
to prevent the battery from discharging.Start engine manually Start engine manually at the ignition.Start/stop operation deactivated Have the faul t corrected at a qualified specialist workshop.*
Display of
selector-lever
position flashesGearshift not engaged PDK transmission:
Selector lever may be positi oned between two settings.
Properly engage selector lever.Move gear lever to position P. PDK transmission:
Move selector lever to position P before removing key from
ignition lock.Move gear lever to position P. To stop and se cure the vehicle, move the selector lever to
position P.Move gear lever to
position P or N. PDK transmission:
Engine can only be started in selector-lever position P or N.Press brake
PDK transmission:
Apply the brake when starting.
Display of
selector-lever
position flashesGearbox emergency operation R estricted gearshift comfort,
reverse gear fails.
Have the fault corrected immediately at a qualified specialist
workshop.*
Display of
selector-lever
position flashesGearbox emergency operation No selector-lever po sition is displayed on the instrument panel.
Vehicle can be driven only until it comes to a stop.
It is not possible to contin ue driving. Stop the vehicle
immediately in a suitable place.
Read the instructions in the se ction “Towing”. Have the vehicle
towed to a qualified specialist workshop.
Light in
instrument
panel
Warning message on multi-function
display Meaning/Action required