2009 PORSCHE PANAMERA jump start
[x] Cancel search: jump startPage 11 of 343

Contents
9
Battery....................................................... 303
External Power Supply, Jump-Lead
Starting...................... ................................ 306
Changing the Remote Control Battery ........... 307
Replacing Bulbs .......... ................................ 308
Headlights ...................... ............................ 308
Side Turn Signal Ligh t ................................. 312
Licence Plate Lights .... ................................ 313
Side Marker Light ... .................................... 313
Changing Light-Emitting Diodes and
Long-Life Bulbs ........... ............................... 314
Headlight Adjustment .. ................................ 314
Towing ....................................................... 316
Fire Extinguisher ......... ................................ 321Tire Pressure and Technical Data ..... 322Vehicle Identification Data ............................ 323
Engine Data................................................ 324
Wheels, Tires.............. ................................ 325
Tire Pressure for Cold Tires (68 °F/20 °C) .... 326
Weights...................................................... 328
Filling Capacities ......... ................................ 329
Driving Performance ... ................................ 329
Dimensions .................... ............................ 330Index .............................................. 331
Page 92 of 343

90
Windows and Slide/Tilt Roof
1. Press lightly on the front tip of the cover over
the left passenger compartment monitoring
sensor.
The opposite end of the cover lifts up.
2. Unclip cover.
f Take the hexagon key out of the tool kit in
the luggage compartment.
For information on the tool kit:
f Please see the chapter “TOOL KIT” on
page 279. 3. Insert the hexagon
key all the way into
the opening.
4. Hold the key in this position and turn.
5. Remove the key. Stow the key in the tool kit.
6. Clip in cover.
f Have the fault corrected.
Please contact a qualified specialist workshop.
We recommend that you have an authorized
Porsche dealer to do this work as they have
trained workshop personnel and the necessary
parts and tools.
Storing end position of the slide/tilt roofThe end position of the slide/ tilt roof are lost if the
vehicle battery is disconnected/reconnected or
flat, the vehicle is started using jump leads, the
electrical fuse for the slide/tilt roof is replaced or
after emergency operation.
Warning!
Risk of injury when closing the slide/tilt roof.
When the end position is stored, the force
limiter is not available and the slide/tilt roof
will close with full force.
f Take care to ensure that nobody can be injured when the slide/tilt roof closes.
The vehicle must be stat ionary to store the end
position of the slide/tilt roof.
1. Switch on ignition.
2. Press the button forwards in closing direction and hold in position.
The process for storing the end position
begins after approximately 10 seconds.
Press and hold the button until the roof has
stopped moving completely.
The process takes a maximum of 20 seconds.
Start the storing process again if the button is
released prematurely.
Page 170 of 343

168
Driving and Driving Safety
f
Do not warm up the engine when stationary.
Drive off immediately. Avoid high revs and full
throttle until the engine has reached operating
temperature.
f If the vehicle battery power is too weak, the
engine can be started with jump leads.
For information on jump-lead starting:
f Please see the chapter “EXTERNAL POWER
SUPPLY, JUMP-LEAD STARTING” on
page 306.
Note on operation
To ensure a good battery charge condition,
thereby ensuring that the battery will start the
engine, all electrical loads that are not required
should be switched off when the ignition is
switched on and when engine revs are low
(in traffic jams, in city traffic or in queues).
Stoppingf Only remove the ignition key when the vehicle
is stationary.
f Only switch the ignition off when the vehicle is
stationary, as there is no power steering and
brake booster assistance when the engine is
switched off.
f When leaving the vehicle, always remove the
ignition key, apply the electric parking brake
and engage selector-lever position P .
The control unit always remains in the ignition
lock on vehicles with Porsche Entry & Drive .
Warning!
Danger of injury. Hot engine compartment
components can burn skin on contact.
f Before working on any part in the engine
compartment, turn the engine off and let it cool
down sufficiently.
Risk of burn injury when standing near or
coming into contact with the exhaust pipe.
The exhaust pipe is hot wh en the vehicle is running
and remains hot for some time after the vehicle is
turned off. f
To prevent injury, make a point of noting where
your vehicle’s exhaust pipe is, avoid placing
your legs near the exhaust pipe when loading
and unloading cargo in the rear, and closely
supervise children around the vehicle during
time when the exhaust pipe could be hot.
A hot exhaust pipe can cause painful skin
burns.
Radiator fanFor information on radiator fans:
f Please see the chapter “RADIATOR FANS” on
page 258.
Warning!
Danger of injury. After the ignition is
switched off, the engine compartment and
coolant temperatures are monitored for
approx. 30 minutes. During this period, and
depending on temperature, the radiator fan
may continue to run or start to run.
f Carry out work in these areas only with the
engine off and exercise extreme caution,
always anticipating that the fan blade could suddenly start to run.
Page 279 of 343

Minor Repairs
277
Minor Repairs
Exercise Extreme Caution when Working
on your Vehicle .......
................................... 278
Tires and Wheels..... ................................... 280
Wheel Bolts ................ .............................. 293
Flat Tire .................. ................................... 293
Electrical System .... ................................... 296
Battery ............................................ .......... 303
External Power Supply, Jump-Lead
Starting ........................................... .......... 306
Changing the Remote Co ntrol Battery .......... 307
Replacing Bulbs ...... ................................... 308
Headlights ....................................... .......... 308
Side Turn Signal Ligh t................................. 312
Licence Plate Lights ................................... 313
Side Marker Light .... ................................... 313
Changing Light-Emitting Diodes and
Long-Life Bulbs ......................................... 314
Headlight Adjustment .................................. 314
Towing ........................ .............................. 316
Fire Extinguisher .......................... .............. 321
Page 308 of 343

306
Minor Repairs
External Power Supply,
Jump-Lead StartingIf the battery is flat, the battery of another vehicle
can be used for starting or as an external power
supply with the help of jump leads.
Both batteries must be 12 V batteries.
The capacity (Ah) of the do nor battery must not be
substantially less than that of the flat battery.
The flat battery must be connected correctly to
the vehicle’s electrical system.
Warning!
Risk of short circuit, damage and explosion,
resulting in serious personal injury or death.
f Use only jumper cables of adequate diameter
cross-section and fitted with completely
insulated alligator clips.
f Follow all warnings and instructions of the
jumper cable manufacturer.
f When connecting jumper cables, make sure
that they cannot get ca ught in any moving
parts in the engine compartment.
The jumper cables must be long enough so
that neither vehicles nor cables touch another.
f The vehicles must not be in contact, otherwise
current might flow as soon as the positive
terminals are connected.
f The cable clamps must not be allowed to
contact each other when one end of the
jumper cables are connected to a battery. f
Carefully ensure that tools or conductive
jewelery (rings, chains, watch straps) do not
come into contact with the positive jumper
cable or the positive battery post.
f Improper hook-up of jumper cables can ruin
the alternator.
Danger of caustic burns.
f Do not lean over the battery.
Danger of gas explosion.
f Improper use of booster battery to start a
vehicle may cause an explosion, resulting in
serious personal injury or death.
f Keep sources of ignition away from the
battery, e.g. open flame, burning cigarettes or
sparking due to cable contact or welding work.
f A discharged battery can freeze even at
14 °F ( −10 °C). Before connecting jumper
cables, a frozen battery must be thawed out.
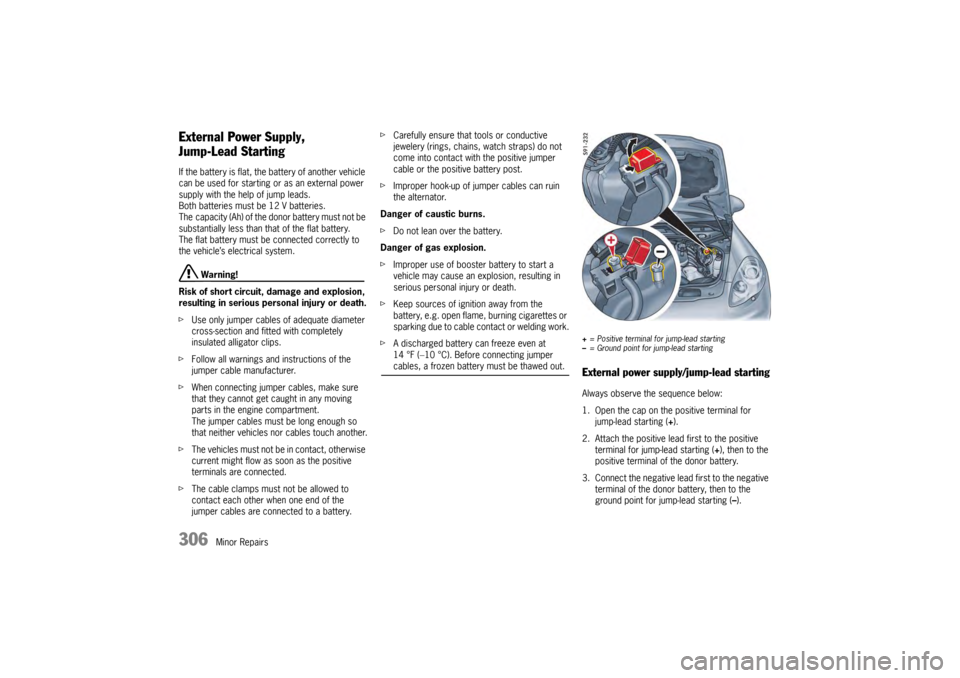
+ = Positive terminal for jump-lead starting
– = Ground point for jump-lead startingExternal power supply/jump-lead startingAlways observe the sequence below:
1. Open the cap on the positive terminal for
jump-lead starting ( +).
2. Attach the positive lead first to the positive terminal for jump-lead starting ( +), then to the
positive terminal of the donor battery.
3. Connect the negative lead first to the negative
terminal of the donor battery, then to the
ground point for jump-lead starting ( –).
Page 309 of 343

Minor Repairs
307
4. Leave the engine of the donor vehicle running at a higher engine speed.
5. Start the engine. An attempted start using jump leads should
not last more than 15 seconds. Then wait for
at least one minute.
6. Disconnect the negative lead from the ground
point for jump-lead starting ( –) first, then from
the negative terminal of the donor battery.
7. Disconnect the positive lead from the positive terminal of the donor ba ttery first, then from
the positive terminal for jump-lead starting ( +).
8. Close the cap on the posi tive terminal for jump-
lead starting ( +).Charging the batteryAutomotive batteries loose their efficiency when
not in use. The charge available in your battery can
be measured with a battery hydrometer. We
recommend that the battery voltage be tested by
your Porsche dealer who has the appropriate
equipment.
If the car is not driven for prolonged periods, the
battery must be charged at least every 6 weeks.
A discharged battery allo ws rapid formation of
sulfates, leading to premature deterioration of the
plates.
Danger!
Hydrogen gas genera ted by the battery
could cause an explosion, resulting in
serious personal injury or death.
f Charge battery in a well ventilated area.
f Never charge a frozen battery. It may explode
because of gas trapped in the ice. Allow a
frozen battery to thaw out first.
f If you get electrolyte, which is an acid, in your
eyes or on your skin, immediately rinse with
cold water for several minutes and call a doctor.
Your authorized Porsche dealer will be pleased to
advise you about a suitable charger.
f Always observe the instructions provided by
the charger manufacturer.
1. Connect the charger to the jump-lead starting terminals.
Only plug into the mains and switch the
charger on when it is connected up correctly.
2. Switch on the charger.
3. After charging the battery, first switch off the charger and then disconnect it.
f Please see the chapter “PUTTING VEHICLE
INTO OPERATION” on page 305.
Changing the Remote Control
BatteryNote
f Please observe the regulations for disposing
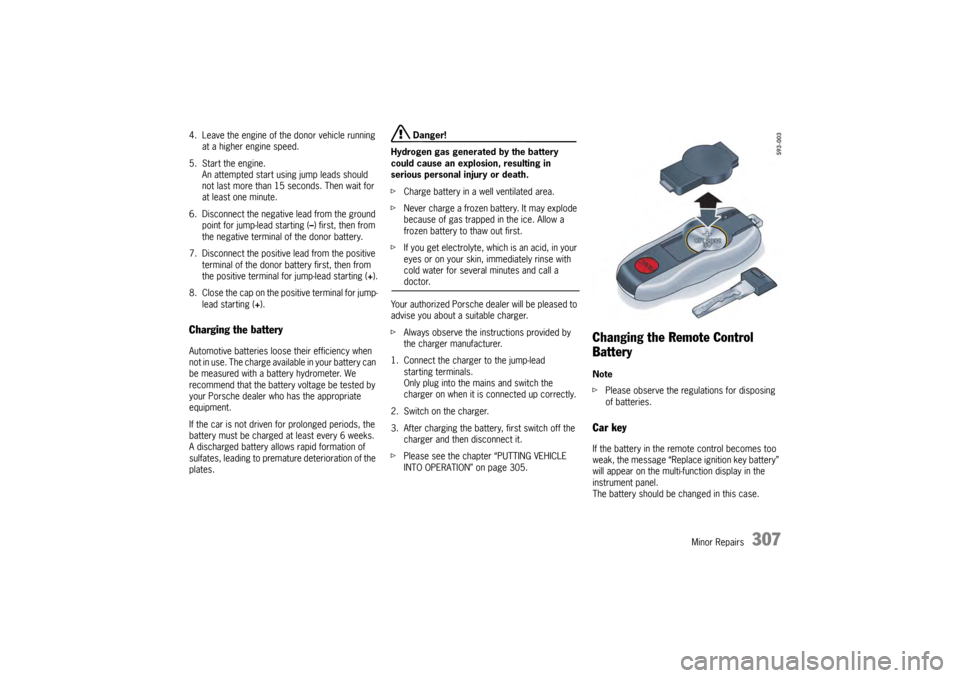
of batteries.Car keyIf the battery in the remote control becomes too
weak, the message “Replace ignition key battery”
will appear on the multi-function display in the
instrument panel.
The battery should be changed in this case.
Page 334 of 343

332
Index
Switching on and off .......................................... 170
Automatic (PDK transmission) Rocker switches on the st eering wheel .................. 61
Automatic brake differential (ABD) Functional description . ....................................... 204
Automatic driving light assistant Adaptive light system .. ......................................... 92
Automatic headlight levelling Functional description . ......................................... 94
Automatic speed control (cruise control) Accelerating ........ ...................................... ........ 177
Decelerating........................................... ........... 177
Functional description . ....................................... 176
Interrupting operation.. ....................................... 177
Storing speed.. .................................................. 176
Switching off .................. ................................... 178
Switching on .................. ................................... 176
Automatic transmission...... .......................................... 193
AUX interface, installation position ................................ 192
Auxiliary high-beam headlight Changing bulb ................ ................................... 311
Installing headlights..... ....................................... 309
Removing headlights ....... ................................... 309
BBaby seat
Installing with LATCH sy stem ................................ 56
LATCH restraint system .. ..................................... 56
Prescribed installation direction (depending on
weight of child) ........... ......................................... 53
Battery ........................................ ............................... 191
Care ................... ...................................... ........ 304
Changing in car key .... ....................................... 307
Charge state ... .................................................. 303
Charging ............. ...................................... ........ 307
General information..... ....................................... 303
Jump-lead starting .......... ................................... 306
Location.............. ...................................... ........ 303
Procedure after connectio n ................................ 305
Replacing .................................................. ........ 305
Vehicle electrical system voltage indication .......... 113
Winter driving ..................... ............................... 304
Before driving off .............. .............................................. 4
Belt tensioner Functional description . ......................................... 45 Belts...................
.......................................... ................ 44
Adjusting belt height .......................... ................... 47
Belt tensioner functional description ...................... 45
Care instructions........... ..................................... 276
Fastening ..................... ....................................... 46
Opening ............ ...................................... ............ 46
Warning light on the tach ometer ............................ 45
Bi-Xenon headlight Changing bulb for auxiliary high-beam headlight .... 311
Installing headlights ....... ..................................... 309
Removing headlights ......... ................................. 309
Brake booster ........................ ..................................... 174
Brake fluid Changing .............. ............................................. 259
Warning light on speedometer
............................. 259
Brake pads Breaking in new brake pa ds .................................... 6
Warning message, brakes . ................................. 174
Brake pedal............. .................................................... 173
Brake wear Warning message ............. ................................. 174
Brakes Applying/releasing parkin g brake ........................ 171
Brake pad warning messag e ............................... 174
Brake pedal ...................... ................................. 173
Brake wear warning mess age ............................. 174
Break in new brake pads ........................................ 6
Footbrake.......... ................................................ 172
Test stand ......... ................................................ 253
Break in hints ..................... ............................................. 6
Breaking in Engine ................. ................................................. 6
Engine oil and fuel consumption during break-in
period ...................................... ............................. 6
Hints .................... ................................................. 6
New brake pads and brake discs ............................ 6
New tires .......... .................................................... 6
Brief overview Air conditioning, front co ntrol panel ....................... 68
Air conditioning, rear co ntrol panel ........................ 69
Opening and locking the ve hicle from outside ......... 21
Windshield wipers ............. ................................. 101
Bulbs Changing bulb for auxiliary high-beam headlight .... 311
Changing bulb for licence plate light .................... 313
Changing bulb for side ma rker light ..................... 313 Changing bulb for
side turn signal light................ 312
CCar care
Air bags.............. .............................................. 276
Alcantara ............ .............................................. 276
Alloy wheels .................... .................................. 274
Cleaning the engine comp artment....................... 272
Fabric linings............... ...................................... 276
Headlights, plastic componen ts, adhesive foils .... 274
Laying up your Porsche ..................................... 276
Leather............... .............................................. 275
Paint .................. .............................................. 271
Seals.................. .............................................. 275
Seat belts ....... .................................................. 276
Undercoating ......................................... ........... 273
Use of high-pressure cleaning equipment ............ 270
Washing the vehicle, inst ructions ........................ 270
Wheel bolts ..................... .................................. 293
Windows ............. .............................................. 272
Car key (remote control) Emergency operation of key in ignition lock ......... 166
Locking vehicle door ....... .................................... 24
Unlocking vehicle door . ........................................ 23
Car Telephone ...................... ...................................... 190
Care instructions Air bags.............. .............................................. 276
Alcantara ............ .............................................. 276
Alloy wheels .................... .................................. 274
Car washing .................... .................................. 270
Carpet ................ .............................................. 275
Cleaning the engine comp artment....................... 272
Fabric linings............... ...................................... 276
Headlights, plastic componen ts, adhesive foils .... 274
Laying up your Porsche ..................................... 276
Leather............... .............................................. 275
Mats................... .............................................. 275
Paint .................. .............................................. 271
Radar sensor ......................................... ...........
274
Reversing camera ........... .................................. 274
Seals.................. .............................................. 275
Seat belts ....... .................................................. 276
Ultrasound sensors, Park Assist .......................... 274
Undercoating ......................................... ........... 273
Use of high-pressure cleaning equipment ............ 270
Page 337 of 343

Index
335
Octane rating .................................................... 265
Portable fuel containers .......................................... 3
Quality ............... ...................................... ......... 265
Recommendation ............... ................................ 268
Recommendations ............. ................................ 268
Refuelling ........... ...................................... ......... 265
Tank capacity ................ .................................... 329
Fuel can ............... .......................................... ............. 267
Fuel containers, portable .. ................................................ 3
Fuel gauge ........... .......................................... ............. 111
Fuel level indicator Fuel gauge .................... .................................... 111
Fuel reserve ......... .......................................... ............. 266
Fuse, changing electric fu ses ....................................... 298
GGarage door opener
Deleting programmed sign als ............................. 244
Functional description ........................................ 243
Operating ................................................. ......... 245
Programming signal (chang eable code system) .... 244
Programming signal (fixed code system).............. 244
Gear selector Emergency unlocking ..... .................................... 200
Glove box Closing .............. ...................................... ......... 219
Cooling .............. ...................................... ........... 83
Opening ............. ...................................... ......... 219
Ground clearance ................ ............................................ 3HHandbrake (electric parking brake)
Operating ................................................. ......... 171
Releasing ........... ...................................... ......... 171
Head restraints ................... .......................................... 38
Headlight levelling (automatic) Functional description .......................................... 94
Headlights Adjusting ....................... .................................... 314
Care instructions ........... .................................... 274
Changing bulb for auxiliary high-beam headlight .... 311
Installing ....................... .................................... 309
Operating washer system ................................... 103 Removing ............
..............................................309
Heated rear window Switching on/off............... ....................................84
Heated seats ...... .............................................. .............43
Switching off.................... ....................................43
Switching on .................... ....................................43
Height adjustment Overview ............. ..............................................209
Warning message on the multi-function display .....210
High beam headlight Stalk ................... ................................................96
High-beam headlight........... ............................................96
Changing bulb (auxiliary high-beam headlight) .......311
Installing headlights ...... ......................................309
Removing headlights ........ ..................................309
High-pressure cleaning equipment Instructions for use ...... ......................................270
Hillholder (Drive-off Assistant) Functional description ... ......................................206
HOLD function Functional description ... ......................................206
Home mode Entry function .................. ....................................95
Welcome Home function ... ....................................95
HomeLink (garag e door opener)
Deleting programmed sign als..............................244
Functional description ... ......................................243
Operating ........................ ..................................245
Programming signal (chang eable code system)
....244
Programming signal (fixed code system) ..............244
Hot exhaust pipes .............. ..............................................3
IIdentification number, position ......................................323
Ignition lock Emergency operation of th e key ..........................166
Functional description ... ......................................164
Removing ignition key, PD K transmission .............195
Immobiliser Functional description ... ......................................250
Switching on/off............... ..................................250
Inclination sensor Function indication ....... ......................................249
Switching off with bu tton in door handle
(Porsche Entry & Drive). ......................................248 Switching off with car key
.................................. 247
Instrument cluster Adjusting lighting ............ ..................................... 95
Cooling system, temperat ure gauge ................... 110
Engine oil temperature ga uge ............................. 110
Fuel gauge ............................................ ............ 111
Odometer .......... ............................................... 112
Speedometer ..................... ............................... 110
Tachometer ....................... ............................... 110
Warning and indicator ligh ts, overview ................. 107
Instrument panel Adjusting lighting ............ ..................................... 95
Cooling system, temperat ure gauge ................... 110
Engine oil temperature ga uge ............................. 110
Fuel gauge ............................................ ............ 111
Odometer .......... ............................................... 112
Speedometer ..................... ............................... 110
Tachometer ....................... ............................... 110
Warning and indicator ligh ts, overview ................. 107
Interior mirror Switching automatic anti-daz zle function on/off ...... 60
Interior surveillance .......... ........................................... 249
Switching off with button in door handle
(Porsche Entry & Drive) ...................................... 248
Switching off with car key .................................. 247
iPod interface, installation position................................ 192
JJump-lead starting for flat battery ................................. 306
Jump-lead starting, external power supply ..................... 306KKey
Changing battery ............ ................................... 307
Emergency operation, igni tion lock ..................... 166
Locking vehicle door....... ..................................... 24
Removing emergency key .................................... 20
Replacement keys .......... ..................................... 19
Unlocking vehicle door .... ..................................... 23
Keys ....................... ..................................................... 19
Kickdown Porsche Doppelkupplung. ................................... 197