2009 PORSCHE PANAMERA key
[x] Cancel search: keyPage 61 of 343

Seats, Mirrors and Steering Wheel
59
If the electrical adjustment facility fails
f Adjust the mirror by pressing on the
mirror face.Folding in exterior mirrorsfPress button D.
Both exterior mirrors fold in automatically.
If the electrical adjustment facility fails
f Fold in mirrors manually.Folding out exterior mirrorsfPress button D.
Both exterior mirrors unfold automatically.
Folding exterior mirrors in and out
automaticallyThe exterior-mirrors can be folded in automatically
after the vehicle is locked.
Folding exterior mirrors in automatically
f Press and hold the button on the car key for
at least 1 second.
or
On vehicles with Porsche Entry & Drive, press
and hold the locking button in the handle on the
driver’s door for at least 1 second.
The exterior mirrors fold in.
Folding exterior mirr ors out automatically
f Switch on ignition.
The exterior mirrors fold out.
Note
The exterior mirrors do not fold out automatically
after the ignition is switch ed on if they were folded
in manually using the button D.
If the electrical adj ustment facility fails
f Unfold mirrors manually.
Storing exterior mirror settingsOn vehicles with driver or comfort memory,
individual exterior mirror settings can be stored on
the person buttons on the driver’s side and on the
car key.
For further information on retrieving and storing
vehicle settings:
f Please see the chapter “STORING VEHICLE
SETTINGS” on page 40.Exterior mirror heatingThe exterior mirror heating is activated
automatically when the heated rear window is
switched on while the engine is running.
For information on switch ing on the heated rear
window:
f Please see the chapter “HEATED REAR
WINDOW/EXTERIOR MIRROR HEATING” on
page 84.
Page 64 of 343
62
Seats, Mirrors and Steering Wheel
Steering Wheel AdjustmentThe steering wheel can be adjusted manually or
electrically in four directions depending on the
vehicle equipment.
Warning!
Risk of accidents. The steering wheel may
move further than desired if you attempt to
adjust it when driving.
You may lose control of the vehicle.
f Do not adjust the steeri ng wheel when driving.
Risk of crushing due to uncontrolled
activation of memory settings.
f Do not leave children in the vehicle unattended.
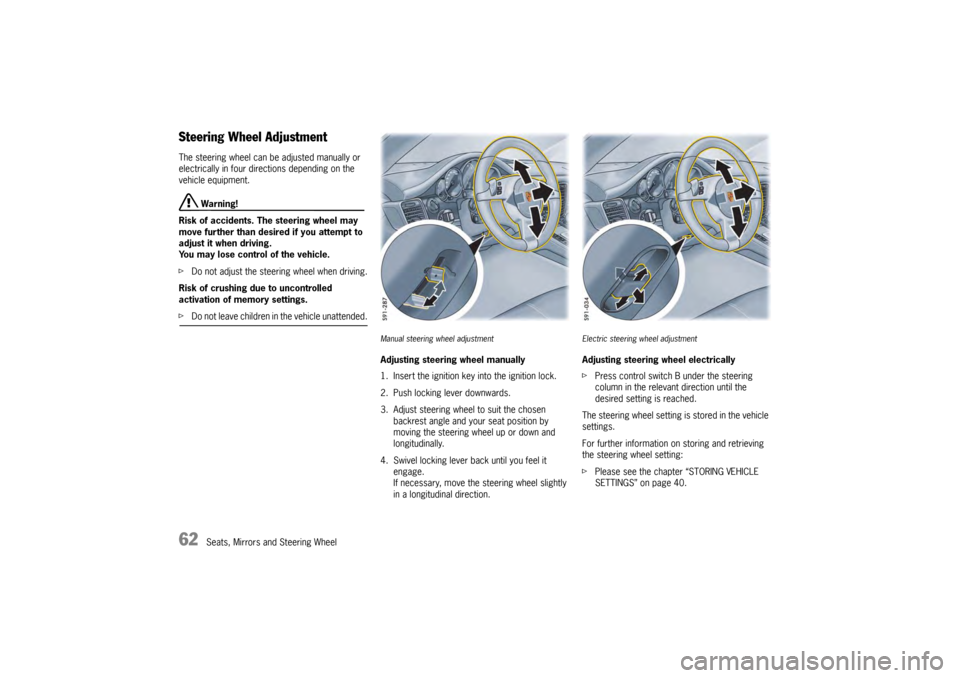
Manual steering wheel adjustmentAdjusting steering wheel manually
1. Insert the ignition key into the ignition lock.
2. Push locking lever downwards.
3. Adjust steering wheel to suit the chosen
backrest angle and your seat position by
moving the steering wheel up or down and
longitudinally.
4. Swivel locking lever back until you feel it engage.
If necessary, move the steering wheel slightly
in a longitudinal direction.
Electric steering wheel adjustmentAdjusting steering wheel electrically
fPress control switch B under the steering
column in the relevant direction until the
desired setting is reached.
The steering wheel setting is stored in the vehicle
settings.
For further information on storing and retrieving
the steering wheel setting:
f Please see the chapter “STORING VEHICLE
SETTINGS” on page 40.
Page 65 of 343

Seats, Mirrors and Steering Wheel
63
Multi-Function Steering Wheel
Warning!
There is a risk of accident if you set or
operate the multi-funct ion display, radio,
navigation system, telephone or other
equipment while driving.
Operating these devices while driving could
distract you from traffic and cause you to
lose control of the vehicle.
f Operate the equipment while driving only if the
traffic situation allows you to do so safely.
f Carry out any complicated operating or setting procedures only when the vehicle is stationary.
Depending on the equipment in your vehicle, you
can use the function keys of the multi-function
steering wheel to operate the following Porsche
communication systems:
– Telephone
–PCM
– Multi-function display in the instrument panel
Readiness for operation of the
multi-function steering wheel– With ignition switched on
f Please observe the operating instructions
supplied for the Porsche communication
systems before operating the function keys.
Note on operation
The Porsche communication systems cannot be
switched on and off using the multi-function
steering wheel.
Function buttons on the multi-function
steering wheelThe rotary buttons at the top left and right of the
steering wheel can also be pressed.
Turn volume control
Upwards – increase volume
Downwards – decrease volume
Press volume control
Switch volume/mute on and off.
Turn rotary knob
Select/highlight the main menu or menu
item on the multi-function display by
turning the rotary knob upward or
downward.
Press rotary knob
Go to submenu or activate selected
function.
Press MFS button
Call up the stored function.
The button can be assigned the desired
function in the multi-fu nction display on the
instrument panel.
Press Back button
Return to the menu.
Press Handset Pickup button
Accept a telephone call.
Press Handset Hangup button
End or refuse a telephone call.
Page 73 of 343
Air Conditioning
71
General FunctionsNote on operation
Additional settings relating to the climate type and
extended ventilation panel can be adjusted in the
multi-function display on the instrument panel:
f Please see the chapter “AIR-CONDITIONING
SETTINGS ON THE MULTI-FUNCTION
DISPLAY” on page 83.
f Please see the chapter “SETTING AIR
CONDITIONING” on page 146.
On vehicles with comfort memory, all air-
conditioning settings are stored on the relevant
ignition key when the vehicle is locked.REST modeUsing engine residual heat
The residual heat of the engine can be used to
heat the interior for up to 20 minutes after the
ignition has been switched off.
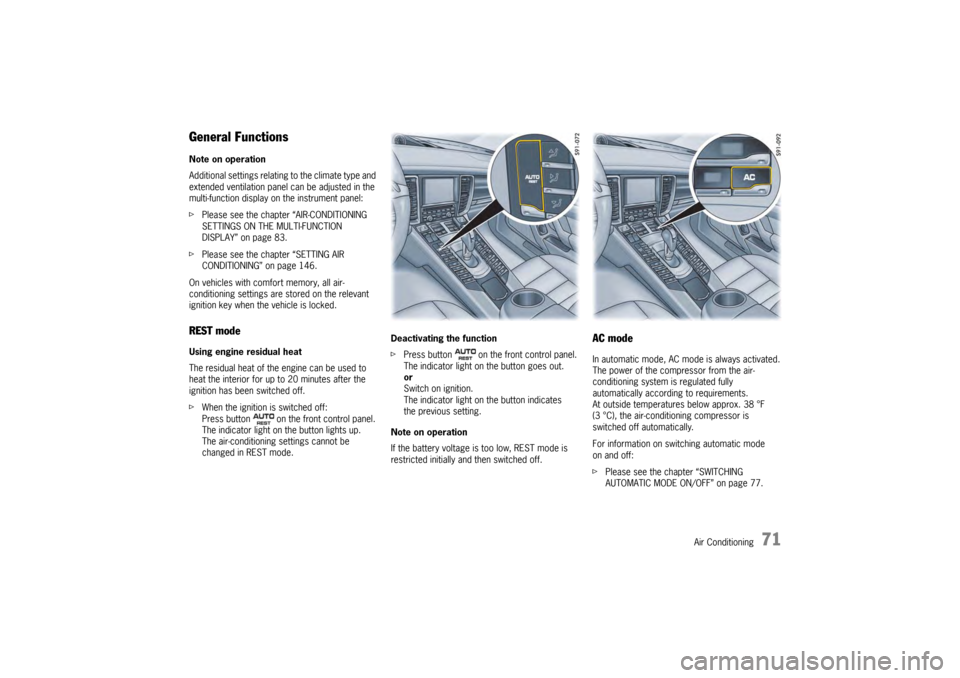
f When the ignition is switched off:
Press button on the front control panel.
The indicator light on the button lights up.
The air-conditioning settings cannot be
changed in REST mode. Deactivating the function
f
Press button on the front control panel.
The indicator light on the button goes out.
or
Switch on ignition.
The indicator light on the button indicates
the previous setting.
Note on operation
If the battery voltage is too low, REST mode is
restricted initially and then switched off.
AC modeIn automatic mode, AC mode is always activated.
The power of the compressor from the air-
conditioning system is regulated fully
automatically according to requirements.
At outside temperatures below approx. 38 °F
(3 °C), the air-conditioning compressor is
switched off automatically.
For information on switching automatic mode
on and off:
f Please see the chapter “SWITCHING
AUTOMATIC MODE ON/OFF” on page 77.
Page 82 of 343
80
Air Conditioning
Cancelling manual air distributionfPress the relevant air distribution button again.
The indicator light on the button goes out.
or
Press button for the relevant
air-conditioned area.
The indicator light on the button lights up.
Air quantity and distribution are controlled
automatically and variations are compensated.
Air distribution in the rear air-conditioned
areas when MONO or REAR mode is
activated (4-zone air conditioning)If the button or is pressed on the front
control panel, air flows from the central and side
vents in the rear of the vehicle.
If the button is pressed on the front control
panel, air flows into the footwells in the rear of
the vehicle.
For information on MONO mode:
fPlease see the chapter “ACCEPTING
SETTINGS FOR DRIVER’S SIDE FOR THE
ENTIRE VEHICLE” on page 74.
For information on REAR mode:
f Please see the chapter “ADJUSTING REAR AIR-
CONDITIONED AREAS WITH THE FRONT
CONTROL PANEL – REAR MODE (4-ZONE AIR
CONDITIONING)” on page 81.
Disabling control panel for rear
air-conditioned areas (4-zone air-
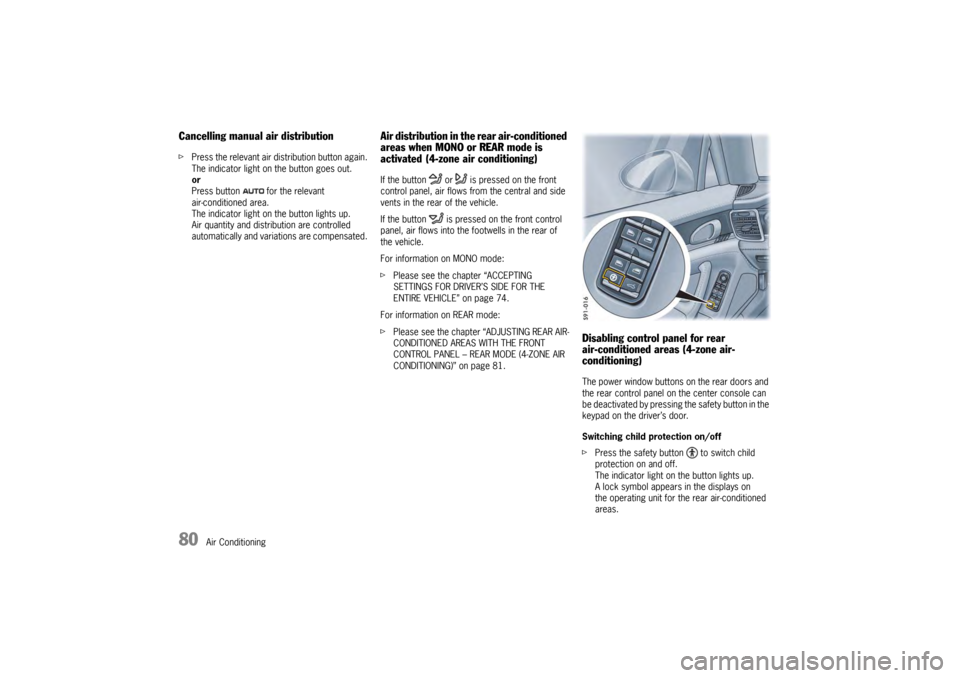
conditioning)The power window buttons on the rear doors and
the rear control panel on the center console can
be deactivated by pressing the safety button in the
keypad on the driver’s door.
Switching child protection on/off
fPress the safety button to switch child
protection on and off.
The indicator light on the button lights up.
A lock symbol appears in the displays on
the operating unit for the rear air-conditioned
areas.
Page 88 of 343
86
Windows and Slide/Tilt Roof
Power Windows
Warning!
Risk of injury when closing the windows,
especially when windows close
automatically.
f Take care to ensure that nobody can be injured
when the windows close.
f Always remove ignition key when leaving the
vehicle or switch ignition off on vehicles with
Porsche Entry & Drive. Always take the ignition
key with you when leaving the vehicle.
Uninformed persons could injure themselves
by operating the power windows.
f In case of danger, immediately release the
button on the ignition key or the button in
the door handle on vehicles with Porsche
Entry & Drive.
f Do not leave children in the vehicle unattended.
Risk of an accident.
f Do not put anything on or near the windows that may interfere with the driver’s vision.
Readiness for operation of power windows– With ignition switched on.
– A maximum of 10 minutes after the ignition is
switched off, but only until driver’s or
passenger door is first opened.
– The one-touch operation for closing the door windows is available only when the ignition is
switched on.
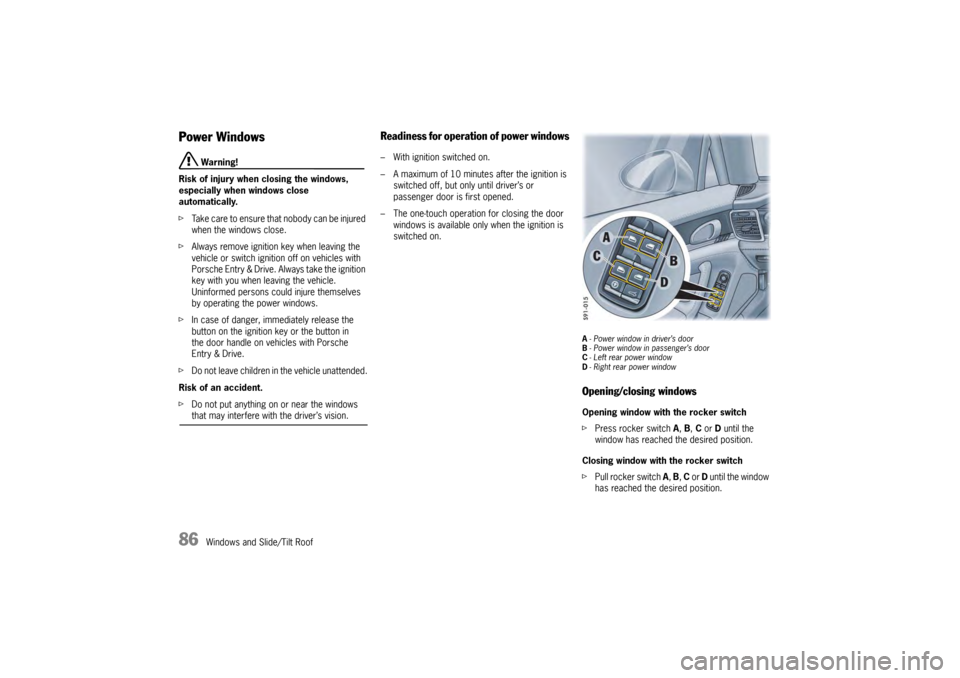
A- Power window in driver’s door
B - Power window in passenger’s door
C -Left rear power window
D - Right rear power windowOpening/closing windowsOpening window with the rocker switch
f Press rocker switch A, B, C or D until the
window has reached the desired position.
Closing window with the rocker switch
f Pull rocker switch A, B, C or D until the window
has reached the desired position.
Page 90 of 343
88
Windows and Slide/Tilt Roof
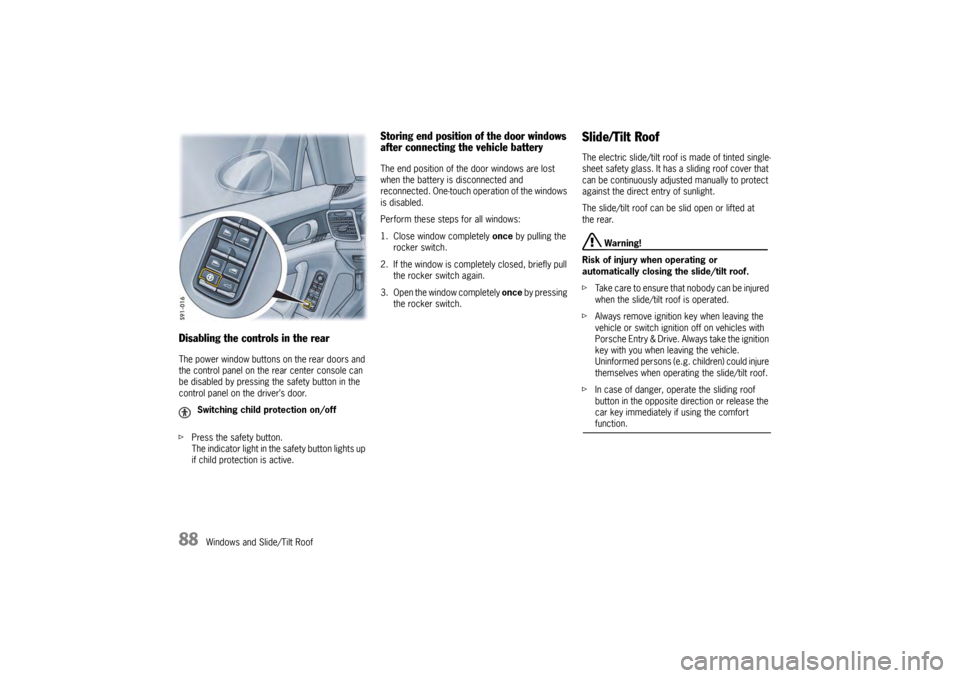
Disabling the controls in the rearThe power window buttons on the rear doors and
the control panel on the rear center console can
be disabled by pressing the safety button in the
control panel on the driver’s door.
fPress the safety button.
The indicator light in the safety button lights up
if child protection is active.
Storing end position of the door windows
after connecting the vehicle batteryThe end position of the door windows are lost
when the battery is disconnected and
reconnected. One-touch operation of the windows
is disabled.
Perform these steps for all windows:
1. Close window completely once by pulling the
rocker switch.
2. If the window is comple tely closed, briefly pull
the rocker switch again.
3. Open the window completely once by pressing
the rocker switch.
Slide/Tilt RoofThe electric slide/tilt roof is made of tinted single-
sheet safety glass. It has a sliding roof cover that
can be continuously adjusted manually to protect
against the direct entry of sunlight.
The slide/tilt roof can be slid open or lifted at
the rear.
Warning!
Risk of injury when operating or
automatically closing the slide/tilt roof.
f Take care to ensure that nobody can be injured
when the slide/tilt roof is operated.
f Always remove ignition key when leaving the
vehicle or switch ignition off on vehicles with
Porsche Entry & Drive. Always take the ignition
key with you when leaving the vehicle.
Uninformed persons (e.g. children) could injure
themselves when operating the slide/tilt roof.
f In case of danger, operate the sliding roof
button in the opposite di rection or release the
car key immediately if using the comfort function.
Switching child protection on/off
Page 91 of 343
Windows and Slide/Tilt Roof
89
Operational readiness of the slide/tilt roof– With ignition switched on.
– A maximum of 10 minutes after the ignition is switched off, but only until driver’s or
passenger door is first opened.
Note on operation
The slide/tilt roof has a force limiter. If obstructed
during the closing process, the slide/tilt roof
opens again immediately.
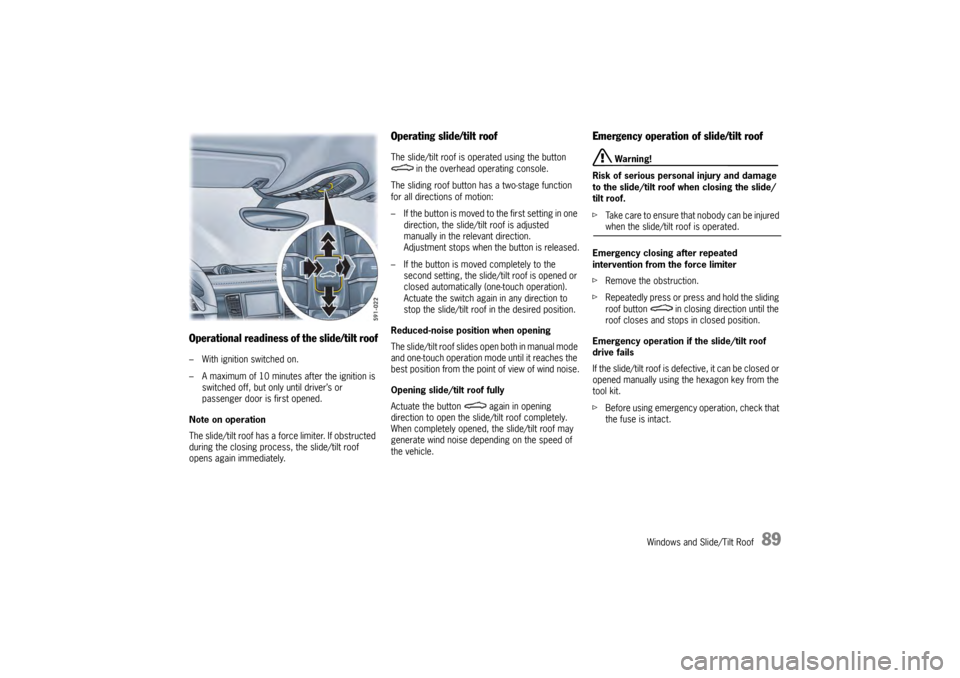
Operating slide/tilt roofThe slide/tilt roof is operated using the button in the overhead operating console.
The sliding roof button has a two-stage function
for all directions of motion:
– If the button is moved to the first setting in one
direction, the slide/tilt roof is adjusted
manually in the relevant direction.
Adjustment stops when the button is released.
– If the button is moved completely to the second setting, the slide/tilt roof is opened or
closed automatically (one-touch operation).
Actuate the switch again in any direction to
stop the slide/tilt roof in the desired position.
Reduced-noise position when opening
The slide/tilt roof slides open both in manual mode
and one-touch operation mode until it reaches the
best position from the poi nt of view of wind noise.
Opening slide/tilt roof fully
Actuate the button again in opening
direction to open the slide/tilt roof completely.
When completely opened, the slide/tilt roof may
generate wind noise depending on the speed of
the vehicle.
Emergency operation of slide/tilt roof
Warning!
Risk of serious personal injury and damage
to the slide/tilt roof when closing the slide/
tilt roof.
f Take care to ensure that nobody can be injured when the slide/tilt roof is operated.
Emergency closing after repeated
intervention from the force limiter
f Remove the obstruction.
f Repeatedly press or press and hold the sliding
roof button in clos ing direction until the
roof closes and stops in closed position.
Emergency operation if the slide/tilt roof
drive fails
If the slide/tilt roof is defective, it can be closed or
opened manually using th e hexagon key from the
tool kit.
f Before using emergency operation, check that
the fuse is intact.