2009 PORSCHE PANAMERA climate control
[x] Cancel search: climate controlPage 8 of 343

6Break in hints for the first
2,000 miles (3,000 kilometers)The following tips will be helpful in obtaining
optimum performance from your new Porsche.
Despite the most modern, high-precision manufac-
turing methods, the moving parts must still wear
in with each other. This we aring-in occurs mainly in
the first 2,000 miles (3,000 km).Therefore:f Preferably take longer trips.
f Avoid frequent cold starts with short-distance
driving whenever possible.
f Avoid full throttle starts and abrupt stops.
f Do not exceed maximum engine speed of
4,200 rpm (revolutions per minute).
f Do not run a cold engine at high rpm either in
Neutral or in gear.
f Do not let the engine labor, especially when
driving uphill. Shift to the next lower gear in
time (use the most favorable rpm range).
f Never lug the engine in high gear at low
speeds. This rule applies at all times, not just
during the break-in period. f
Do not participate in motor racing events,
sports driving schools, etc. during the first
2,000 miles (3,000 kilometers).
There may be a slight stiffness in the steering or
other controls during the br eak-in period which will
gradually disappear.
Break in brake pads and brake discsNew brake pads and discs ha ve to be ”broken in“,
and therefore only attain optimal friction when the
car has covered several hundred miles or km.
The slightly reduced braking ability must be
compensated for by pressing the brake pedal
harder. This also applies whenever the brake pads
and brake discs are replaced.New tiresNew tires do not have maximum traction. They
tend to be slippery.
f Break in new tires by driving at moderate
speeds during the first 60 to 120 miles (100
to 200 km). Longer braking distances must be
anticipated.
Engine oil and fuel consumptionDuring the break-in peri od oil and fuel consump-
tion may be higher than normal.
f Please see the chapter “ENGINE DATA” on
Page 324.
As always, the rate of oil consumption depends on
the quality and viscosity of oil, the speed at which
the engine is operated, the climate and road
conditions, as well as the amount of dilution and
oxidation of the lubricant.
f Make a habit of checking engine oil with every
refueling, add if necessary.
Page 70 of 343

68
Air Conditioning
Brief Overview –
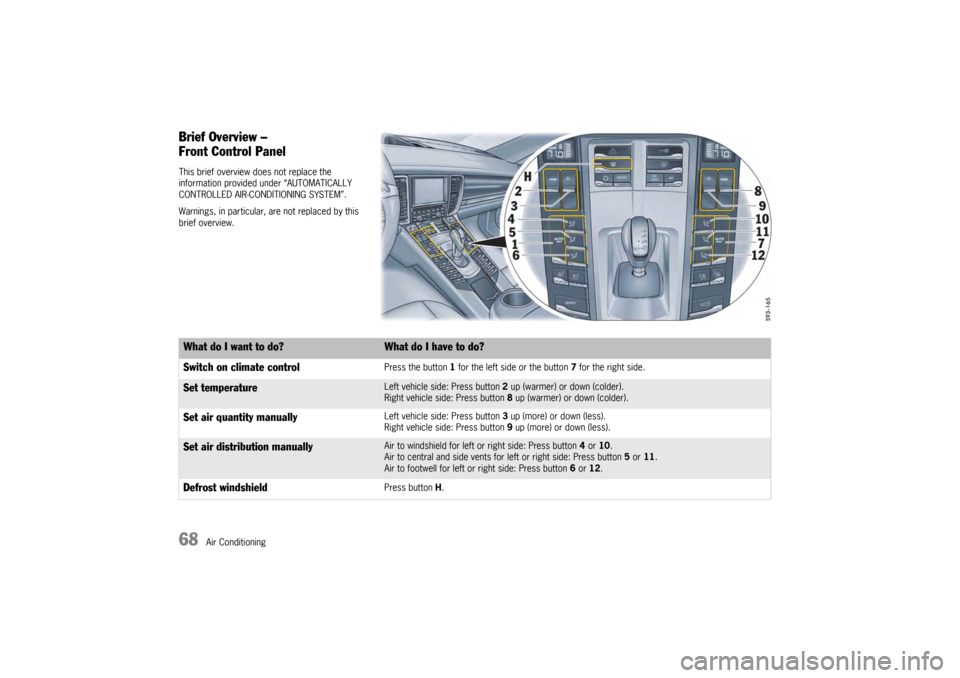
Front Control PanelThis brief overview does not replace the
information provided under “AUTOMATICALLY
CONTROLLED AIR-CONDITIONING SYSTEM”.
Warnings, in particular, are not replaced by this
brief overview.What do I want to do?
What do I have to do?
Switch on climate controlPress the button 1 for the left side or the button 7 for the right side.
Set temperature
Left vehicle side: Press button 2 up (warmer) or down (colder).
Right vehicle side: Press button 8 up (warmer) or down (colder).
Set air quantity manually
Left vehicle side: Press button 3 up (more) or down (less).
Right vehicle side: Press button 9 up (more) or down (less).
Set air distribution manually
Air to windshield for left or right side: Press button 4 or 10 .
Air to central and side vents for left or right side: Press button 5 or 11 .
Air to footwell for left or right side: Press button 6 or 12.
Defrost windshield
Press button H.
Page 71 of 343

Air Conditioning
69
Brief Overview –
Rear Control Panel
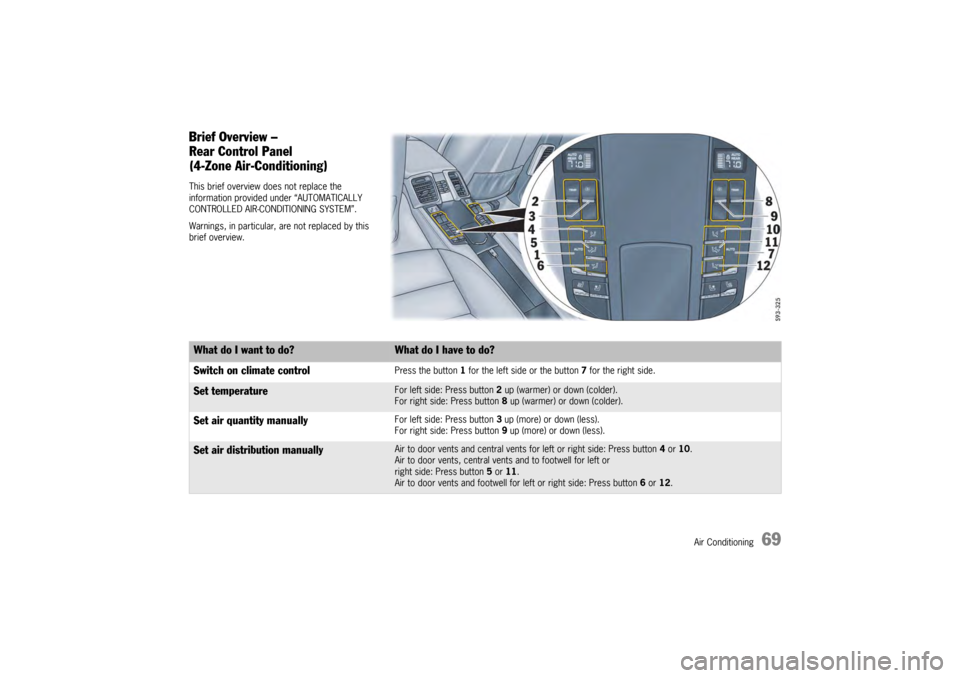
(4-Zone Air-Conditioning)This brief overview does not replace the
information provided under “AUTOMATICALLY
CONTROLLED AIR-CONDITIONING SYSTEM”.
Warnings, in particular, are not replaced by this
brief overview.What do I want to do?
What do I have to do?
Switch on climate controlPress the button 1 for the left side or the button 7 for the right side.
Set temperature
For left side: Press button 2 up (warmer) or down (colder).
For right side: Press button 8 up (warmer) or down (colder).
Set air quantity manually
For left side: Press button 3 up (more) or down (less).
For right side: Press button 9 up (more) or down (less).
Set air distribution manually
Air to door vents and central vents for left or right side: Press button 4 or 10.
Air to door vents, central vents and to footwell for left or
right side: Press button 5 or 11.
Air to door vents and footwell for left or right side: Press button 6 or 12.
Page 73 of 343

Air Conditioning
71
General FunctionsNote on operation
Additional settings relating to the climate type and
extended ventilation panel can be adjusted in the
multi-function display on the instrument panel:
f Please see the chapter “AIR-CONDITIONING
SETTINGS ON THE MULTI-FUNCTION
DISPLAY” on page 83.
f Please see the chapter “SETTING AIR
CONDITIONING” on page 146.
On vehicles with comfort memory, all air-
conditioning settings are stored on the relevant
ignition key when the vehicle is locked.REST modeUsing engine residual heat
The residual heat of the engine can be used to
heat the interior for up to 20 minutes after the
ignition has been switched off.
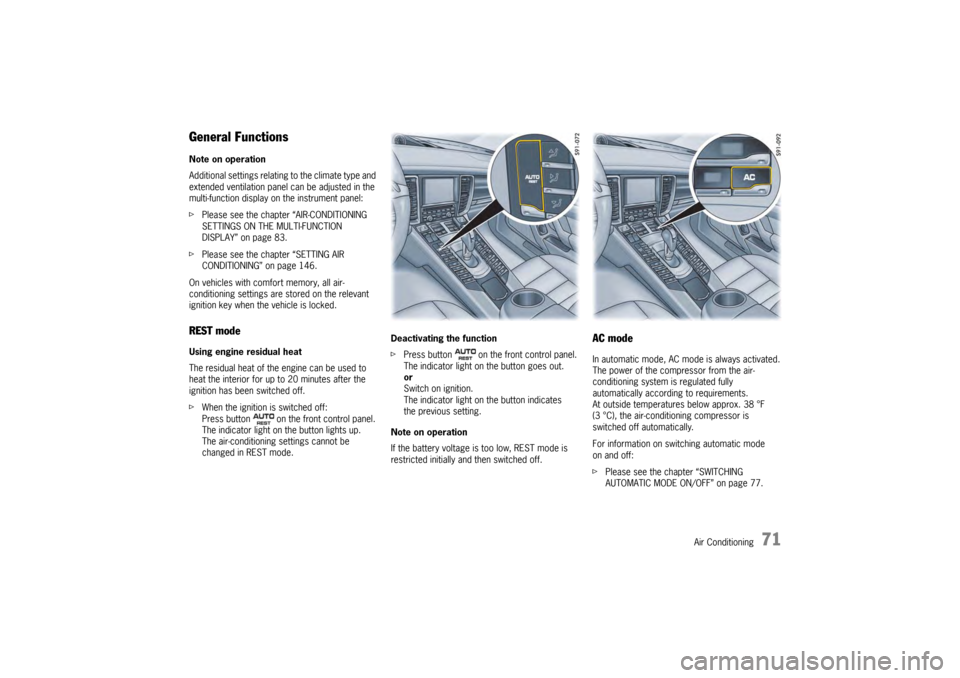
f When the ignition is switched off:
Press button on the front control panel.
The indicator light on the button lights up.
The air-conditioning settings cannot be
changed in REST mode. Deactivating the function
f
Press button on the front control panel.
The indicator light on the button goes out.
or
Switch on ignition.
The indicator light on the button indicates
the previous setting.
Note on operation
If the battery voltage is too low, REST mode is
restricted initially and then switched off.
AC modeIn automatic mode, AC mode is always activated.
The power of the compressor from the air-
conditioning system is regulated fully
automatically according to requirements.
At outside temperatures below approx. 38 °F
(3 °C), the air-conditioning compressor is
switched off automatically.
For information on switching automatic mode
on and off:
f Please see the chapter “SWITCHING
AUTOMATIC MODE ON/OFF” on page 77.
Page 78 of 343

76
Air Conditioning
Front control panel
(2-zone and 4-zone air conditioning systems)Automatically Controlled
Air ConditioningDepending on various factors (e.g. sunlight, air
quality, ambient temperature, misted windows),
the air-conditioning system adjusts the preset
interior temperature, air distribution and air
quantity fully automatically.
Automatic mode is deactivated as soon as the
settings are adjusted manually. In this case,
automatic climate control still regulates the
air-conditioning functions that have not been
modified manually. Please read the information on:
–
REST mode , see page 71.
– AC mode , see page 71.
– AC MAX mode, see page 72.
– MONO mode , see page 74.
– Defrosting the windshield , see page 73.
– Air-recirculation mode , see page 74.
– Air-conditioning compressor , see page 75.
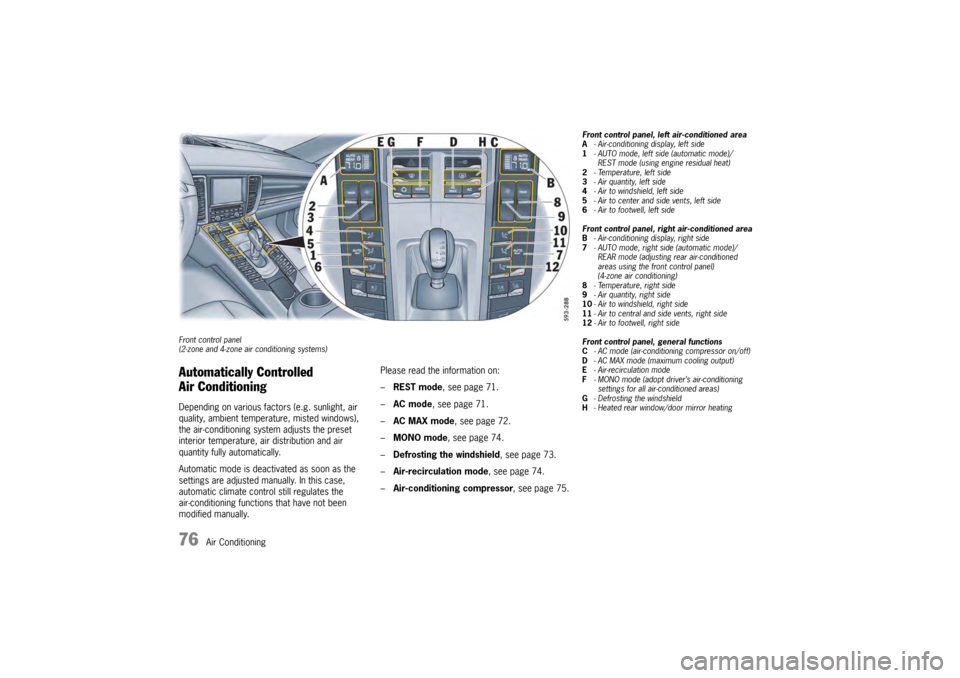
Front control panel, left air-conditioned area
A- Air-conditioning display, left side
1 - AUTO mode, left side (automatic mode)/
REST mode (using engine residual heat)
2 - Temperature, left side
3 - Air quantity, left side
4 - Air to windshield, left side
5 - Air to center and side vents, left side
6 - Air to footwell, left side
Front control panel, right air-conditioned area
B - Air-conditioning display, right side
7 - AUTO mode, right side (automatic mode)/
REAR mode (adjusting rear air-conditioned
areas using the front control panel)
(4-zone air conditioning)
8 - Temperature, right side
9 - Air quantity, right side
10 - Air to windshield, right side
11 - Air to central and side vents, right side
12 - Air to footwell, right side
Front control panel, general functions
C - AC mode (air-conditioning compressor on/off)
D - AC MAX mode (maximum cooling output)
E - Air-recirculation mode
F - MONO mode (adopt driver’s air-conditioning
settings for all air-conditioned areas)
G - Defrosting the windshield
H - Heated rear window/door mirror heating
Page 283 of 343

Minor Repairs
281
Treadwear
The treadwear grade is a comparative rating
based on the wear rate of the tire when tested
under controlled conditions on a specific
government test course. For example, a tire
graded 150 would wear one and a half (1-1/2)
times as well on the government course as a tire
graded 100. The relative performance of tires
depends upon the actual conditions of their use,
however, and may depart significantly from the
norm due to variations in driving habits, service
practices and differences in road characteristics
and climate.
Traction AA, A, B, C
The traction grades, from highest to lowest, are
AA, A, B, and C and they represent the tire's ability
to stop on wet pavement as measured under
controlled conditions on specified government
test surfaces of asphalt and concrete. A tire
marked C may have poor traction performance.
Warning!
The traction grade assigned to this is based
on braking (straight-ahead) traction tests
and does not include cornering (turned)
traction, acceleration, hydroplaning or peak
traction characteristics. Temperature A, B, C
The temperature grades are A (the highest), B and
C, representing the tire's resistance to the
generation of heat and it
s ability to dissipate heat
when tested under controlled conditions on a
specified indoor laboratory test wheel.
Sustained high temperatures can cause the
material of the tire to de generate and reduce tire
life, and excessive temperature can lead to
sudden tire failure.
The grade C corresponds to a level of
performance which all passenger car tires must
meet under the Federal Motor Vehicle Safety
Standard No. 109.
Grades B and A represent higher levels of
performance on the labora tory test wheel than the
minimum required by law.
Warning!
The temperature grade for this tire is
established for a tire that is properly inflated
and not overloaded. Excessive speed,
underinflation, or excessive loading, either
separately or in combin ation, can cause heat
buildup and possible tire failure, resulting
loss of control, leading to serious personal
injury or death.
Tire pressures
Danger!
Risk of accident.
Risk of serious personal injury or death.
Driving the vehicle with low tire pressure
increases risk of a tire failure and resulting
loss of control. Furthermore, low tire
pressure increases rate of wear of the
affected tires and cause damage.
f Always use an accurate tire pressure gage
when checking inflation pressures.
f Do not exceed the maximum tire pressure
listed on the tire sidewall. (Also refer to
”Technical data“).
f Please see the chapter “TIRE PRESSURE
PLATE” on page 283.
f Cold tire inflation pressure means: all tires
must be cold, ambient temperature maximum
68 °F (20 °C), when adjusting the inflation
pressure. Avoid sunlight striking the tires
before measuring cold pressures, since the
pressures would rise from temperature
influence.