2009 PORSCHE PANAMERA window
[x] Cancel search: windowPage 90 of 343

88
Windows and Slide/Tilt Roof
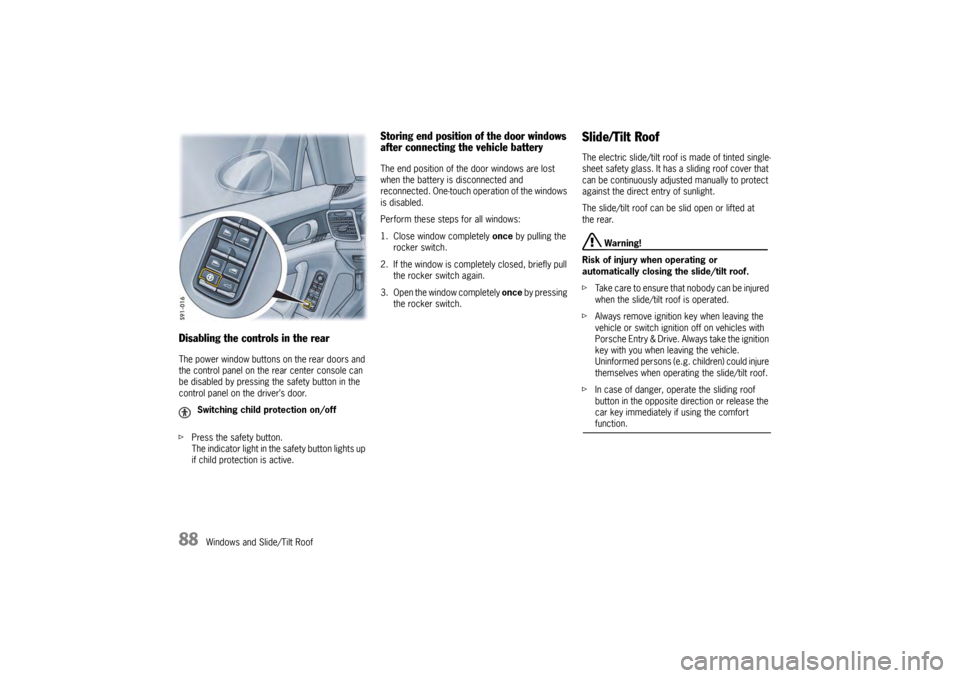
Disabling the controls in the rearThe power window buttons on the rear doors and
the control panel on the rear center console can
be disabled by pressing the safety button in the
control panel on the driver’s door.
fPress the safety button.
The indicator light in the safety button lights up
if child protection is active.
Storing end position of the door windows
after connecting the vehicle batteryThe end position of the door windows are lost
when the battery is disconnected and
reconnected. One-touch operation of the windows
is disabled.
Perform these steps for all windows:
1. Close window completely once by pulling the
rocker switch.
2. If the window is comple tely closed, briefly pull
the rocker switch again.
3. Open the window completely once by pressing
the rocker switch.
Slide/Tilt RoofThe electric slide/tilt roof is made of tinted single-
sheet safety glass. It has a sliding roof cover that
can be continuously adjusted manually to protect
against the direct entry of sunlight.
The slide/tilt roof can be slid open or lifted at
the rear.
Warning!
Risk of injury when operating or
automatically closing the slide/tilt roof.
f Take care to ensure that nobody can be injured
when the slide/tilt roof is operated.
f Always remove ignition key when leaving the
vehicle or switch ignition off on vehicles with
Porsche Entry & Drive. Always take the ignition
key with you when leaving the vehicle.
Uninformed persons (e.g. children) could injure
themselves when operating the slide/tilt roof.
f In case of danger, operate the sliding roof
button in the opposite di rection or release the
car key immediately if using the comfort function.
Switching child protection on/off
Page 91 of 343

Windows and Slide/Tilt Roof
89
Operational readiness of the slide/tilt roof– With ignition switched on.
– A maximum of 10 minutes after the ignition is switched off, but only until driver’s or
passenger door is first opened.
Note on operation
The slide/tilt roof has a force limiter. If obstructed
during the closing process, the slide/tilt roof
opens again immediately.
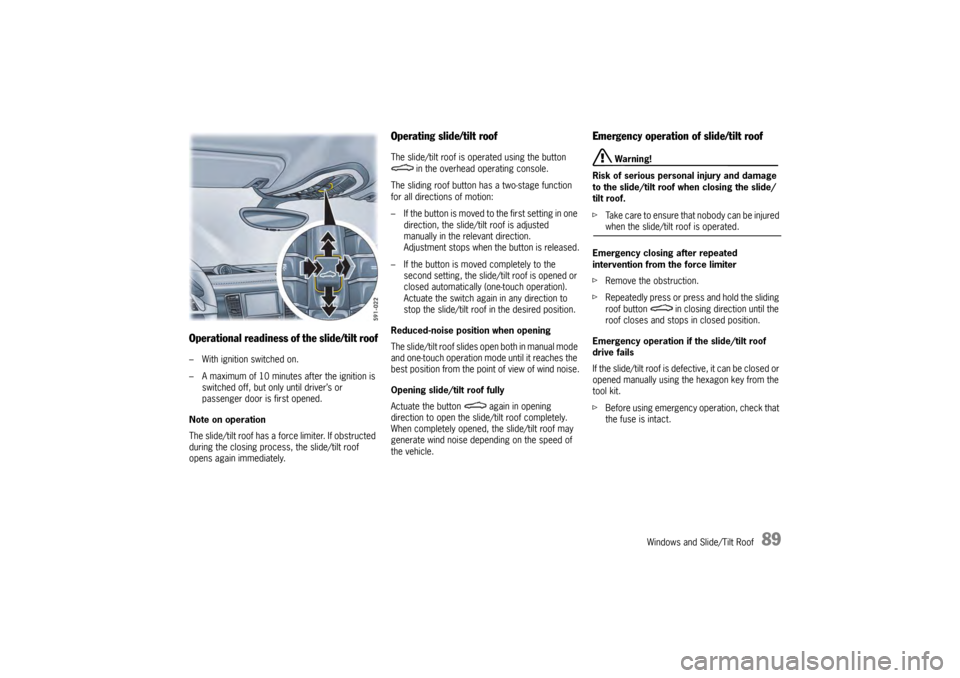
Operating slide/tilt roofThe slide/tilt roof is operated using the button in the overhead operating console.
The sliding roof button has a two-stage function
for all directions of motion:
– If the button is moved to the first setting in one
direction, the slide/tilt roof is adjusted
manually in the relevant direction.
Adjustment stops when the button is released.
– If the button is moved completely to the second setting, the slide/tilt roof is opened or
closed automatically (one-touch operation).
Actuate the switch again in any direction to
stop the slide/tilt roof in the desired position.
Reduced-noise position when opening
The slide/tilt roof slides open both in manual mode
and one-touch operation mode until it reaches the
best position from the poi nt of view of wind noise.
Opening slide/tilt roof fully
Actuate the button again in opening
direction to open the slide/tilt roof completely.
When completely opened, the slide/tilt roof may
generate wind noise depending on the speed of
the vehicle.
Emergency operation of slide/tilt roof
Warning!
Risk of serious personal injury and damage
to the slide/tilt roof when closing the slide/
tilt roof.
f Take care to ensure that nobody can be injured when the slide/tilt roof is operated.
Emergency closing after repeated
intervention from the force limiter
f Remove the obstruction.
f Repeatedly press or press and hold the sliding
roof button in clos ing direction until the
roof closes and stops in closed position.
Emergency operation if the slide/tilt roof
drive fails
If the slide/tilt roof is defective, it can be closed or
opened manually using th e hexagon key from the
tool kit.
f Before using emergency operation, check that
the fuse is intact.
Page 92 of 343

90
Windows and Slide/Tilt Roof
1. Press lightly on the front tip of the cover over
the left passenger compartment monitoring
sensor.
The opposite end of the cover lifts up.
2. Unclip cover.
f Take the hexagon key out of the tool kit in
the luggage compartment.
For information on the tool kit:
f Please see the chapter “TOOL KIT” on
page 279. 3. Insert the hexagon
key all the way into
the opening.
4. Hold the key in this position and turn.
5. Remove the key. Stow the key in the tool kit.
6. Clip in cover.
f Have the fault corrected.
Please contact a qualified specialist workshop.
We recommend that you have an authorized
Porsche dealer to do this work as they have
trained workshop personnel and the necessary
parts and tools.
Storing end position of the slide/tilt roofThe end position of the slide/ tilt roof are lost if the
vehicle battery is disconnected/reconnected or
flat, the vehicle is started using jump leads, the
electrical fuse for the slide/tilt roof is replaced or
after emergency operation.
Warning!
Risk of injury when closing the slide/tilt roof.
When the end position is stored, the force
limiter is not available and the slide/tilt roof
will close with full force.
f Take care to ensure that nobody can be injured when the slide/tilt roof closes.
The vehicle must be stat ionary to store the end
position of the slide/tilt roof.
1. Switch on ignition.
2. Press the button forwards in closing direction and hold in position.
The process for storing the end position
begins after approximately 10 seconds.
Press and hold the button until the roof has
stopped moving completely.
The process takes a maximum of 20 seconds.
Start the storing process again if the button is
released prematurely.
Page 106 of 343

104
Lights, Turn Signals and Windshield Wipers
Rear window wiperSwitching on intermittent operation of rear
window wiper
fPush switch C upwards to detent position INT .
Switching off intermittent operation of rear
window wiper
f Push switch C downwards to detent
position OFF. Manual wiping
f
Push switch C on the wiper stalk all the way
down from detent position OFF or all the way
up from detent position INT.
The washer system wipes as long as the
switch is pressed down.
Switching on the rear window wiper when
reverse gear is engaged
In the multi-function display, you can configure the
rear wiper to automatically perform a series of
wipes when it rains or when the windshield wipers
are used while reverse gear is engaged.
For information on configuring the automatic
function for activating the rear wiper when reverse
gear is engaged:
f Please see the chapter “SETTING ACTIVATION
OF THE REAR WIPER WHEN REVERSE GEAR IS
ENGAGED” on page 143. Maintenance note
f
Clean the wiper blades with window cleaner at
regular intervals, especi ally after washing the
vehicle in a car wash.
We recommend Porsche window cleaner. If the
wiper blades are very dirty (e. g. soiled with
insect remains), they can be cleaned with
a sponge or cloth.
If the wiper blades rub or squeak, this may be due
to the following:
– If the vehicle is washed in an automatic car
wash, wax residues may adhere to the
windshield. These wax residues can be
removed only by using window cleaner
concentrate.
f Please see the chapter “WASHER FLUID” on
page 259.
Contact your authorized Porsche dealer for more
information.
– The wiper blades may be damaged or worn.
f Replace damaged wiper blades immediately.
Page 228 of 343

226
Storage, Luggage Compartment and Roof Transport System
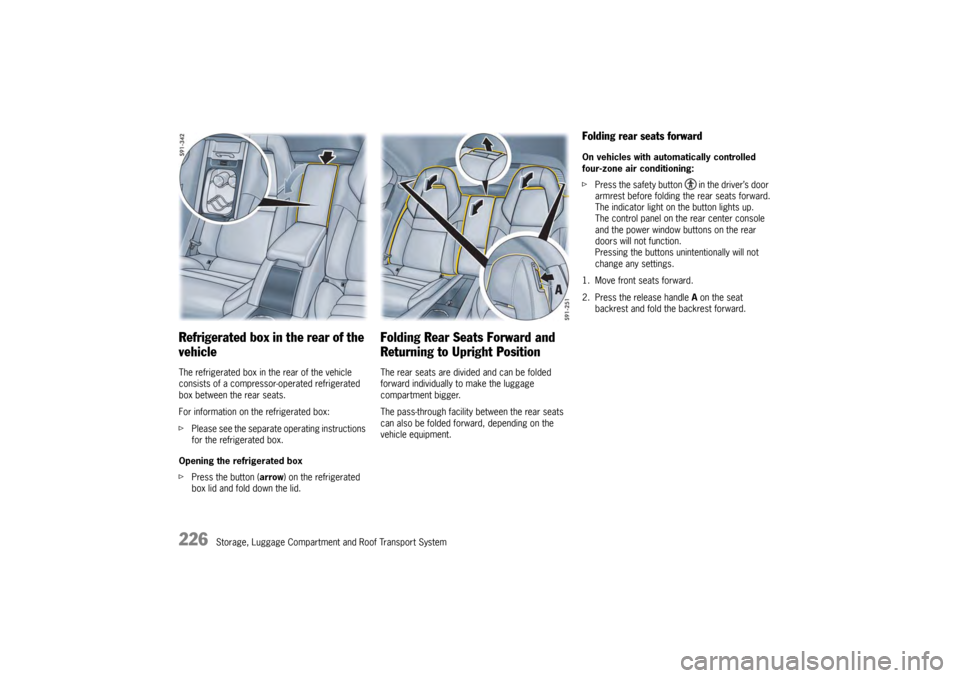
Refrigerated box in the rear of the
vehicleThe refrigerated box in the rear of the vehicle
consists of a compressor-operated refrigerated
box between the rear seats.
For information on the refrigerated box:
fPlease see the separate operating instructions
for the refrigerated box.
Opening the refrigerated box
f Press the button (arrow ) on the refrigerated
box lid and fold down the lid.
Folding Rear Seats Forward and
Returning to Upright PositionThe rear seats are divided and can be folded
forward individually to make the luggage
compartment bigger.
The pass-through facility between the rear seats
can also be folded forward, depending on the
vehicle equipment.
Folding rear seats forwardOn vehicles with auto matically controlled
four-zone air conditioning:
f Press the safety button in the driver’s door
armrest before folding the rear seats forward.
The indicator light on the button lights up.
The control panel on the rear center console
and the power window buttons on the rear
doors will not function.
Pressing the buttons unintentionally will not
change any settings.
1. Move front seats forward.
2. Press the release handle A on the seat
backrest and fold the backrest forward.
Page 230 of 343

228
Storage, Luggage Compartment and Roof Transport System
Stowing Loads
Danger!
Danger of injury. An unsecured or incorrectly
positioned load can slip out of place or
endanger the vehicle occupants during
braking, direction changes or in accidents.
Never transport objects that are not secured.
f Always transport loads in the luggage
compartment, never in the passenger
compartment (e.g. on or in front of the seats).
f Support the load against the seat backrests
wherever possible. Always lock the backrests
into place.
f Only transport heavy objects with the rear seat
backrests upright and engaged.
f Place the load behind unoccupied seats
whenever possible.
f Stow heavy objects as far forward as possible
on the floor, with lightweight objects behind
them.
f Never load the vehicle higher than the top
edge of the seat backrest.
f Always protect the passenger compartment
with a luggage compartment cover. Do not
drive with objects on top of the luggage
compartment cover. f
If the rear seats are not occupied, the
backrests can be addition ally secured with the
seat belts. Simply cro ss the outer seat belts
and insert each into the opposite buckle.
f Make sure that the load cannot damage the
heating filaments and the TV antenna in the
rear window.
Tie-down belts
f Do not use elastic belt s or straps to tie
down a load.
f Do not route belts and straps over
sharp edges.
f Observe the directions for use and information
for the tie-down equipment.
f Use only belts with a tear strength of at least
1543 lbs (700 kg) and a maximum width of
1 in. (25 mm).
f Cross the belts over the load. Driving
f
Vehicle handling changes depending on the
vehicle load. Adapt your driving style to the
changed driving behavior.
f Do not exceed the maximum gross weight
and axle load.
This information can be found under “Technical
data” in this Owner’s Manual:
f Please see the chapter “WEIGHTS” on
page 328.
f Never drive with the tailgate open. Exhaust
gases can enter the passenger compartment.
f Adapt the tire pressure to the load.
After you change the tire pressure, you must
also update the setting for Tire Pressure
Monitoring.
For information on setting Tire Pressure
Monitoring on the multi-function display:
f Please see the chapter “OVERVIEW OF
WARNING MESSAGES” on page 152.
Information on tire pressures for partially and fully
loaded vehicles can be found under “Technical
data” in this Owner’s Manual:
f Please see the chapter “TIRE PRESSURE FOR
COLD TIRES (68 °F/20 °C)” on page 326.
Page 249 of 343

Alarm System and Theft Protection
247
Alarm System and Passenger
Compartment MonitoringThis device complies with:
Part 15 of the FCC Rules
RSS-210 of Industry Canada.
Operation of this device is subject to the following
two conditions:
– It may not cause harmful interference, and
– it must accept any interference received including interference that may cause
undesired operation.
Note
The manufacturer is not responsible for any radio
or TV interference caused by unauthorized
modifications to this equipment.
Such modification could void the user's authority
to operate the equipment.
Warning!
Any changes or modifications not expressly ap-
proved by Porsche could void the user’s authority
to operate this equipment.
The alarm system monitors the following alarm
contacts:
– Alarm contacts in doors, tailgate, engine compartment lid and headlights
– Interior surveillance: Movement in the interior when the vehicle is locked, e.g. attempted
theft after breaking a window.
– Inclination sensor: Tilting of the vehicle (e.g. attempt to tow away the vehicle).
If one of these alarm contacts is interrupted,
the alarm horn sounds for approx. 30 seconds
and the emergency flasher flashes on and off.
After 5 seconds of interruption, the alarm is
triggered again. This cycle is repeated ten times.Switching onf The alarm system is activated when the vehicle
is locked. Switching offfThe alarm system is deactivated when the
vehicle is unlocked. Note on operation
f
If you unlock the vehicle with the emergency
key in the door lock, you must switch the
ignition on (ignition lock position 1) within
10 seconds of opening the door in order to
prevent the alarm system from being
triggered.
The vehicle is locked ag ain automatically after
20 seconds if no doors are opened.
Switching off the alarm system if it is
triggeredf Unlock vehicle doors with the remote control
or
Switch on ignition.Switching off interior surveillance and
inclination sensorIf people or animals are remaining in the locked
vehicle or the vehicle is being transported on
a train or ship, for example, the interior
surveillance system and inclination sensor must
be switched off temporarily.
f Inform any persons remaining in the vehicle
that the alarm system will be triggered if the
door is opened.
USA: KR55WK50138
Canada: 7812D-5WK50138
Page 251 of 343

Alarm System and Theft Protection
249
Emergency flasher flashes twice and an
acoustic signal will sound twice.
The vehicle doors, the rear lid and the rear window
are locked but the doors can be opened from the
inside by pulling once on the front door opener or
by pulling twice on the rear door opener.
fInform any persons remaining in the vehicle
that the alarm system will be triggered if the
door is opened.
Note on operation
If the ignition is switched on after pressing the
rocker switch, the passenger compartment
monitoring system is activated again. The symbol
on the rocker switch will flash.
Activating the alarm system and the
passenger compartment monitoring system
f Unlock the vehicle and lock it again.
Fault indication
If the monitoring system could not be deactivated
the symbol on the rocker sw itch will flash (e.g. the
rocker switch is pressed with the ignition on).
For deactivating the passenger compartment
monitoring:
f Switch off ignition.
f Press the rocker switch.
f Lock the vehicle.
B- Indicator light for alarm system – example: driver’s
doorFunction indicationThe locking condition of the vehicle is indicated by
the indicator lights B in the front doors flashing at
different frequencies.
The indicator lights go out when the vehicle is
unlocked. Alarm system is activated
– The indicator lights flash quickly while you are
locking the vehicle, then flash normally.
Alarm system is activated, interior
surveillance and inclination sensor are
switched off
– The indicator lights flash quickly while you are locking the vehicle, go out for 10 seconds and
then flash normally.
Faults in the central locking system and
alarm system
The indicator lights come on for 10 seconds, flash
at double speed for 20 seconds and then flash
normally.
Avoiding false alarmsf If people or animals are remaining in the locked
vehicle or the vehicle is being transported on
a train or ship, for example, the interior
surveillance system an d inclination sensor
must be switched off temporarily.
f Always close the slide/tilt roof and all door
windows.